How to Buff Vinyl Floors to a High-Shine Finish
You can restore a high-shine finish on vinyl by thoroughly cleaning first, then using the right pad, polish, and controlled buffing technique. Sweep, mop with a pH-neutral cleaner, and test a small patch. Use a soft polishing pad for light scuffs or a bonnet for maintenance, apply a thin even coat of vinyl polish, and buff with overlapping passes at appropriate speed and pressure. Follow manufacturer guidance for pads and polishes, and continue for tips on troubleshooting and long-term care.
How to Buff Vinyl Floors to a High-Shine Finish (Quick Answer and Overview)
Yes—you can buff vinyl to restore shine, but expect improved gloss rather than a permanent fix for deep wear.
Buffing works when the finish is intact and lightly scuffed; strip and recoat if the finish is compromised, or replace if the vinyl is cracked or delaminating.
Before you start, confirm the surface is clean, dry, free of wax buildup, and use proper PPE and equipment rated for vinyl.
Quick Answer Can you buff vinyl and what results to expect
Can you buff vinyl? Yes—you can buff vinyl to restore mild scuffs and increase shine.
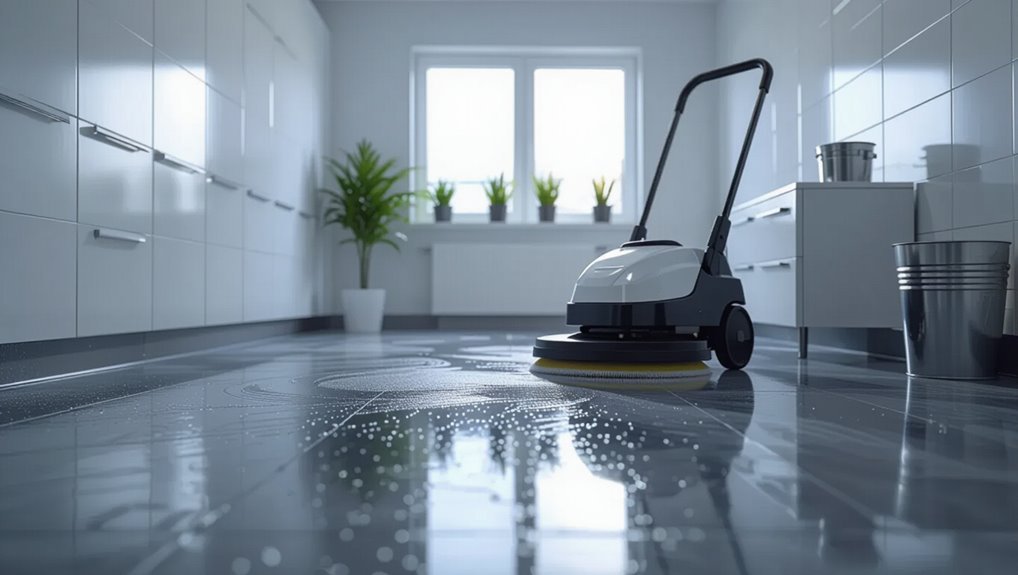
When you learn how to buff vinyl floors, you’ll use a low-speed polisher or hand buffer with a suitable pad and a vinyl-safe polish.
Expect improved gloss and reduced surface marks, not a miracle restore; deep scratches or worn layers need different treatment.
When buffing is appropriate vs when to strip/recoat or replace
When your vinyl still has its original wear layer and only shows surface scuffs, light dulling, or minor scratches, buffing is the quickest way to restore shine and hide blemishes.
However, if the surface finish is worn through, shows deep scratches, gouges, or extensive discoloration, you’ll need to strip and recoat—or consider replacement for badly damaged or aged planks.
Inspect for adhesive residue, severe warping, loose seams, and persistent stains before deciding.
Safety and surface-readiness checklist
Before you power up the buffer, run through a quick safety and surface-readiness checklist to protect yourself and confirm the finish will bond and shine.
Inspect for loose tiles, deep scratches, or old finish that needs stripping. Clear the area and ventilate. Gather PPE and correct pads.
- Wear gloves and eye protection
- Verify outlet and cords are safe
- Remove debris and furniture
- Test a small patch
Understanding Vinyl Flooring and Shine Basics
Vinyl floors are made of layered PVC and wear coatings, and the finish you choose—gloss, semi-gloss, or matte—determines how much light the surface reflects.
You’ll find that surface scratches, embedded dirt, and old or uneven finish all reduce shine and make buffing less effective.
Before you start buffing, inspect and clean the floor and repair or strip old finish so the true sheen can be restored.
What vinyl floors are made of and how finishes work
Although they look simple, your vinyl floors are layered engineered products: a wear layer of clear polymer protects a printed design layer, which sits atop a resilient PVC core and backing.
That wear layer’s composition and thickness determine durability and how well polish or buffing bonds. Finishes adhere to or fill microscopic texture; proper cleaning, compatible sealers, and correct buffing pressure maximize shine without damaging layers.
Types of vinyl finishes (gloss, semi-gloss, matte)
When you choose a finish—gloss, semi-gloss, or matte—you’re picking how much light the floor reflects and how visible wear will be. You’ll prefer gloss for maximum reflectivity, semi-gloss for balance, and matte for subtlety and fewer visible scuffs.
| Finish | Best use |
|---|---|
| Gloss | High shine areas |
| Semi-gloss | Everyday rooms |
| Matte | Low-reflect spaces |
| Choice tip | Match style and traffic |
How surface scratches, dirt, and old finish affect shine
Because light behaves predictably, scratches, dirt, and an aged finish all reduce how much your floor reflects and make it look duller than its chosen sheen.
You’ll notice micro-scratches scatter light, grime fills grooves and blocks reflection, and old finish yellows or wears unevenly.
Regular cleaning, scratch repair, and stripping/recoating restore uniform reflectivity so your vinyl regains true shine.
Tools, Materials, and Products You Need
Before you start, gather the right gear so the job goes quickly and safely: choose the appropriate buffer or polisher, a mop for prep, and the correct pads for the task.
Know which pads to use—bonnet for light maintenance, soft pads for polishing, and abrasive pads for stripping—and pick a finish or polish and cleaner matched to vinyl.
Don’t forget safety gear (gloves, eye protection, non-slip shoes) and clear, well-ventilated workspace before you begin.
Essential tools (buffer/polisher types, pads, mop)
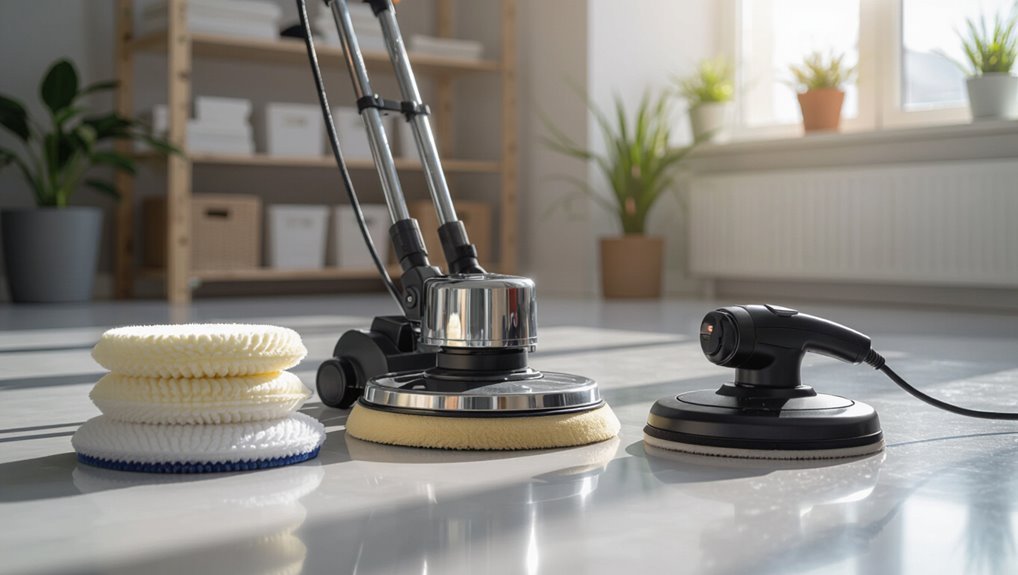
Tools matter: pick the right buffer or polisher, pads, and a good mop to get vinyl floors clean and glossy without damage.
You’ll want equipment that’s gentle yet effective, easy to control, and suited to room size.
Choose a reliable mop for prepping, a manageable polisher for edges, and pads that match finish needs to avoid harm.
- Joy
- Confidence
- Pride
- Calm
Recommended pads and their uses (bonnet, soft, abrasive)
For most vinyl floors you’ll use three pad types—bonnet, soft (or polishing), and abrasive—each serving a clear purpose so you can match the pad to the job.
Use a bonnet pad for quick surface cleaning and light sheen enhancement.
A soft polishing pad is for building gloss without damage.
An abrasive pad should be used sparingly to remove scuffs or old finish before refinishing.
Finishes, polishes, and floor cleaners: what to choose
When you’re choosing products for buffing vinyl, focus on compatibility: match cleaners, polishes, and finishes to your floor’s vinyl type and the existing finish so you won’t dull or damage the surface.
Test first, use manufacturer-recommended finishes, pick water-based polishes for low odor, and avoid abrasives that strip coatings.
- Restore pride
- Enjoy gleam
- Save effort
- Protect investment
Safety gear and workspace preparation
Before you start buffing, gather the right safety gear and set up your workspace so you can work efficiently and avoid accidents.
Wear non-slip shoes, gloves, and eye protection. Clear and dry the area, guarantee good lighting, and keep cords tidy. Have a wet/dry vacuum ready.
- Protect yourself
- Prevent slips
- Reduce stress
- Preserve finish
Step-by-Step Process to Buff Vinyl Floors
Start by inspecting the vinyl for chips or grime and make any repairs. Then sweep, vacuum, and mop so the surface is spotless.
Test a small area with your chosen pad and product to confirm compatibility and the shine you want.
Finally, set the buffer speed, attach the right pad, and work in overlapping strokes with consistent pressure for an even finish.
Step 1 Inspect and prepare the floor (repair chips, deep-clean)
Although the process of buffing looks simple, you’ll get the best, longest-lasting results if you carefully inspect and prepare the vinyl first.
Check for chips, gouges, or loose seams and repair them; remove stubborn grime and restore surface integrity so buffing shines evenly.
- Spot repairs to prevent worsenings
- Smooth edges for uniform gloss
- Test small area first
- Feel confident before buffing
Step 2 Clean thoroughly: sweeping, vacuuming, and mopping
Sweep up loose dirt and grit, then vacuum and mop methodically so every bit of debris that could scratch or dull the finish is removed.
Use a soft-bristle broom, a vacuum with a hard-floor setting, and a microfiber mop.
Change mop water often, use a manufacturer-approved cleaner, and rinse to remove residue.
Let the floor fully dry before continuing.
Step 3 Test a small area for compatibility and desired shine
With the floor clean and dry, pick a discreet spot—like inside a closet or under a cabinet—to test the buffing method and product.
You’ll see instantly if the finish dulls, shines, or reacts. Note odor, texture, and drying time.
If satisfied, continue; if not, adjust product or skip buffing.
- Relief
- Confidence
- Surprise
- Satisfaction
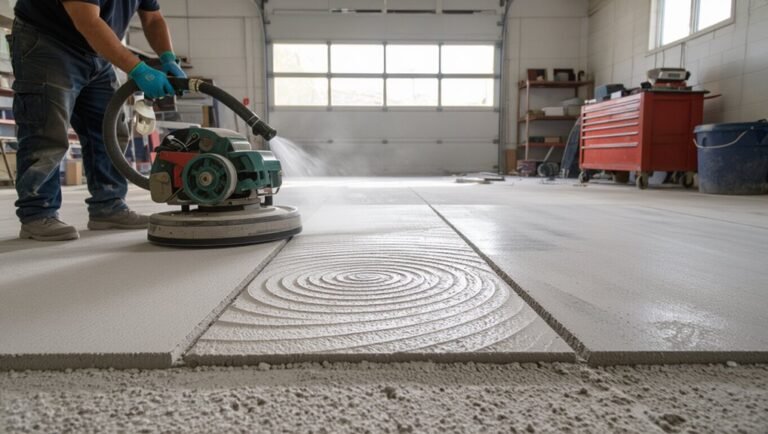
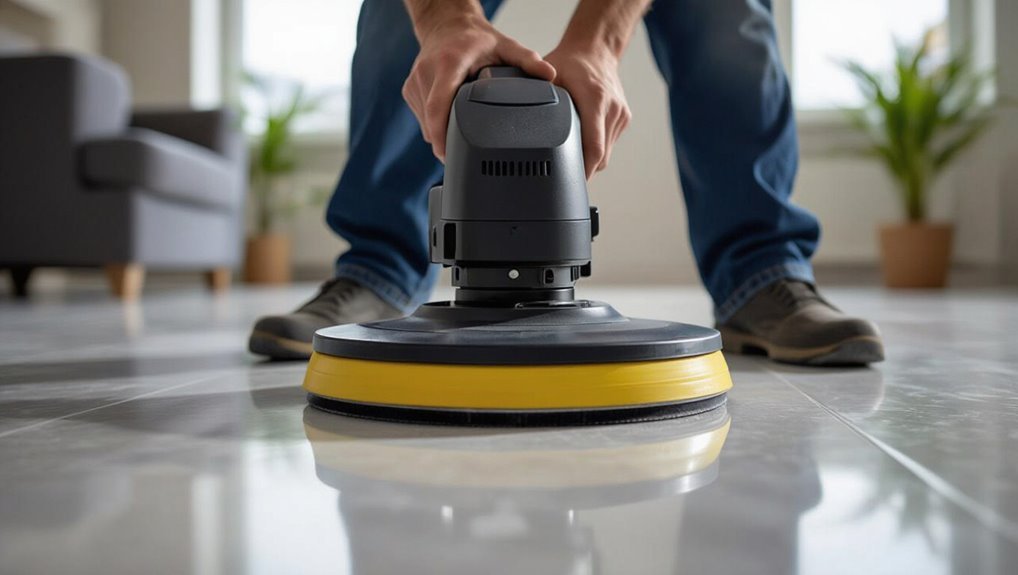
Step 4 Choose machine speed and pad; set up buffer
Pick the right speed and pad before you plug in the buffer so you don’t damage the vinyl.
You’ll select a low RPM for thin vinyl and a softer pad for delicate finishes. Secure the pad, check power cords, and test rotation away from the floor.
- Breathe—this matters
- Respect the surface
- Stay focused
- Feel confident
Step 5 Buffing technique: strokes, overlap, and pressure
Now that your buffer’s set and spinning the right way, it’s time to focus on how you move it: use smooth, overlapping passes and steady, light pressure to lift scuffs and even out shine without sanding through the vinyl.
Keep the machine moving at a controlled pace, overlap each pass by about 30–50%, avoid lingering on edges, and let the pad do the work.
Step 6 Apply polish or finish if needed; buff again for high gloss
Apply a thin, even layer of recommended vinyl polish or finish using a clean microfiber mop or applicator pad, working in small sections so you can buff while the coat is still tacky.
Let the polish set to a slight tack, then buff each section with a high-speed buffer or low-speed machine and soft pad, using overlapping passes until you achieve a uniform, mirror-like gloss.
Step 7 Final cleaning and curing time; foot-traffic restrictions
When the final buff is finished, give the floor a careful wipe-down to remove any remaining dust or residue.
Then let the polish cure undisturbed for the manufacturer’s recommended time—usually 24–48 hours—before heavy use.
During curing, keep traffic minimal, use socks or soft-soled shoes if necessary, and avoid rugs or furniture placement until the finish hardens to prevent scuffs or impressions.
Common Problems and How to Fix Them
You’ll likely run into issues like a hazy or streaky finish, burn marks or pad swirls, peeling polish, or uneven shine between rooms.
For each you’ll need specific fixes—buffing techniques, pad or speed adjustments, spot stripping and reapplication, or blending methods to match adjacent areas.
Read on and you’ll learn quick, practical steps to correct each problem without risking further damage.
Problem Hazy or streaky finish and corrective steps
A hazy or streaky finish usually means the buffing or product application went wrong, but you can fix it by identifying the cause and taking targeted steps—like re-cleaning, stripping excess finish, or re-buffing at the right speed.
Wipe residue with a pH-neutral cleaner, remove buildup with a finish stripper if needed, then apply thin, even coats and buff uniformly to restore clear shine.
Problem Burn marks or pad swirls and how to remedy
If re-cleaning and re-buffing didn’t clear haziness, you may be facing burn marks or pad swirls—abrasive heat or the wrong pad can etch or streak the finish during buffing.
Stop buffing, switch to a softer pad and lower RPMs, and try feathering passes.
For mild marks, gently re-buff; for deeper etches, lightly abrade with fine-grit maroon pad and reapply a thin polish coat to blend.
Problem Polish peeling or flaking; when to strip and reapply
1 clear sign that your floor needs a full strip and recoat is large areas of polish lifting, flaking, or exposing the vinyl beneath; don’t try to patch these spots with more finish, because loose polish won’t bond and will just keep failing.
Strip damaged finish, clean thoroughly, and allow the floor to dry.
Reapply manufacturer-recommended finish in thin, even coats, buffing between coats.
Problem Uneven shine across rooms and blending techniques
When rooms show different levels of gloss, you’ll notice seams where new finish meets old or where traffic has worn shine away; that unevenness usually comes from inconsistent application, different finish types, or wear patterns.
To fix it, feather buff blending zones, use matching finish and dilution, gradually blend with light passes, and recoat entire connected areas when necessary to guarantee uniform reflection.
Maintenance and Best Practices to Preserve High Shine
To keep that freshly buffed shine, you’ll want a simple daily sweep and weekly damp mop routine plus spot-treatments for scuffs.
Plan on light re-coating every 6–12 months depending on traffic, use furniture pads and entry mats, and control humidity to prevent lifting.
Choose eco-friendly, low-VOC cleaners and finishes to protect the floor and indoor air quality.
Daily and weekly care routine
Although daily care doesn’t take long, sticking to a simple routine will keep your vinyl’s shine and prevent buildup that dulls the finish.
You’ll quickly protect the surface and feel pride in your floors.
- Sweep daily to remove grit and avoid scratches.
- Damp-mop weekly with a pH-neutral cleaner.
- Wipe spills immediately to prevent stains.
- Use felt pads and entrance mats to reduce wear.
Long-term maintenance: re-coating frequency and spot treatments
If you want your vinyl to keep a showroom shine, plan for periodic recoating and timely spot treatments based on traffic and wear.
Recoat high-traffic areas every 6–12 months, lower-traffic zones every 12–24 months.
For scuffs or dull spots, clean gently, buff, and apply a targeted thin coat.
Track wear, address stains immediately, and avoid harsh abrasives to prolong finish.
Protective measures: furniture pads, mats, humidity control
Re-coating and quick spot repairs keep the surface looking fresh, but preventing damage in the first place will save time and preserve the shine longer.
- Use soft furniture pads to stop scratches and heartache.
- Place non-slip mats at entries to trap grit and calm your nerves.
- Lift heavy items instead of dragging to avoid panic-inducing gouges.
- Control humidity to prevent warping and keep pride intact.
Eco-friendly and low-VOC product recommendations
1 smart swap you can make is choosing eco-friendly, low-VOC cleaners and polishers that protect your vinyl’s shine without off-gassing harsh chemicals into your home.
You’ll keep air fresh, finish durable, and peace of mind high.
Try these:
- Plant-based cleaner — gentle, effective.
- Water-based polish — non-yellowing sheen.
- pH-neutral solution — safe daily use.
- Biodegradable wipes — quick, guilt-free touch-ups.
Comparison: Buffing vs. Stripping and Recoating vs. Replacing
You’ll choose buffing when surface scuffs and dullness are the main issues, but stripping and recoating—or replacing—may be smarter for deep wear or damage.
Consider cost, time, and how long each option will keep your floor looking good before you need to act again.
Also weigh environmental and health impacts of solvents and finishes so you can pick the safest, most sustainable approach.
When to choose buffing vs stripping/recoating
Deciding whether to buff, strip and recoat, or replace vinyl comes down to the floor’s condition, budget, and how long you need it to last. If scratches are light, buffing revives shine; deep damage needs stripping/recoating or replace. Choose based on appearance, longevity, and effort—prioritize fast refresh or full renewal.
| Option | Feeling | Result |
|---|---|---|
| Buff | Relief | Bright |
| Recoat | Confidence | Renewed |
| Replace | Fresh start | Lasting |
Cost, time, and durability comparison
After weighing appearance and longevity, cost, time, and durability become the practical factors that actually steer your choice between buffing, stripping/recoating, or replacing. You’ll find buffing is cheapest and fastest but short-term; recoating costs more, takes longer, and lasts years; replacing is costliest, most time-consuming, and longest-lasting.
| Option | Cost | Durability |
|---|---|---|
| Buffing | Low | Short |
| Recoat | Medium | Medium-Long |
| Replace | High | Long |
Environmental and health considerations
While buffing keeps chemicals and waste to a minimum, it also stirs up dust and old finish particles you’ll want to control with a mask and good ventilation.
Stripping and recoating introduces stronger solvents and fumes that need respirators and proper disposal.
Full replacement brings manufacturing and demolition impacts like embodied carbon and landfill waste that you should weigh against longer-term benefits.
Balance risks, costs, and lifespan when choosing.
Mistakes to Avoid When Buffing Vinyl Floors
When buffing vinyl floors, you should avoid using the wrong pad or machine speed because it can scuff or melt the surface.
Don’t skip proper cleaning and a spot test, and don’t overuse polish or mix incompatible products.
Always follow the manufacturer’s recommendations to prevent damage and voiding warranties.
Using the wrong pad or machine speed
If you pick the wrong pad or run the machine at the wrong speed, you’ll damage the finish or leave streaks and swirl marks that are hard to fix.
Match pad aggressiveness to finish—soft for topcoats, firmer for scuff removal—and follow manufacturer speed recommendations.
Test a small area, maintain even pressure, and keep the machine moving to avoid heat buildup and burning the vinyl.
Skipping proper cleaning or testing
Because dirt, grit, and old residue act like sandpaper, skipping thorough cleaning or a small test patch before you buff will grind the finish and leave uneven results.
You should vacuum and mop, remove build-up, and let the floor fully dry.
Do a discreet test patch to confirm pad compatibility and finish response so you avoid scratches, streaks, or patchy shine.
Overusing polish or incompatible products
Although a little polish goes a long way, piling on product or mixing incompatible cleaners will do more harm than good.
You’ll create sticky buildup, haze, or chemical reactions that dull finish and attract dirt. Use measured amounts, apply thin coats, and stick to products labeled for vinyl.
Rinse residues thoroughly and wait between applications so each layer cures properly.
Ignoring manufacturer recommendations
When you skip the manufacturer’s instructions, you risk voiding warranties, damaging the wear layer, or using cleaners and pads that aren’t compatible with your vinyl; follow their guidelines for recommended products, pad types, and drying times so you don’t turn a simple buff into an expensive repair.
Always check product labels, consult the flooring spec sheet, and contact customer support if unsure—then proceed with approved tools and techniques.
FAQ Fast Answers to Common Questions
You probably have quick questions like whether plank and sheet vinyl buff the same, if buffing permanently removes scratches, and how often you should buff to keep the shine.
You may also wonder if hiring a pro is worth it and whether any vinyl types should never be buffed.
Read on for short, practical answers to each.
Can I buff vinyl plank flooring the same as sheet vinyl?
Can you buff vinyl plank flooring the same way you buff sheet vinyl?
You can use similar buffing techniques, but planks often have textured surfaces, grout lines, or beveled edges that need gentler pressure and smaller pads.
Test a hidden area, use recommended pads and speeds, and avoid excessive heat.
For glued or click-lock planks, guarantee seams stay sealed and follow manufacturer care instructions.
Will buffing remove scratches permanently?
Often the short answer is: not always. Buffing can reduce or hide light surface scratches by blending them into the finish and restoring shine, but it won’t eliminate deep gouges or cuts.
For severe damage you’ll need repair or replacement of affected planks or the top layer. Use appropriate pads and cleaners to avoid worsening scratches.
How often should I buff vinyl floors to maintain shine?
How frequently should you buff vinyl floors to keep that showroom shine? Generally, buff light-traffic rooms every 4–6 months and high-traffic areas every 4–8 weeks. Adjust based on wear, dullness, and floor finish type. Spot-buff scuffs as they appear and strip-and-recoat only when multiple passes no longer restore gloss. Regular sweeping and mopping extend time between buffs.
Is a professional buffing service worth the cost?
If you’re weighing whether to hire a pro after scheduling regular buffs, consider the time, equipment, and results you’ll get versus the cost.
Professionals deliver faster, more consistent high-gloss results and handle stubborn wear without you buying machines or pads.
Hire if you value time, flawless finish, or large areas; DIY saves money for small, well-maintained spaces.
Are there vinyl types that should never be buffed?
Which vinyl should you skip buffing?
Avoid buffing vinyl with a worn, paper-backed surface, peel-and-stick tiles, or floors with failing factory finish—buffing can lift layers or expose adhesive.
Also skip textured or embossed vinyl that loses pattern definition.
When in doubt, test a small hidden area or consult the manufacturer; improper buffing can cause irreversible damage.
Visual Guide and Troubleshooting Gallery
You’ll find clear before-and-after examples with notes on what to look for so you can judge results at a glance.
A pad selection chart and photos of pad wear will help you pick the right pad and know when to replace it.
Follow the troubleshooting flowchart to quickly diagnose and fix common finish issues.
Before-and-after examples and what to look for
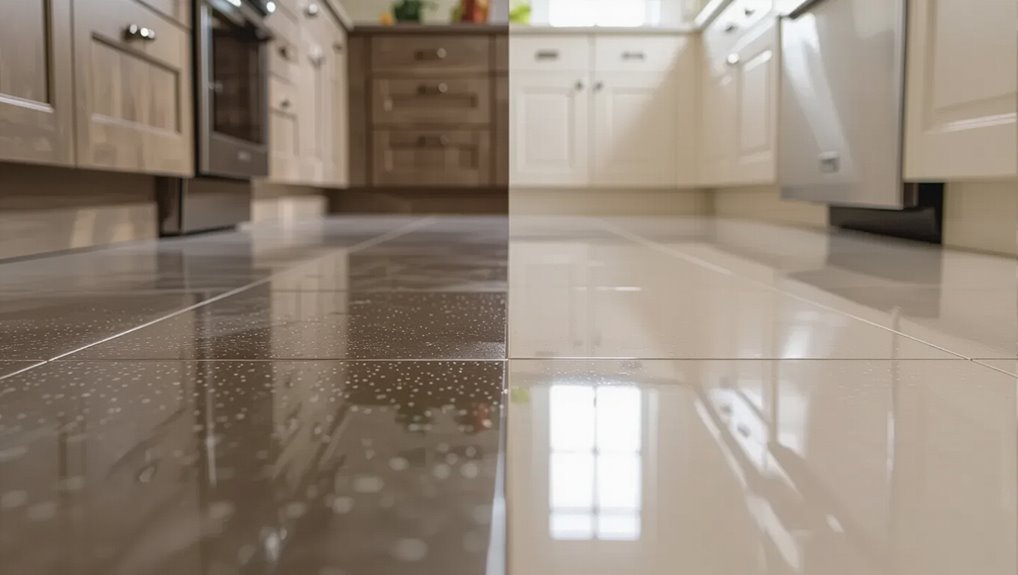
Before-and-after photos make it easy to spot the results you should expect and common issues to watch for, so study them before you start buffing.
Compare gloss, uniformity, and edge consistency. Look for haze, streaks, or uneven shine indicating missed passes or product buildup.
Note repaired scratches versus deep gouges. Use examples to set realistic goals and troubleshoot technique promptly.
Pad selection chart and visual pad wear indicators
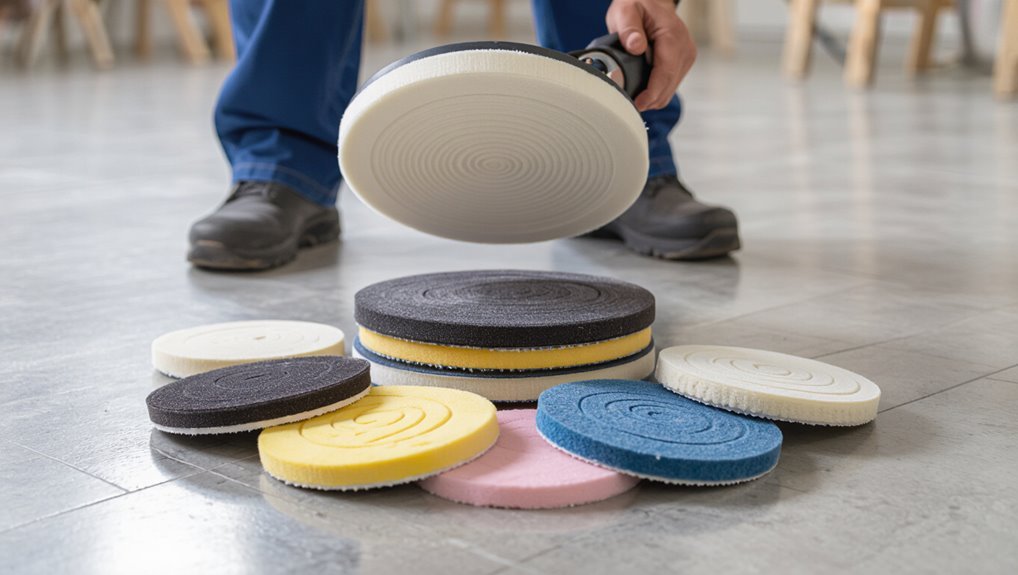
Start by matching pad type to the job — a simple chart will save you time and prevent damage. Use soft pads for polishing, medium for daily buffing, and aggressive for stripping. Inspect edges, color change, and pile compression as wear signs; replace when performance drops.
| Pad Type | Use | Wear Indicator |
|---|---|---|
| White | Polish | Gloss loss |
| Red | Buff | Flattened nap |
| Black | Strip | Fraying |
Troubleshooting flowchart for common finish issues
Struggling to identify a finish problem quickly? Use the troubleshooting flowchart to trace symptoms—dullness, haze, streaks, orange peel, or scuffing—then follow stepwise fixes: clean, recoat, buff, or strip.
Reference the visual guide to match photos with causes and the troubleshooting gallery for before/after examples.
You’ll diagnose faster, choose the right pad, product, and technique, and restore consistent shine.