How to Install Bathroom Flooring: A Complete Beginner’s Guide
You can install bathroom flooring yourself if you’ve got basic tools, patience, and some DIY skills. Start by choosing water-resistant materials like vinyl or tile, measure and test your subfloor for level and moisture, and remove old flooring and adhesives. Lay out a plan, gather tools and safety gear, then follow manufacturer steps for adhesive or click-lock systems or for thinset and grout with tile. Keep joints staggered and allow proper cure times—keep going for full step-by-step guidance.
Quick Answer Can You Install Bathroom Flooring Yourself?
You can often install bathroom flooring yourself if you’re comfortable with basic tools and have a few weekends to spare, and it can save you money compared with hiring pros.
Expect moderate time and cost depending on material—vinyl and tile plank are easier and cheaper, while ceramic tile and waterproof systems take more skill and time.
Hire a professional if you’re dealing with complex subfloor repairs, waterproofing, or a small bathroom where mistakes could cause big water damage.
Short summary of feasibility, time, cost, and skill level
If you’ve got basic DIY experience and the right tools, installing most bathroom floors is entirely doable yourself; tile and vinyl plank are common choices that vary in time and difficulty.
Expect 1–4 days depending on prep, about $200–$2,000 for materials and tools, and beginner-to-intermediate skill.
Learn how to install bathroom flooring, follow instructions, and plan extra time for mistakes.
When to hire a professional
Because many factors affect the outcome, decide whether to hire a pro when the job includes complex prep, plumbing or subfloor repairs, or materials you haven’t installed before.
Hire a pro if you lack tools, time, or confidence, if waterproofing or code compliance matters, or if visible mistakes would be costly.
Otherwise, take it on if you’re comfortable with measurements, cuts, and tight seals.
Basics What Bathroom Flooring Is and Why It Matters
You’ll want to know the basic types of bathroom flooring—waterproof options like vinyl and tile versus water-resistant choices like certain laminates—so you can pick what’s right for your space.
Consider key properties such as slip resistance, moisture resistance, durability, and maintenance needs to match your lifestyle.
Also get familiar with the essential tools and materials you’ll need before you start.
Types of bathroom flooring (waterproof vs water-resistant)
When choosing bathroom flooring, understanding the difference between waterproof and water-resistant materials helps you match performance to the room’s moisture risks.
Waterproof floors block all water, ideal for wet areas. Water-resistant options resist spills but need faster cleanup. Choose based on exposure and budget.
- Waterproof: vinyl plank, tile
- Water-resistant: treated wood, some laminates
- Sealants: improve protection
Key properties to consider: slip resistance, moisture resistance, durability, maintenance
Now that you know the difference between waterproof and water-resistant options, think about four practical properties that determine how a floor performs day to day: slip resistance (how safe it’s when wet), moisture resistance (how well it stands up to spills and humidity), durability (how it handles traffic and wear), and maintenance (how much time and cost you’ll spend cleaning and repairing).
Choose finishes that balance grip, sealing, toughness, and easy upkeep to fit your routine and budget.
Tools and materials overview
Because bathroom floors face constant moisture and traffic, picking the right tools and materials up front makes installation faster and the result more reliable.
You’ll need basics and specifics: quality underlayment, moisture-rated flooring, proper adhesives, spacers, and sealants. Match tools to material type and room size so you don’t stop mid-job.
- Underlayment and moisture barrier
- Flooring and trim
- Adhesives, saws, spacers, sealant
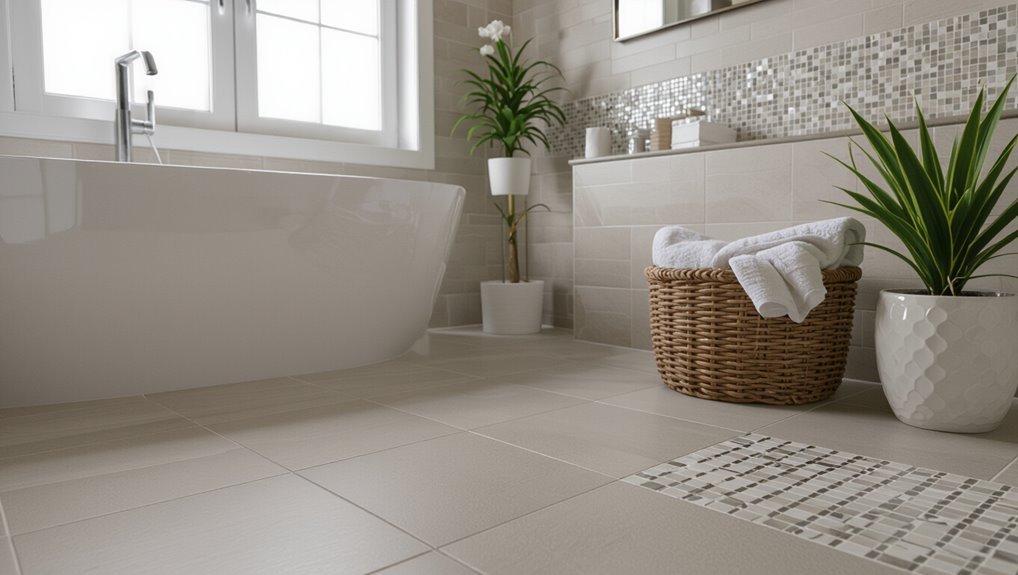
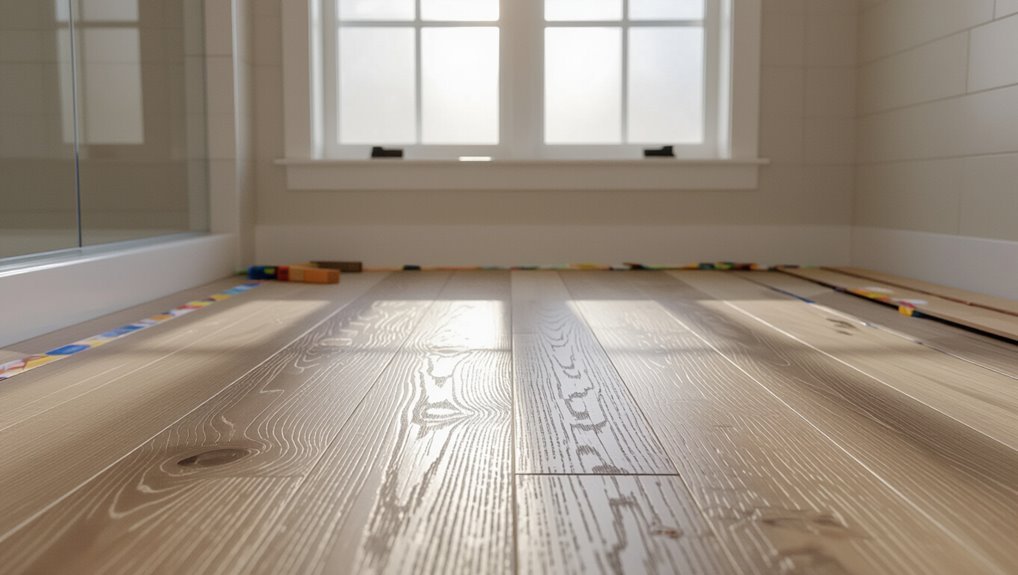
Choosing the Right Flooring for Your Bathroom
You’ll weigh common options like vinyl plank, LVT, ceramic or porcelain tile, natural stone, engineered wood, and laminate to find the best fit for moisture and traffic.
Consider budget and expected lifespan for each material, since costs and durability vary widely.
Also think about design factors—grout lines, seams, tile size and pattern, and whether you want underfloor heating compatibility.
Comparison of common options: vinyl plank, luxury vinyl tile (LVT), ceramic/porcelain tile, natural stone, engineered wood, laminate
When choosing bathroom flooring, weigh water resistance, durability, maintenance, comfort, and budget—each material balances these differently. You’ll find vinyl plank and LVT are waterproof and easy to install; tile and stone resist moisture but need grout care; engineered wood and laminate look warm but need moisture protection.
| Material | Water Resistance | Maintenance |
|---|---|---|
| Vinyl/LVT | High | Low |
| Tile/Stone | High | Medium |
| Wood/Laminate | Low | Medium |
Budget ranges and lifespan by material
Different materials come with distinct price tags and lifespans, so you can match cost to how long you want the floor to last. Choose vinyl for low cost and 10–20 years, tile for moderate cost and 25–50 years, or stone for higher cost and 50+ years.
| Material | Budget | Lifespan |
|---|---|---|
| Vinyl | Low | 10–20 yrs |
| Tile | Moderate | 25–50 yrs |
Design considerations: grout lines, seams, underfloor heating compatibility, tile size and pattern
While selecting bathroom flooring, think beyond color and material to how grout lines, seams, underfloor heating, and tile size/pattern will affect durability and appearance.
Narrow grout joints and larger tiles create fewer seams and easier cleaning, while smaller tiles or intricate patterns can improve slip resistance and visual interest but require more grout maintenance.
Choose tile size to suit room scale, confirm adhesive and tile are rated for underfloor heating, and plan grout color to hide stains.
Preparing to Install Site Assessment and Prep Work
Before you lay any material, measure the room carefully and calculate how much flooring, underlayment, and trim you’ll need.
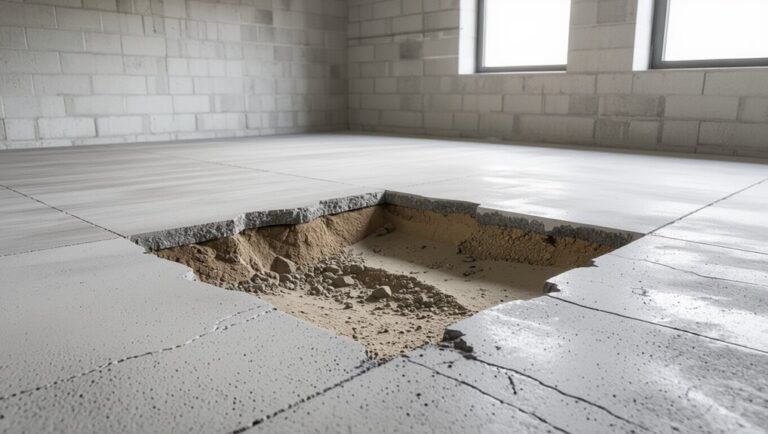
Check the subfloor—plywood, concrete, or existing tile—for level, damage, and signs of moisture, and run moisture tests where appropriate.
If you find old flooring, remove it and any stubborn adhesives or underlayment, and address any moisture problems before proceeding.
Measuring the space and calculating materials

Once you’ve cleared the room, measure the length and width of the floor area and sketch a simple diagram noting alcoves, fixtures, and door swings so you can calculate total square footage and account for waste.
Then calculate material needs, add 10–15% for cuts/waste, and note changes and thresholds.
- Measure and sketch precisely.
- Compute square footage.
- Add waste and extras.
Assessing subfloor condition: plywood, concrete, existing tiles
Start by inspecting the subfloor—plywood, concrete, or existing tile—to determine its condition and what prep it will need.
Check for rot, soft spots, loose or uneven tiles, cracks, and squeaks. Measure flatness with a straightedge.
Note repairs: replace damaged plywood, level concrete, or remove/secure loose tiles.
Document issues so you can plan materials and time for proper remediation.
Moisture testing and addressing moisture issues
How wet is the subfloor and surrounding slab, and will that moisture compromise your new flooring?
Test plywood with a moisture meter and concrete with a calcium chloride or relative humidity test.
Identify leaks, vapor drive, or high readings.
Fix issues: dry, seal, add moisture barrier, or improve drainage and ventilation.
Only proceed when moisture levels meet manufacturer specs.
Removing old flooring and dealing with adhesives/underlayment
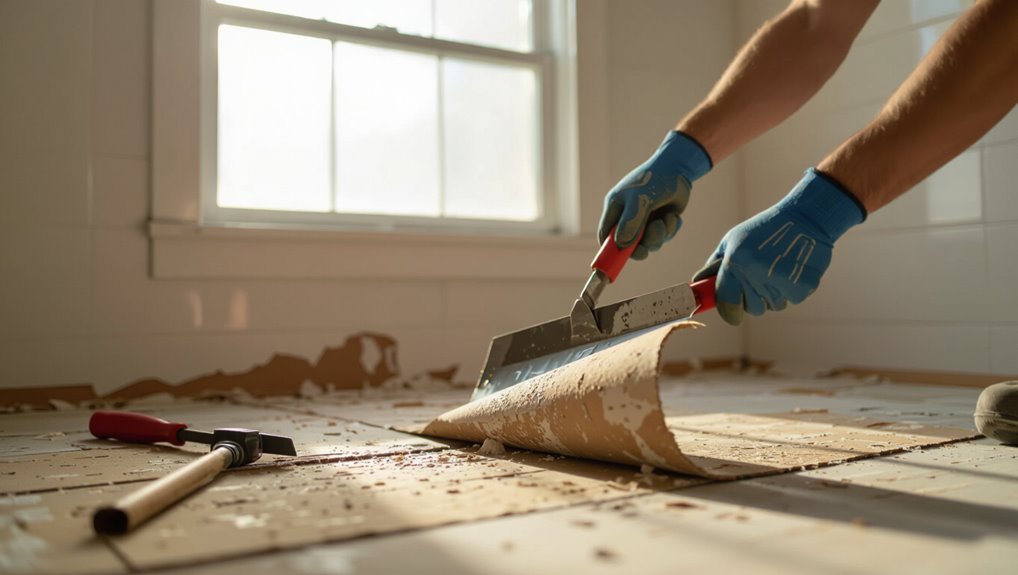
Strip the old floor carefully and inspect what’s left beneath it: remove carpet, tile, vinyl, or hardwood and note any damaged subfloor, residual adhesive, or underlayment that could affect bonding or level.
You’ll pry, scrape, and sand to a clean, flat surface, repair any rot, and vacuum debris so new flooring adheres properly.
- Remove debris and old adhesive.
- Repair or replace damaged subfloor.
- Sand and clean for adhesion.
Step-by-Step Installation Guide
Now you’ll move through a clear, step-by-step installation process starting with gathering tools, safety gear, and materials.
You’ll then prep and level the subfloor, plan your layout and dry-fit pieces, and follow the specific installation method for your chosen material—vinyl plank/LVT (adhesive or click-lock) or ceramic/porcelain tile (thinset, spacers, grout).
Follow each step in order to guarantee a durable, professional-looking finish.
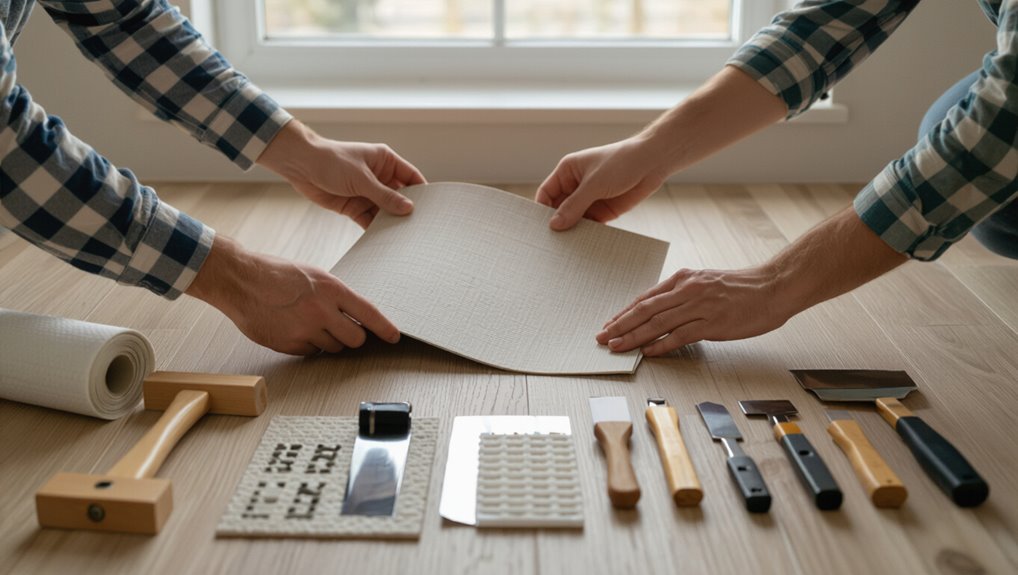
Step 1 Gather tools, safety gear, and materials
Before you begin, gather the tools, safety gear, and materials you’ll need so the job goes smoothly and safely.
Pick appropriate flooring (tile, vinyl, or plank), underlayment if required, adhesive or spacers, grout, and trim.
Collect tools: tape measure, utility knife, saw, trowel, rubber mallet, spacers, level, and caulk gun.
Wear gloves, eye protection, knee pads, and a dust mask.
Step 2 Prepare and level subfloor; install underlayment if needed
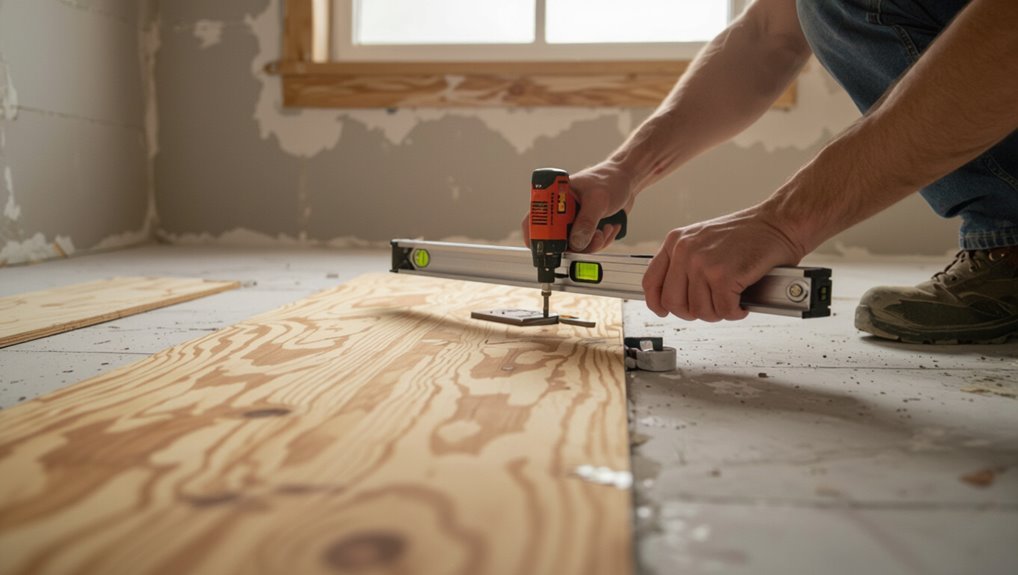
Once you’ve cleared the room, check the subfloor for level, damage, and moisture so you can fix problems before laying anything down.
Patch holes, replace soft or rotten sections, and sand high spots. Use a level and straightedge to identify dips; apply self-leveling compound where needed.
Install a recommended underlayment for your flooring type, securing it per manufacturer instructions to guarantee a stable, moisture-resistant base.
Step 3 Layout planning and dry fitting (starting point, stagger pattern)
After you’ve prepped the subfloor, plan your layout and dry-fit the planks or tiles to find the best starting point and stagger pattern; this prevents surprises and guarantees a balanced look.
Measure and snap reference lines, work outward from the focal wall, and test end-piece widths. Adjust plank offsets to avoid short pieces under thresholds, keeping joints staggered at least 6–8 inches for stability and appearance.
Step 4 Installation process for vinyl plank / LVT (adhesive vs click-lock)
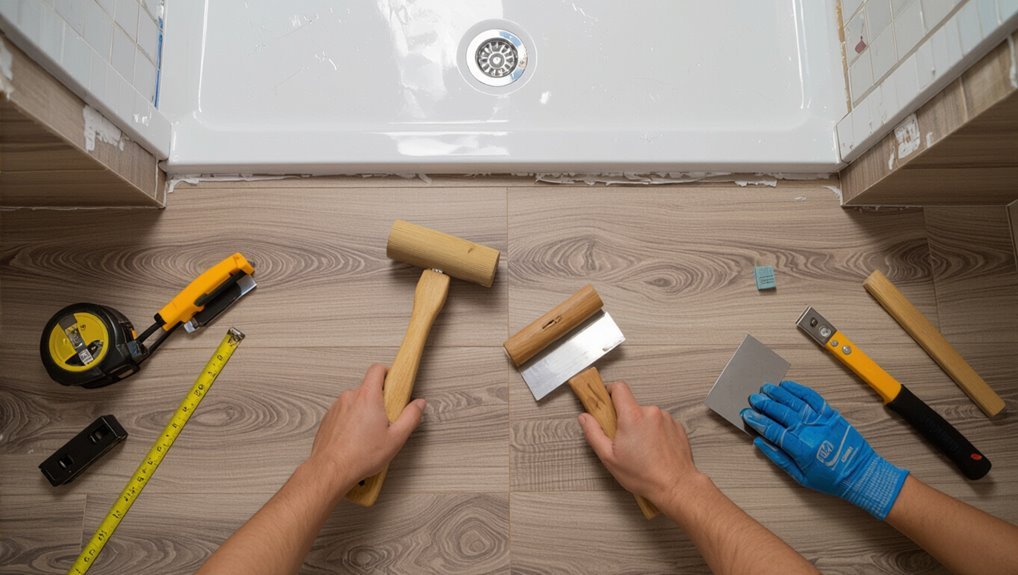
Start by deciding whether you’ll use adhesive LVT or a click-lock vinyl plank system, because each changes the tools, timing, and technique you’ll need.
For adhesive, spread adhesive, lay planks, roll seams.
For click-lock, acclimate, click rows, trim edges.
Finish with trim and junction pieces.
- Gather tools and materials.
- Follow manufacturer adhesive or locking instructions.
- Check alignment and seams.
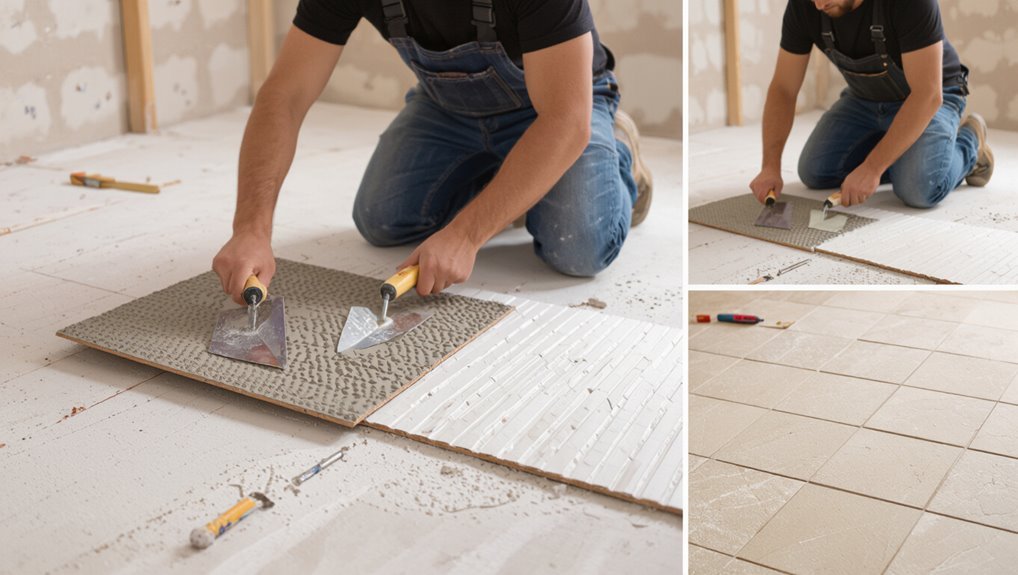
Step 5 Installation process for ceramic/porcelain tile (thinset, spacers, grouting)
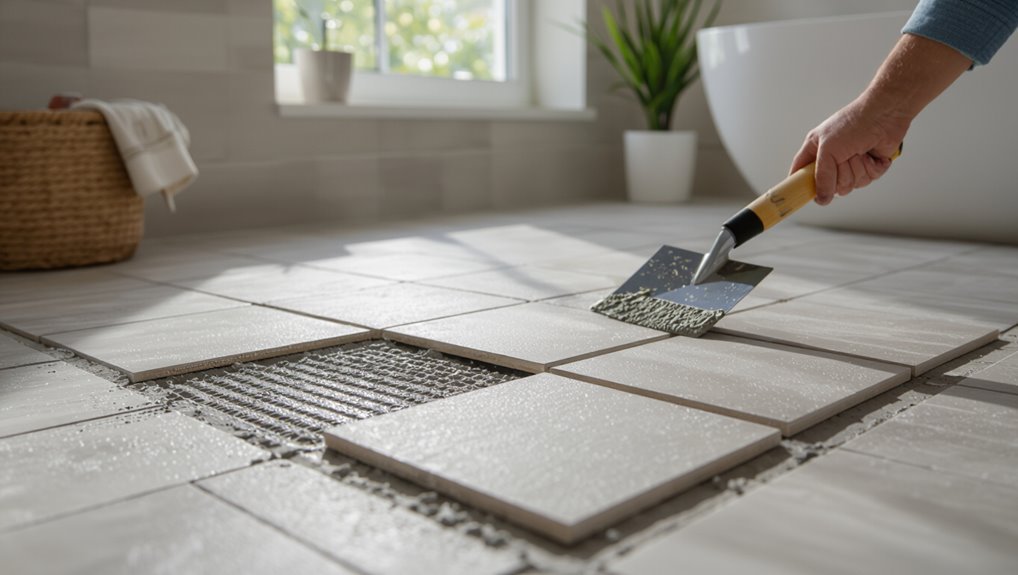
Prepare your workspace and materials so you can lay ceramic or porcelain tile with confidence.
Mix thinset to package specs, spread with a notched trowel, and back-butter large tiles. Use spacers for consistent joints, check level frequently, and cut edge tiles to fit.
After curing, remove spacers and grout, wiping haze before it hardens.
- Thinset
- Spacers
- Grout
Step 6 Installation process for natural stone (backerboard, mortar, sealing)
Lay natural stone carefully and methodically to guarantee a durable, level floor that resists moisture and shifting.
Prepare backerboard, tape seams, and screw per manufacturer instructions.
Spread mortar with appropriate trowel, set stones using spacers and a level.
Seal stone and grout with recommended sealer and allow full cure before use.
- Backerboard prep
- Mortar setting
- Sealing and curing
Step 7 Cutouts for fixtures, drains, and transitions
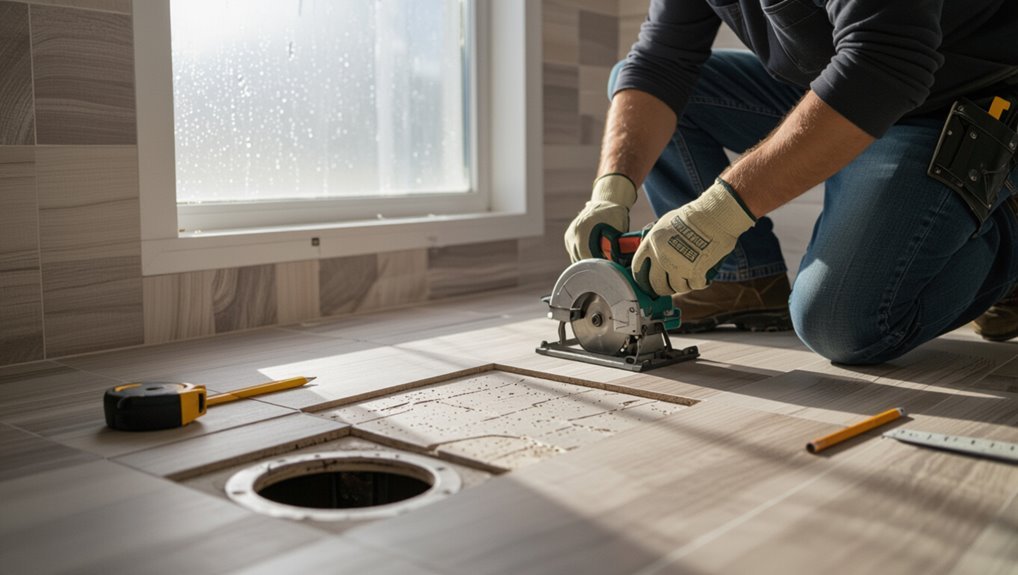
With the stone set, you’ll next make precise cutouts for fixtures, drains, and flooring junctions so everything fits and functions properly.
Measure twice, mark cuts, and use the correct blade—diamond for stone. Cut slowly, keeping edges clean.
Test-fit each piece around pipes and the drain flange, trimming as needed.
File rough edges, vacuum debris, and dry-fit before final setting.
Step 8 Finishing touches: baseboards, transition strips, sealing grout
Finish strong by adding baseboards, threshold strips, and sealing the grout to protect your work and give the room a polished look.
Measure and cut baseboards to fit, paint or stain before nailing, and caulk seams.
Install transition pieces at doorways for smooth movement and expansion gaps.
Apply grout sealer per manufacturer instructions, wiping excess and allowing proper cure time.
Step 9 Cleanup and curing time; first-use recommendations
After the installation, clean up debris and let the materials cure undisturbed so your new floor reaches full strength.
You’ll want to remove spacers, sweep and vacuum thoroughly, wipe down tile surfaces, and follow the manufacturer’s cure times for grout and adhesives before heavy use.
Keep traffic light, use felt pads under furniture, avoid water for the recommended curing period, and ventilate the room to speed drying.
Tools, Adhesives, and Materials Cheat Sheet
Now that you’ve completed the installation steps, let’s cover the specific tools and supplies you’ll need for each flooring type so you can work efficiently.
You’ll get recommended adhesives, grout, and sealants matched to tile, vinyl, or engineered wood, plus underlayment options for moisture control and sound.
Use this cheat sheet to confirm you have the right gear before you start the final installation.
Essential tools by flooring type
Because different bathroom floors demand different tools and adhesives, you’ll want a clear, consolidated cheat sheet before you start. Match tools to material: tile needs trowel, spacers, wet saw; vinyl needs roller, utility knife; engineered wood needs underlay, pull bar. Quick reference:
| Flooring | Essential Tools | Notes |
|---|---|---|
| Tile | Trowel, spacers, wet saw | Wet cuts |
| Vinyl | Roller, straightedge, knife | Seam finishing |
| Engineered wood | Pull bar, underlay, saw | Floating install |
Recommended adhesives, grout, sealants, and underlay options
With your tool list ready, pick materials that match both your flooring type and bathroom conditions—moisture, subfloor, and traffic will guide your choices.
Choose adhesives rated for wet areas, epoxy grout for durability, and waterproof sealants at joints. Select underlay with vapor barrier or cork for warmth and sound.
- Adhesive: polymer-modified thinset or waterproof glue
- Grout: epoxy or high-performance cement
- Underlay: vapor-barrier foam, cork, or cement board
Common Problems and How to Fix Them
You’ll run into issues like buckling, warping, or gaps if the subfloor, acclimation, or installation isn’t right, and I’ll show how to identify and fix each cause.
You’ll learn how to prevent moisture-related failures and mold with proper waterproofing, ventilation, and maintenance.
I’ll also cover repairs for cracked tiles, lippage, and grout failures so you can restore a flat, watertight surface.
Buckling, warping, or gaps causes and fixes
If your bathroom floor starts to buckle, warp, or show gaps, it usually signals moisture, improper acclimation, or subfloor issues that need quick attention to prevent bigger damage.
Check for loose underlayment, inadequate expansion gaps, or poorly glued seams.
Fix by re-seating or replacing planks, improving acclimation before install, securing or leveling the subfloor, and reapplying appropriate adhesive or fasteners.
Moisture-related failures and mold prevention
Because bathrooms are high-moisture environments, water intrusion and trapped humidity are the main causes of flooring failures and mold growth, so you need to diagnose and address sources quickly.
Inspect seams, underlayment, fixtures, and drains for leaks.
Replace damaged underlayment, seal joints with proper waterproof membrane or caulk, improve ventilation with fans, and use mold-resistant materials to prevent recurrence.
Cracked tiles, lippage, and grout failure repair methods
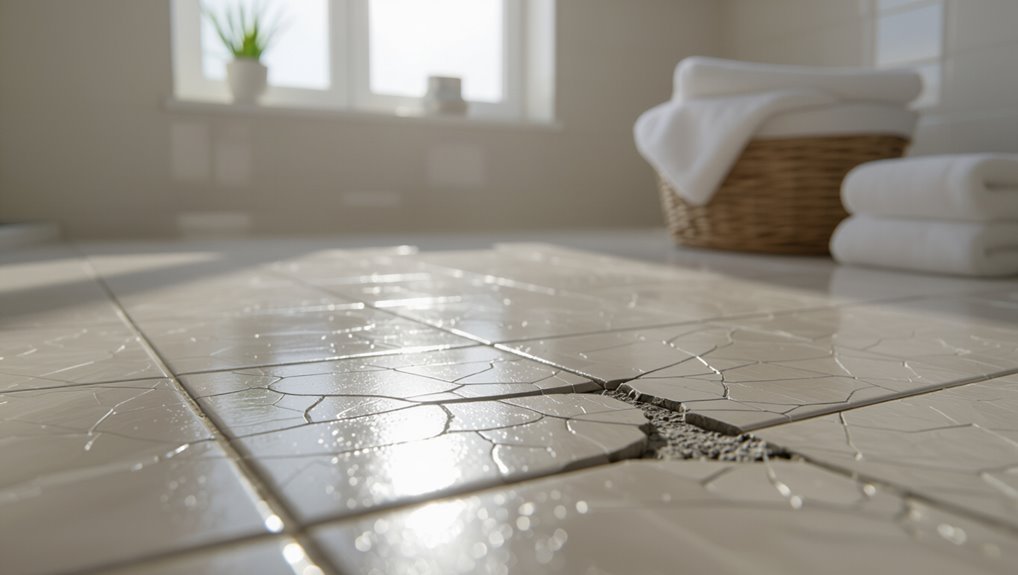
Spotting cracked tiles, uneven edges (lippage), or crumbling grout early makes repairs quicker and less costly.
Remove damaged tiles, clean substrate, and replace with matching tile using thinset; level adjacent tiles to correct lippage before thinset cures.
Rake and repaint grout joints or remove and regrout with epoxy for durability.
Seal grout and monitor for movement or moisture to prevent recurrence.
Tips, Best Practices, and Time-Saving Strategies
Start by planning your layout and pattern so you minimize cuts and waste, and mark out runs that hide narrow edge strips.
Use templates and specialty tools to fit around toilets, cabinets, and tight corners without rushing, and keep a clear sequence for installing pieces.
Work safely with knee pads, proper lifting technique, and simple maintenance routines to protect your floor and save repair time later.
Layout and pattern tips to minimize cuts and waste
If you plan your tile layout before cutting, you’ll save time, material, and frustration; measure the room, dry-fit rows, and mark a clear center line to balance border cuts on opposite walls.
Stagger joints for strength, use full tiles along high-visibility paths, choose a repeating pattern that fits dimensions to avoid tiny edge pieces, and cut strategically from waste pieces first.
Working around obstacles and tight spaces
When you run into fixtures, corners, and narrow gaps, plan cuts and access points before laying any tile so you can work confidently and avoid redoing sections.
Measure twice, mark clearly, and use templates for pipes, drains, and toe kicks.
Cut tiles with appropriate tools, dry-fit pieces, and stagger seams.
Keep spare tiles for tricky replacements and work from obstacles outward.
Safety tips and ergonomic suggestions for DIYers
Because bathroom flooring work often involves sharp tools, dust, and awkward positions, prioritize safety and ergonomics from the outset: wear cut-resistant gloves, safety glasses, and a respirator for dust.
Use knee pads, a cushioned mat, and take regular short breaks to avoid strain. Lift with your legs, keep tools organized, and guarantee good lighting and ventilation to reduce mistakes and fatigue.
Maintenance tips to extend flooring life
Protect your investment by following a few simple maintenance habits that keep bathroom floors looking and performing their best.
Clean spills quickly, use pH-neutral cleaners, and avoid steam cleaners on vulnerable materials.
Place mats at entrances and use felt pads under furniture.
Reseal grout annually and check caulking for gaps to prevent water damage.
- Clean and dry promptly
- Protect and cushion
- Inspect and reseal
Cost Breakdown and Time Estimates
You’ll want to compare typical cost per square foot for tile, vinyl, laminate, and engineered wood to pick the right balance of budget and durability.
I’ll also outline estimated timelines so you know how long small (under 50 sq ft), medium (50–150 sq ft), and large (150+ sq ft) bathrooms usually take.
That way you can plan materials, labor, and scheduling before you start.
Typical cost per square foot by material
Costs vary a lot by material, so plan on comparing price per square foot alongside durability and installation complexity. Typical ranges: vinyl $1–5, ceramic tile $3–10, porcelain $4–12, natural stone $7–20, engineered wood $4–10, luxury vinyl $2–8. Choose based on moisture resistance and skill level; factor in underlayment and labor if you’re not DIYing.
| Material | Low | High |
|---|---|---|
| Vinyl | $1 | $5 |
| Tile | $3 | $12 |
Estimated project timeline for small, medium, and large bathrooms
For a typical bathroom flooring project, plan timelines by size: a small bathroom usually takes 1–2 days, a medium 2–4 days, and a large bathroom 4–7 days—these estimates assume straightforward removal, level subflooring, and no major plumbing or structural work.
Factor drying/cure times: adhesives or mortar often need 24–72 hours.
Add extra day for unforeseen fixes, trim, and cleanup.
When to Hire a Pro Signs You Should Stop DIY
If your project involves structural changes, plumbing reroutes, or electrical work, you should call a pro—those are more than DIY tweaks.
Complex layouts, radiating heat systems, or installing natural stone also demand professional skills and tools you mightn’t have.
Knowing when to stop and hire help will save time, money, and headaches.
Structural, plumbing, or electrical complications
When your bathroom project uncovers rotten subfloor, hidden pipe damage, or exposed wiring, stop and call a professional—these issues go beyond simple tiling and can create safety hazards or costly mistakes if you press on alone.
You should hire a licensed contractor, plumber, or electrician to assess structural integrity, repair joists, replace damaged piping, or safely rewire circuits before continuing with flooring.
Complex layouts, radiating heat systems, or natural stone installation
After you’ve stopped work for major structural, plumbing, or electrical problems, watch for technical challenges that also warrant a pro: complex room layouts, in-floor radiant heat systems, and natural stone installations each carry their own pitfalls.
If tiles need custom cuts, heating requires precise wiring or membrane work, or stone demands sealing and leveling beyond your skill, hire an experienced installer to avoid costly mistakes.
FAQ
You’ll likely have a few practical questions as you plan your bathroom floor—like whether you can lay vinyl plank over tile, how long grout and adhesives need to cure, or if underfloor heating works with your chosen material.
You’ll also want to know how to make the floor slip-resistant and whether a beginner can tackle the job. Below are clear answers to those common concerns.
Can you install vinyl plank over existing tile?
Can you install vinyl plank over existing tile? Yes—if the tile is level, firmly bonded, and clean.
You’ll need to fill grout lines, sand glossy surfaces, and remove loose or cracked tiles. Use an appropriate underlayment or adhesive recommended by the vinyl manufacturer.
Check door clearances and thresholds. If tile is uneven or damaged, removing it first is usually the better option.
How long should grout and adhesives cure before using the bathroom?
How long should you wait before using the bathroom? Typically, wait 24 hours for most tile adhesives and 24–72 hours for grout to reach initial cure.
For full strength and waterproof grout, allow 7 days before heavy use or showering.
Follow manufacturer instructions and maintain ventilation and consistent temperature to guarantee proper curing and avoid staining or weakness.
Is underfloor heating safe with all bathroom flooring types?
Wondering whether underfloor heating works with every bathroom floor? It’s generally safe, but compatibility varies.
Tile and stone conduct heat well. Engineered wood can work if manufacturer approves and you control temperatures.
Solid hardwood, some vinyls, and laminates may warp or off-gas if not rated for heat.
Always check flooring specs, use proper underlayments, and follow manufacturer installation guidelines.
How do I make bathroom floors slip-resistant?
If you’ve decided on a flooring type that works with underfloor heating, you’ll also want to make sure the surface won’t become hazardous when wet—bathrooms are high‑risk for slips.
Choose textured or matte tiles, non‑slip vinyl, or rubber; add adhesive anti‑slip strips or mats near tubs and showers; use water‑resistant rugs with grip; keep surfaces clean and dry; consider professional anti‑slip treatments.
Can I install bathroom flooring myself if I have minimal experience?
Can you tackle bathroom flooring with minimal experience? Yes — with the right tools, prep, and patience.
Choose user-friendly materials like peel-and-stick vinyl or click-lock planks, follow manufacturer instructions, and watch tutorial videos.
Practice cuts on scrap, verify subfloor is flat and dry, and use proper underlayment.
For complex layouts or plumbing, consider hiring a pro to avoid costly mistakes.