How to Heat a Concrete Floor: Best Options for Warmth and Efficiency
You can warm a concrete floor with electric radiant mats for quick retrofit or hydronic tubing for whole-house efficiency; electric costs less up front and heats fast, while hydronic saves on long‑term fuel but needs higher install and slower response. Add good slab insulation and proper controls to cut heat loss and run costs. Choose by budget, climate, and slab type; keep zoning for comfort—and keep going to see installation steps, costs, and best-use cases.
How to Heat a Concrete Floor Quick Answer and Overview
You can heat a concrete floor most effectively with electric radiant mats, hydronic tubing, or surface-mounted heaters—each has trade-offs in installation and performance.
You’ll usually heat floors to add comfort, speed snow-melt in garages, or maintain temperatures in basements and bathrooms.
Expect upfront costs and installation time to vary widely, with hydronic systems often cheaper to run long-term and electric systems cheaper to install.
Direct Answer: Best Methods at a Glance
Four practical options will warm a concrete floor effectively: electric radiant mats or cables, hydronic (hot-water) tubing, surface-mounted heaters, and improved insulation plus passive strategies.
Choose by budget, retrofit ease, and efficiency. For how to heat a concrete floor, consider:
- Electric radiant mats — easy retrofit.
- Hydronic tubing — efficient for large areas.
- Surface-mounted heaters — quick install.
- Insulation/passive — reduces loss.
When you should heat a concrete floor (benefits and common use cases)
If your concrete floor feels cold underfoot, heating it makes sense—especially in basements, slab-on-grade homes, sunrooms, garages, and bathrooms where occupants spend time standing or walking.
You’ll improve comfort, reduce drafts, and warm tiled or stone surfaces. Heat also prevents moisture-related issues and can speed snowmelt in attached garages or entryways.
Choose heating where people spend time barefoot or prone to cold.
Cost and energy-efficiency summary (what to expect)
Although upfront costs vary by system, expect to pay more to install hydronic radiant heat than electric mats or cables.
You’ll usually recover the difference over years through lower operating costs in larger or whole-house installations.
Electric systems cost less to install, heat quickly, and suit small areas.
Hydronic systems run cheaper long-term for big spaces but need higher maintenance and boiler or manifold expenses.
Basic Understanding What You Need to Know About Concrete Floors
You’ll want to understand how concrete conducts and stores heat because that affects how quickly a heated floor responds and how long it stays warm.
Consider heat-loss pathways—conduction into the ground, convection at the surface, and radiation to the room—along with how slab thickness, slab type, and insulation change performance.
Also check building codes, moisture barriers, and freeze risk before you design or install a system.
How concrete conducts and stores heat
Concrete acts like a slow-moving battery for heat: it soaks up warmth, spreads it through its mass, and releases it steadily over time.
You’ll notice concrete’s high thermal mass evens temperature swings, storing energy from underfloor heating or sun exposure.
Because it conducts heat moderately well, it transfers warmth inward and outward slowly, so your heating cycles can run longer and more efficiently.
Heat loss pathways: conduction, convection, radiation
When evaluating heat loss from a concrete floor, remember there are three main pathways you’ll need to address: conduction through the slab, convection to the air, and radiation to surrounding surfaces.
You’ll lose heat downward into colder ground or subfloors by conduction, upward into room air via convection, and toward cooler walls or windows by radiation.
Manage all three for efficient warmth.
Impact of floor thickness, slab type, and insulation
If you’re choosing or modifying a slab, thickness, slab type, and insulation determine how quickly it stores and loses heat.
Thicker slabs store more thermal energy but respond slower; thin slabs heat fast but cool quicker.
On-grade slabs differ from suspended ones in heat transfer paths.
Proper insulation under or around the slab reduces downward losses, improving efficiency and comfort.
Building codes, moisture barriers, and freeze risk
Because local codes govern structural details, vapor control, and freeze protection, you’ll need to check them before installing or modifying a slab; they set minimum insulation, moisture-barrier placement, and depth requirements to prevent heaving and mold.
You should install a continuous vapor barrier, slope exterior slabs for drainage, insulate edges and under-slab where required, and follow frost-depth rules to avoid freeze damage.
Primary Options for Heating Concrete Floors (Main Methods)
Now you’ll look at the main ways to heat a concrete floor so you can pick what fits your space and budget.
You can choose electric radiant mats or cables for easier installation, hydronic (water-based) systems for larger or whole-house heating, or surface-mounted options when embedding isn’t possible.
For short-term needs or spot warmth, supplemental and temporary solutions are worth considering.
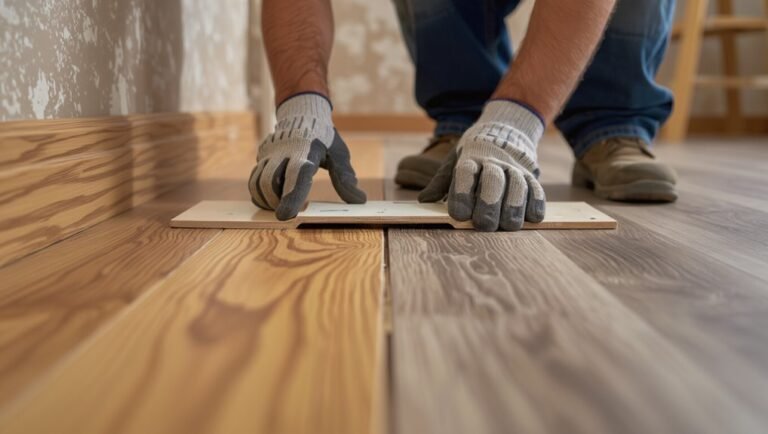
Electric radiant floor heating systems
You’ll find two main electric options for concrete floors: pre-spaced cable systems and mesh-backed heating mats that warm the slab directly.
Each has pros and cons—mats are faster to install in regular layouts, cables are better for odd shapes or higher output, but both need proper insulation, a moisture barrier, and precise thickness control in the substrate.
Before you choose, check installation requirements, floor build-up limits, and compatibility with your concrete mix and slab height.
Electric mats and cables how they work
When you install electric mats or loose cables in a concrete floor, they convert electricity into heat through resistive wiring embedded just below the slab surface. This direct, evenly distributed warming raises floor temperatures quickly and efficiently without moving air.
You’ll place mats or nail down cables, cover with thinset or concrete, connect to a thermostat and circuit, and let the system run on demand.
Pros, cons, and best use cases
Although electric radiant systems cost less to install and heat floors quickly and evenly, they also raise your electrical bills and can be expensive to run in areas with high electricity rates. You’ll enjoy fast response, low maintenance, and zoned control, but expect higher operating costs. Best for bathrooms, renovations, and small spaces.
| Benefit | Drawback |
|---|---|
| Fast heat | Higher bills |
| Low upkeep | Power-dependent |
| Zoned control | Costly large areas |
| Thin profile | Not ideal off-grid |
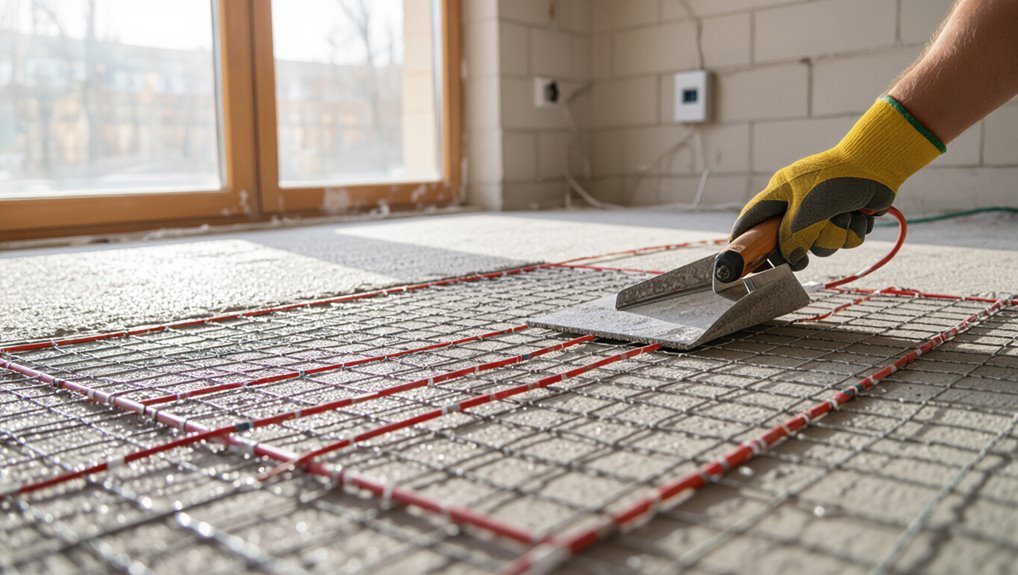
Installation requirements and substrate considerations
Now that you know where electric radiant systems shine and where they don’t, let’s look at what they need during installation and how the concrete substrate affects performance.
You’ll need a clean, crack-free slab, proper insulation beneath to prevent heat loss, and a moisture barrier for slabs-on-grade.
Embed cables or mats per manufacturer depth specs, allow curing, and test electrical circuits before finishing.
Hydronic (water-based) radiant heating systems
For hydronic systems you’ll be working with a heat source or boiler, a manifold, and PEX tubing embedded in the slab to circulate warm water.
They’re efficient for large areas and long-run heating, but upfront cost and system complexity can be higher than electric options.
You can pair them with boilers, heat pumps, or solar thermal setups depending on your efficiency and budget goals.
Boiled-down components: boiler/heat source, manifold, PEX tubing
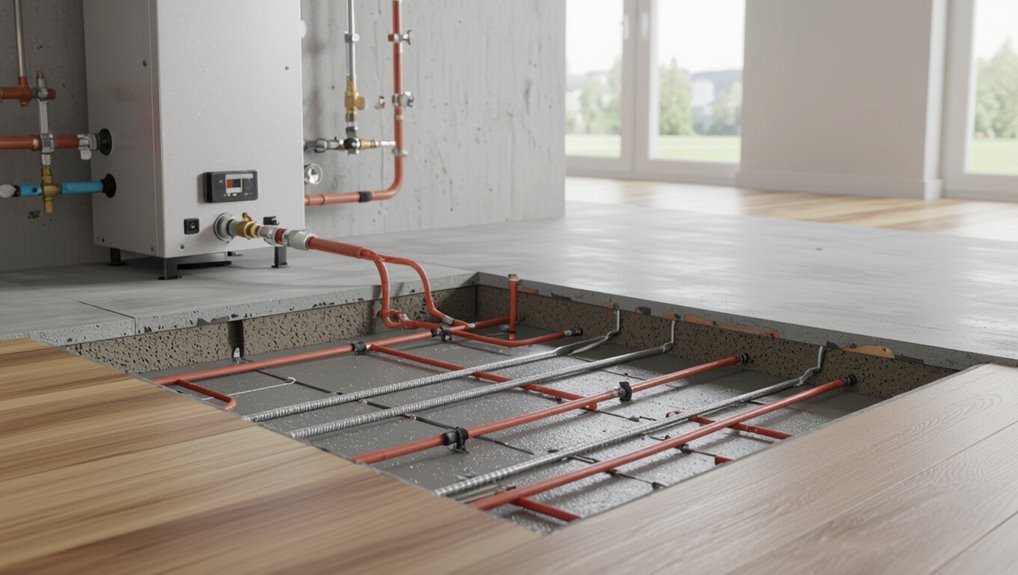
A hydronic radiant floor system boils down to three essential parts: a heat source or boiler that warms the water, a manifold that controls flow and zones, and PEX tubing embedded in the concrete that carries the heated water and transfers warmth to the slab.
You’ll pick a boiler type (gas, electric, or heat pump), size it to load, route PEX loops, and use the manifold to balance and zone for comfort.
Pros, cons, and best use cases
While hydronic radiant systems demand more upfront planning and installation work than electric options, they give you efficient, even heat and lower operating costs over time. You’ll enjoy comfort and zoning control, but face higher install cost and slower response. Best for whole-house or large areas.
| Pros | Cons |
|---|---|
| Efficient, even warmth | Higher installation cost |
| Good zoning | Slower heat-up |
Integration with boilers, heat pumps, and solar thermal
Since hydronic systems pair well with various heat sources, you’ll want to contemplate how boilers, heat pumps, and solar thermal tie into your concrete-floor setup.
Boilers deliver high-temperature water for quick response. Heat pumps run efficiently at lower temperatures, and solar thermal can preheat water to cut costs.
Match source temperature, system design, and controls to maximize comfort and efficiency.
Surface-mounted solutions (when embedding isn’t possible)
If you can’t embed tubing in the slab, surface-mounted options like electric heated rugs/panels and thin-film systems let you add warmth without major demolition.
They’ll heat faster and are easier to install than embedded hydronic systems, but watch for higher operating costs, floor height buildup, and compatibility with your flooring.
I’ll cover pros, cons, and practical installation tips so you can pick the right approach for your space.
Electric heated rugs/panels and thin-film systems
Electric heated rugs, panels, and thin-film systems give you a quick, low-profile way to warm a concrete floor when embedding heating elements isn’t possible.
You can lay modular mats or adhesive films beneath flooring or over concrete, connect to existing circuits, and control zones for targeted comfort.
They heat fast, suit renovations, and work with many floor coverings, offering flexible, space-saving warmth.
Pros, cons, and installation tips
When embedding heating elements isn’t possible, surface-mounted systems give you fast, flexible warmth with minimal disruption—yet they come with trade-offs you should weigh.
You get quick installation, lower cost, and easy repairs, but lose some efficiency and raise floor height.
Choose low-profile panels, follow manufacturer spacing, guarantee proper insulation and moisture barriers, and hire an electrician for wiring and thermostat integration.
Supplemental and temporary options
If you need temporary warmth or extra heat in a specific spot, portable heaters, heated mats, and area rugs are quick, low-commitment options you can use.
You’ll want to weigh their efficiency, running costs, and how well they transfer heat to concrete versus open air.
Also check safety features—tip-over protection, proper insulation, and fire-safe rugs—to avoid hazards on cold floors.
Portable heaters, heated mats, and area rugs
Portable heaters, heated mats, and area rugs give you quick, targeted warmth for concrete floors without a major installation.
You can move portable electric heaters to cold spots, place heated mats under rugs or workspace areas, or add thick area rugs to trap heat.
These options suit rentals, temporary setups, or supplementing existing systems while staying affordable and flexible.
Efficiency and safety considerations
While supplemental options like space heaters, heated mats, and rugs can warm concrete quickly and cheaply, you should weigh their efficiency and safety before relying on them long-term.
You’ll face higher operating costs, uneven heat, and fire risks from overloaded circuits or poor placement.
Use thermostats, timers, certified devices, GFCI protection, and never leave portable heaters unattended to minimize hazards and waste.
How to Choose the Right System Comparison and Decision Guide
To choose the right system, you’ll weigh decision factors like budget, climate, slab type, whether it’s a retrofit or new build, and how quickly the system responds.
Compare performance across cost, installation complexity, runtime efficiency, and comfort in a simple table to see trade-offs.
Also match the heat source—electric grid, gas, heat pump, or solar—to the system for best efficiency and operating cost.
Decision factors: budget, climate, slab type, retrofit vs new build, responsiveness
Because your choices affect comfort, cost, and installation complexity, you should weigh five key factors—budget, climate, slab type, whether it’s a retrofit or new build, and how quickly you want the floor to heat—before picking a system.
Consider upfront and operating costs, local winter severity, slab insulation and thickness, access limitations for retrofits, and desired response time to match system type to your priorities.
Performance comparison table (cost, installation complexity, runtime efficiency, comfort)
Now that you’ve weighed budget, climate, slab type, retrofit vs new build, and responsiveness, it’s time to compare how the main heating options stack up on four practical metrics: upfront cost, installation complexity, runtime efficiency, and occupant comfort.
| System | Pros | Cons |
|---|---|---|
| Electric mats | Low install, quick | Higher runtime cost |
| Hydronic tubing | Efficient, comfy | Higher install cost |
| Radiant panels | Fast response | Uneven heat risk |
| Heated slab | Very comfy, efficient | Very costly, slow response |
Matching heat source to system (electric grid, gas, heat pump, solar)
When you pick a heating system for a concrete floor, match the system type to the heat source you actually have or can afford—electric mats pair naturally with an electric grid, hydronic tubing needs a boiler or heat-pump water heater, and large heated slabs work best with efficient gas boilers or heat pumps supplemented by solar where feasible.
Consider fuel cost, local incentives, backup needs, and future electrification when deciding.
Step-by-Step Installation Overview (Retrofitting vs New Construction)
Now you’ll get a clear, step-by-step look at installing embedded systems in new construction (hydronic or electric) and the six key stages for each.
For retrofits you’ll see six practical options and methods, plus the overlay and thinset/underlayment choices that suit different floor coverings.
We’ll also cover essential site prep—insulation, vapor barrier, and leveling—so your system performs reliably.
New construction: installing embedded systems (hydronic/electric) Step 1 to Step 6
1 clear path separates a new-construction install from a retrofit: you embed the heating system as the slab’s poured, so planning, layout, and coordination happen up front.
You’ll follow steps: design, install tubing/mat, pour slab, connect to manifold/controls, pressure-test, commission.
Stay coordinated with trades to avoid rework and guarantee thermal mass and controls match your comfort and efficiency goals.
- Design
- Layout
- Embed
- Commission
Retrofit options and methods Step 1 to Step 6
Retrofitting a concrete floor calls for different choices and sequencing than new construction, because you’re working around an existing slab and finished spaces. You’ll evaluate surface-mounted electric options, thin-over-slab electric or hydronic systems, and raised-floor assemblies. Then pick the approach that best balances disruption, insulation needs, floor height, and budget.
- Assess slab, insulation, and headroom.
- Choose system type and power source.
- Plan routing, controls, and zones.
- Install, test, and finish with minimal disruption.
Flooring overlay choices and thinset/underlayment options
Because you’re working over an existing slab, choosing the right overlay and thinset or underlayment is critical to performance, floor height, and finish compatibility.
Pick cementitious overlays for tile, self-leveling compounds for thin electric or hydronic mats, and plywood or uncoupling membranes for wood or vinyl.
Match thinset type to tile and membrane requirements, and verify thickness limits to preserve door clearances and passages.
Required site prep: insulation, vapor barrier, and leveling
Whether you’re updating an existing slab or building new, proper site prep—insulation, a vapor barrier, and a level substrate—determines how well your heated floor performs and how long it lasts.
You should install continuous edge and under-slab insulation, lay a sealed vapor barrier to prevent moisture, and use a self-leveling compound or screed for flatness.
Check slopes, joints, and compression before proceeding.
Controls, Zoning, and Thermostats
You’ll want to choose the right thermostats and smart controls to match your system and lifestyle, from simple programmable units to Wi‑Fi models with remote access.
Plan zoning so you can control separate rooms or areas independently for comfort and energy savings.
Also consider integrating the controls with your home automation and using weather‑compensated setpoints to optimize performance.
Thermostat options and smart controls
Curious which thermostat will give you the best control over a heated concrete floor?
Choose a floor-sensing thermostat for accurate surface temperature, or a dual-sensor model that blends air and floor readings.
Look for programmable or smart thermostats with learning schedules, remote app control, and integration with home automation.
Verify compatibility with your heating system and consider energy-saving features like adaptive recovery.
Zoning strategies for comfort and efficiency
Choosing the right thermostat sets the stage for effective zoning, because how you control each area determines comfort and running costs.
You’ll divide floors into zones, match controls to occupancy, and prioritize high-use rooms. Use thermostats and manifold valves to balance flow and schedules.
- Identify zones by use
- Set independent schedules
- Balance flow rates
- Monitor and adjust remotely
Integration with home automation and weather compensation
When you tie your hydronic floor system into home automation and weather-compensated controls, you get smarter comfort and lower energy bills by letting systems react automatically to occupancy, outdoor temperatures, and user preferences.
You’ll schedule zones, adjust setpoints remotely, and prioritize fast-warming rooms.
Weather compensation modulates supply temperature to match heat loss, reducing cycling and saving fuel while keeping floors consistently comfortable.
Energy Efficiency, Running Costs, and Heat Source Selection
To pick the most cost-effective floor-heating setup, you’ll want to compare estimated running costs for electric mats or cables versus hydronic systems.
Improve efficiency with proper insulation beneath the slab, sensible scheduling, and a programmable thermostat to cut wasted runtime.
Also consider low-carbon heat sources like air- or ground-source heat pumps, solar-assisted systems, or waste-heat recovery to lower long-term emissions and bills.
Estimating running costs for electric vs hydronic systems
Although upfront installation and system complexity differ, the biggest long-term cost driver for electric versus hydronic concrete-floor heating is the price you pay per delivered kilowatt-hour and how efficiently each system converts energy into usable heat.
Calculate expected hours, system efficiency (electric nearly 100%, hydronic depends on boiler and pump losses), local energy rates, and maintenance costs to compare total annual operating expenses.
Improving efficiency: insulation, scheduling, programmable thermostats
If you want your heated concrete floor to use less energy and cost you less over time, focus on airtight insulation, smart scheduling, and a programmable thermostat that matches heat output to actual occupancy.
Seal edges, add under-slab or perimeter insulation, and insulate above unheated spaces.
Program setbacks for nights and absences, use gradual warm-up cycles, and monitor usage to refine schedules and minimize waste.
Renewable and low-carbon options: heat pumps, solar, and waste-heat recovery
When you pair a heated concrete floor with low‑carbon sources — like heat pumps, solar thermal or PV-driven electric systems, and waste‑heat recovery — you’ll cut emissions and often lower running costs compared with fossil fuels.
You can use ground- or air-source heat pumps for efficient low-temperature output, integrate solar panels or thermal collectors, and reclaim industrial or greywater heat to reduce demand and bills.
Common Problems, Mistakes, and How to Avoid Them
When you install radiant heat, small mistakes can cut efficiency or even damage the slab, so you’ll want to follow best practices and manufacturer specs.
If you notice cold spots, slow response, or uneven warmth, check for layout errors, flow issues, or airlocks in the system.
Also watch for moisture, cracking, and adhesion failures—identify the cause (vapor drive, poor slab prep, or thermal stress) and address it with proper subfloor prep, control joints, and moisture mitigation.
Installation mistakes that reduce efficiency or cause damage
Because even small errors can cut performance or lead to costly repairs, installing a heated concrete floor demands attention to detail and adherence to best practices.
You should avoid shortcuts that compromise efficiency or cause damage.
Common installation mistakes include:
- Poor insulation under slab.
- Incorrect tubing spacing or depth.
- Insufficient concrete cover or protective conduit.
- Skipping pressure/testing and documentation.
Troubleshooting cold spots, slow response, and uneven heating
Although a properly installed heated concrete floor should warm evenly, you’ll still run into cold spots, slow response times, or patchy heating if any part of the system’s design, installation, or controls is off.
Check thermostat placement, sensor calibration, and zoning; verify pump/boiler output and flow rates; inspect wiring, mats, and tubing continuity.
Balance circuits and purge air to restore consistent, responsive warmth.
Moisture, cracking, and adhesion failures causes and fixes
If your heated concrete floor shows moisture stains, hairline cracks, or tiles lifting, chances are the problem stems from poor substrate prep, improper drying, or incompatible materials—and you can usually prevent it by following a few key steps.
Test slab moisture, allow full cure time, use proper vapor barriers and flexible adhesives, accommodate thermal movement with joints, and choose compatible finishes to avoid failures.
Best Practices and Maintenance
Before you install, check subfloor conditions, system compatibility, and get a pro to confirm layout and electrical or plumbing needs.
Once running, you’ll perform simple routine maintenance—inspect connections, monitor controls, and flush or test hydronic loops as recommended.
Seasonally adjust setpoints, bleed lines, and schedule inspections to keep efficiency high and extend system life.
Pre-installation checks and professional considerations
When planning a heated concrete floor, start with thorough pre-installation checks and consult qualified professionals so you can avoid costly mistakes and guarantee system longevity.
Verify structural suitability, insulation levels, moisture barriers, and electrical or plumbing capacities.
Get written load calculations, warranties, and permits.
Ask for references, certifications, and a clear installation timeline.
Confirm testing procedures and post-installation inspections.
Routine maintenance for electric and hydronic systems
Although electric and hydronic systems differ in components and failure modes, you’ll keep both performing reliably by following a simple, regular maintenance routine: inspect visible wiring and manifolds quarterly, test thermostats and controls seasonally, flush and check antifreeze/pressure for hydronic loops annually, and verify floor surface temperatures and electrical connections before heavy use.
Replace damaged wiring, tighten fittings, and address leaks promptly to prevent larger failures.
Seasonal tips to maximize lifespan and efficiency
If you want your heated concrete floor to last and run efficiently through the seasons, follow a few simple seasonal checks and adjustments:
Inspect and clean thermostats and sensors, bleed and top off hydronic systems if needed, tighten electrical connections, and recalibrate controls as outdoor temperatures shift.
Drain and flush antifreeze yearly if applicable, check insulation and seals, schedule professional inspections, and adjust setpoints for shoulder seasons.
Cost Breakdown and ROI Considerations
You’ll want to compare typical upfront costs for electric mats, hydronic tubing, and retrofit versus new-construction installs to pick the right system for your project.
Consider payback timelines under different usage and energy-price scenarios and the factors—insulation, thermostat control, and fuel source—that most affect ROI.
Also look into financing options, local incentives, and rebates that can greatly reduce your net cost.
Typical upfront costs by system and project type
When planning a heated concrete floor, start by breaking costs into system type (electric mats, hydronic tubing, or radiant panels), floor condition (new slab vs. retrofit), and project scope (single room, whole-house, or garage). Typical upfront ranges: electric $8–$15/ft², hydronic $10–$25/ft², panels $7–$18/ft². Use this quick guide:
| System | New slab | Retrofit |
|---|---|---|
| Electric | $8–$12/ft² | $10–$15/ft² |
Payback timeline scenarios and factors that affect ROI
Although upfront costs can seem steep, payback timelines for heated concrete floors vary widely based on system choice, energy prices, and how you use the space.
Calculate ROI by comparing installation cost, annual energy savings, and maintenance.
Electric systems often pay back faster in small or intermittent-use rooms; hydronic pays off in whole-house installs with lower fuel rates.
Climate and insulation matter.
Financing, incentives, and rebates
Several financing paths can make heated concrete floors more affordable, and you should pick the one that matches your budget and timeline.
Explore low-interest home improvement loans, HVAC or contractor financing, and energy-efficient mortgages.
Check federal, state, and local rebates or tax credits for energy-efficient heating or geothermal systems.
Factor incentives into ROI and request installer help to claim available programs and paperwork.
Case Examples and Scenario-Based Recommendations
If you’re building new in a cold climate, a hydronic slab with good insulation and a high-efficiency boiler or heat pump usually gives the best comfort and operating cost.
For a retrofit slab-on-grade in a mild area, electric mat systems or thin hydronic lines under a floating floor are often the simplest, least-invasive options.
And for garages, basements, or bathrooms, pick solutions tailored to use—durable electric mats for garages, insulated hydronic loops for basements, and fast-responding electric or small hydronic circuits for bathrooms.
New build cold-climate house: recommended system and rationale
When you’re building a new house in a cold climate, pick an in-floor heating approach that matches your insulation, floor type, and long-term fuel goals so the system delivers steady comfort without runaway operating costs.
Prefer a high-efficiency hydronic slab with continuous insulation and multiple zones; size boiler or heat pump for peak loads, use smart controls, and design for maintenance access and future fuel switching.
Retro-fit slab-on-grade in mild climate: recommended approach
For a mild-climate retrofit on a slab-on-grade, pick a low-mass, easy-to-install system that matches your existing floor, budget, and comfort goals — typically electric thin-film or hydronic tubing laid over the slab with a thin screed or float layer.
Insulate beneath if possible, use a dedicated thermostat with floor sensor, and prioritize low-profile finishes to minimize floor height and heat-up time.
Garage, basement, and bathroom-specific solutions
Because garages, basements, and bathrooms each have unique moisture, load, and use patterns, you’ll choose different heating strategies for each: durable, low-profile hydronic or electric mats work best in garages and basements where you need robust heat and resistance to occasional wetness, while bathrooms benefit from thin electric films or small-diameter hydronic loops paired with a floor sensor for quick, comfortable surface warmth.
For garages, prioritize impact-resistant mats; basements need frost protection and zoning; bathrooms require GFCI protection and rapid response.
Frequently Asked Questions (FAQ)
You probably have a few practical questions about radiant heating, like whether it can harm your concrete or how long a slab takes to heat and cool.
You’ll also want to know cost comparisons between electric and hydronic systems, if you can install over existing flooring, and whether separate thermostats are needed for each room.
Let’s answer those common concerns so you can choose the right approach for your floor.
Will radiant heat damage my concrete floor?
Worried that radiant heat will crack or ruin your concrete floor? Properly installed systems won’t harm concrete.
Keep temperatures moderate, allow for controlled warm-up cycles, and use expansion joints or membranes as recommended.
Address existing cracks or moisture issues before installation.
Follow manufacturer and contractor guidelines to prevent thermal stress and preserve slab integrity—radiant heat is safe when designed and managed correctly.
Which is cheaper to run: electric or hydronic radiant floor heating?
If you’re comparing operating costs after choosing a safe radiant system, the two common types—electric and hydronic—have very different cost profiles.
Electric systems cost less to install for small areas but run higher per hour in many regions.
Hydronic systems are pricier up front but use gas or boilers more efficiently for larger spaces, lowering long‑term operating expenses.
Can I install radiant heat over existing flooring?
Curious whether you can add radiant heat without ripping out your current floor? You can, but feasibility depends on floor type, height restrictions, and heat transfer needs.
Electric mats or thin hydronic panels work over existing tile, vinyl, or wood if you can add a low-profile layer.
Check subfloor condition, insulation, and manufacturer guidelines; consult a pro to guarantee performance and avoid voiding warranties.
How long does it take for a concrete slab to heat up and cool down?
How quickly a concrete slab heats up or cools down depends on slab thickness, insulation, and the heat source you’re using.
Thin, well-insulated slabs with embedded hydronic or electric systems can warm in 30–90 minutes and cool similarly.
Thick, uninsulated slabs may take several hours to a day to change temperature.
Expect slower response but longer heat retention once warmed.
Do I need a separate thermostat for each room?
Knowing how a slab heats and cools helps when planning room-by-room control, because different spaces often need different temperatures and response times.
You don’t always need a thermostat per room; zone controls work well. Use separate thermostats where usage, comfort needs, or slab thickness vary.
Combine programmable thermostats with motorized manifold valves to balance efficiency, responsiveness, and cost across rooms.
Visuals and Resources
You’ll find suggested diagrams and photos that show layout options, wiring or tubing runs, and finished floor examples to help both DIYers and pros visualize each step.
Use the reference checklist to confirm site prep, safety items, and inspection points before you start.
Installers can also grab the starter materials list to order exactly what’s needed for a smooth install.
Suggested diagrams and photos to include for DIY and pro readers
Visual aids make it much easier to plan and install floor heating, so include clear diagrams and sharp photos that show layout patterns, component placement, and installation steps.
Add exploded views of mat, tubing, and slab layers; wiring schematics for thermostats and sensors; spacing detail for loops; before-and-after site photos; step-by-step close-ups of fastening, screeding, and probe placement; and thermal-imaging examples of finished results.
Reference checklist and starter materials list for installers
Start with a concise checklist that you can pocket on site: essential tools, materials, safety gear, and the key measurements and permits you’ll confirm before pouring or embedding heating elements.
You’ll want a durable starter pack and quick reference for specs, placement, and testing.
- Tape, laser, multimeter, thermal camera
- Rebar/mesh, insulation, vapor barrier, heating mats/pipes
- PPE, permits, MSDS
- Installation, pressure test, and documentation templates