
How to Cut Vinyl Plank Flooring Lengthwise for a Perfect Edge Fit
To cut vinyl plank flooring lengthwise for a perfect edge fit, measure and mark the cut line, support the plank with scrap backer, and clamp it down to prevent tear-out. Use a utility knife for thin or flexible planks by scoring repeatedly and snapping, or a circular/table saw with a fine-tooth carbide blade for rigid cores, taking light passes. Smooth the edge with a file or sanding block. Keep blades sharp and test on scrap for best results; more tips follow.
How to Cut Vinyl Plank Flooring Lengthwise for a Perfect Edge Fit
Yes—you can cut vinyl planks lengthwise, and you’ll learn safe, simple methods like scoring and snapping, using a utility knife, or a table saw with the right blade.
This guide is for DIYers and installers who need clean, precise edge cuts for trim runs and tight fits. Follow the steps and safety tips here, and you’ll get professional-looking edges without damaging the plank.
Quick Answer Can You Cut Vinyl Planks Lengthwise and How to Do It Safely?
If you need a narrower strip to fit along a wall or around a fixture, you can cut vinyl planks lengthwise with the right tools and technique to get a clean, stable edge.
You’ll work safely and accurately by following these steps:
- Measure and mark using a straightedge.
- Score or saw slowly along the line.
- Clamp to prevent movement.
- Wear eye and hand protection.
Who This Guide Is For and What You’ll Achieve
Who needs this guide and what’ll you get from it?
You’ll get clear, practical steps to cut vinyl planks lengthwise, plus safety tips and tool choices.
It’s for DIYers, renovators, and pros needing neat edge fits.
- DIY homeowners wanting clean results
- Contractors speeding up installs
- Renters doing small repairs
- Anyone avoiding wasted material
Basic Understanding What Is Lengthwise Cutting and Why It Matters
When you rip cut a vinyl plank, you’re slicing it lengthwise to make narrower strips that fit against walls, trim, or in tight runs.
You’ll do this to guarantee clean edges and proper alignment where full-width planks won’t fit.
Remember that different profiles—click-lock, glue-down, and rigid SPC/WPC—handle lengthwise cuts differently, so adjust your technique and tools accordingly.
What “Rip Cutting” or Lengthwise Cutting Means for Vinyl Planks
Rip cutting, also called lengthwise cutting, means slicing a vinyl plank along its long edge to reduce its width or remove tongue-and-groove features.
It’s something you’ll use whenever a full-width board won’t fit at a wall or around obstacles.
You’ll make straight, controlled cuts with a saw or utility knife to create clean edges that lock or sit flush, maintaining appearance and function.
Reasons to Cut Vinyl Planks Lengthwise (fit against walls, trim pieces, narrow runs)
You’ll use lengthwise cutting whenever a full-width plank won’t fit or when you need narrower pieces to finish a run; it’s how you make boards lie flat against walls, fit around doorways and cabinets, and create trim or starter rows.
You cut lengthwise to eliminate gaps, match patterns at edges, accommodate irregular walls, and produce uniform starter strips or junction pieces for tight, professional-looking installations.
Types of Vinyl Plank Profiles and How They Affect Cutting (click-lock, gluedown, SPC/WPC)
Different plank profiles—click-lock, gluedown, and rigid cores like SPC or WPC—change how you cut lengthwise and why it matters for fit and stability.
You’ll score gluedown thinner layers differently to avoid delamination, trim click-locks to preserve locking edges, and handle rigid cores with sturdier blades to prevent chipping.
Adjust blade type, support, and cut technique for each profile.
Tools and Materials You Need
You’ll need a mix of essential cutting tools—utility knife, circular saw, jigsaw, table saw—and a straight edge for accurate lengthwise cuts.
For extra precision you might use a track saw, planer, or sanding block, and don’t forget recommended blades and accessories for each tool.
Always wear safety glasses and a mask, clamp materials, and work on a stable surface to protect yourself and get clean cuts.
Essential Tools (utility knife, circular saw, jigsaw, table saw, straight edge)
Gather the right tools before you start cutting vinyl plank flooring so the job goes quickly, accurately, and safely.
You’ll need a sharp utility knife for score-and-snap cuts, a straight edge for precise guides, and a circular saw or jigsaw for long, straight or curved rip cuts.
A table saw speeds repetitive rips and keeps edges square.
Wear eye and hearing protection.
Optional Tools for Precision (track saw, planer, sanding block)
If you want cleaner, more precise cuts than basic tools can give, consider adding a track saw, planer, and sanding block to your kit.
A track saw delivers straight, splinter-free lengthwise cuts. Use a planer to shave tiny thickness variations for snug seams.
Finish edges with a fine sanding block to remove burrs and guarantee smooth, even mating between planks.
Safety Gear and Workspace Prep (glasses, masks, clamps, stable work surface)
Because cutting and fitting vinyl throws up dust, sharp edges, and flying debris, wear safety glasses and a dust mask before you start work.
Clamp planks to a stable work surface, keep hands clear, and use hearing protection if cutting power tools. Prep the area for scraps and sweep often.
- Safety glasses
- Dust mask
- Clamps
- Stable work surface
Recommended Blades and Cutting Accessories by Tool Type
Different tools need different blades and accessories to get clean, accurate cuts—so match what you’re using to the plank type and cut style. Use fine-tooth carbide blades for saws, snap cutters for quick straight cuts, and utility knives for thin wear layers. Clamp, guide, and dust extraction calm nerves and improve precision.
| Tool | Blade/Accessory | Emotion |
|---|---|---|
| Circular saw | Fine carbide | Confidence |
| Jigsaw | Fine-tooth | Control |
| Utility knife | New blade | Focus |
| Snap cutter | Sharp edge | Ease |
| Table saw | Thin kerf | Pride |
Preparation Steps Before Cutting
Before you cut, measure and mark precise lines with a template, chalk line, or pencil so your cuts are accurate.
Support the plank with a backer scrap and clamps to prevent tear-out. Decide whether to remove the tongue or groove based on how the plank will join adjacent pieces, and set up your saw.
Always make a test cut on scrap to confirm blade position and settings before cutting the actual plank.
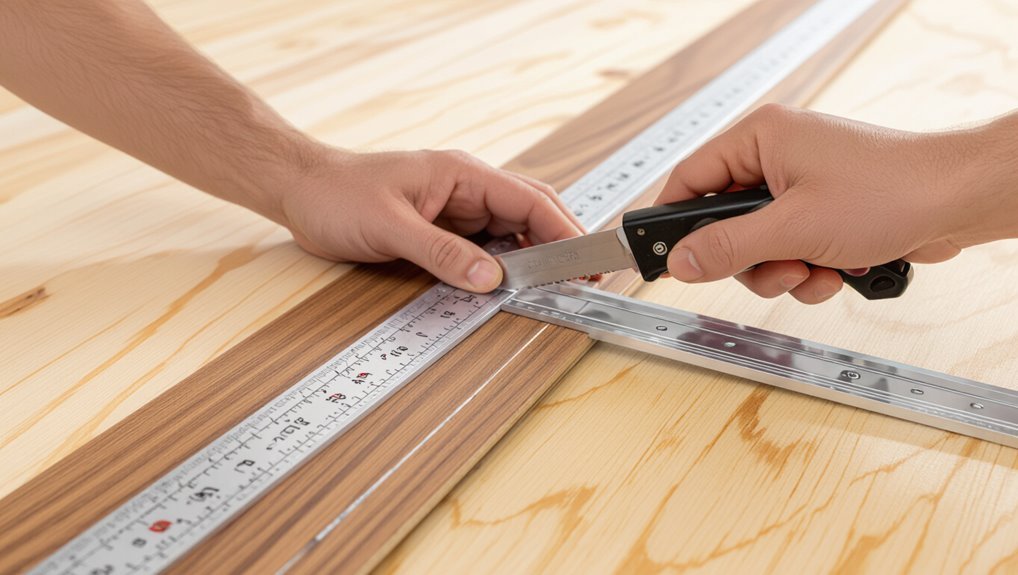
Measuring and Marking Accurate Cut Lines (templates, chalk line, pencil)
When you’re ready to cut, accurate measuring and clear marking are what make the difference between a snug fit and wasted planks; take your time to get both right.
Measure twice along the plank using a straightedge or template, transfer measurements with a pencil, then snap a chalk line for a visible guide.
Confirm alignment before cutting to avoid mistakes.
Supporting the Plank to Prevent Tear-Out (backer scrap, clamps)
If you want clean edges, support the plank’s cut line by tacking a scrap piece underneath or securing the board with clamps so the material won’t lift as the blade exits.
Place the backer scrap flush and tape it down, or clamp near the cut without crushing the plank. This stabilizes fibers, reduces tear-out, and gives a straighter, safer cut.
Deciding Which Edge to Remove (tongue vs groove) and Why
Which edge should you remove—the tongue or the groove—and why does it matter for the rest of the installation?
You’ll usually trim the tongue when ripping a plank so the remaining groove can lock onto the adjacent full plank.
Removing the groove is only for edge strips or when replacing a damaged board.
Choose based on installation direction and keeping locking integrity.
Setting Up Tools and Test Cut on Scrap
Gather your tools and set up a safe cutting station before you touch a real plank:
- Clamp a scrap plank to a stable workbench, blade clear and aligned.
- Wear safety glasses and hearing protection; keep fingers away from the blade.
- Set blade depth for a clean score rather than full plunge.
- Make a trial cut, inspect the edge, adjust fence or blade as needed.
Step-by-Step Method: Cutting Vinyl Planks Lengthwise
Before you start cutting lengthwise, pick the cutting method that suits your plank type and set up a stable guide or fence.
Clamp the plank, make a slow, steady first pass with the right blade speed, then tidy the edge with a file or sanding block.
Dry fit the piece and make any small adjustments before final installation.
Step 1 Choose the Best Cutting Method for Your Plank Type
Choose the right cutting method based on the plank material and the cut you need—solid SPC or WPC cores, thin vinyl, and tile-style planks each respond differently to saws, scoring tools, and utility knives.
Inspect thickness and wear layer: use a fine-tooth circular or jigsaw for rigid cores, score-and-snap or utility knife for thin planks, and a carbide blade for tile-style pieces.
Step 2 Secure the Plank and Align Your Guide or Fence
1. Position the plank on a stable work surface, face up, with the cut line visible. Clamp the plank firmly near the cut, using non-marring clamps or a sacrificial board to prevent crushing.
Align your straightedge, guide rail, or rip fence to the marked line, double-checking measurements and squareness. Keep clamps clear of the tool path and re-check before cutting.
Step 3 Make the First Pass (slow, steady feed; blade speed tips)
With the plank clamped and your guide aligned, you’re ready to make the first pass—feed the plank steadily into the blade at a controlled pace so the saw cuts cleanly rather than drags or tears the vinyl.
Keep hands clear, maintain consistent pressure, and let the blade do the work.
Match feed speed to blade RPM; slower for thin planks, slightly faster for thicker material.
Step 4 Clean Up the Cut Edge (file, sanding block, deburring)
Smooth the rough edge using a file or sanding block so the plank fits snugly and the seam stays invisible.
Lightly file burrs and raised vinyl, working toward the board’s profile. Use a fine-grit sanding block for a uniform bevel and a deburring tool for tight spots.
Wipe dust away, check the edge against the adjoining plank, and repeat until the joint seats cleanly.
Step 5 Dry Fit and Adjust for Final Installation
Now dry-fit the plank in place to confirm length, profile, and seam alignment before you lock anything down.
- Check gaps at walls and junctions; adjust spacing to allow expansion.
- Verify tongue-and-groove engagement; trim if binding.
- Inspect cut edge for flush fit and uniform reveal.
- Make final micro-adjustments, mark any touch-up cuts, then reinstall for permanent fixing.
Alternative Method: Scoring and Snap Technique for Thin Vinyl
Try the scoring-and-snap method when you’re working with thin vinyl planks—it’s quick, clean, and needs only a utility knife and straightedge.
Measure and mark the cut line, clamp the straightedge, then score firmly along the line several times. Bend the plank backward to snap it cleanly.
Smooth the edge with fine sandpaper or a deburring tool before dry fitting to guarantee a snug, professional fit.
Comparison of Cutting Methods: Accuracy, Speed, and Edge Quality
You’ll compare circular saws, table saws, jigsaws, and utility knives to see how they stack up for accuracy, speed, and edge quality.
You’ll also match each tool to common situations—table saws for large batches, utility knives for on-site one-offs, and jigsaws or circular saws for tricky cuts or delicate planks.
This will help you pick the right method for the job.
Circular Saw vs Table Saw vs Jigsaw vs Utility Knife
When choosing between a circular saw, table saw, jigsaw, or utility knife for cutting vinyl plank flooring, consider how each tool balances accuracy, speed, and edge quality so you pick the right one for the job. You’ll favor table saws for precise straight cuts, circular saws for fast long cuts, jigsaws for curves, and utility knives for clean score-and-snap edges.
| Tool | Strength |
|---|---|
| Table saw | Precision |
| Circular saw | Speed |
| Jigsaw | Versatility |
| Utility knife | Clean edge |
Best Method by Situation (large batches, on-site one-offs, delicate planks)
Having picked the right tool for straight cuts, curves, or quick jobs, you now need to match cutting methods to the situation—large batches, on-site one-offs, or delicate planks—because each context changes which trade-offs matter most.
For large batches, use a table or circular saw for speed and repeatability.
For one-offs, score and snap or a jigsaw.
For delicate planks, hand-cut with a utility knife to prevent chipping.
Common Problems and How to Fix Them
When you start cutting vinyl planks, you’ll run into issues like tear-out, chipping, uneven or wavy edges, and occasional damage to the click-lock profile.
You’ll learn simple repairs for torn or chipped edges, how to correct wavy cuts, and ways to salvage a plank with a damaged locking seam.
We’ll also cover safety incidents to watch for and immediate steps to take if something goes wrong.
Tear-Out and Chipping Causes and Repairs
If planks start to tear out or chip, you’ll usually spot rough edges, missing fragments, or loose seams that undermine the floor’s appearance and performance.
Fix small chips by trimming frayed edges, sanding lightly, and applying vinyl repair filler or matching paint.
Prevent tear-out by using a sharp blade, scoring before snapping, and supporting the plank edge during cuts to reduce splintering.
Uneven or Wavy Edges Causes and Corrective Actions
Because uneven or wavy edges can create gaps, trip hazards, and a sloppy finish, you’ll want to spot and fix them before laying adjacent planks or finishing the job.
Check blade sharpness, secure the plank, and use a straightedge guide when cutting.
Sand small waves gently or recut along a clamped straightedge.
Replace severely distorted pieces to guarantee a tight, safe seam.
Damage to Click-Lock Profile How to Salvage a Plank
Small edge errors can be fixed easily, but damage to the click-lock profile demands quicker attention since it prevents planks from locking snugly.
If teeth are chipped, trim only the damaged section and use a connector strip or adhesive-rated vinyl glue to join.
For warped or crushed tongues, replace the plank if repair won’t restore secure engagement; test fit before final installation.
Safety Incidents What to Watch For and Immediate Steps
When you’re cutting and fitting vinyl plank flooring, stay alert for common safety incidents like slips, blade kickback, flying debris, and sudden dust clouds; act quickly to stop the tool, check yourself and anyone nearby for injuries, and secure the work area before doing anything else.
Then assess hazards, treat or call for medical help, ventilate and clean dust, tag the area, inspect tools, and resume only when safe.
Best Practices and Pro Tips for a Perfect Edge Fit
Start by planning a cutting order and workflow so you’re working efficiently and minimizing waste.
When you rip planks, match seams and grain patterns as you go, and decide immediately whether a mistaken cut can be repaired or needs replacing.
Finish edges with caulk, trim, or joining strips for a seamless, professional look.
Cutting Order and Workflow for Efficiency
Although it might seem tempting to cut planks as you go, planning a logical cutting order saves time, reduces waste, and gives you cleaner edge fits.
Start with perimeter pieces, group identical widths, and batch-rip to consistent lengths.
Work from farthest corner toward the exit, keep a labeled offcut pile, and use a single setup for repeated cuts to maintain accuracy and speed.
How to Match Seams and Grain Patterns After Ripping Planks
Matching seams and grain after ripping planks takes a careful eye and a few simple tricks you can use every time to keep joints invisible and patterns continuous.
Inspect each plank before installing, orient matching grains in the same direction, stagger seams, dry-fit pieces, trim micro-variations, and use a fine sanding block to blend edges.
Use adhesive sparingly to avoid telegraphing seams.
When to Replace vs Repair a Mistaken Cut
If a cut doesn’t line up or leaves a ragged edge, you’ll need to decide quickly whether to repair it or replace the plank to keep the installation looking seamless.
Repair when damage is minor—trim, sand, or patch with matching filler and touch-up.
Replace if the cut compromises lock profiles, shows visible gaps, or affects structural stability.
Always check nearby seams for alignment before deciding.
Finishing Touches: Caulk, Trim, and Transition Strips
Once you’ve decided to repair or swap a plank, you’ll want to finish the edges so the floor looks polished and holds up over time.
- Apply matching silicone caulk sparingly to gaps, smoothing with a wet finger.
- Install quarter round or shoe molding to hide expansion space.
- Use adhesive threshold strips between different floor heights.
- Clean residues and inspect seams for tight fit and waterproofing.
Cost, Time Estimates, and When to Hire a Professional
You can usually cut a single vinyl plank in a minute or two, but figure total install time by adding layout, acclimation, and changes.
So a small room can take a day and a larger one several days.
Compare the cost of buying or renting proper cutting tools and safety gear against a pro’s hourly rate and the value of flawless results.
If your layout is complex, you’re short on time, or you’re uncomfortable with power tools, it’s smarter to hire a professional.
Typical Time Per Plank and Total Project Time Estimates
A single vinyl plank usually takes you 1–5 minutes to measure, mark, and cut with basic tools, but that time can stretch to 10–15 minutes for angled cuts, notches, or when working around pipes and door jambs.
For a 200 sq ft room expect 3–6 hours of cutting for one person; add setup, cleanup, and breaks for a full-day project.
Cost Considerations: Tool Investment vs Hiring Pros
After estimating how long cutting will take, weigh whether buying or renting tools makes financial sense versus hiring a pro.
Factor tool cost, rental rates, blade wear, and safety gear against hourly labor and travel fees. Include setup and cleanup time when valuing your time.
For small jobs, renting or hand tools often win; for large or complex jobs, pros may be more cost-effective.
Signs You Should Hire a Pro Instead of DIY
When budget, time, or skill gaps threaten the project’s outcome, hire a pro—it’s often the smarter choice.
You should call a contractor if cuts require complex tools, precise edge matching, or rushed timelines.
Estimate professional cost versus tool purchase and your hourly value.
Hire when mistakes risk visible seams, wasted material, or if you lack confidence—pros save time and prevent costly fixes.
Frequently Asked Questions (FAQ)
You’ve probably got a few specific questions about cutting vinyl planks—like whether you can score them lengthwise with a utility knife, whether that affects the warranty, or how to cut long straight pieces without a table saw.
You’ll also want to know if narrow leftovers can be used as starter strips and how to hide minor imperfections after installation. Below are clear, practical answers to each of those points.
Can I cut vinyl plank flooring lengthwise with a utility knife?
Can you cut vinyl plank flooring lengthwise with a utility knife? Yes — for thin or soft vinyl, score repeatedly along a straightedge, then snap or bend against the cut.
Use multiple light passes, a fresh blade, and firm support to avoid jagged edges. Thicker or rigid planks may need a saw.
Always measure, mark clearly, and cut slowly for a clean edge.
Will cutting the plank lengthwise void the manufacturer warranty?
Will cutting a vinyl plank lengthwise void the warranty?
It depends on the manufacturer and reason for cutting. Some warranties exclude damage from improper alterations, while others allow field trimming if you follow their guidelines.
Check the warranty terms and installation instructions, document your work, and contact the manufacturer before cutting to confirm coverage isn’t voided.
How do I get a perfectly straight long cut without a table saw?
Need a perfectly straight long cut but don’t have a table saw? Use a straightedge clamp or long metal ruler, mark your line, and score repeatedly with a utility knife until the plank snaps cleanly.
For thicker vinyl, use a circular saw with a fine-tooth blade or a jigsaw on slow speed, guiding along the clamped straightedge for a smooth, accurate edge.
Can I use the leftover narrow strip as starter pieces along walls?
Using those narrow leftover strips as starter pieces along walls is fine in many cases, but you’ll want to check a few things first.
Verify strips meet the manufacturer’s minimum width and warranty rules, and that the tongue/groove orientation allows a secure first row.
Confirm subfloor flatness and adhesive or click system compatibility, and trim for consistent expansion gaps so the install stays stable and clean.
How to hide slightly imperfect cut edges once installed?
A few simple fixes can make slightly imperfect cut edges virtually disappear after installation.
Press trim firmly, add matching quarter round or shoe molding, and use color-matched caulk for tiny gaps.
Sand rough edges lightly and apply edge sealer or contact cement where needed.
For visible seams, insert thin matching vinyl slivers or trim with a coordinating junction strip for a clean, professional finish.