How to Clean Marble Floors and Grout Without Etching or Dullness
Use a pH‑neutral stone cleaner and a soft microfiber mop to avoid etching or dullness; rinse with clean water and dry immediately to prevent water spots. Dust or sweep daily, spot‑treat spills at once, and deep‑clean weekly with gentle agitation and fresh pads. For grout, use a baking soda paste or a non‑ionic soap with hydrogen peroxide on small sections, rinse and dry thoroughly. Follow these steps now, and you’ll find more tips for tougher stains and upkeep.
Quick pH‑Neutral Routine for Marble Floors
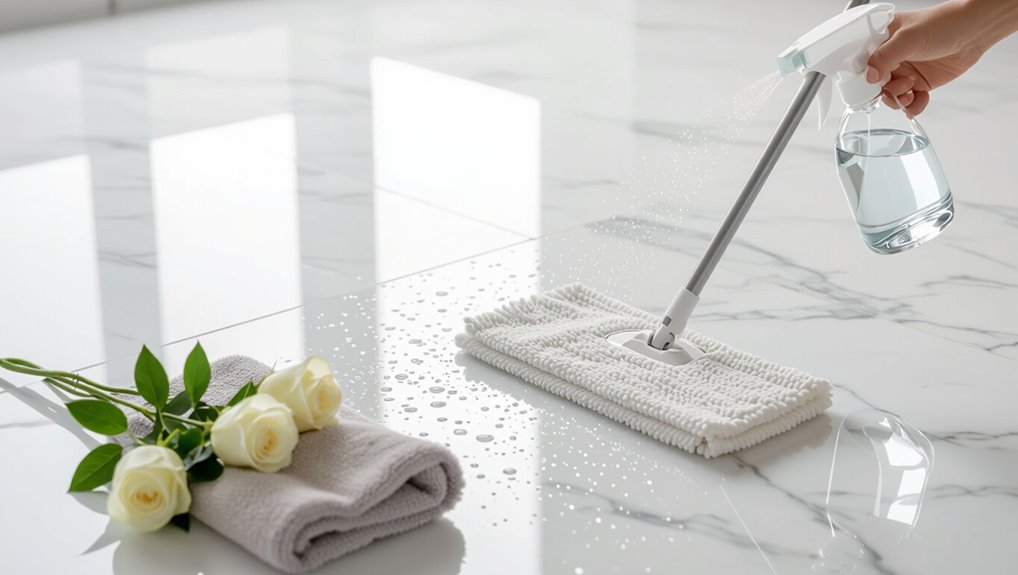
When you want a fast, safe clean, use a pH‑neutral solution so you won’t dull or etch the marble’s surface.
You’ll mop with a soft microfiber, rinse thoroughly, and dry immediately to prevent water spots.
Follow marble maintenance tips: spot-treat spills, avoid acidic cleaners, and use mats.
Set cleaning frequency suggestions based on traffic—weekly for high traffic, monthly for low.
Why pH Matters for Marble
Because marble’s calcium carbonate base reacts easily with acids, the pH of any cleaner you use directly affects its finish and longevity.
Because marble’s calcium carbonate reacts with acids, cleaner pH directly impacts its finish and long-term durability.
You need to respect the pH scale importance to avoid dulling or etching from low-pH products. Understand marble acidity effects and follow simple rules:
- Use pH-neutral cleaners.
- Test cleaners in a hidden spot.
- Rinse and dry thoroughly.
How to Choose Cleaner for Sealed vs. Unsealed Marble
Before you clean, test a small, inconspicuous spot to make sure the product won’t harm the finish.
Use pH-neutral cleaners whenever possible, since acidic or alkaline formulas can etch marble.
For sealed floors, pick cleaners labeled safe for sealers; for unsealed marble, avoid ingredients that could penetrate or discolor the stone.
Test Surface First
If you’re not sure whether your marble is sealed, test a small hidden spot first so you can choose a cleaner that won’t damage the stone—sealed marble tolerates mild pH-neutral cleaners, while unsealed marble needs gentler, oil- and acid-free care or professional sealing before regular cleaning.
- Use damp cloths for surface testing and residue analysis.
- Do stain assessment and check product compatibility.
- Note maintenance frequency to protect surface integrity and guide cleaning methods for etching prevention.
pH Neutral Options
Wondering which cleaner won’t dull or etch your marble? You’ll choose a pH neutral product to minimize pH impact and avoid safe acids unless specified for spot use.
For sealed versus unsealed marble, pick gentler, eco friendly options and adjust cleaning frequency—less for sealed, more for unsealed.
Always prioritize surface protection and test a hidden area before full use.
Sealer-Compatible Ingredients
When your marble’s sealed, you’ll want cleaners that respect the coating. Choose based on sealer types and application methods; unsealed stone needs gentler, breathable formulas.
Do compatibility testing on a small area before full use. Prioritize ingredient safety—avoid acids and abrasives.
- Read sealer types guidance
- Test cleaner compatibility testing spot
- Confirm ingredient safety and method
Everyday Products to Avoid on Marble
Although marble looks sturdy, it’s actually vulnerable to many common household products—so avoid acidic cleaners, abrasive powders, and vinegar-based solutions that can etch or dull the surface.
You should also skip bleach, ammonia, and generic all-purpose sprays; they promote staining, etching, and finish loss.
Debunk marble cleaning myths by heeding acidic cleaners dangers and stick to pH-neutral, manufacturer-approved solutions.
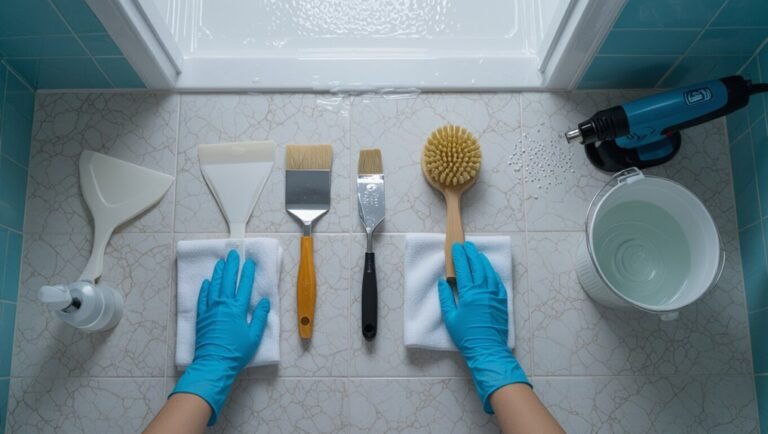
Marble‑Safe Tools: Mops, Microfiber, Soft Brushes
You’ll want soft microfiber mops for regular wet cleaning because they trap dirt without scratching the stone.
Use nonabrasive soft brushes to gently scrub grout or textured areas, and finish with lint-free drying cloths to remove moisture and prevent streaks.
These tools protect your marble while keeping maintenance simple and effective.
Soft Microfiber Mops
Anyone tasked with marble care should choose soft microfiber mops — they lift dust and grit without scratching, hold enough dampness for gentle cleaning, and wring out easily so you don’t over-saturate the stone.
- soft mop benefits: trap debris, reduce streaks.
- microfiber durability: launder gently to extend life.
- Use a flat head and rinse frequently to avoid grit.
Nonabrasive Soft Brushes
After choosing a soft microfiber mop, add nonabrasive soft brushes to your toolkit for spot cleaning and grout edges; they reach crevices mops can’t and lift stuck-on dirt without scratching.
Use soft bristle techniques with light pressure and short, controlled strokes. You’ll prefer gentle cleaning methods: rinse brushes often, test in an inconspicuous area, and avoid harsh scrubbing that risks etching.
Lint-Free Drying Cloths
Lint-free drying cloths are essential for finishing marble cleaning because they remove moisture and streaks without leaving fibers that can dull the surface.
- Use lint free materials and absorbent fabrics (microfiber benefits) to boost cleaning efficacy and surface protection.
- Choose cloth types suited for drying methods; mop heads or hand cloths fit different drying techniques.
- Integrate into cleaning routines for streak prevention and consistent results.
How to Test a Cleaner on Marble
Before using a cleaner across your whole marble floor, test it in a discreet spot to make sure it won’t dull, stain, or etch the surface.
Choose representative cleaner types (pH-neutral, stone soap) and try small amounts.
Use both spray and mop application methods, wait 24 hours, inspect for sheen changes, stains, or etching, then proceed only if safe.
Daily Cleaning Routine for Glossy Marble
For glossy marble, you’ll want a simple daily routine to keep the shine and prevent damage.
Start with gentle dusting or a microfiber sweep, mop with a pH-neutral solution, and wipe up spills immediately to avoid stains.
Stick to these steps and you’ll minimize wear while preserving the finish.
Gentle Daily Dusting
A quick daily dusting keeps glossy marble looking sharp and prevents grit from scratching the surface.
You should use a soft microfiber or lambswool duster for gentle dusting as part of daily maintenance, removing particles before they abrade the finish.
- Sweep or dust with light strokes.
- Focus high-traffic zones first.
- Shake or wash your duster weekly.
pH-Neutral Mopping
1. You should mop with a pH-neutral solution for marble floor maintenance, avoiding acids or alkalis. Choose appropriate cleaning product selection labeled pH-neutral. Use a microfiber mop, wring well, and work in small sections. Replace water often to prevent grit abrasion.
| pH | Tool | Frequency |
|---|---|---|
| Neutral | Microfiber | Daily |
| Safe | Damp, not wet | As needed |
Immediate Spill Management
Blot spills immediately to stop staining and etching on glossy marble—don’t wipe or spread the liquid.
You handle common spills with quick cleanup, spill absorption, and liquid containment to guarantee surface protection and stain prevention; keep an emergency kit and spill barriers ready.
- Assess spill types, choose immediate actions.
- Use absorbent pads, tamp—never scrub.
- Dispose, rinse with pH-neutral water.
Weekly Deep Clean Without Etching
When you deep clean marble weekly, use pH-neutral products and soft tools so you won’t etch the surface; gentle agitation with a microfiber mop or soft-bristle brush lifts dirt without damaging the stone.
Rinse thoroughly with clean water, dry with a soft towel, and rotate pads to avoid grit buildup.
Follow marble maintenance tips and eco-friendly solutions to preserve shine and prevent wear.
Cleaning Marble Grout Safely
Cleaning marble grout safely starts with the right tools and products: use a soft nylon brush, pH-neutral cleaner specifically labeled safe for marble, and plenty of clean water to prevent residue.
You’ll follow gentle grout cleaning techniques and stick to safe marble products to avoid etching.
- Test cleaner in a hidden spot.
- Work small sections.
- Rinse thoroughly and dry.
DIY Grout Paste Recipes Safe for Marble
If you’ve followed safe grout-cleaning steps and rinsed thoroughly, you can move on to gentle DIY grout pastes that won’t harm marble.
Use a baking soda and water paste for mild grime, or mix non‑ionic soap with hydrogen peroxide carefully for light stains.
Test in an inconspicuous area first.
These homemade grout recipes follow grout cleaning techniques that prioritize pH-neutral care and gentle action.
Poultices for Oil and Organic Stains
You’ll learn how to tell oil stains from organic ones by their appearance and how they react to blotting.
Then you’ll make a simple poultice—usually a powdered absorbent mixed with a solvent or water—to draw the stain out.
Finally, you’ll apply, cover, and let the poultice work before gently removing and repeating if needed.
Identifying Oil Versus Organic
Wondering whether that dull mark is oil or an organic stain will change how you treat it: oil soaks in and leaves a translucent film, while organic stains—like coffee, wine, or food—often discolor the stone and may react to mild bleach.
- Check identifying marks: translucent sheen suggests oil stains.
- Test cleaning agents gently.
- Prefer stain removal methods that avoid surface damage; follow maintenance tips.
Making And Applying Poultices
A simple poultice can draw out both oil and organic stains without grinding away the marble’s surface, and you’ll only need a few common ingredients and patience to make one. Follow surface preparation, mix poultice ingredients, use correct applying techniques, set poultice duration, monitor drying time, and test effectiveness testing. Use gentle removal methods tailored to stain types.
| Step | Detail |
|---|---|
| Mix | Powder + solvent |
| Apply | Cover, seal |
Removing Water Rings and Mineral Deposits
When water sits on marble it can leave dull rings or white mineral deposits, but you can remove them without damaging the stone if you act carefully and use the right cleaners and tools.
- Use gentle water spot removal with pH-neutral cleaner and soft cloths for effective solutions.
- Apply DIY remedies like distilled water poultices for mineral buildup prevention.
- Prefer natural alternatives and tested cleaning techniques to avoid etching.
Treating Etch Marks vs. Stains: How to Tell
1 clear way to tell etching from staining is to tap the surface with a fingernail: if the mark feels flat and smooth but looks dull, it’s likely an etch; if it feels raised or the color sits on top, it’s probably a stain.
For reliable etch mark identification and stain difference, inspect texture, test with a damp cloth, and note whether residue lifts or penetration occurred.
How to Buff Out Light Etching by Hand
Start by gathering the right supplies—clean, soft microfiber cloths, a ph-neutral stone cleaner, fine-grit abrasive powder made for marble (or a marble polishing compound), and a small amount of water—so you can work carefully and avoid making the etch worse.
Gather soft microfiber, a pH-neutral stone cleaner, fine marble polishing powder, and a bit of water to gently restore etches.
- Gently dampen cloth, apply compound, and rub in small circles.
- Rinse, inspect for remaining etching causes, repeat sparingly.
- Finish with a clean dry cloth to buff and refine buffing techniques.
When to Call a Professional for Honing or Polishing
Wondering if the etching or dullness is beyond DIY fixes?
If scratches are deep, restoration signs multiply, or your honing techniques and polishing options haven’t restored luster, get a professional assessment.
A pro will evaluate substrate depth, recommend honing or polishing approaches, and prevent further damage.
Call a qualified stone restoration specialist when results stay unsatisfactory or risks feel uncertain.
How and When to Reseal Marble Floors
If a professional or your own restorative efforts have removed old sealers or the shine still soaks up spills, you’ll need to reseal to protect the stone.
- Check surface preparation, caution signs, and environmental factors to set reseal frequency.
- Choose product selection wisely; follow application technique and respect drying time.
- Use maintenance tips for sealing benefits and long term care to prolong protection.
Preventive Measures: Mats, Pads, and Rugs
Place a durable entry mat outside and a non-slip one inside to trap grit before it reaches your marble.
Use soft, felt or rubber-backed furniture pads to prevent scratches and check them periodically for wear.
Pick rugs made from natural, low‑abrasion fibers with a breathable backing so they don’t trap moisture or stain the stone.
Entry Mat Placement
Why not start at the door—your first line of defense against grit and moisture? Choose entry mat styles and entry mat materials that trap debris and drain water.
Place mats outside, inside, and just beyond thresholds so grit never reaches marble.
- Outside: coarse scraper mat
- Inside: absorbent fabric mat
- Threshold: thin, low-profile mat
Furniture Pad Choices
When you slide a chair or shift a sofa, small abrasive particles and heavy legs can scratch or crack marble, so choose furniture pads that match the weight and movement of each piece. Pick felt or rubber based on furniture pad materials and check furniture pad sizes for coverage. Replace pads regularly and test movement on a scrap marble tile.
| Type | Best use |
|---|---|
| Felt | Chairs |
| Rubber | Sofas |
| Plastic glides | Cabinets |
| Felt+Rubber | Heavy, movable |
Rug Material Selection
- Pick rug materials with proven rug durability and low rug maintenance—natural fiber blends resist wear and simplify rug cleaning.
- Match rug patterns, rug colors, and rug styles to hide dirt while considering rug textures that won’t trap grit.
- Optimize rug placement and use non-slip, breathable pads to protect marble and simplify future rug cleaning.
Spill Response: Wine, Juice, Vinegar, Citrus
Act quickly: blot spills of wine, juice, vinegar, or citrus with a soft, absorbent cloth to lift liquid without rubbing it into the marble.
For wine spill response, dab from edges inward, then rinse with distilled water.
Follow juice cleaning tips by neutral pH cleaners.
Use vinegar alternatives for streak-free care—never acidic solutions.
Observe citrus precautions: dilute and rinse immediately to prevent etching.
Safe Sanitizers for Kitchens and Bathrooms
After you’ve blotted up spills, you’ll want to sanitize surfaces without harming the marble.
- Choose eco friendly sanitizers and surface safe products that balance kitchen hygiene with marble care.
- Use natural disinfectants and non toxic cleaners labeled as safe cleaning agents for bathroom sanitation.
- Prefer antimicrobial solutions with neutral pH; rinse and dry promptly to prevent residue and etching.
How Humidity and Temperature Affect Marble Care
You’ll want to monitor temperature because heat and cold can change how sealers cure and how long they last.
High humidity raises the risk of mold and staining in grout lines, while very dry conditions can make grout and marble more brittle.
Rapid temperature swings can cause thermal expansion and cracking, so plan maintenance when conditions are stable.
Temperature’s Impact On Sealers
Because sealers cure through chemical reactions that depend on moisture and heat, temperature and humidity have a direct effect on how well a marble sealer sets and performs.
You should consider temperature sensitivity and seasonal considerations to optimize sealing effectiveness.
Markdown list:
- Application timing — avoid temperature extremes and strong humidity effects.
- Environmental factors — stable conditions improve cure.
- Maintenance practices — adjust schedules per season.
Humidity And Mold Risk
When humidity stays high and temperatures hover in the warm range, mold and mildew can take hold on and around marble surfaces.
You should monitor indoor climate closely to protect both appearance and integrity.
You’ll use humidity monitoring and temperature regulation, prioritize humidity control and proper ventilation, improve air circulation, manage moisture with prompt surface drying, adjust cleaning frequency, and focus on moisture management and mold prevention as key environmental factors.
Thermal Expansion And Cracking
If temperatures and humidity swing widely, marble can expand and contract enough to stress seams, grout, and even the stone itself.
So you should keep environmental changes gradual and controlled to reduce cracking risk. You’ll manage thermal movement and moisture control to protect substrate stability and structural integrity.
- Monitor temperature fluctuations and environmental factors.
- Use expansion joints for crack prevention.
- Maintain consistent humidity levels.
Best Cleaners for Dark, Veined, and Light Marble
Choosing the right cleaner for dark, veined, or light marble can make the difference between a gleaming floor and one that looks dull or etched; you’ll want products formulated for marble’s sensitivity to acids and abrasives.
For dark marble care and veined marble tips, use pH-safe, non-abrasive solutions.
Light marble maintenance needs gentle color specific cleaning.
Consider marble texture considerations, pattern awareness, aesthetic marble choices, and marble durability insights.
Recommended Commercial pH‑Neutral Marble Cleaners
After you’ve picked a safer approach for dark, veined, or light marble, learn which ready-made, pH-neutral cleaners will keep that finish looking its best.
- Choose a well-reviewed brand labeled pH-neutral with safe ingredients for daily wiping.
- Prefer products highlighting eco friendly options and low-residue formulas for sealed surfaces.
- Test any commercial cleaner on a hidden spot before full use to avoid dulling or etching.
Eco‑Friendly Marble Cleaning Options That Work
You can keep marble pristine with eco‑friendly choices that won’t harm the stone.
Start with gentle pH‑neutral cleaners, use natural solutions for oil stains, and finish with an eco‑safe sealer to protect the surface.
I’ll show simple recipes and product picks that actually work.
Gentle pH‑Neutral Cleaners
1 simple rule will keep your marble looking its best: use a pH‑neutral cleaner made for natural stone.
You’ll protect shine and grout while relying on cleaner effectiveness and gentle scrubbing rather than harsh acids. Choose biodegradable, labeled stone-safe solutions and test a hidden area first.
- Dilute per label
- Use a soft mop or cloth
- Rinse and dry promptly
Natural Oil‑Removing Solutions
When oil stains or greasy footprints appear, reach for eco-friendly, oil-cutting solutions that lift residue without damaging marble’s surface or sealant. You’ll use gentle oil extraction with natural solutions like baking soda poultices, castile soap blends, and enzyme sprays. These cleaning methods use safe ingredients, speed stain prevention, and preserve finish.
| Method | Ingredient | Benefit |
|---|---|---|
| Poultice | Baking soda | Absorbs oil |
| Soap blend | Castile soap | Emulsifies grease |
| Enzyme spray | Plant enzymes | Breaks down oils |
| Rinse | Water | Removes residue |
Eco Safe Sealing Options
Although sealers protect marble from stains and wear, choosing an eco-safe option means you won’t trade indoor air quality or the stone’s breathability for protection.
You should pick eco friendly sealers with natural ingredients, apply per instructions, and recoat minimally.
Consider:
- Water‑based breathable sealer.
- Plant‑derived penetrating formula.
- Low‑VOC, certified topical finish.
Choosing Cleaners for Different Marble Finishes
Different marble finishes need different care, so pick cleaners that match the surface: polished marble tolerates mild, pH-neutral solutions, honed or matte finishes benefit from gentle, non-abrasive cleaners, and textured or antiqued stones often need thicker, low-splash products that won’t leave streaks.
You should identify marble finish types, evaluate cleaner formulation considerations, test in inconspicuous spots, and avoid acidic or abrasive products.
Tools and Techniques for Grout Re‑Coloring and Sealing
When re‑coloring grout, you’ll want to choose a stain that matches your marble and is formulated for porous grout to guarantee even coverage.
Use a small brush or applicator for precise work, then wipe excess before it sets.
After recoloring, apply a penetrating sealer according to the manufacturer’s instructions to protect color and resist stains.
Choosing The Right Stain
Color choice matters: pick a grout stain that matches your marble’s undertones and the room’s lighting to make the floor look seamless.
You’ll consider stain types, color matching, stain identification, and stain testing before applying stain treatments.
Think about stain longevity, stain removal ease, and stain prevention strategies.
- Test small area
- Match undertones
- Choose durable formula
Proper Sealing Techniques
1 smart seal job locks in your grout’s color and keeps stains from returning, so you’ll want the right tools and a careful technique.
You’ll choose sealing products for durability, follow sealing preparation steps, and practice precise sealing application.
Learn sealing techniques, set sealing frequency, and perform sealing maintenance to protect results.
Ignore sealing myths; proper work delivers real sealing benefits.
Common Cleaning Mistakes That Dull Marble
Although marble looks sturdy, the wrong cleaning habits can quickly strip its shine and etch the surface.
- Using acidic cleaners or harsh scrubs — product selection matters; this myth harms surface protection and causes dullness.
- Over-wetting and poor drying — routine mistakes that undermine marble care and etching prevention.
- Ignoring stain identification and inconsistent maintenance tips — bad cleaning techniques accelerate wear and dullness causes.
How to Restore Shine on Mildly Dulled Marble
If your marble looks slightly dulled, you can often bring back its shine with gentle polishing using a soft cloth or a low-speed polishing pad.
Use only pH-neutral cleaners so you don’t etch the surface while removing grime.
Start with a small test area to make sure the method restores gloss without damaging the stone.
Gentle Polishing Techniques
A few simple, nonabrasive steps will bring mildly dulled marble back to a soft, natural shine without risking etching or haze.
- Use gentle buffing techniques with a microfiber pad, moving in small circles.
- Apply polishing product recommendations sparingly—test on an inconspicuous spot first.
- Finish with a dry, clean microfiber cloth to remove residue and inspect shine; repeat lightly if needed.
pH-Neutral Cleaning
One simple step to revive mildly dulled marble is to use a pH-neutral cleaner formulated for natural stone; it removes dirt and film without risking etching from acids or streaking from alkaline soaps.
You’ll choose cleaning agents balanced on the pH scale to guarantee etching prevention, stain removal, surface protection and marble longevity.
Check product effectiveness, adjust cleaning frequency, consider environmental impact, and follow routine maintenance.
Quick Troubleshooting: Five Common Marble Problems
When spills, stains, etching, dull spots, or scratches show up, you’ll want quick fixes that won’t harm the stone; this section walks you through five common marble problems, how to identify each issue, and safe, effective steps you can take to restore your floors.
Use marble etching causes to choose stain removal methods, grout cleaning techniques, marble maintenance tips, and polishing marble surfaces.
- Spot etching
- Grout discoloration
- Surface scratches
Product Checklist to Keep for Emergencies
Keep a small emergency kit on hand so you can tackle spills, etching, and scratches immediately before they worsen.
Include pH-neutral stone cleaner, soft microfiber cloths, non-abrasive poultice powder, plastic scraper, marble-safe poultice binder, and felt pads.
Label items for emergency spill response and store a concise list of essential cleaning supplies.
Check and replenish quarterly to stay ready.
Cost and Time: Routine Care vs. Restoration
Having that emergency kit ready saves you time and money by letting you fix small issues before they worsen, but you’ll still face choices about ongoing care versus costly restoration.
- Compare cost comparison and labor costs: routine practices cost less than full restoration techniques.
- Factor time investment and maintenance frequency into cleaning schedules.
- Use budgeting tips to balance cleaning schedules, routine practices, and potential restoration techniques.
Signs Your Marble Needs Professional Renovation
If your marble shows dull patches, deep scratches, persistent stains, or uneven wear that regular cleaning won’t fix, it’s time to call a pro.
You should watch for marble deterioration signs like etching, pitting, grout breakdown, or loss of shine.
Surface wear indicators include inconsistent gloss, visible abrasion lines, or recurring stains—these mean professional renovation is warranted.
How to Create a Maintenance Schedule
Because marble responds best to consistent care, set a maintenance schedule that balances daily chores, weekly cleaning, and periodic professional checks.
Use maintenance reminders and plan seasonal inspections to catch wear early. You’ll stay proactive and avoid costly repairs.
- Daily: sweep, spot-clean spills.
- Weekly: damp-mop with pH-neutral cleaner.
- Quarterly: review reminders; schedule professional check.
Behavioral Tips to Reduce High‑Traffic Wear
A maintenance schedule helps prevent damage, but you can cut wear even more by changing how people use the space. Track traffic patterns, enforce footwear guidelines and shoe choices, and adjust furniture placement to protect marble. Use area rugs and mat types thoughtfully; boost cleaning frequency and maintenance habits. Practice prompt spill management for effective wear prevention.
| Emotion | Action |
|---|---|
| Care | Lay rugs |
| Pride | Enforce rules |
| Relief | Quick cleaning |
Final Checklist: Daily, Weekly, and Seasonal Care
When you stick to a clear checklist, daily, weekly, and seasonal tasks keep your marble looking its best and prevent costly repairs down the line.
You’ll safeguard finish and grout with simple, consistent actions tied to seasonal maintenance and routine marble care.
Safeguard your marble’s finish and grout with simple, consistent seasonal and routine care.
- Daily: sweep, blot spills, use pH-neutral cleaner.
- Weekly: damp-mop, inspect grout, buff spots.
- Seasonal: reseal, deep-clean grout, inspect for etching.
Frequently Asked Questions
Can Marble Be Safely Steam Cleaned to Sanitize Without Etching?
You can, but cautiously: steam cleaning benefits include sanitizing, yet high heat or pressure can etch marble, so you’ll use low-heat settings, gentle technique, and safe cleaning products (pH-neutral) to avoid damage while disinfecting.
Can Grout Dyeing Change Marble Color or Damage the Stone?
Grout dyeing won’t usually change marble color or damage it if you’re careful; proper grout application, sealed edges, and testing prevent bleed-through, preserving color preservation and avoiding stains or etching from harsh dyes or solvents.
Are Ultrasonic or Vibrating Floor Cleaners Safe for Marble?
Absolutely safe—well, almost miraculously—if you’ll use low-frequency ultrasonic cleaning and gentle vibrating technology; you’ll avoid etching by choosing marble-safe settings, soft pads, and testing a small area before treating the whole floor.
How Do Pets’ Nails and Urine Affect Marble Long‑Term?
Pets’ nails scratch marble over time, so you’ll practice nail trimming and regular pet care; urine’s acidity etches and stains unless you use urine neutralization and prompt cleanup, forming part of your long term maintenance plan.
Can Radiant‑Heated Marble Floors Expand or Craze When Cleaned?
About 30% of thermal stresses cause surface microcracking; you shouldn’t cause marble expansion by using hot, harsh cleaning methods. Use lukewarm water, pH-neutral cleaners, gentle mopping, and avoid steam to prevent crazing.
Conclusion
Keep a gentle routine and your marble will keep its luster: use pH‑neutral cleaners, soft microfiber tools, and avoid acidic or abrasive products. Seal as recommended and tackle spills immediately—90% of marble etching comes from common household acids like lemon and vinegar, so vigilance pays. Stick to a simple schedule, rotate high‑traffic routes, and call a pro when dullness or deep stains persist. Small habits prevent big repairs and keep floors looking fresh.