How to Attach a 2×4 to a Concrete Floor Safely and Securely
You can secure a 2×4 to concrete by using the right anchors, drilling clean pilot holes, and protecting the wood from moisture. Mark and level the board, raise it slightly on a sill gasket, then hammer‑drill matching holes and install concrete screws or wedge anchors per manufacturer depth and torque specs. Use pressure‑treated lumber or sealant and stainless or galvanized anchors for corrosion resistance. Follow spacing guidelines and check pullout loads — keep going to learn step‑by‑step setup and tips.
How to Attach a 2×4 to a Concrete Floor Quick Answer
The safest, most reliable way is to anchor the 2×4 with concrete screws or anchors through pre-drilled holes so the wood sits tight and won’t shift.
For most jobs you’ll want a hammer drill with a masonry bit, concrete screws (Tapcon) or sleeve/epoxy anchors, washers, and a good tape measure.
I’ll show quick steps and which fasteners work best for different loads.
One-sentence summary of the safest, most reliable method
Bolt a pressure-treated 2×4 to the concrete using concrete anchors (wedge or sleeve) or Tapcon screws through predrilled holes—this gives the safest, most reliable hold when you drill correctly, use the right-length fasteners, and set anchors per manufacturer specs.
For how to attach 2×4 to concrete floor, follow correct hole depth, clean dust, and tighten anchors to manufacturer torque for a secure, lasting connection.
Best fasteners and tools at a glance
Start with anchors that match the job: sleeve or wedge anchors for permanent, heavy-duty holds, Tapcon (concrete) screws for lighter loads or when you want easier removal, and powder-actuated pins only when you’re trained to use the tool. Use a hammer drill, masonry bit, proper socket or driver, and safety gear. Visual guide:
| Fastener | Use |
|---|---|
| Sleeve | Heavy |
| Tapcon | Removable |
| Wedge | Permanent |
| Powder-actuated | Quick fix |
Basic Understanding What You’re Doing and Why It Matters
When you attach a 2×4 to a concrete floor you’re usually framing, blocking, or anchoring the wood to create a stable base.
You’ll want the right method because anchors and adhesives perform differently and a poor choice can compromise safety and longevity.
Learn the key terms—anchor types, expansion versus adhesive anchors, and proper embedment depth—so you can pick the correct fastener and install it correctly.
What “attaching a 2×4 to concrete” means (framing, blocking, anchoring)
Attaching a 2×4 to concrete means securing wood to a masonry surface so it can carry loads, locate framing, or provide blocking for finishes and fixtures.
You’ll anchor plates for walls, set sole plates for partitions, fasten blocking for cabinets or stairs, and secure ledger strips for built-ins.
Each task uses anchors, screws, or adhesives chosen for load type and installation access.
Why choosing the right method matters for safety and longevity
Because the connection between wood and concrete carries both the weight and the consequences of failure, you need to pick the right fastening method for the loads, environment, and expected lifespan.
Choose methods that resist expected forces, moisture, and corrosion so joints stay tight. Proper selection prevents movement, rot, and collapse, reduces maintenance, and guarantees the structure performs safely over time.
Key terms: anchor types, expansion vs. adhesive anchors, embedment depth
If you want a reliable connection, you need to understand the anchor types—mechanical (expansion) anchors and adhesive (epoxy) anchors—and how embedment depth affects their performance.
Expansion anchors grip by wedging as you tighten; they’re quick and best for solid concrete.
Adhesive anchors bond into drilled holes, offering higher pullout strength and vibration resistance.
Embedment depth dictates load capacity and safety margins.
Materials, Tools, and Safety Preparations
Before you start, gather recommended materials like pressure-treated 2x4s, concrete anchors or Tapcon screws, and corrosion-resistant fasteners.
Plus tools: drill with masonry bit, hammer, level, measuring tools, and a shop vacuum.
Put on safety gear—eye and ear protection, dust mask, and knee pads—and plan for dust control while working.
Finally, inspect the concrete for moisture and cracks, mark your layout clearly, and confirm the site is clean and ready.
Recommended materials and fasteners
You’ll need a handful of specific materials and fasteners to secure a 2×4 to concrete effectively: pressure‑treated or exterior‑grade 2x4s, a masonry drill bit matched to your anchor size, and either wedge anchors, Tapcon screws, or concrete screws rated for the load and environment—plus a good hammer drill to install them.
- Hardened steel wedge anchor sinking into solid concrete.
- Corrosion‑resistant Tapcon threaded into predrilled hole.
- Epoxy adhesive backing for heavy, vibration‑prone connections.
Tools required (drill, hammer, level, vacuum, measuring tools)
Tools matter as much as materials when you’re fastening a 2×4 to concrete: a hammer drill with the correct masonry bit, a regular hammer, a level, tape measure and pencil, and a shop vacuum to clear dust will make the job accurate and safe.
Use them purposefully:
- Drill holes square and clean.
- Align and level the 2×4.
- Remove dust before anchoring.
Safety gear and precautions (dust control, eye/ear protection, knee pads)
Because drilling into concrete throws up fine, abrasive dust and sends loud impacts through your hands and ears, you should suit up with the right protective gear: a respirator or dust mask, safety glasses, hearing protection, and knee pads.
Don gloves, tuck sleeves, and seal gaps.
Visualize the work:
- dust cloud
- flying chips
- grounded, cushioned knees
Site prep: moisture check, concrete condition inspection, mark layout
After you suit up and control dust, check the slab for moisture, surface damage, and layout before you grab the drill.
Use a moisture meter or plastic sheet test to spot dampness. Inspect for cracks, spalling, or loose toppings and mark safe anchoring zones.
Snap chalk lines for the 2×4, locate rebar with a detector, and plan fastener spacing.
Step-by-Step Guide Attaching a 2×4 to Concrete (Primary Method: Concrete Screws)
Now you’ll walk through the concrete-screw method step by step, starting with planning and marking hole locations based on spacing and load.
Pick the right screw and matching pilot bit, drill clean, correctly deep holes, then set the 2×4 and drive the screws with proper torque.
Finally, verify the attachment is tight and the board is aligned before finishing.
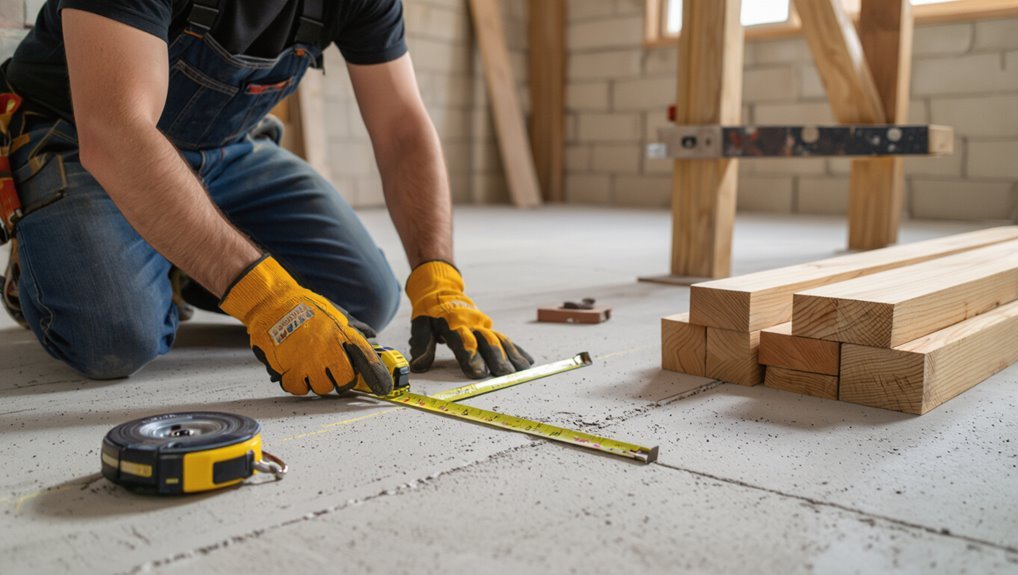
Step 1 Plan and mark locations (spacing, load considerations)
Step 1 starts with careful planning: measure and mark where each 2×4 will sit, accounting for spacing, load points, and obstacles so you know exactly where to drill.
You’ll consider support needs, foot traffic, and concrete condition.
Visualize placements:
- Beam run layout along the floor.
- Load-bearing points under heavy equipment.
- Clearance around doorways and vents.
Step 2 Choose screw size and pilot drill bit size
Pick the right concrete screws and matching drill bit before you start so the fasteners hold securely without splitting the 2×4 or over-stressing the concrete. Choose 3/16″ bits for #8 screws, 1/4″ bits for #10 or #12. Match screw length to embed 1″–1½” into concrete beyond the 2×4.
| Screw | Bit | Embed |
|---|---|---|
| #8 | 3/16″ | 1″ |
| #10 | 1/4″ | 1–1½” |
| #12 | 1/4″ | 1½” |
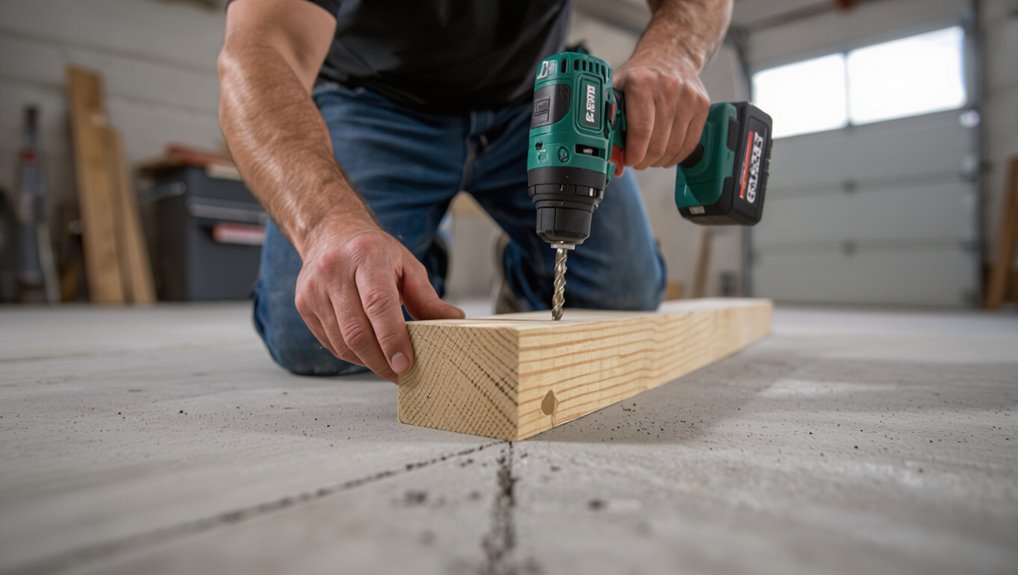
Step 3 Drill pilot holes to correct depth and clean debris
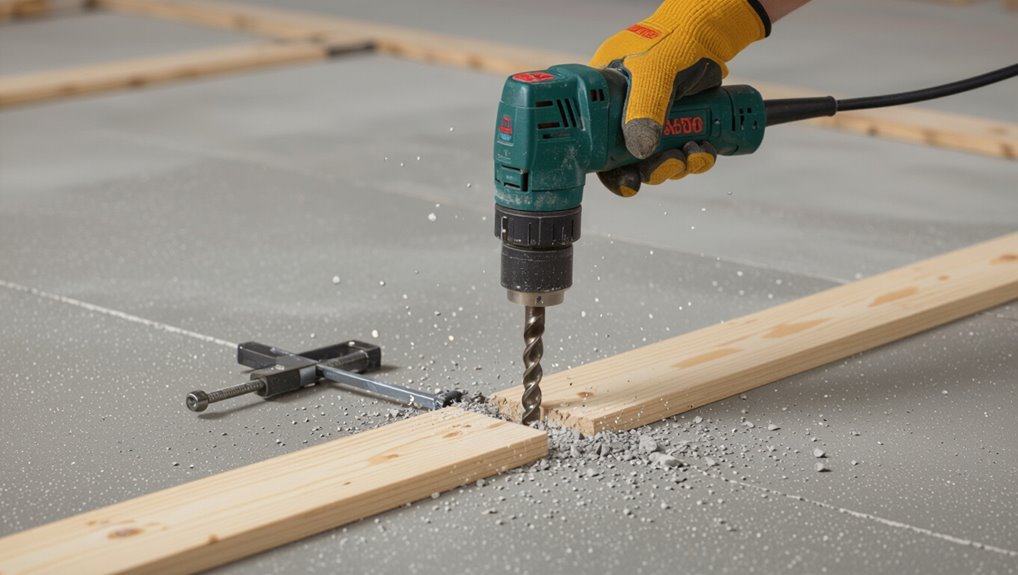
Mark your hole locations through the 2×4, clamp the board flat, then drill straight into the concrete with the matching masonry bit to the proper depth—usually the thickness of the 2×4 plus the required embedment (see screw chart).
Use a depth stop or tape on the bit, drill at steady speed, then clean each hole with a vacuum or compressed air to remove dust before proceeding.
Step 4 Position the 2×4 and install concrete screws with proper torque
With the holes cleaned and the 2×4 still clamped in place, line the board up over the drilled locations and set each screw tip into its hole to hold the timber against the concrete.
Drive screws straight with a hammer drill or impact, applying steady pressure.
Torque to manufacturer specs—don’t over-tighten—so the head seats flush without crushing the wood or stripping the anchor threads.
Step 5 Verify secure attachment and check alignment
Confirm the board is firmly seated and plumb before you finish—give the 2×4 a few firm tugs and tap along its length to feel for any movement or hollow spots.
Then visually and with a level confirm straightness, adjust if needed, and tighten loose screws.
Picture the checks:
- Tap for voids.
- Level for plumb.
- Tug for secure hold.
Alternative Methods (When Concrete Screws Aren’t Ideal)
If concrete screws aren’t the best fit, you’ll want to evaluate alternatives like epoxy or adhesive anchors for heavy or cracked concrete.
Wedge and sleeve anchors provide strong, permanent holds, and there are trade-offs between Tapcon screws and powder-actuated fasteners.
I’ll explain when to use epoxy and how to install it, outline wedge vs. sleeve anchor pros and cons and basic installation steps, and compare Tapcon screws with powder-actuated options so you can pick the right tool for the job.
Read on for clear guidance and quick installation tips.
Epoxy/adhesive anchors when to use and how to install
When concrete screws won’t grip—like in cracked, hollow, or deteriorated slab—or when you need higher load capacity, epoxy or adhesive anchors give a reliable alternative by bonding threaded rods or rebar directly into drilled holes.
You’ll use them when mechanical expansion could split the concrete or when vibration and dynamic loads demand a stronger, more durable connection.
Follow steps:
- Drill, clean hole.
- Inject epoxy, insert rod.
- Cure fully, trim and fasten.
Wedge anchors and sleeve anchors pros, cons, installation overview
Although epoxy anchors are great for damaged or high-load situations, wedge and sleeve anchors offer a simpler mechanical option that works very well in solid concrete and masonry. You’ll choose wedge for higher loads and sleeve for thinner or softer materials. Drill correct diameter/depth, clean hole, insert anchor, tighten. Inspect torque and avoid cracked concrete.
| Anchor Type | Best Use |
|---|---|
| Wedge | High load |
| Sleeve | Thin slabs |
| Both | Solid concrete |
Tapcon vs. powder-actuated fasteners comparison and use cases
Wedge and sleeve anchors handle many heavy-duty jobs, but you’ll want other options for lighter-duty work or where hammering anchors isn’t practical. Tapcons drill and screw into concrete—good for removability and thin plates. Powder-actuated fasteners drive pins quickly into hard concrete—best for speed and blind fastening.
| Tapcon | Powder-actuated |
|---|---|
| Removable | Permanent |
| Slower install | Fast |
| Requires drill | Requires tool/permit |
| Lower shear | High shear |
| Good for retrofit | Good for production |
Load and Structural Considerations
Think about the loads your 2×4 will face—shear forces along the length versus pullout forces from uplift—and whether those loads are spread out or concentrated at points.
Follow spacing guidelines for framing and blocking so anchors share the load instead of relying on a single fastener.
If you expect heavy concentrated loads or any structural use, get an engineer’s recommendation or choose heavier-duty anchors.
Assessing loads: shear vs. pullout, evenly distributed vs. point loads
When you plan fasteners for a 2×4 on concrete, start by figuring out whether the connection will face shear (sideways) forces or pullout (tension) forces, because each mode demands different anchors and embedment depths.
Assess load type and distribution, then choose anchors and spacing accordingly:
- Point load: concentrated at a single fastener.
- Evenly distributed: shared across multiple fasteners.
- Lateral shear: uses thicker anchors and edge distance.
Spacing guidelines for typical framing and blocking applications
For typical framing and blocking, space anchors so each fastener shares the load and stays clear of concrete edges; a common rule is to set 16 in. on-center for wall plates and 24 in. for non‑loadbearing blocking, tightening spacing where loads concentrate or where code requires. Space closer at corners, openings, and high-load points; stagger anchors to avoid breaks.
| Application | Typical Spacing |
|---|---|
| Wall plates | 16 in. OC |
| Blocking | 24 in. OC |
When to consult an engineer or use heavier anchors
If your project will carry significant loads, include continuous load paths, support tall or bearing walls, or attach heavy fixtures, you should consult a structural engineer or choose heavy‑duty anchors rather than relying on basic fasteners.
For loads, vibration, or safety-critical applications, get engineering guidance. Use epoxied studs, heavy wedge anchors, or through‑bolts sized per calculations, and verify concrete condition and edge distances.
Common Problems and Mistakes to Avoid
Watch out for common errors like drilling the hole too shallow or too deep, using the wrong anchor or an undersized fastener, or fastening into poor concrete or rebar.
If an anchor fails, you’ll need to remove it, enlarge or patch the hole with proper repair mortar, and install the correct anchor type and size.
Taking these steps prevents weak connections and costly rework.
Mistake: drilling too shallow or too deep
When you drill into concrete, getting the hole depth wrong—either too shallow or too deep—can ruin the anchor’s hold or damage the concrete itself, so you’ll want to measure and mark carefully before you start.
If too shallow, the anchor won’t seat and will pull out; if too deep, you weaken the substrate or lose bite.
Use a depth stop and verify with a probe.
Mistake: using wrong anchor type or undersized fastener
Choose the right anchor and size—don’t assume any concrete fastener will do.
You’ll weaken the joint if you pick a cheap sleeve or undersized screw meant for light loads. Match anchor type to load, concrete hardness, and thickness.
Use manufacturer torque and embedment specs, choose diameter for shear and withdrawal capacity, and swap bolts if they deform during installation.
Mistake: poor concrete condition or drilling into rebar
Even with the right anchor and size, the concrete itself can sabotage your fastening job: cracked, powdery, or spalled slab won’t hold fasteners, and hitting rebar while drilling can ruin bits and prevent proper embedment.
Inspect the slab for sound concrete, surface delamination, and voids. Use a hammer test, don’t drill blindly, and mark known rebar locations to avoid costly mistakes.
How to fix failed anchors and remediate mistakes
If an anchor fails or you spot a botched hole, don’t panic — you can usually repair the problem without tearing up the whole slab.
Clean and widen the hole, use epoxy or a larger anchor, or relocate slightly.
Visualize steps:
- Drill out damaged concrete.
- Inject epoxy and set new anchor.
- Shift the 2×4 and reattach securely.
Best Practices, Tips, and Longevity Recommendations
Think about using corrosion-resistant anchors or stainless fasteners suited to your environment so they last without failing.
You’ll want to seal the wood-concrete interface and manage moisture with a gasket or waterproof barrier to prevent rot.
Also pre-drill, use proper screw size and allow for seasonal movement to avoid splitting and long-term checks.
Corrosion resistance and fastener materials for different environments
When you’re fastening a 2×4 to concrete, choosing the right fastener material matters as much as the anchoring method, because the wrong metal can rust quickly in damp or salty environments.
Stainless steel, hot-dipped galvanized steel, and specially coated anchors each offer different levels of corrosion resistance and cost.
Choose stainless for coastal or high-moisture sites, hot-dip for general use, and coated anchors where budget matters.
Sealing and moisture management at the wood-concrete interface
Corrosion-resistant anchors help protect metal, but wood sitting directly on concrete still invites rot and mold unless you control moisture at the interface.
You should:
- Raise the 2×4 on a sill gasket or plastic shim to allow airflow.
- Apply a bead of exterior-grade sealant between wood and concrete.
- Use a breathable membrane or damp-proofing paint on concrete to divert moisture.
Maintain ventilation and periodic inspections.
Preventing splitting, checks, and long-term movement
Although wood naturally expands and contracts with humidity and temperature, you can minimize splitting, checks, and long-term movement by choosing stable materials and employing proper fastening and moisture-control techniques.
Use kiln-dried, straight lumber, pre-drill pilot holes for anchors, avoid over-tightening fasteners, maintain a vapor barrier, seal cut ends, allow small gaps for seasonal movement, and inspect periodically for moisture or loosening.
Tools and Material Buying Guide (Short)
You’ll want to match drill bits, screw brands, and anchors to the job—DIY projects can usually use common masonry bits and reputable mid-range anchors, while pros often pick premium, SDS-ready bits and heavy-duty anchors.
Consider whether a budget option meets your strength and corrosion needs or if paying more for tested brands is worth the longevity.
I’ll point out which combinations work best for hobbyists versus contractors.
Selecting drill bits, screw brands, and anchors for DIY vs. pro
Anyone can get the right hardware without overbuying—pick a masonry bit that matches your anchor size (carbide-tipped for concrete), choose screws rated for concrete or exterior use, and match anchors to load and skill level: plastic or sleeve anchors for light DIY jobs, wedge or screw anchors for heavier, professional loads.
- Drill bit: match anchor diameter.
- Screws: corrosion-resistant.
- Anchors: rated load.
Budget vs. premium options what matters
When you’re balancing price and performance, decide which tools and fasteners will actually affect the job rather than just your sticker shock. Choose premium for drill, anchors, and screws where strength matters; budget for consumables and simple tools.
| Item | Recommendation |
|---|---|
| Hammer drill | Premium |
| Anchors | Premium |
| Screws | Premium |
| Drill bits | Mid-range |
| Tape measure | Budget |
FAQ
You’ll find answers here to common questions like whether you can fasten a 2×4 to concrete without drilling and what size or spacing of anchors you should use for a load-bearing plate.
We’ll also cover moisture protection to prevent rot and whether older or cracked concrete can safely accept anchors.
If you need quick specs—anchor type, screw size, and spacing—we’ll spell them out.
Can I attach a 2×4 directly to concrete without drilling?
Can you attach a 2×4 directly to concrete without drilling?
You can use construction adhesive or heavy-duty concrete adhesive for temporary or light-duty fixes, but you shouldn’t rely on it for structural or load-bearing walls.
Adhesive bonds can fail with moisture, movement, or heavy loads.
For permanent, secure connections use mechanical anchors after drilling into concrete.
How far apart should anchors be for a load-bearing wall plate?
For a typical load-bearing wall plate, space your anchors about 16 inches on center and no more than 24 inches apart, with an anchor placed within 6 inches of each stud bay end.
This spacing gives predictable load distribution and meets most building-code and manufacturer’s recommendations for sill plates.
Use anchors rated for shear and tension, stagger them at joints, and follow local code for spacing adjustments.
What size concrete screw should I use for a sole plate?
Which size concrete screw should you pick for a sole plate?
Use 3/16″ x 1-3/4″ or 1/4″ x 2-1/4″ Tapcon-style screws for typical 2×4 sole plates.
Choose 1/4″ for heavier loads or wider spacing.
Drill the proper diameter and depth, clean the hole, and seat screws flush.
Follow manufacturer embedment and spacing specs for strength and code compliance.
Will moisture from concrete rot the 2×4 and how to prevent it?
After you’ve anchored the sole plate, you’ll want to address moisture from the slab because untreated contact can lead to rot over time.
Raise the 2×4 slightly using a sill gasket or plastic shim, apply a waterproof membrane or bituminous coating, and use pressure‑treated lumber or a moisture barrier.
Check periodically and guarantee good ventilation to keep wood dry and durable.
Can I install anchors into older or cracked concrete?
Can you install anchors into older or cracked concrete? Yes, but inspect and test the slab first.
Small hairline cracks usually accept expansion or wedge anchors if you drill into solid concrete beyond the crack.
Avoid crumbling, spalling, or heavily deteriorated areas; those require patching or epoxy repair.
For major damage, consult a structural pro and consider using epoxy-set anchors after proper remediation.