How to Fill Holes in a Concrete Floor for a Smooth, Even Surface
You can restore a smooth concrete floor by first cleaning and dampening the hole, then choosing the right repair—cementitious filler for small pits, polymer-modified mortar for medium depressions, or epoxy/polyurethane for deep voids. Mix to a trowelable, lump-free consistency, press firmly to avoid air pockets, level and feather edges, and cure under plastic or damp burlap. Finish by grinding low spots and applying a skim coat if needed, and keep reading to learn detailed steps and tips.
How to Fill Holes in a Concrete Floor for a Smooth, Even Surface
Start by cleaning the hole thoroughly so the patch will bond and the finished floor will be level.
Begin by thoroughly cleaning the hole so the patch bonds and the finished floor sits level.
You’ll remove debris, dust, and loose concrete, then dampen the area.
Mix a suitable patching compound, apply in layers, compacting each.
Smooth the surface with a trowel, feathering edges to match surrounding floor.
Cure as directed to get a durable, even repair.
Quick Answer Best Approach at a Glance
If the damage is just a few small holes you’ll patch them; widespread or deep deterioration calls for resurfacing.
Use a quality patching compound or floor resurfacer plus a trowel, wire brush, and protective gear.
Expect small patches to take an hour and cost under $50 in materials, while resurfacing can take a day or more and run from $100–$500 depending on area and product.
When to Patch vs. Resurface
When deciding whether to patch a few spots or resurface the whole slab, weigh the size, depth, and spread of the damage: small, isolated holes and shallow spalls call for patching, while widespread cracking, large depressions, or surface scaling mean you should resurface.
Patch for localized cosmetic or trip hazards; resurface when structural integrity, drainage, or finish uniformity are compromised beyond spot repairs.
Recommended Materials and Tools
Because the right mix of materials and tools makes repair faster and more durable, you’ll want a concise kit:
- Bag of polymer-modified patching compound
- Concrete bonding adhesive bottle
- Stiff wire brush and hand trowel
- Margin trowel and finishing float
- Mixing bucket, drill mixer, and disposable gloves
Time and Cost Estimates
Expect most small repairs to take 1–3 hours from prep to finish, while larger patches or multiple holes can take a day or more including cure time.
You’ll spend $10–$50 for DIY supplies for a few holes; professional repairs run $100–$500 depending on size and complexity.
Factor in patching compound, tools, sealant, and any disposal or surface prep costs.
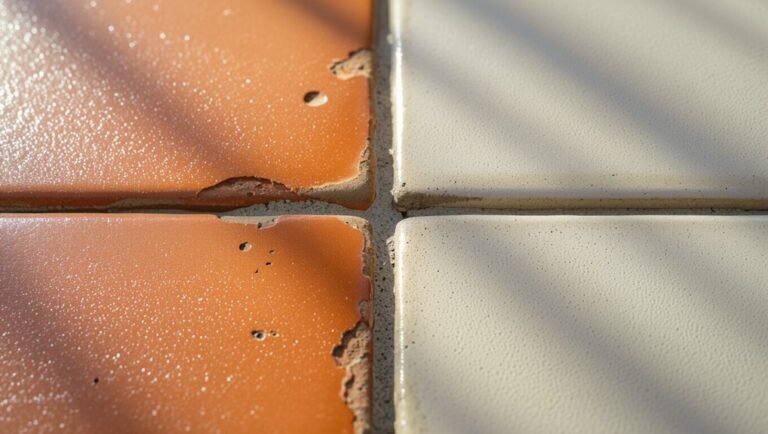
Understanding the Problem What Causes Holes and Sinking in Concrete Floors
You’ll want to identify what caused the hole—settling, spalling, impact, or a poor pour—because the fix depends on the origin.
Different damage types (cracks, craters, surface flaking) change whether you need a cosmetic patch or a structural repair.
Start by checking if the issue is just surface-level or if it signals deeper structural problems before picking materials and methods.
Common Causes (settling, spalling, impact, poor pour)
When a concrete floor develops holes or sinks, several predictable causes are usually at work: soil settling beneath the slab, surface spalling from freeze-thaw or chemical attack, localized impact damage, and improper mixing or pouring during installation.
You’ll spot patterns: low spots, flaking, chips, or soft bedding that reveal the root cause.
- Cracked slab edges
- Flaky surface patches
- Pothole from a dropped tool
- Sunken slab over voids
- Uneven aggregate distribution
Types of Concrete Damage and How They Affect Repair Choice
Because different kinds of damage change what’s needed to fix a concrete floor, you should identify the exact type before choosing a repair, not after. You’ll encounter cracks, spalling, sinkage—each needs specific materials and prep. Use this quick reference:
| Damage Type | Typical Repair |
|---|---|
| Surface chips | Patch compound |
| Small sinkage | Levelling mix |
| Spalling | Bonding agent + patch |
Assessing Structural vs. Cosmetic Issues
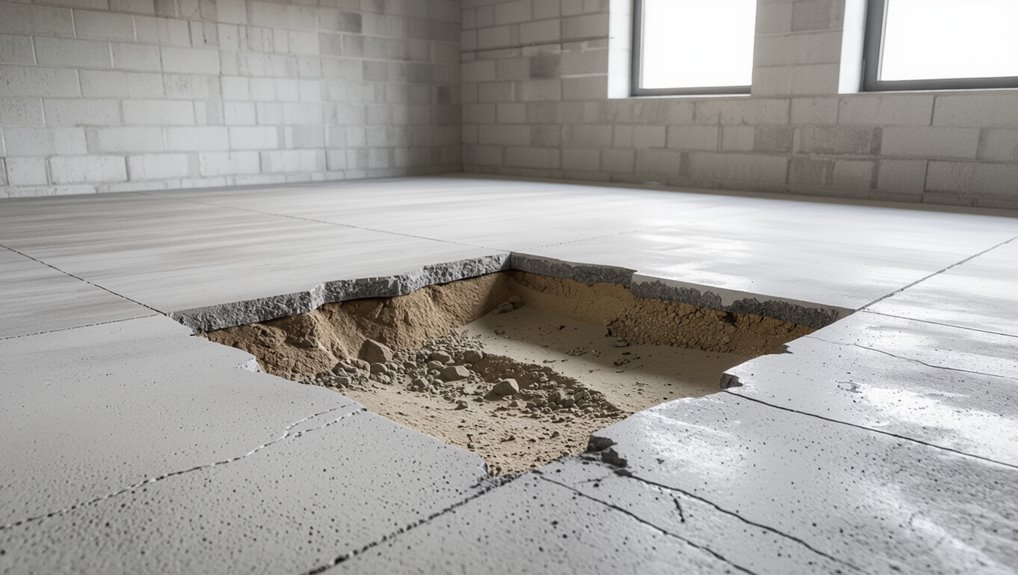
Distinguishing structural from cosmetic damage starts with a close look: small surface chips and discoloration are usually cosmetic, but deep holes, wide cracks, or areas that sag under load point to structural problems that need more than a simple patch.
You should probe edges, measure crack width and depth, check for moisture, and test load response; call a structural pro if movement, mapped cracking, or settling appears.
Safety, Preparation, and Materials
Before you start, put on proper PPE—gloves, eye protection, a dust mask or respirator, and knee pads—to protect against dust and chemical exposure.
Gather your tools and materials (concrete patch or epoxy/grout, bonding agent, trowel, grinder, and a shop vacuum) so you won’t have to stop mid-job.
Clean the area, remove loose concrete, and test for moisture to guarantee a strong, lasting repair.
Safety Precautions and PPE
When you tackle filling holes in a concrete floor, prioritize safety by wearing proper PPE and following a few simple precautions: eye protection, a respirator or dust mask, sturdy gloves, and knee pads will cut most injury risks, while steel-toed shoes and hearing protection are wise for heavy tools.
Stay aware, ventilate the area, and keep a first-aid kit nearby.
- Safety goggles
- N95 respirator
- Cut-resistant gloves
- Padded knee pads
- Steel-toed boots
Tools and Materials Checklist (concrete patch, epoxy, grout, bonding agent, trowel, grinder, vacuum)
Tools matter: gather a concrete patch or epoxy suitable for the hole size, grout or polymer-modified mix for larger repairs, a bonding agent to guarantee adhesion, a steel trowel and mixing bucket, a grinder with diamond cup wheel for clean edges, and a shop vacuum to remove dust—plus any manufacturer-recommended additives and a stiff brush for prep.
- Bagged patch mix and epoxy tubes
- Bonding primer bottle
- Steel trowel gleaming
- Grinder with cup wheel
- Shop vacuum and hose
Site Preparation: Cleaning, Removing Loose Concrete, and Moisture Testing
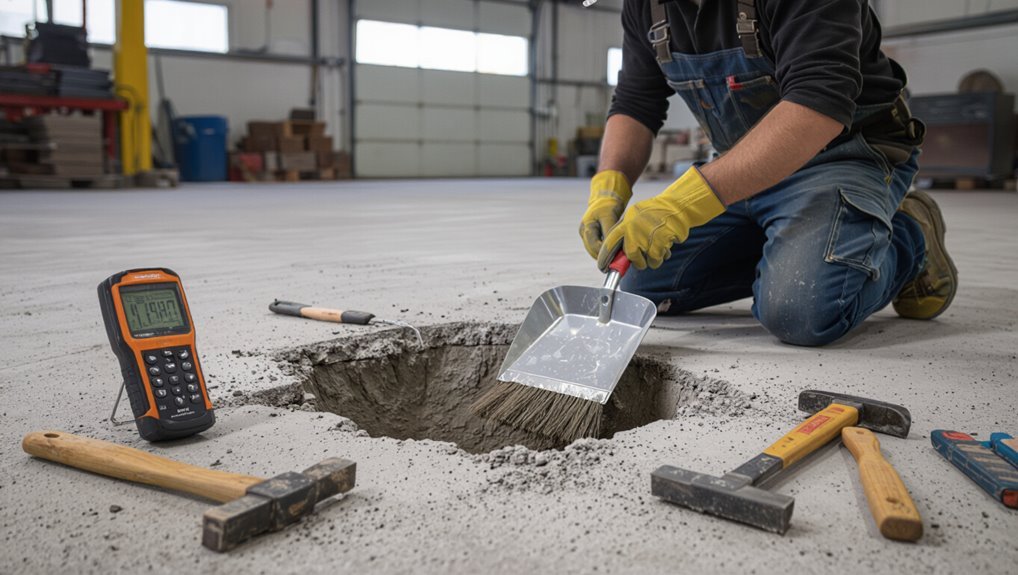
Start by clearing the work area so you can see and access every edge of the hole; remove loose concrete, dust, oil, and debris with a stiff brush, grinder, and shop vacuum to guarantee the repair bonds properly.
Then chip undermined edges, blow out dust, and wipe with solvent.
Test moisture with a plastic sheet or meter; allow drying or use a moisture barrier before patching.
Step-by-Step Repair Methods
Now we’ll walk through four practical repair methods so you can pick the right approach for each hole size and condition.
You’ll start with patch compounds for small surface pits, move to repair mortars for medium depressions, and use injection or underpinning for deep or structural voids.
If the damage is widespread, you’ll learn when overlays or self‑leveling compounds are the better choice.
Method 1 Small Surface Holes and Pitting (Concrete Patch or Cementitious Filler)
Start by cleaning the hole and undercutting the edges so the patch will bond solidly.
You’ll then brush on a bonding agent, mix the cementitious patch per the maker’s directions, and trowel it into the void.
Finish by leveling and smoothing the surface, then keep it moist while it cures for the recommended time.
Step 1: Clean and Undercut Edges
Clear away loose debris and undercut the hole’s edges so the patch will bond securely.
Use a wire brush and chisel or rotary tool to remove dust, laitance, and weak concrete to at least 1/2 inch beneath the surface.
Blow or vacuum debris, then dampen the area—don’t soak it.
Make sure edges are clean, sound, and slightly tapered for maximum adhesion.
Step 2: Apply Bonding Agent
Brush a bonding agent onto the cleaned, dampened edges and floor to guarantee the patch adheres firmly; follow the manufacturer’s instructions for mixing and application.
Apply a thin, even coat with a stiff brush or roller, and allow it to become tacky (not fully dry) before placing the cementitious filler.
You’ll avoid pooling, work in small sections, and rewet porous surfaces if the agent soaks in too quickly.
Step 3: Mix and Apply Patch Compound
Mix the patch compound to the consistency recommended on the product label—usually a thick, peanut-butter–like paste for shallow pits—and work in only as much as you can apply within the material’s working time.
Use a trowel or putty knife to press material firmly into holes, overfilling slightly. Remove excess around edges, keeping patched areas compact and free of air pockets before initial set.
Step 4: Leveling, Finishing, and Curing
Once the patch is applied, level and finish it while the material’s still workable so you get a smooth, flush surface; use a flat trowel or a damp sponge to strike off excess and feather the edges to blend with the surrounding concrete.
Keep the surface slightly overfilled, then smooth.
Cover with plastic or damp burlap, cure per product directions, avoid traffic until fully set.
Method 2 Medium Holes and Depressions (Concrete Repair Mortar or Polymer-Modified Mix)
For medium holes and shallow depressions you’ll first clean the area, set any needed formwork, and make sure the substrate is sound.
Mix the repair mortar or polymer-modified mix to the manufacturer’s ratios and add any recommended admixtures for bonding and workability.
Trowel and screed the material level with the floor, then texture the surface to match the surrounding concrete before it cures.
Step 1: Prepare Substrate and Formwork if Needed
Clear the area and inspect the hole to determine how much surface preparation and formwork you’ll need before applying repair mortar.
Remove loose debris, dust, grease, and old paint; chase undercut edges to sound concrete.
Dampen (not soak) the substrate.
Install simple wooden or foam forms for deep or sloping repairs to hold shape and support the mortar until it cures.
Step 2: Mixing Ratios and Additives
1. You’ll mix repair mortar per manufacturer ratios—usually one part powder to about 0.18–0.25 parts water by weight—or use polymer-modified mixes requiring less water and a liquid polymer additive.
Additives improve bond, flexibility, and working time; follow label dosages. Measure precisely, mix to a trowelable, lump-free consistency, and avoid overwatering, which weakens the repair.
Step 3: Trowel Application and Screeding
Once your mix reaches a smooth, trowelable consistency per the manufacturer’s ratios, you’ll move to apply and screed the repair.
Press mix firmly into the hole, eliminating voids and layering as needed for depth. Strike off excess with a straightedge or screed board, keeping the surface slightly proud.
Allow initial set, then clean edges before proceeding to final texture.
Step 4: Finishing Textures to Match Existing Floor
After the patch has set enough to hold a texture but is still slightly damp, you’ll match the surrounding finish by tooling and texturing the repair to blend seamlessly with the existing floor.
Use the same trowel strokes, broom finish, or stipple pattern as adjacent concrete. Feather edges, remove ridges, and lightly rework high spots.
Cure per product instructions to preserve texture.
Method 3 Deep Holes, Voids, or Structural Voids (Epoxy/Polyurethane Injection and Underpinning)
For deep holes or structural voids, you’ll start by drilling injection ports and sealing the surface around the repair to control the flow.
Then you’ll inject epoxy or polyurethane while watching for complete fill and any signs of migration.
Finish by removing the ports and grinding the patch flush with the floor.
Step 1: Drill Injection Ports and Seal Surface
Begin by drilling a series of injection ports into the concrete around the void, placing them at staggered intervals and depths so resin can reach all voided areas.
Clean dust from ports and surrounding surface, then apply a flexible surface seal over the repair area, leaving port tops exposed.
Use epoxy-rated caulk for airtight seals and let it cure before proceeding.
Step 2: Inject Material and Monitor Fill
Start injecting the chosen epoxy or polyurethane through the lowest ports while watching pressure gauges and observing resin return at adjacent ports so you can confirm the void is filling evenly.
Increase flow gradually, pausing if pressures spike. Track fill progression, log volumes and times, and adjust injection points as needed.
Stop when resin exits upper ports or pressure stabilizes, ensuring complete void saturation before curing.
Step 3: Remove Ports and Grind Smooth
Once the injected resin has cured, pull the injection ports and scrape away any excess material so the surface is flush with the surrounding concrete.
Then grind the patched area with a diamond cup wheel or grinder, feathering edges to blend.
Vacuum dust, inspect for low spots, and repeat light grinding or apply a skim coat if needed.
Finish by sealing the repair.
Method 4 Resurfacing Entire Slab (Overlays and Self-Leveling Compounds)
If your slab has widespread surface damage or unevenness, you’ll choose resurfacing with an overlay or self-leveling compound.
Start by priming the slab and preparing edges so the material bonds properly.
Then mix and pour the self-leveling compound to fill low spots.
Finish by smoothing, allow proper curing time, and seal the surface for long-term protection.
Step 1: When to Choose Resurfacing
While minor cracks and pits are often fixed with patching compounds, you should choose full-slab resurfacing when damage is widespread, the floor has uneven areas that affect usability, or cosmetic wear makes the surface look tired.
Choose resurfacing if multiple repairs won’t restore flatness, joints are failing, or you want a uniform finish and improved durability across the entire slab.
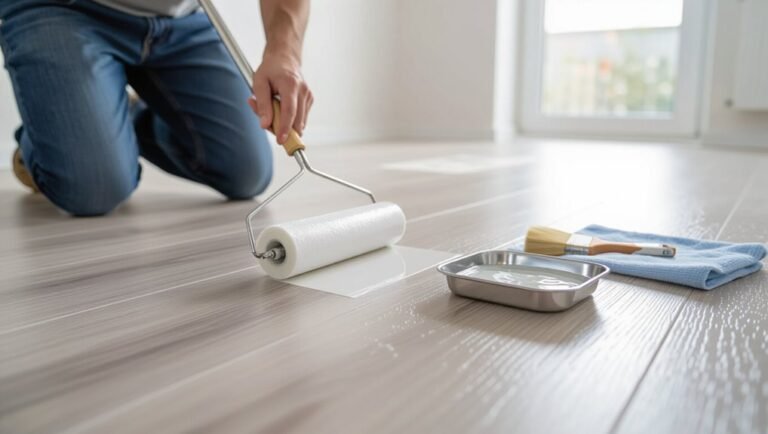
Step 2: Priming and Edge Preparation
Before you pour any overlay or self-leveling compound, prime the slab and trim back edges so the new material bonds consistently and flows smoothly.
Clean thoroughly, remove dust, oil, loose particles, and efflorescence.
Apply manufacturer-recommended primer with a roller, working into pores.
Chamfer or tape vertical joints and install edge controls to prevent bleed and guarantee uniform thickness at walls and changes.
Step 3: Pouring Self-Leveling Compound
Now that the slab is primed and edges are prepped, you’re ready to pour the self-leveling compound.
Mix per manufacturer directions to a lump-free, pourable consistency. Pour from one side, guiding flow into low spots with a gauge rake or trowel.
Work steadily; the material levels itself. Avoid overworking and keep traffic off until it sets to the tack-free stage.
Step 4: Finishing, Curing, and Sealing
1. You’ll finish the overlay by troweling or smoothing the surface, removing trowel marks, and ensuring consistent texture.
Let the compound set per manufacturer instructions, keeping traffic off and humidity controlled.
After full cure, sand any high spots, clean thoroughly, then apply a breathable concrete sealer or epoxy as recommended.
Allow proper dry times before normal use for durable, even protection.
Choosing the Right Product Comparison and Selection Guide
Now you’ll compare cement-based patch, epoxy, polyurethane, and self-leveling compounds to match the hole and conditions.
Consider depth, expected load, moisture, interior vs. exterior use, and traffic when choosing a product.
I’ll also cover brand differences and cost tips so you can pick the best option for your repair.
Cement-Based Patch vs. Epoxy vs. Polyurethane vs. Self-Leveling Compound
Choosing the right product for filling holes in a concrete floor depends on the size of the damage, the floor’s purpose, and whether you need a structural repair, a smooth finish, or a chemical-resistant surface. You’ll pick cement for strength, epoxy for chemical resistance, polyurethane for flexibility, or self-leveling for a smooth topcoat.
| Type | Strength | Finish |
|---|---|---|
| Cement-based | High | Rough |
| Epoxy | High | Gloss |
| Polyurethane | Medium | Flexible |
| Self-leveling | Low | Smooth |
Criteria: Depth, Load, Moisture, Interior vs. Exterior, Traffic
After you’ve weighed product types—cement for strength, epoxy for chemical resistance, polyurethane for flexibility, or self-leveling for a smooth coat—you’ll pick the right material by matching specific site conditions to each product’s properties.
Consider depth, expected load, moisture levels, interior vs. exterior exposure, and traffic patterns.
- Deep pothole under heavy forklift use
- Damp garage corner with salt exposure
- Sun‑baked exterior patio
- Light foot‑traffic basement crack
- Busy warehouse aisle with oil spills
Brand and Cost Comparison Tips
When you compare brands and costs for concrete repair products, focus on performance-per-dollar rather than just the sticker price; look at coverage, cure time, warranty, and real-world reviews to see which formulation actually fits your site’s demands.
Check material type (patch, epoxy, polymer-modified), match it to depth and traffic, calculate per-square-foot cost, and prioritize proven durability over bargains that save upfront but fail sooner.
Common Mistakes and How to Avoid Them
When you tackle patching, common slip-ups usually happen in prep, application, or curing, and they’ll cost you time and strength if you ignore them.
Don’t skimp on cleaning or try to work with a damp substrate, mix or apply materials incorrectly, or expose fresh patches to bad temperatures or premature traffic.
If a patch fails, stop, remove the bad material, correct the surface and mix, and reapply following proper bonding and curing steps.
Mistakes During Prep (inadequate cleaning, damp substrate)
Prep mistakes—like leaving dust, grease, or loose debris in a hole, or working on a damp substrate—will doom a repair before it starts.
You must remove all contaminants, chip out weak edges, and dry the area thoroughly. Use a stiff brush, vacuum, and degreaser if needed.
Test for moisture and wait until the slab’s surface is bone dry before you mix or apply patching material.
Application Errors (wrong mix, overworking, poor bonding)
If you mix patching compounds too dry or too wet, overwork the paste, or skip proper bonding steps, the repair will crack, shrink, or pull away.
Use manufacturer proportions, mix just enough, and stop when the texture is smooth and cohesive.
Press material firmly into the hole, remove air pockets, and feather edges.
Follow bonding primer instructions to guarantee a lasting, integrated patch.
Curing and Environmental Mistakes (temperature, premature traffic)
Once you’ve mixed and bonded the patch correctly, curing and site conditions will determine whether the repair holds up.
Don’t let extreme temperatures or drafts dry the patch too fast; use blankets, plastic sheeting, or curing compound to retain moisture and warmth.
Keep foot and vehicle traffic off the area for the recommended cure time.
Monitor humidity and avoid sudden temperature swings.
How to Fix Failed Patches
Spot the problem quickly and act decisively: failed patches usually show cracking, crumbling edges, or loose material, and addressing them now prevents larger repairs later.
Remove loose debris, chip out unsound concrete to solid edges, then clean and dampen. Reapply a compatible patch mix, compact firmly, and finish to match surrounding grade.
Cure properly and avoid premature traffic to prevent repeat failure.
Best Practices and Preventive Maintenance
You should follow a regular inspection checklist to catch small cracks, spalls, and failing joints before they become holes.
Seal surfaces, maintain joints, and manage loads to reduce water intrusion and stress that cause damage.
If damage is extensive or you’re unsure about structural concerns, call a professional.
Regular Inspection Checklist
A simple, consistent inspection routine will help you catch small cracks, spalling, and moisture issues before they turn into bigger problems; check the floor monthly in garages and workshops and quarterly in less-used areas.
You’ll note damage, measure hole sizes, and plan repairs.
Visual cues to observe:
- hairline cracks radiating from holes
- surface flaking and spalling patches
- dark damp spots near walls
- rust stains from rebar exposure
- uneven settled areas
Sealing, Joint Maintenance, and Load Management
While sealing and joint upkeep won’t make existing structural damage disappear, they’ll stop water and debris from worsening holes and cracks and keep loads from stressing weakened areas.
You should seal joints, replace failed sealant, and monitor load patterns regularly to extend the floor’s life.
Use flexible polyurethane or silicone seals, clean joints first, inspect annually, patch deterioration promptly, and redistribute concentrated loads to prevent recurrence.
When to Call a Professional
If repair needs go beyond simple patching or you spot signs of structural distress—like widening cracks, spalling that exposes rebar, uneven settlement, or recurring water intrusion—call a professional so they can assess causes and recommend durable fixes.
You should also seek help for large or deep holes, active leaks, load-bearing failures, or if DIY attempts fail; a pro guarantees safety, proper diagnosis, and long-term repairs.
Tools and Materials Quick Reference (What to Buy and Why)
You’ll want a compact kit of essential tools—trowel, putty knife, wire brush, mixing bucket, and a grinder or chisel for cleaning—that each serve a clear purpose in prepping and finishing the patch.
Choose materials rated for floor repair: polymer-modified patching compound for small holes and a fast-setting cement mix for deeper repairs, and follow manufacturer mix ratios precisely.
Keep tool quality and exact mix proportions in mind because they determine bond strength and durability.
Essential Tools with Purpose
Tools make the job predictable and faster, so gather the right ones before you start.
You’ll want durable, ergonomic tools that save time and give clean results. Pick items suited to hole size and access; you’ll use them repeatedly for prepping, mixing, placing, and finishing.
- Stiff-bristle broom
- Wire brush
- Chisel and hammer
- Margin trowel
- Concrete float
Recommended Material Specifications and Mix Ratios
Because the right mix and materials determine strength and durability, pick products that match the hole size and traffic level. Use fast-setting patch for small holes, polymer-modified for medium, and concrete mix for deep repairs. Follow manufacturer water ratios; avoid overwatering. Seal with epoxy for high traffic.
| Material | Use |
|---|---|
| Fast-set patch | Small holes |
| Polymer-modified | Medium |
| Concrete mix | Deep |
| Epoxy sealer | High traffic |
Troubleshooting Guide Problems During and After Repair
If your patch cracks, falls out, or shows signs of bond failure, you’ll want to stop and assess the cause before reworking it.
Check for improper mixing, inadequate substrate prep, or moisture issues that can cause delamination or an uneven surface after curing.
I’ll walk you through targeted solutions and remedial steps to fix each problem and prevent it from happening again.
Patch Cracking or Falling Out
When patch material cracks or falls out after you repair a concrete floor, it’s usually due to poor adhesion, inadequate substrate prep, or using the wrong mix for the job.
Clean and roughen the hole, remove dust and loose debris, and use a bonding agent if recommended.
Match repair mix to depth and load, cure per instructions, and avoid heavy traffic until fully set.
Uneven Surface After Curing
Even with good adhesion and proper mix, the finished surface can still come out uneven after curing.
You’ll notice high or low spots from shrinkage, settling, or improper screeding. Lightly grind high areas and feather-edge low spots with a thin recoat of patch or self-leveling compound.
Check moisture and cure times before heavy traffic to avoid future irregularities.
Bond Failure or Delamination
While you’re repairing a concrete floor, bond failure or delamination can show up as lifting, cracking, or peeling of the patch from the substrate, and it usually means the new material never properly adhered.
You’ll notice hollow sounds, edge separation, or exposed aggregate. Causes often include contaminated surfaces, excessive moisture, improper mixing, or inadequate priming.
Inspect areas promptly to assess extent and prevent further damage.
Solutions and Remedial Steps
If your patch shows lifting, cracking, or hollow sounds after repair, act quickly to diagnose the cause and choose the right fix so the problem doesn’t worsen.
Probe loose areas, remove failed material, and clean substrate thoroughly.
Reapply a compatible bonding agent and patch mix, compacting and curing per manufacturer instructions.
For recurring issues, consult a structural or concrete specialist to assess moisture or load problems.
FAQ
You’ll find quick answers here to common worries like cure times for foot and vehicle traffic and whether quick‑set mixes work for deep holes.
I’ll also cover whether patches can change floor height or create trip hazards, how to match color and texture, and whether epoxy injections are a permanent fix for structural voids.
If you need more detail on any point, ask and I’ll expand.
How long does a concrete floor patch take to cure before foot or vehicle traffic?
How long before you can walk or drive on a patched concrete floor depends on the patch material and thickness: most quick-setting repair mixes let you safely walk on the surface in 1–4 hours and handle light vehicle traffic in 24–48 hours.
In contrast, standard cement-based patches need 24–72 hours for foot traffic and up to 7 days (or longer for heavy loads) before vehicle use.
After curing, test firmness and avoid heavy loads until fully cured.
Can I use quick-set concrete for deep holes?
Can you use quick-set concrete for deep holes? You can for moderate depths, but don’t pour it full depth in one go.
For holes deeper than a few inches, fill in layers or use aggregate backfill first, compacting each lift.
Follow manufacturer guidelines for maximum thickness per pour and curing.
For very deep repairs, consider a structural mix or professional advice.
Will patching change the floor height or create trip hazards?
If you level the patch flush with the surrounding slab and follow proper finishing and curing, it shouldn’t create a trip hazard; however, imperfect topping, overbuild, or settling can leave the repair high or low and produce a noticeable edge.
Use a straightedge to check level, feather edges, and compact base before pouring.
Shim, grind, or reprofile any raised or sunken spots promptly to eliminate hazards.
How do I match the color and texture of the existing concrete?
Want the patch to blend in? Match color by testing small mixes with powdered pigments or cement stain until you get a close tone; cure samples beside the floor to see final shade.
Match texture by adjusting aggregate size, trowel technique, and surface finishing (broom, float, or steel trowel).
Feather edges and lightly blend with surrounding concrete for a seamless look.
Are epoxy injections permanent for structural voids?
How permanent are epoxy injections for structural voids?
Epoxy injections provide a long-lasting repair by bonding and filling cracks, restoring strength and preventing further deterioration. They resist moisture and chemical attack, but permanence depends on correct surface prep, proper epoxy selection, and addressing underlying causes like settlement or corrosion.
You’ll get durable results if you follow best practices and monitor conditions.