How to Redo Concrete Floors on a Budget and Get Professional Results
You can get professional-looking concrete floors on a budget by focusing on prep, picking cost-effective products, and doing selective hires. Start by inspecting for cracks, moisture, and contamination, then clean, repair, and profile the slab. Use affordable overlays, stains, or acrylic/epoxy coatings and rent grinders or sprayers to save money. Prioritize prep over pricey materials and allow proper curing. Keep basic maintenance up to extend life, and keep going to learn step-by-step tips and options.
Quick Answer Can You Redo Concrete Floors on a Budget and Get Professional Results?
Yes—you can redo concrete floors on a budget and still get professional-looking results if you pick the right prep, materials, and techniques.
Expect to spend anywhere from a few hundred to a couple thousand dollars and from a weekend to a few days of work depending on surface condition and finish choice.
With careful planning and focus on key steps like patching, grinding, and sealing, you’ll save money without sacrificing quality.
One-paragraph direct answer with cost/time summary
While you can get professional-looking results on a budget by focusing on prep and choosing cost-effective finishes, expect to spend roughly $2–$6 per sq ft for DIY epoxy or stain and $3–$12 per sq ft for contractor-applied options, with total projects taking a weekend for DIYs and 1–3 days for pros (plus curing time).
- Prep thoroughly
- Choose stain or epoxy
- Rent equipment
- Hire help selectively
You’ll learn how to redo concrete floors efficiently and affordably.
Basic Understanding What Redoing Concrete Floors Means
Redoing your concrete floor can mean anything from simple repairs and sealing to resurfacing, polishing, or applying epoxy or overlays.
You’ll decide whether a DIY approach fits based on scope, cost, and skill—minor patching and sealers are DIY-friendly, while grinding, shot blasting, or large overlays often need a pro.
Learn a few terms like grinding, shot blasting, microtopping, epoxy, and sealers so you can compare quotes and plan the right budget.
Types of concrete floor updates (repair, resurfacing, polishing, coatings, overlays)
There are five common ways to update a concrete floor—repair, resurfacing, polishing, coatings, and overlays—and each approach fixes different problems and fits different budgets.
You’ll patch cracks and spalls with repairs, smooth imperfections via resurfacing, reveal shine through polishing, add protection and color with coatings, or change texture and thickness with overlays.
Choose based on condition, use, and cost.
When to choose DIY vs. hiring a pro
Wondering whether you should tackle your concrete floor project yourself or hire a pro?
Consider scope, skill, tools, and time: small repairs, simple coatings, or cosmetic resurfacing can be DIY if you’re handy.
Hire a pro for structural issues, large areas, complex finishes, or when equipment and experience matter.
Factor budget, risk tolerance, and desired finish quality before deciding.
Common terms homeowners should know (grinding, shot blasting, microtopping, epoxy, sealers)
If you decide to DIY or hire a pro, you’ll want to understand a handful of common terms so conversations and estimates make sense.
Grinding smooths and levels concrete; shot blasting cleans and profiles surfaces for coatings; microtopping is a thin corrective layer for texture/appearance; epoxy is a durable coating; sealers protect, enhance color, and reduce staining.
Ask pros for specifics and costs.
How to Evaluate Your Current Floor (Assessment Checklist)
Start by walking the floor and looking for cracks, delamination, spalling, moisture stains, uneven slope, and any contamination.
You can run simple moisture checks (plastic sheet test) and basic flatness checks (straightedge and string) yourself to spot issues.
If you find major structural cracks, persistent moisture problems, or significant settlement, call a contractor or structural engineer.
Inspecting for cracks, delamination, spalling, moisture, slope, and contamination
Before you tear up or resurface anything, walk the whole floor and note cracks, delamination, spalling, moisture, slope, and contamination—each problem changes what repairs and materials you’ll need.
Mark locations, measure crack width and length, check for loose or flaking concrete, obvious staining or oil, and visible pooling or uneven sections.
These observations guide repair methods, prioritization, and cost estimates.
Simple moisture and flatness tests you can do yourself
You’ve already mapped cracks, spalling, and contamination—now check moisture and flatness, since they directly affect repair choice and coating performance.
Do quick DIY checks to decide prep.
- Tape a 2×2 ft plastic sheet, wait 24–48 hours for condensation.
- Use a simple moisture meter across zones.
- Lay a straightedge and measure gaps for flatness.
- Mark high/low spots for grinding or leveling.
When structural issues require a contractor or engineer
If cracks are wide, slabs are moving, or deflection and drainage problems show up, it’s time to call in a pro—either a qualified contractor experienced with structural concrete or a licensed structural engineer.
You should document damage, note load changes, and stop DIY repairs.
Ask for written assessments, scope, repair options, timelines, permits, and warranties so you can compare bids and avoid costly mistakes.
Budget-Friendly Options Compared (Cost, Durability, Appearance)
Now that you’ve assessed the floor, let’s compare budget-friendly fixes so you can pick the best fit for cost, durability, and look.
You’ll weigh basic repairs and patching, resurfacing or microtoppings, epoxy and polyaspartic coatings, polishing with densifiers, and concrete stains or dyes.
I’ll point out typical price ranges, lifespan expectations, and appearance outcomes for each.
Basic repairs and patching
When patching small cracks or leveling low spots, choosing the right budget-friendly option can save you time and money while keeping the floor functional and presentable.
Use vinyl concrete patch for hairline cracks, polymer-modified cement for deeper repairs, and epoxy fillers for high-traffic areas.
Match cure times and grind smooth for appearance.
Prioritize adhesion and moisture compatibility to guarantee lasting results.
Resurfacing and microtoppings
Resurfacing and microtoppings give you a fast, low-cost way to refresh worn concrete without tearing it out; you’ll choose between thin polymer overlays, cement-based microtoppings, or acrylic-modified mixes based on budget and desired look.
Polymer overlays cost less, resist staining, and suit light traffic. Cement microtoppings are durable and textured. Acrylic mixes balance cost and color options for a clean, updated finish.
Epoxy and polyaspartic coatings
If you want a hard, low-maintenance finish that still fits a tight budget, epoxy and polyaspartic coatings are two of the best choices—each trades off cost, cure time, and appearance in different ways.
Epoxy is cheaper, durable, and needs longer cure; polyaspartic costs more, cures fast, resists UV/yellowing, and offers glossier looks.
Pick based on timeline and budget.
Polishing and densifying
Consider polishing and densifying if you want a hard, long-lasting finish that keeps costs low: grinding the surface, progressively polishing the concrete, and applying a densifier produces a glossy, low-maintenance floor without adding a thick coating.
You’ll spend less than many coatings, get exceptional durability, and enjoy a clean, reflective look.
Maintenance is simple—sweeping and occasional neutral cleaner keep shine and protection intact.
Concrete stain and dye
When you want color without a thick surface coating, stains and dyes offer budget-friendly options that change concrete’s look by penetrating the slab rather than sitting on top. You’ll choose acid stain for variegated, durable tones; water-based dye for bright, affordable color; or translucent pigment for subtle depth. Compare cost, longevity, and maintenance to match your budget and use.
| Type | Cost | Durability |
|---|---|---|
| Acid stain | Medium | High |
| Water dye | Low | Medium |
| Translucent pigment | Low–Medium | Medium |
Step-by-Step Guide to Redoing Concrete Floors on a Budget
You’re about to walk through a clear, budget-minded sequence: prepare the space, fix cracks and spalls, and create the right surface profile with grinding, etching, or shot blasting.
Then you’ll pick an affordable thin overlay or coating that fits your needs and learn the application methods—rolling, troweling, or broadcast—to get a professional finish.
Follow each step in order and you’ll save money while getting durable, attractive results.
Step 1 Preparation: clearing, cleaning, and safety
Before you start any repairs or coatings, clear the room completely and give the slab a thorough cleaning so you can spot damage and work safely.
Remove debris, dust, and oils; ventilate well; and set boundaries. Follow PPE and basic precautions.
- Sweep and vacuum
- Degrease stains
- Open windows, use fans
- Wear gloves, mask, eye protection
Step 2 Repairing cracks, spalls, and surface defects
Now that the slab is clean and clear, inspect it closely for cracks, spalls, and surface defects so you can prioritize repairs.
Mark defects, widen hairline cracks with a V-groove for better adhesion, remove loose concrete, and clean dust.
Use epoxy or polymer-modified patch for structural cracks and a thin skim coat for minor pitting.
Follow cure times before proceeding.
Step 3 Surface profile: grinding vs. acid etching vs. shot blasting
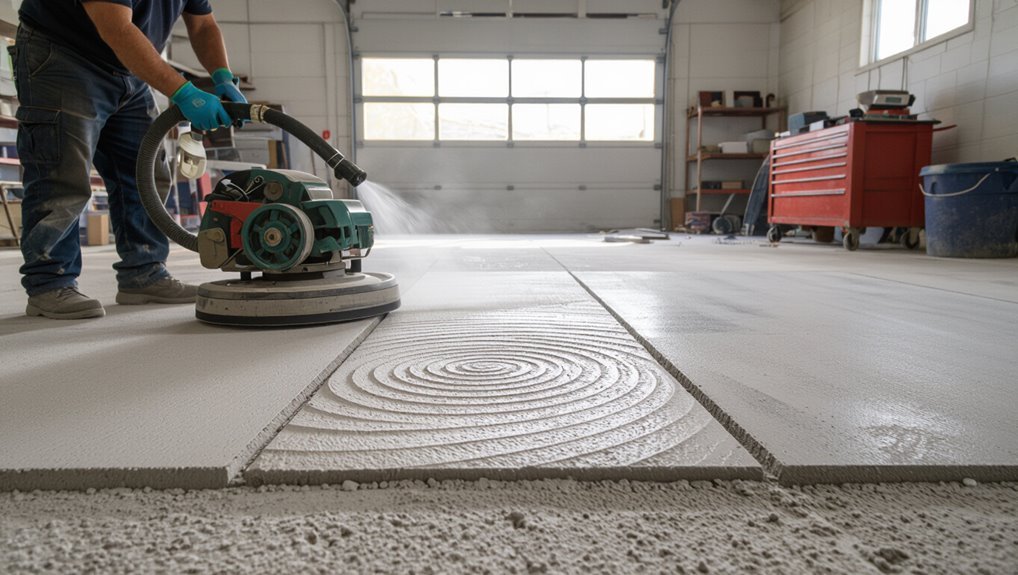
Anyone tackling a concrete redo needs the right surface profile to guarantee coatings or overlays bond properly; you can create that profile three ways—grinding, acid etching, or shot blasting—each with different costs, dust levels, equipment needs, and results.
Grinding gives consistent profile and control but produces dust.
Acid etching is cheap but uneven and not for deep profiles.
Shot blasting is fast, clean, and ideal for commercial jobs.
Step 4 Choosing the right thin overlay or coating for low cost
Picking the right thin overlay or coating boils down to matching performance needs and budget: you’ll balance durability, appearance, prep effort, and material cost to get the best value.
Choose acrylic or water-based epoxy for low cost and easy upkeep; consider cementitious overlays for thin, repair-friendly resurfacing.
Prioritize UV resistance for sunlit areas and slip resistance for safety.
Step 5 Application techniques for a professional finish (roll, trowel, broadcast)
Start by choosing the right application method for your chosen product—rolling, troweling, or broadcasting—because technique determines durability, appearance, and how much prep you’ll need.
Roll thin coatings with a nap roller for even coverage, trowel overlays smoothly to eliminate ridges, and broadcast flakes or sand into wet resin for texture.
Work in sections, maintain wet edges, and inspect for consistency.
Step 6 Curing, sealing, and topcoats
6. After the surface’s set time, cure properly: keep it moist or use a curing compound per product instructions to prevent cracking.
Once cured, clean thoroughly and choose a sealer or epoxy suitable for traffic and budget.
Apply thin, even coats, allowing full dry times between layers.
Finish with a protective topcoat for durability and easy cleaning.
Step 7 Finishing touches: trims, transitions, and maintenance setup
Once your sealer or epoxy has fully cured and the surface is clean, focus on the finishing touches that make the floor look complete and work well in the house.
Install trims and linking strips at thresholds, secure baseboards, and seal gaps.
Add felt pads to furniture, set a simple maintenance schedule, and keep supplies handy for spot repairs to preserve the finish.
Tools, Materials, and Estimated Costs for DIY vs Pro
You’ll need a few essential tools—like a grinder, trowels, mixers, and a moisture meter—to get started and keep quality consistent.
Compare consumables and material options (sealants, overlays, epoxy) by price ranges so you can choose budget-friendly or premium routes.
Decide whether to rent big equipment or buy it based on frequency of use and total project cost to avoid overspending.
Essential tools for DIY (grinder, trowels, mixers, moisture meter)
Before you start, gather the essential tools—a concrete grinder (or rental), a set of finishing trowels, a mixing drill or mortar mixer, and a reliable moisture meter—so you can tackle prep, patching, and finishing without costly delays.
Add durable knee pads, a hawk, mixing buckets, and quality abrasives. Know when to rent the grinder; it’s often cheaper than buying for one job.
Consumables and material options with price ranges
Now that you’ve got the basic tools lined up, let’s look at the consumables and material choices that will drive your budget.
For DIY expect bags of patching compound ($10–$40), epoxy primer ($30–$80/gal), sealers or topcoats ($20–$100), diamond pads ($15–$60 each), and masking supplies ($10–$30).
Pros may use higher-grade resins and labor but materials often cost similarly.
When to rent vs buy equipment
One clear rule of thumb: rent heavy, buy small. You’ll save money and avoid storage headaches.
Rent grinders, floor polishers, and walk-behind saws for big jobs; buy hand tools and small power tools you’ll reuse.
- Rent: planetary grinder, scarifier
- Buy: angle grinder, trowels
Rent for one-off jobs.
Buy for frequent use.
Timeframe and Project Planning
Plan your schedule around typical timelines—garage and basement pours can often wrap in a weekend while interior floors usually need several days for prep and curing.
You’ll want to stagger work and pick products with shorter cure times to cut downtime.
Coordinate deliveries, weather-sensitive steps, and any room re-entry windows so you won’t be stuck waiting.
Typical timelines for garage, basement, and interior floors
Timelines for redoing concrete floors vary by space and prep work, but you can generally expect a garage to take a weekend, a basement several days to a week, and interior rooms up to two weeks when you include curing and finishing.
Plan tasks: demo and repair, grinding or shot blasting, priming, coating or overlay application, and final cure.
Weather and moisture testing can alter schedules.
Scheduling tips to minimize downtime and waiting for cures
After you’ve mapped out the rough schedule for demo, prep, and curing, focus on sequencing tasks to shrink downtime and keep the project moving.
Stagger crews: while one area cures, prep the next. Use fast-curing products where practical. Schedule deliveries and inspections back-to-back.
Plan tool and material staging to avoid wait time. Build buffer days for weather or unexpected repairs without derailing the whole timeline.
Common Mistakes and How to Avoid Them
Don’t skip moisture testing or ignore signs of hydrostatic pressure, because wet concrete will wreck any finish.
Make sure you prep the surface thoroughly and choose products matched to your traffic and climate to prevent delamination and premature wear.
Take your time with application and curing—rushing or using the wrong technique is how coatings fail.
Skipping moisture testing or ignoring hydrostatic issues
If you skip moisture testing or ignore signs of hydrostatic pressure, you can ruin a new floor finish before it’s even cured.
Test concrete moisture with a reliable meter or calcium chloride kit.
Address rising damp or high vapor drive—seal slabs, add vapor barriers, or fix drainage.
Don’t assume dry; confirm conditions and treat them to protect coatings and adhesives.
Poor surface prep leading to delamination
Moisture problems are just one way a new finish can fail; another common culprit is poor surface prep that lets coatings or overlays peel off.
You must remove contaminants, laitance, paint, and loose concrete, then profile the slab for adhesion. Use proper grinding or shot blasting, vacuum thoroughly, and repair defects.
Skipping steps costs time and money when delamination appears.
Incorrect product selection for traffic and climate
When you choose a product that wasn’t designed for the traffic load or climate it’ll face, premature wear, cracking, or loss of bond will follow.
You should match coatings and sealers to expected foot, vehicle, and chemical exposure and to temperature swings and humidity.
Check manufacturer ratings, pick UV-stable and flexible systems for extremes, and test small areas to confirm durability before committing.
Rushing curing times and improper application technique
Although you’re enthusiastic to finish, rushing curing times or using sloppy application techniques will cost you in durability and appearance.
Don’t skip recommended cure periods; solvents and sealers need time to set. Use proper tools, maintain consistent coverage, and follow temperature and humidity guidelines.
Test a small area, correct flaws immediately, and plan for adequate drying between coats to guarantee a lasting, professional finish.
Best Practices and Pro Tips for Professional Results on a Budget
Start by prioritizing prep over pricey products—cleaning, patching, and profiling the slab will make any finish perform better.
You can save money by doing prep yourself and hiring a pro for critical steps, and pick multi-functional products like densifier-sealers to cut costs and steps.
Set a simple maintenance routine so the finish lasts longer and you avoid early rework.
Prioritizing preparation over fancy products
Because a solid base determines the finish, focus your time and effort on prep work rather than chasing expensive sealers or coatings.
Clean, degrease, repair cracks, and properly profile the surface for adhesion. Sand or grind uneven areas, remove contaminants, and vacuum thoroughly.
Good preparation guarantees thin, inexpensive coatings perform like premium ones and prevents costly failures or premature wear.
Combining DIY prep with selective professional services
If you handle basic prep tasks yourself—cleaning, degreasing, filling hairline cracks—you’ll cut costs while reserving professionals for work that really matters, like major leveling, shot-blasting, or applying industrial-grade coatings.
Coordinate schedules, get written scopes, and request quotes for discrete tasks. You’ll save labor costs, reduce project time, and still rely on pros’ equipment and expertise where precision and safety are critical.
Choosing multi-functional products (e.g., densifier + sealer)
When you pick a combined densifier-plus-sealer product, you cut steps and costs while still improving durability and stain resistance—but you’ll need to match the product’s chemistry and application method to your floor’s condition.
Read labels for silicate vs. polymer bases, test adhesion on a small area, follow prescribed dwell and cure times, and choose breathability levels suited to indoor moisture and traffic.
Maintenance routines that extend the finish life
Though routine care seems small, a consistent maintenance plan is what actually keeps a budget-friendly concrete finish looking professional and lasting years longer.
You should sweep and dust-mop daily, use pH-neutral cleaners weekly, and address spills immediately.
Reapply topical sealer every 2–5 years depending on traffic.
Inspect for wear quarterly, spot-repair scratches, and avoid harsh chemicals or abrasive tools to preserve the finish.
Comparison: DIY vs Hiring a Professional
You can save money by doing simple refinishes yourself, but weigh that against time, skill, and imperfect results.
Professionals cost more up front yet reduce risk, provide warranties, and handle complex fixes you mightn’t confidently tackle.
For structural issues, large areas, or decorative finishes you want done right, hiring a pro is usually the smarter choice.
Cost-benefit overview
If you’re comfortable with tools and have time to spare, tackling a concrete floor redo yourself can cut labor costs dramatically.
However, hiring a pro often saves money in the long run by avoiding mistakes, rework, and subpar materials that shorten the floor’s lifespan.
Weigh material savings and time value against expertise: DIY lowers upfront expenses, while pros deliver speed, superior finish, and proper material selection that reduces future maintenance.
Risk and warranty differences
When you take on a concrete floor redo yourself, you accept most of the risk—ranging from improper surface prep and cracking to moisture issues that void material warranties—while hiring a pro shifts liability to the contractor, who typically carries insurance, provides workmanship guarantees, and stands behind manufacturer warranties through proper installation.
You’ll assume cost of mistakes and limited recourse, whereas a pro offers documented coverage and clearer remedies.
Situations where a pro is strongly recommended
Because some concrete projects demand specialized skills, you should hire a pro for large-area pours, structural repairs, pervasive moisture problems, or decorative finishes that require precision—these situations carry risks that are costly or unsafe to fix on your own, and a trained contractor can diagnose hidden issues, apply the right materials, and back the work with insurance and warranties.
| Situation | DIY Viability | Pro Benefit |
|---|---|---|
| Large pours | Low | Proper batching |
| Structural repair | None | Safety, code |
| Moisture issues | Low | Diagnostics |
| Decorative epoxy | Medium | Flawless finish |
| Warranty needed | None | Coverage |
Project Scenarios and Case Examples
You’ll see practical examples that match common needs: a low-cost garage floor redo with materials, steps, and a tight budget.
You’ll also get a straightforward plan for resurfacing a basement to make it livable.
Finally, you’ll learn affordable approaches to achieve a durable, commercial-looking floor without breaking the bank.
Low-cost garage floor redo (materials, steps, budget)
Start by evaluating the surface and your budget to decide whether a simple clean-and-seal, a DIY epoxy kit, or a peel-and-stick tile approach fits best; each option balances cost, durability, and labor differently, so knowing your priorities up front keeps the project practical and affordable.
For a low-cost garage redo, clean, patch cracks, etch concrete, apply chosen coating or tiles, allow cure time, and budget $100–$600.
Basement concrete resurfacing for living space
When converting a basement into usable living space, pick a resurfacing approach that matches how you’ll use the room—simple micro-topping for a sleek, budget-friendly finish; polymer-modified cement for durability in high-traffic or moisture-prone areas; or thinset tile or luxury vinyl over a leveled substrate when you want warmth and design options.
Assess moisture, level the slab, seal, and match finish to function: cozy family room, home gym, or guest suite.
High-traffic commercial-looking floor on a homeowner budget
If your basement or garage needs a tough, commercial look without the contractor price tag, you can mimic industrial finishes with homeowner-friendly materials and methods.
Choose epoxy or polyaspartic kits, prep thoroughly, and add silica sand for grip.
Stencil or use acid stain for faux patina. Seal with a durable topcoat.
Plan traffic patterns, use mats at entries, and maintain regularly.
FAQ Common Questions About Redoing Concrete Floors
You’ll want clear answers to common questions before you start: how long will resurfacing or epoxy last, and can you coat over existing paint?
You’ll also need to check whether moisture will ruin the new floor, whether staining is cheaper than overlays or coatings, and if the job can be done in winter or cold climates.
Let’s walk through practical, budget-minded answers to each.
How long does a resurfaced or epoxy floor last?
Wondering how long a resurfaced or epoxy floor will last?
With proper prep, quality materials, and routine care, epoxy lasts 10–20 years in garages or light-use areas; commercial-grade systems can last longer under heavy traffic.
Resurfacing overlays typically last 5–15 years depending on thickness and use.
Regular cleaning, avoiding harsh chemicals, and repairing chips promptly will extend the lifespan.
Can I apply a coating over existing paint or coatings?
Can you coat over existing paint or coatings? You can, but only if the old coating is sound, well-adhered, and clean.
Scrape loose areas, sand glossy finishes to profile, and degrease thoroughly.
Perform a tape adhesion test and patch to confirm bonding.
If the existing layer fails adhesion or is incompatible, remove it before applying a new resurfacer or epoxy for lasting results.
How do I know if moisture will ruin my new floor?
If your old coating passed the adhesion test, great — but don’t assume you’re done: moisture under or through the slab can still wreck a new topping or epoxy.
Test with a moisture meter, plastic sheet (72 hours), or calcium chloride kit.
Look for white powder, blistering, or peeling. If elevated, use a vapor barrier primer or address slab sources before coating to avoid failure.
Is concrete staining cheaper than overlays or coatings?
How much you’ll save with staining depends on the size and condition of the slab and the look you want; staining usually costs less than overlays or thick epoxy systems because it only colors the existing concrete rather than adding material, grinding, or hefty surface prep.
You’ll spend less on materials and labor, but staining won’t repair major damage or build up thickness like overlays or some coatings.
Can I redo a concrete floor in winter or cold climates?
Staining might save you money, but weather can change what’s doable—cold and moisture affect both surface prep and product performance.
You can work in winter if you control temperature and humidity: heat the space, use low-temperature formulas, and wait for concrete to dry fully.
Avoid coatings that cure poorly below manufacturer minimums. Plan longer curing times and test a small area first.
Quick Resources and Next Steps
Grab the checklist below to start your project today and keep tasks, materials, and budget organized.
If your job is larger or you want price comparisons, get multiple quotes and ask contractors about timeline, included warranties, cleanup, and any subcontracting.
Keep those answers handy so you can compare apples to apples and decide confidently.
Checklist to start your project today
Ready to get started? Gather safety gear, basic tools, primer/sealer, patch compound, and chosen finish.
Measure area, set a budget, and schedule a weekend or phased timeline.
Clear and clean the space, mark repair spots, and test a small patch.
Keep emergency contacts, product instructions, and disposal plan handy so you’ll finish efficiently and confidently.
When to get multiple quotes and what to ask contractors
Once you’ve got your measurements, budget, and a tested patch, it’s time to decide whether to hire help and, if so, to get multiple quotes to compare scope, cost, and timelines.
Get at least three bids and ask about:
- Detailed scope and materials
- Timeline and start/end dates
- Permits, warranties, and cleanup
- Payment schedule and change orders