How Thick Should a Basement Concrete Floor Be? (Codes and Guidelines)
You should pour a residential basement slab about 3.5–4 inches thick for typical use, increasing to 4–6 inches for garages or workshops and 5–8+ inches where heavy equipment or poor soils demand it. Use 3000–4000 psi concrete, a vapor barrier, and reinforcement (mesh or rebar) as needed. Check local codes and test soil bearing capacity before you build, and keep curing and drainage in mind—scroll on to learn how to size, reinforce, and protect your slab.
Quick Answer Recommended Basement Concrete Floor Thickness
For most residential basements you’ll use a 3.5–4 inch concrete slab.
If you’re finishing a garage, workshop, or plan to park heavy equipment, you’ll increase that to 4–6 inches (or add reinforcement).
For unusually heavy loads or questionable soil conditions, consult a structural engineer before pouring.
Standard thickness for residential basements
Most homeowners install a 3.5- to 4-inch concrete slab for a finished residential basement, which balances strength, cost, and ease of finishing.
For typical use, you’ll pour 3.5–4 inches over a compacted base with a vapor barrier and wire mesh or rebar.
That thickness meets common codes and answers the question how thick basement concrete floor should be for living spaces.
Thickness variations for garages, workshops, and basements with heavy equipment
Because garages, workshops, and spaces that will house heavy equipment see much higher loads, you’ll want a thicker slab than a typical living-space basement—commonly 4 to 6 inches for garages and 5 to 8 inches (or more) where heavy machinery, vehicle lifts, or concentrated loads will sit, often with thicker edge footings and extra reinforcement.
You should also use higher-strength mix, closer joint spacing, and added steel or fiber reinforcement to control deflection and prevent cracking under point loads.
Exceptions and when to consult an engineer
When unusual loads, unstable soils, deep frost lines, or structural changes are involved, you should consult an engineer to determine slab thickness and reinforcement.
They’ll assess loads, soil bearing, drainage, and frost protection.
Get stamped plans for permits, and hire a qualified structural or geotechnical engineer when equipment, vehicles, slope corrections, expansive soils, or any uncertainty could compromise performance or code compliance.
Basic Understanding What Determines Required Thickness
When deciding thickness, you’ll weigh factors like structural loads, soil type and frost depth, concrete psi and reinforcement, and local code requirements.
You’ll also consider how you’ll use the space—habitable rooms need different specs than storage or mechanical areas.
These basics determine whether you can use a thinner slab or need extra depth and reinforcement.
Structural loads and load-bearing considerations
If you want your basement floor to carry heavy equipment, storage, or living-room loads without cracking or settling, you need to match slab thickness and reinforcement to the actual loads and how they’re distributed.
Calculate point, line, and uniformly distributed loads, consider load paths to footings or beams, and size slab, rebar or mesh, and joint spacing accordingly.
Follow code load values and safety factors.
Soil type, frost depth, and ground conditions
Because the ground under your basement dictates how the slab behaves, you’ll need to match thickness and reinforcement to the soil type, frost depth, and other site conditions.
Rocky, sandy, or clay soils settle differently; clay and frost-prone areas demand deeper footings and thicker slabs to resist heave.
Poor drainage or high groundwater may require gravel subbase and drainage to protect slab performance and longevity.
Concrete mix strength (psi) and reinforcement needs
Although soil and loading set the stage, the concrete mix strength (measured in psi) and the type and placement of reinforcement directly determine how thick your basement slab must be to resist cracking and carry loads.
You’ll choose higher psi for heavy loads or thinner slabs, and add rebar, welded wire fabric, or fiber mesh to control shrinkage and distribute stresses, reducing required thickness safely.
Local building codes and permit requirements
When you plan a basement pour, local building codes and permit rules set the minimum slab thickness, required reinforcement, and inspection points you’ll have to follow.
Check your municipality’s structural and plumbing codes, obtain permits before work, and schedule inspections at footing, pre-pour, and final stages.
Permit documents often specify vapor barriers, slab-on-grade details, and load-bearing requirements—follow them to avoid fines and rework.
Use case: habitable space vs storage vs mechanical rooms
How thick should your basement slab be depends mostly on what you’ll use the space for: habitable rooms need a more robust, insulated, and often thicker slab than a simple storage area, while mechanical rooms may require targeted reinforcement or deeper footings under heavy equipment.
For living spaces you’ll add vapor, insulation, and thicker concrete; storage can be thinner; mechanical zones need local strengthening and load-bearing pads.
Codes, Guidelines, and Standards
You’ll want to check the International Residential Code (IRC), International Building Code (IBC), and any local codes to see baseline requirements for basement slab thickness.
Codes typically list minimum thicknesses for uses like unheated storage, habitable space, or heavy loads, and those minima often guide your design.
Also be aware that local amendments or municipal rules can raise those minimums, so confirm requirements with your jurisdiction before you pour.
Overview of international and typical national code references (IRC, IBC, local codes)
Although building codes vary by jurisdiction, the International Residential Code (IRC) and International Building Code (IBC) form the baseline standards most local authorities adopt or adapt for basement slab thickness, reinforcement, and vapor control; you’ll also need to check local amendments and municipal engineering standards that can override or supplement those model codes.
| Code type | Purpose |
|---|---|
| IRC | Residential guidance |
| IBC | Commercial/structural rules |
| Local | Amendments, zoning |
Minimum thicknesses cited by codes for different uses
Codes and standards set clear minimum slab thicknesses based on the planned use—residential garages, habitable basements, light commercial spaces, and heavy industrial floors each have different requirements tied to load, moisture control, and subbase conditions.
You’ll typically see 3½–4 inches for residential slabs on grade, 4–6 inches for garages and light commercial, and 6–8+ inches for heavy industrial or forklift traffic, often with reinforcement.
When local amendments or municipal rules affect thickness
When local jurisdictions adopt amendments or set municipal rules, they can change the minimum slab thickness you must use for basements and other concrete floors.
You should check local building departments and permit requirements early, since amendments may require thicker slabs, additional reinforcement, frost-protected designs, or specific vapor barriers.
Don’t rely solely on national codes; follow municipal specs to avoid failed inspections or costly rework.
How to Determine the Right Thickness Step-by-Step
Start by evaluating how you’ll use the basement and what loads the floor must carry.
Then assess site conditions like soil type, moisture and frost, and select concrete strength plus any reinforcement (wire mesh, rebar, or fiber).
Finally, design the slab components—vapor barrier, base/subbase, insulation—and confirm thickness with structural calculations or a professional review.
Step 1 Assess intended use and load requirements
Before you pick a concrete thickness, decide how you’ll use the basement and what loads the floor must carry; this determines whether you need a thin, economy slab or a heavier, reinforced slab for machinery or frequent vehicle traffic.
Next, list expected loads and usage to size the slab and reinforcement:
- Light loads: storage, living space
- Moderate loads: appliances, occasional vehicles
- Heavy loads: machinery, frequent vehicle traffic
Step 2 Evaluate site conditions (soil, moisture, frost)
2 key site factors you must evaluate are the soil type and moisture behavior, plus local frost conditions, because they directly affect how thick and reinforced your basement slab should be.
Inspect soil bearing, drainage, and frost depth.
Consider vapor barriers and subgrade compaction.
Prioritize mitigation where needed:
- Test soil type
- Measure moisture/frost risk
- Improve drainage/subgrade
Step 3 Choose concrete strength and reinforcement (wire mesh, rebar, fiber)
Once you’ve nailed the site assessment, pick a concrete strength and reinforcement scheme that matches your load demands and local conditions.
You’ll typically use 3000–4000 psi concrete for residential basements, with reinforcement added to control cracking and carry tensile loads.
Decide between options:
- Welded wire mesh for moderate loads
- Rebar for heavy loads and point loads
- Synthetic fibers to reduce plastic shrinkage
Step 4 Design slab-on-grade components (vapor barrier, base/subbase, insulation)
Now that you’ve selected concrete strength and reinforcement, turn your attention to the slab-on-grade build-up that actually supports and protects the slab.
You’ll design vapor barrier placement, compacted base/subbase, and insulation for moisture control and load distribution.
Consider:
- Continuous vapor barrier under slab
- Properly graded, compacted granular base
- Rigid insulation at edge or under slab as required
Step 5 Confirm with structural calculations or professional review
Although you’ve selected materials and detailed the slab build-up, you should verify thickness with structural calculations or a professional review before pouring concrete.
Have an engineer check load assumptions, soil bearing, reinforcement spacing, and slab edge conditions. They’ll confirm minimum thickness, control joint layout, and any special requirements for equipment loads or moisture.
Get written approval to avoid costly corrections.
Typical Thickness Recommendations and Construction Details
When planning your basement slab, you’ll want to follow typical thicknesses: standard slab-on-grade floors are often 3½–4 inches, while thickened-edge slabs tie into footings for perimeter support.
For garages, warehouses, or other heavy-load areas you should bump the slab to 4–6+ inches and add reinforcement like rebar or wire mesh.
Don’t forget frost protection and insulation requirements, which can change slab depth and edge details depending on your climate.
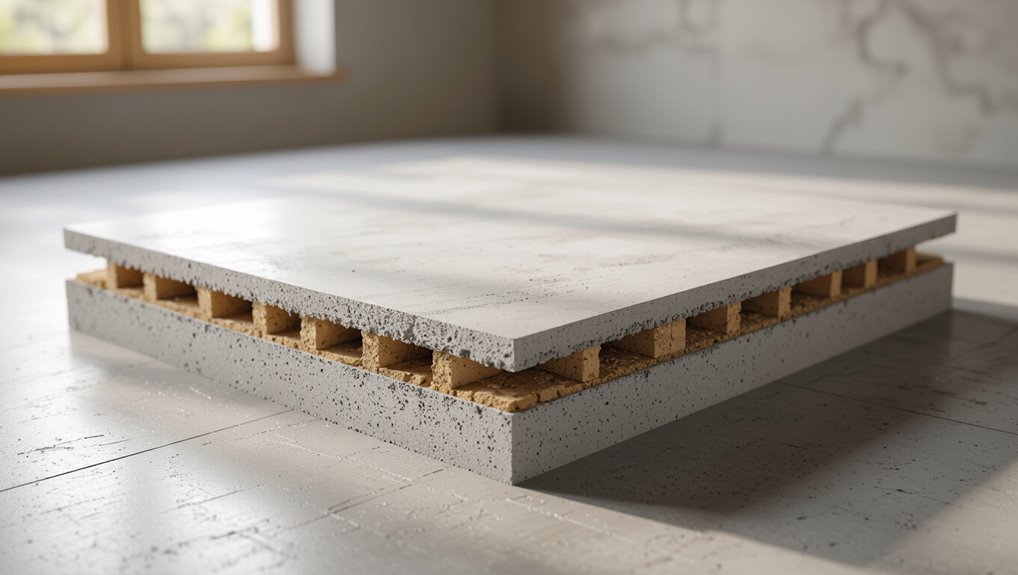
Slab-on-grade for standard residential basements
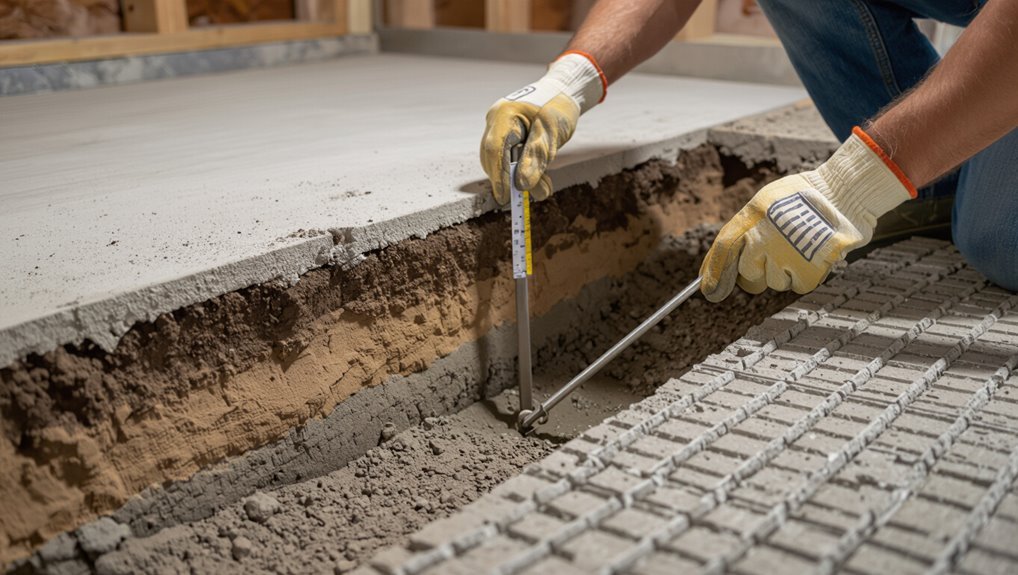
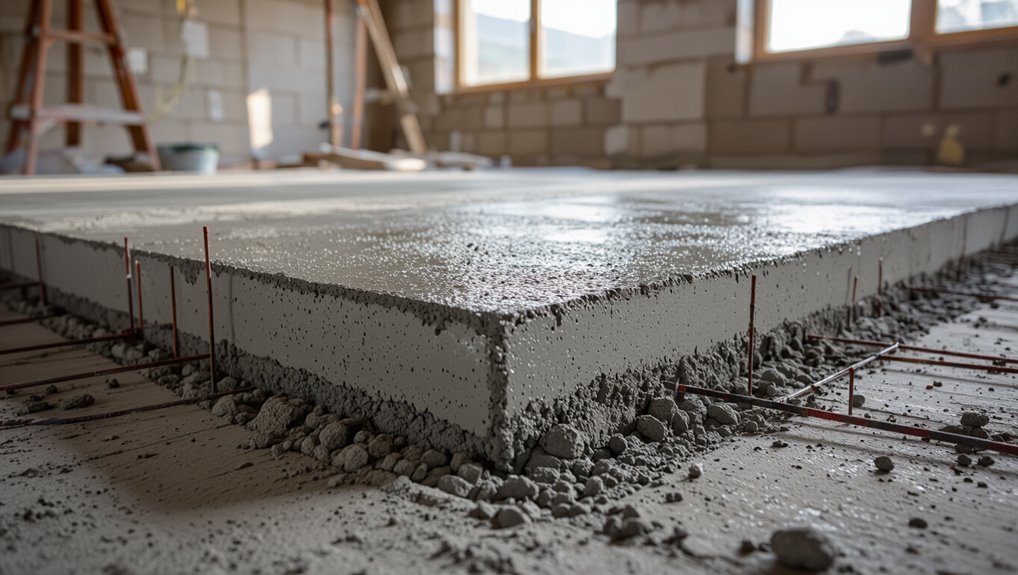
For a typical residential basement slab-on-grade you’re usually looking at a 3.5–4 inch concrete finish over a compacted granular base, with thicker sections—up to 6–8 inches—under heavy loads or at footings and load-bearing walls. You should include vapor barrier, proper reinforcement, and control joints to minimize cracking.
| Item | Purpose |
|---|---|
| Vapor barrier | Moisture control |
| Reinforcement | Crack resistance |
| Base | Support/stability |
| Joints | Crack control |
| Slope | Drainage |
Thickened-edge slab and footing integration details
If your slab-on-grade needs extra edge support where walls, columns, or heavy equipment sit, a thickened-edge slab ties the slab and footing together to carry loads without separate deep footings.
You’ll typically thicken edges to 12–24 inches wide and 6–12 inches deep, with continuous reinforcement doweled into footing rebar.
Compact subgrade, use vapor barrier, and control joints to limit cracking.
Garages, warehouses, and heavy-load areas: recommended 4“6+ inches and reinforcement
Because garages, warehouses, and other heavy‑load areas see concentrated wheel and equipment loads, you’ll normally pour slabs 4–6+ inches thick with added reinforcement to prevent cracking and punching, and to distribute loads into the subgrade.
Use wire mesh or rebar, adequate joint spacing, and a well‑compacted base with vapor barrier.
Increase thickness at load points and follow local load tables.
Frost-protected and insulation requirements affecting slab depth
When cold climates threaten frost heave, you’ll alter slab depth and detail insulation to keep the concrete stable and dry; frost‑protected shallow foundations let you reduce slab thickness by placing rigid insulation vertically or horizontally to shift the frost line.
While uninsulated slabs must be thicker and sit on deeper compacted fill, you’ll follow local codes for insulation R‑values, edge treatment, and drainage to prevent heave.
Reinforcement, Joints, and Surface Treatments
You’ll choose between rebar, welded wire mesh, or fiber reinforcement based on load, slab thickness, and cracking risk.
You’ll set control and expansion joints at recommended spacing to manage movement.
Follow proper finishing and curing practices to achieve the strength and surface you need, then apply a sealer if moisture or wear is a concern.
Next we’ll cover selection criteria, joint layout guidelines, and specific finishing and sealing steps.
When to use rebar vs welded wire mesh vs fiber reinforcement
If your slab will carry heavy loads, be exposed to freeze-thaw cycles, or sit on variable subgrade, you’ll want to choose reinforcement that matches those demands:
Rebar for high-strength, load-bearing applications;
Welded wire mesh for controlling shrinkage and moderate loads;
And synthetic fibers for reducing cracking and improving surface durability in lighter-duty floors.
Use rebar for structural slabs, mesh for slabs on grade, and fibers for floor finishes.
Control joints, expansion joints, and spacing guidelines
Reinforcement helps control internal stresses, but joints are what you use to manage cracking and accommodate slab movement.
You should lay control joints at about 2–3 times slab thickness in feet, saw or form them early, and use expansion joints where slab meets walls or heavy loads.
Maintain joint filler and sealants to preserve movement capacity.
- Spacing
- Type
- Maintenance
Surface finishing, curing, and sealing recommendations
When you finish a basement slab, the surface treatment, curing approach, and sealing steps you choose will determine durability, moisture resistance, and how well reinforcement and joints perform; follow timely finishing, controlled curing, and proper sealant application to protect the slab and preserve joint movement.
Float, trowel, or broom for desired finish, cure with wet coverings or curing compound for seven days, and apply breathable sealers compatible with joints.
Common Mistakes and Problems Related to Slab Thickness
You can cause big problems by skimping on slab thickness—too-thin concrete won’t handle heavy loads and will crack or settle.
Skipping proper site prep, compaction, or a vapor barrier speeds deterioration and invites moisture issues.
Also don’t rush curing, joint layout, or reinforcement placement, because poor execution there compounds failures.
Underestimating loads and using too-thin slabs
If you underplay the loads a basement floor will carry, it’s easy to choose a slab that’s too thin and then watch cracks, sagging, or even structural failure appear over time.
You’ll need to account for point loads, heavy equipment, storage, and future remodeling.
Thin slabs deflect, stress reinforcement, and transfer loads poorly, so size the slab to anticipated loads and follow code minimums.
Poor site preparation and inadequate subbase compaction
Soil matters: poor site preparation and inadequate subbase compaction will doom even a correctly thick slab to cracking, settling, and uneven floors.
You must remove organic material, regrade properly, and compact the subbase in uniform lifts. Skimping here creates voids and differential support that wreck joints and finish.
Use proper compaction equipment and verify density to guarantee long-term stability.
Ignoring moisture/vapor barriers leading to deterioration
Poor subbase work sets the stage for moisture problems, but failing to install a proper vapor barrier will let ground moisture creep up and weaken your slab over time.
You’ll see spalling, efflorescence, mold, and adhesive failures under flooring.
Install a continuous, correctly rated vapor barrier beneath the slab, seal seams, and protect penetrations to preserve strength and avoid costly repairs.
Improper curing, joints, or reinforcement placement
When you skip proper curing, misplace joints, or set reinforcement wrong, the slab won’t perform as planned and you’ll face cracking, reduced strength, and premature failure.
You should cure concretely—keep it moist and protected—position control and expansion joints correctly, and place rebar or mesh at the designed depth.
Otherwise, expect uneven settlement, spalling, and costly repairs that undermine slab longevity.
Prevention, Best Practices, and Cost Considerations
To keep your basement slab durable, follow best practices like proper thickness, adequate reinforcement, controlled joint spacing, and a well-prepared subbase.
Weigh cost trade-offs between pouring a thicker slab, adding rebar or mesh, or improving the subbase—each option shifts expense and long-term risk differently.
If you’re unsure about soil conditions or load demands, invest in engineering or a geotechnical report before you commit.
Best practices for long-lasting basement slabs
Because a durable basement slab starts with careful planning and proper materials, you’ll save on repairs and avoid common failures down the road.
Follow proven practices: proper subgrade prep, correct mix and placement, and moisture control.
Inspect and compact soil, use vapor barrier and drainage, cure concrete properly, and reinforce where needed.
- Prep subbase
- Control moisture
- Cure and reinforce
Cost trade-offs: thicker slab vs reinforcement vs subbase improvements
If you’re balancing budget and performance, the smartest move is to compare the real benefits of a thicker slab against investing in reinforcement or a better subbase. You’ll weigh upfront material and labor versus long-term crack control and load capacity. Choose thicker slabs for heavy loads, reinforcement for tensile strength, and subbase improvements for moisture and settlement control.
| Option | Cost vs Benefit |
|---|---|
| Thicker slab | Higher material, simpler |
| Reinforcement | Moderate cost, tensile gain |
| Improved subbase | Low-medium, prevents settlement |
| Combination | Best longevity, higher upfront |
When to invest in engineering or geotechnical reports
When you’re planning a basement slab that must handle heavy loads, poor soils, unusual groundwater, or complex site conditions, hire an engineer and consider a geotechnical report to avoid costly surprises.
You’ll get soil-bearing capacity, settlement risk, and drainage recommendations tailored to your site. That upfront cost guides slab thickness, reinforcement, and subbase improvements, often saving money and preventing structural problems.
Case Examples and Scenarios
Now let’s look at practical examples to help you choose the right slab for different uses.
For a standard residential basement you’ll see typical designs, thicknesses, and material choices that balance cost and performance.
Then we’ll cover thicker, reinforced slabs for a home workshop with heavy equipment and the insulation/slab modifications needed when converting a garage to living space.
Example A Standard residential basement (design, thickness, materials)
Although your design choices will depend on local codes and soil conditions, a standard residential basement typically uses a 3.5- to 4-inch poured concrete slab over a compacted aggregate base and vapor barrier, with thicker edges or a 6- to 8-inch footing where load-bearing walls sit.
You’ll reinforce with welded wire or light rebar, slope slightly for drainage, and finish smooth for flooring.
Example B Home workshop with heavy equipment (design adjustments)
If you’re converting a basement into a home workshop that will house heavy machinery, plan on increasing slab thickness and strengthening the base to handle concentrated loads and vibration.
You’ll typically go thicker than standard—often 6–8 inches or more with thicker footings under heavy points—add welded wire or rebar, a compacted granular subbase, and consider isolated piers or pads for extreme loads and vibration isolation.
Example C Garage converted to living space (insulation and slab modifications)
When you convert a garage into living space, upgrading the slab for insulation, moisture control, and comfort is essential; you’ll typically add thermal insulation, a vapor barrier, and a slightly thicker or insulated concrete slab to meet code and comfort needs.
You should also address perimeter insulation, slab edge detail, and proper drainage.
Consider underfloor heating, local code for frost depth, and vapor mitigation before finishing.
Tools, Materials, and Professional Help
Before you pour, you’ll want basic evaluation tools like a soil compaction plate or probe and a moisture meter to check subgrade conditions.
Gather typical materials—gravel base, vapor barrier, rebar or wire mesh, form boards, and the right concrete mix—and plan for proper curing supplies.
If you find poor soil, high water table, or load-bearing questions, hire a structural engineer or licensed contractor to design and oversee the work.
Tools and tests for site evaluation (soil compaction, moisture meters)
You’ll want a small toolkit of reliable tests to evaluate the site: a hand-operated penetrometer or plate-bearing tester for quick compaction checks, a moisture meter and calcium chloride kit for slab moisture, and a probe or auger to sample subgrade layers.
- Confirm uniform compaction.
- Verify moisture below tolerances.
- Identify weak or organic layers requiring remediation.
Typical materials list for a basement slab pour
A typical basement slab pour needs a concise kit of tools, materials, and occasional professional help so you can pour a durable, code-compliant floor:
- Gravel base, vapor barrier, compacting plate.
- Rebar or welded wire mesh, chairs, formwork materials.
- Ready-mix concrete, admixtures (air-entrainment, plasticizer), finishing tools.
You’ll also want a reliable level, concrete saw, and safety gear; rent or hire mixers as needed.
When to hire a structural engineer or licensed contractor
Sometimes you’ll want expert help sooner than later: hire a structural engineer or licensed contractor when your project changes load-bearing walls, involves complex footings or underpinning, requires permits or code compliance, or when soil, drainage, or existing foundation issues could affect slab performance.
You’ll also call one if you spot significant cracks, uneven settlement, high groundwater, or if you lack experience with reinforcement, vapor barriers, or proper grading.
Frequently Asked Questions
You’ll find answers here to common concerns like the standard thickness for a residential slab, whether rebar or fiber lets you go thinner, and how slab depth ties into moisture control and insulation.
You’ll also learn acceptable slope or thickness variation for drainage and warning signs of a slab that was poured too thin or improperly.
If you still have questions after this, note them so you can ask a contractor or inspector.
How thick should a basement floor be for normal residential use?
Although local codes and soil conditions can change the specifics, a typical basement slab for normal residential use is 3.5 to 4 inches thick over a compacted base with a vapor barrier.
You’ll want 4 inches or more if you expect heavier loads or finished floors. Stick to proper base prep, slope for drainage, and curing time to avoid cracking and moisture issues.
Can I pour a thinner slab if I add rebar or fiber reinforcement?
Can you safely reduce slab thickness by adding rebar or fiber reinforcement?
You can’t simply thin a slab and rely on reinforcement to replace required thickness.
Rebar and fibers control cracking and improve tensile strength, but design thickness still depends on loads, soil support, and code.
Use reinforcement to enhance performance, not as a substitute for minimum slab depth specified by engineers or standards.
Does slab thickness affect basement moisture and insulation needs?
Because slab thickness influences thermal mass and capillary movement, it plays a role in basement moisture and insulation needs.
A thicker slab slows temperature swings and reduces vapor transmission from soil, lowering condensation risk.
You’ll still need a capillary break, vapor barrier, and under-slab insulation to control moisture and heat loss; thickness complements, but doesn’t replace, proper waterproofing and insulation strategies.
How much slope or thickness variation is acceptable for drainage?
Thicker slabs help reduce moisture movement, but you still need a slight slope to direct water toward drains or sump pits. Aim for 1/8″ to 1/4″ per foot (about 1–2%) toward collection points.
Keep variations outside that range localized and gradual to avoid puddles. For garage-style drains use consistent fall; for slab-to-sump shifts, blend changes over several feet to prevent cracking.
What are signs of a slab that was poured too thin or improperly?
How do you tell if a concrete slab was poured too thin or done poorly?
Look for widespread cracking, spalling, pop-outs, or visible aggregate—signs of weak mix or inadequate cover.
Check for localized soft spots, excessive flexing under load, and water seepage or discoloration.
Uneven thickness, exposed rebar, and persistent settling also indicate improper pouring or finishing.