
Linoleum vs Vinyl Flooring: Are They Actually the Same Thing?
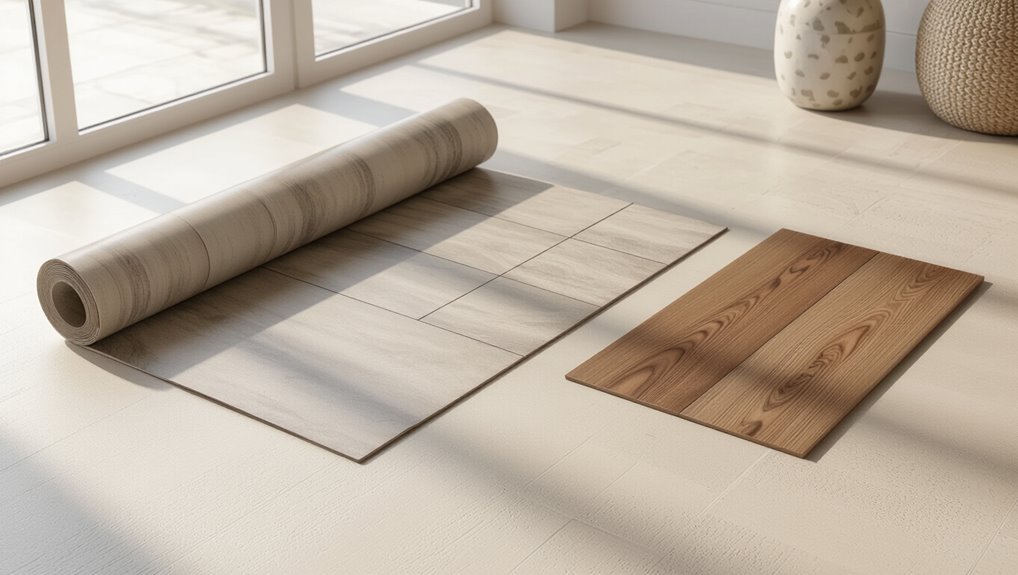
They’re not the same: linoleum is a natural sheet floor made from linseed oil, cork and wood flour with a jute backing, while vinyl is synthetic PVC with a plastic backing. You’ll get greener, repairable linoleum and longer-lasting, waterproof vinyl that resists spills. Installation, feel, and maintenance differ, so pick based on moisture, traffic, and sustainability priorities. Keep going and you’ll get clear guidance on spotting, installing, and caring for each option.
Are Linoleum and Vinyl Flooring the Same?
They’re not the same, though they can look similar at a glance.
Linoleum is made from natural materials like linseed oil and cork, while vinyl is a synthetic PVC product.
You’ll notice differences in durability, feel, and environmental impact when you compare them side by side.
Short direct comparison summary
Although both look similar at a glance, linoleum and vinyl are different: linoleum’s a natural, oil-based product made from linseed oil and cork or wood dust, while vinyl is a synthetic PVC product; you’ll ask, is linoleum and vinyl flooring the same? Quick table:
| Feature | Linoleum | Vinyl |
|---|---|---|
| Material | Natural | Synthetic |
| Durability | Long | Moisture-resistant |
| Eco | Biodegradable | Recyclable |
What Each Material Is: Basic Definitions
You’ll find linoleum is a natural product made from linseed oil, cork or wood flour, and pigments, with roots in 19th-century flooring and common use in kitchens and high-traffic rooms.
Vinyl flooring is a synthetic PVC material available as sheet, tile, or luxury vinyl (LVT/LVP), and it’s engineered for durability and water resistance.
Knowing their composition and typical formats helps you choose the right floor for your needs.
What is Linoleum? (composition, history, typical uses)

Linoleum is a resilient, natural floor covering made from linseed oil mixed with pine resin, cork or wood flour, and mineral pigments on a jute backing. It’s been used in homes and commercial spaces since the mid-19th century.
You’ll find it valued for durability, biodegradability, and ease of maintenance. It is commonly installed in kitchens, hallways, schools, and healthcare settings for long-term performance.
What is Vinyl Flooring? (PVC composition, types: sheet, tile, LVT/LVP)
When you choose vinyl flooring, you’re getting a synthetic floor covering made from polyvinyl chloride (PVC) that’s manufactured in several forms—sheet, tile, and the increasingly popular luxury vinyl plank or tile (LVP/LVT)—each built with layers that provide wear resistance, cushioning, and printed designs that mimic wood, stone, or other textures.
You’ll find affordable, water-resistant options suited for bathrooms, kitchens, and high-traffic areas.
Key Differences Between Linoleum and Vinyl
Now let’s look at the core differences so you can choose the right floor for your space.
You’ll compare how each is made, how long it lasts, and how it handles water and moisture.
Then we’ll cover appearance options and what installation each material requires.
Materials and Manufacturing Processes
A closer look at how these floors are made will show you they’re fundamentally different: linoleum is a natural, oil-based product made from linseed oil, wood flour, cork dust, and natural pigments pressed onto a jute backing, while vinyl is a synthetic material—polyvinyl chloride (PVC) combined with plasticizers, stabilizers, and printed layers—manufactured through extrusion or calendaring.
| Aspect | Linoleum | Vinyl |
|---|---|---|
| Base | Natural oils | PVC |
| Color method | Pigments | Printed film |
| Backing | Jute | Synthetic |
Durability and Lifespan
Because they’re built from different materials and processes, linoleum and vinyl will behave differently over time, so you’ll want to weigh their typical durability and lifespan before choosing.
Linoleum often lasts 20–40 years with proper care and resists wear well, while vinyl typically lasts 10–25 years depending on wear layer thickness.
You’ll consider traffic, maintenance, and repairability when deciding.
Water Resistance and Moisture Behavior
Moisture performance is another key factor you’ll want to compare after considering durability.
Linoleum resists spills but absorbs moisture over time, so you shouldn’t install it in damp basements or constantly wet areas without proper subfloor sealing.
Vinyl is inherently waterproof, tolerates bathrooms and kitchens better, and handles occasional flooding.
Both need sealed seams and correct installation to prevent underlayment damage and mold.
Appearance and Design Options (patterns, colors, textures)
How do you want your floors to look—bold and modern or warm and classic?
You’ll find vinyl offers endless printed patterns, realistic wood or stone visuals, and varied textures for affordable trends.
Linoleum gives more muted, natural hues and marbled or speckled patterns from pigment blends, plus a matte, slightly tactile surface.
Choose vinyl for variety, linoleum for understated, durable character.
Installation Methods and Requirements
You’ve picked the look you want—now think about how it gets laid down.
Linoleum often needs a smooth, dry subfloor, precise acclimation and adhesive installation or loose-lay with seams welded; it’s less forgiving.
Vinyl offers peel-and-stick, click-lock planks, or glue-down sheets, tolerating minor subfloor imperfections.
Both may require trim, changes and professional installation for best results.
Maintenance and Cleaning Needs
Keeping either floor clean is straightforward, but linoleum and vinyl demand different care.
You should sweep or vacuum both regularly to remove grit.
Damp-mop linoleum with a pH-neutral cleaner and avoid excessive water to protect the natural fiber backing.
For vinyl, you can use a mild detergent and more frequent wet mopping; avoid abrasive scrubbers on both surfaces.
Environmental Impact and Sustainability (VOC, biodegradability, recyclability)
After regular care, many people also consider a floor’s environmental footprint before deciding; linoleum and vinyl differ markedly in VOC emissions, biodegradability, and recyclability.
You’ll find linoleum, made from natural materials, emits fewer VOCs, is largely biodegradable, and can sometimes be recycled.
Vinyl, petroleum-based, can off-gas more VOCs, resists biodegradation, and has limited recycling options, increasing long-term waste.
Cost Comparison (material and installation)
While linoleum often costs more upfront than basic vinyl, it can save you money long-term because of its durability and repairability. You’ll pay higher material and sometimes labor costs for linoleum, but its lifespan and lower maintenance balance totals. Compare at a glance:
| Item | Linoleum | Vinyl |
|---|---|---|
| Material cost | Higher | Lower |
| Installation | Skilled labor | Easier/cheaper |
| Lifespan | Longer | Shorter |
When to Choose Linoleum vs Vinyl Use-Case Evaluation
When deciding between linoleum and vinyl, think about where the floor will be used and what matters most to you — durability, water resistance, eco-friendliness, or cost.
Choose linoleum for high-traffic areas and green projects that prioritize natural materials, and pick vinyl for bathrooms, basements, budget remodels, or when you want waterproof luxury vinyl options.
Below, you’ll find room-by-room recommendations to match each material’s strengths to your space.
Best Scenarios for Linoleum (high-traffic, eco-conscious projects)
Although you might be tempted by vinyl’s low upfront cost, linoleum wins for heavy-use spaces and eco-focused projects because it’s tougher, long-lasting, and made from natural materials; choose linoleum for busy kitchens, hallways, classrooms, and commercial areas where durability and repairability matter.
You’ll also appreciate low VOCs, biodegradability, and long service life that reduce lifecycle impact and replacement frequency.
Best Scenarios for Vinyl (wet areas, budget remodels, luxury vinyl uses)
Linoleum shines in high-traffic, eco-minded settings, but vinyl has clear advantages where moisture, tight budgets, or upscale visuals matter most.
You’ll pick vinyl for bathrooms, laundry rooms, and basements because it resists water.
Choose vinyl plank for a luxury look without hardwood cost, or sheet vinyl for fast, inexpensive remodels.
It’s forgiving, low-maintenance, and widely available.
Room-by-room Recommendations
Pick the right floor for each room by matching performance needs to material strengths: choose linoleum for busy, eco-conscious spaces that need durability and easy repairs, and pick vinyl where water resistance, budget, or high-end visuals matter most.
You’ll pick based on moisture, traffic, and style. Consider these quick recommendations:
- Kitchen: vinyl for spills; linoleum if sealed and cared for
- Bathroom: vinyl for full water protection
- Living room: linoleum for longevity and natural feel
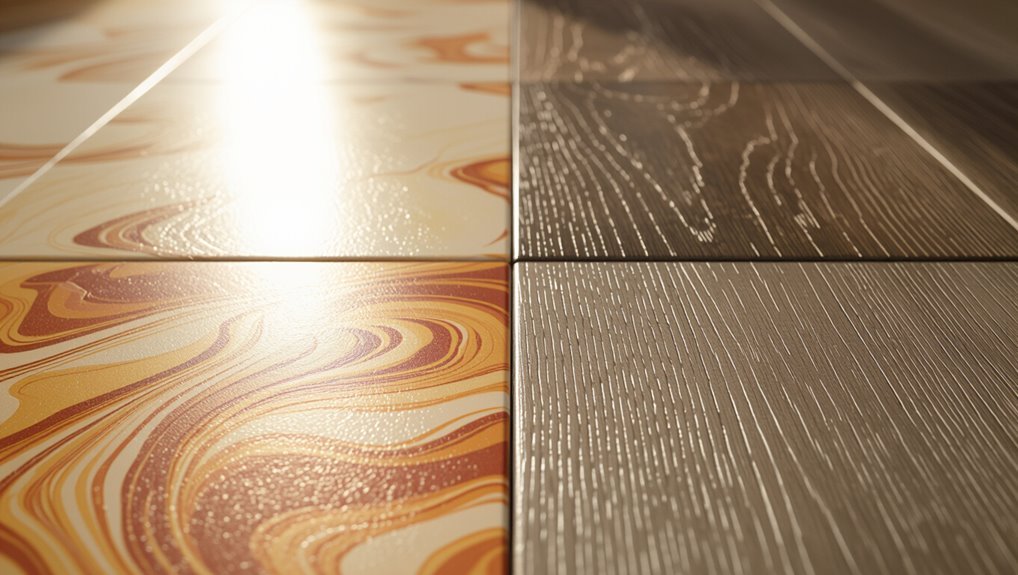
How to Tell Them Apart in Practice
You can often spot differences by looking and feeling—linoleum usually has a more matte, textured surface and finished edges, while vinyl often looks glossier with a printed pattern and softer edges.
Try simple tests at home: a water droplet will bead on vinyl but absorb slowly on linoleum, and a cautious heat or scratch test can reveal backing and material behavior (don’t attempt open flame tests).
If you’re unsure or the product’s important, ask the supplier or a flooring pro to confirm.
Visual and Tactile Clues (surface texture, edges)
While both materials can mimic each other at a glance, surface texture and edge details give the clearest clues, and knowing what to look for helps you tell them apart quickly.
Run your hand: linoleum feels warmer, slightly textured, and seams look painted-in; vinyl often feels slicker or plasticky with molded grain.
Check plank or tile edges—linoleum layers show natural fiber, vinyl has uniform plastic edges.
Simple DIY Tests (water droplet, burn test caution)
After feeling the texture and examining the edges, try a couple quick DIY tests to confirm what you’ve found.
Use safe, minimal checks: a water droplet and a cautious heat check—don’t cut or inhale fumes. If unsure, stop and get expert help.
- Drop a water bead: linoleum absorbs slightly, vinyl beads.
- Sniff near warmth: linoleum smells organic, vinyl smells chemical.
- Look under edge for backing layers.
When to Ask a Professional or Supplier
If the simple checks leave doubt or the flooring will affect resale, health, or warranty, call a professional or the supplier for a definitive ID.
Ask for product specifications, backing composition, and manufacturing date. Request samples or lab testing if necessary.
Keep receipts and any installation records. A pro will verify adhesive compatibility, removal risks, and confirm whether material meets building codes or VOC limits.
Installation Overview Step-by-Step Differences
When you install linoleum or vinyl, the steps look similar but the details differ at each stage.
You’ll start by preparing the subfloor, then gather the specific tools and adhesives, follow distinct laying and seaming techniques, and finish with post-installation care and curing.
I’ll walk you through those four step-by-step differences so you can choose the right method for your project.
Preparing Subfloor for Linoleum vs Vinyl (Step 1)
Step 1 is making the subfloor clean, level, and dry—because both linoleum and vinyl demand a stable base but they differ in tolerance: linoleum needs a very smooth, rigid surface with minimal moisture, while most vinyl products can handle slight imperfections and higher moisture tolerance.
You’ll inspect for squeaks, fill gaps, sand high spots, and test moisture; correct issues before laying either material.
Tools and Adhesives Required (Step 2)
Although both linoleum and vinyl demand basic carpentry tools, the specific adhesives and specialty items you’ll need differ enough that you should plan each job separately:
You’ll use solvent‑based or pressure‑sensitive adhesives and seam rollers for vinyl, while linoleum prefers water‑based or contact adhesives plus heavier trowels and a heat gun for seams.
Both require knee pads, straightedges, and a utility knife.
Laying and Seaming Techniques (Step 3)
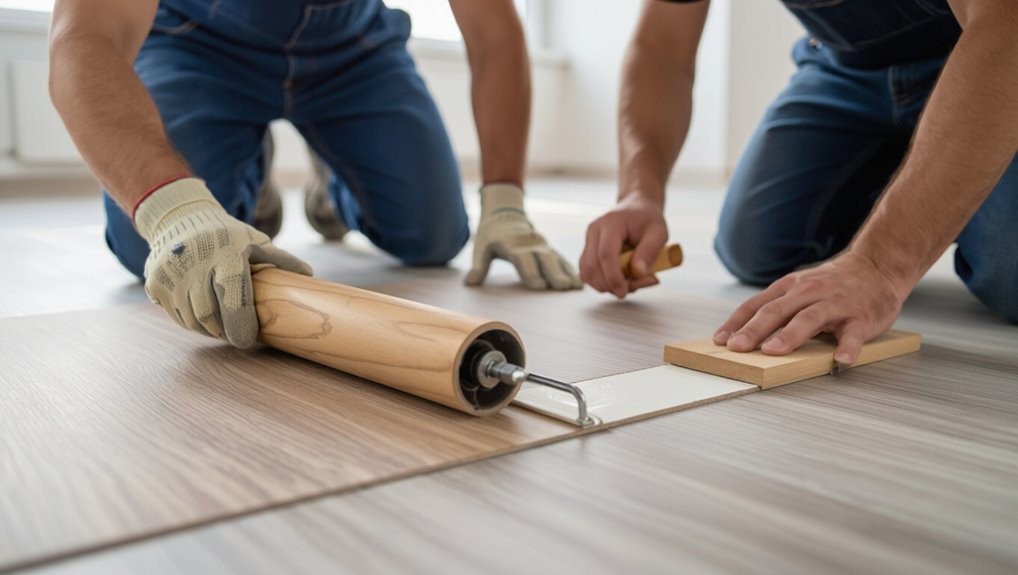
Once you’ve prepared the subfloor and laid out your sheets, start by unrolling and acclimating the material in the room.
Then work from the farthest corner toward the exit so you’re not stepping on freshly set seams; align seams carefully, trim overlaps, and use proper adhesive or welding for vinyl and cold seams or heat-bonding for linoleum.
Roll seams flat and clean excess adhesive promptly.
Post-installation Care and Curing (Step 4)
After seams are set and adhesives cured to the touch, give your new linoleum or vinyl time and conditions to finish bonding and stabilize; limit foot traffic, furniture placement, and heavy loads for the manufacturer‑recommended cure period.
Keep the room temperature and humidity within specified ranges, and ventilate as instructed to help solvents dissipate and adhesives harden properly.
When cured, clean gently, avoid harsh chemicals, and use pads under furniture.
Common Mistakes and Pitfalls to Avoid
Don’t pick flooring without matching it to the room’s humidity, traffic, and subfloor—those selection mistakes come back to haunt you.
If you skip proper subfloor prep or use the wrong adhesive, installation problems like buckling and gaps will follow.
And neglecting recommended cleaning and care will shorten either floor’s lifespan fast.
Mistakes During Selection (ignoring room conditions)
When you ignore room conditions—like moisture levels, sunlight exposure, and traffic patterns—you’ll end up with flooring that wears prematurely or looks wrong for the space.
Choose linoleum for dry, low-sun areas; pick water-resistant vinyl for bathrooms or basements.
Match wear layers to traffic, consider UV protection near windows, and test samples in the room before committing.
Installation Errors (improper subfloor prep, wrong adhesive)
You’ve picked the right material for the room, but installation mistakes can undo that choice fast — poor subfloor prep or the wrong adhesive will cause lifting, buckling, or premature wear.
Check for level, dryness, and cleanliness before laying. Use manufacturer-recommended adhesive and trowel size.
Allow proper acclimation time, follow seam and rolling techniques, and avoid shortcuts that void warranties.
Maintenance Mistakes That Shorten Lifespan
Even with proper installation, neglect and small shortcuts will shave years off linoleum or vinyl floors; skipping recommended cleaning methods, using harsh chemicals, or dragging heavy furniture without protection all cause scratches, discoloration, and edge failure.
You should mop with mild, pH-neutral cleaners, avoid ammonia or bleach, use felt pads, control sunlight exposure, and fix spills or seams promptly to prevent moisture damage.
Tips and Best Practices for Buying and Maintenance
When you’re comparing linoleum and vinyl, check warranties and product specs so you know what’s covered and how the product performs.
For everyday care, follow manufacturer cleaning guidelines and use gentle tools to keep the surface looking new.
When it’s time to replace flooring, look into recycling programs and eco-friendly disposal to reduce waste.
How to Compare Warranties and Product Specs
Why does the fine print matter? You’ll want clear coverage limits, transferability, and exclusions before choosing linoleum or vinyl.
Compare specs like wear layer thickness, backing, and moisture resistance so you match warranty conditions.
- Check warranty duration and what triggers voiding
- Verify wear layer mm/mils and warranty applicability
- Confirm installation and maintenance requirements for claims
Cleaning and Routine Care Tips for Longevity
Because regular care keeps linoleum and vinyl looking their best and extends their life, you should adopt a simple, consistent cleaning routine tailored to each material.
Sweep or vacuum daily, mop with manufacturer-recommended cleaners, and avoid abrasive tools. Wipe spills immediately, use felt pads under furniture, and place mats at entrances.
Refinish linoleum when dull; reseal vinyl seams if needed.
Eco-friendly Disposal and Recycling Options
How can you dispose of or recycle old linoleum and vinyl without harming the environment?
Check local recycling centers and municipal programs—some accept vinyl; linoleum (natural) may compost if untreated.
Donate usable remnants to reuse stores or community projects.
Hire installers who reclaim waste for recycling.
Avoid landfill by separating materials, removing adhesives, and documenting disposal to guarantee responsible processing.
Cost Breakdown and ROI Considerations
You’ll want to compare typical price ranges for linoleum and vinyl by type and quality so you know what to expect up front.
Consider not just purchase and installation costs but also life-cycle costs like replacement frequency and maintenance over time.
That way you can weigh short-term expense against long-term ROI for your specific project.
Typical Price Ranges by Type and Quality
Curious what linoleum and vinyl will cost you upfront and over time? You’ll see ranges by type and quality—materials, installation, and warranty affect price. Use the table to compare typical low–mid–high tiers and expected per-square-foot costs so you can pick based on budget and room.
| Type | Quality Tier | $/sq ft |
|---|---|---|
| Linoleum | Low | $2–$4 |
| Linoleum | High | $5–$8 |
| Vinyl | Low | $1–$3 |
| Vinyl | High | $3–$7 |
Long-term Value: Replacement Frequency and Life-Cycle Costs
Because upfront cost is only part of the story, you should weigh replacement frequency and ongoing expenses when comparing linoleum and vinyl.
Linoleum often lasts 25–40 years with proper care but needs refinishing; thicker vinyl can endure 10–20 years and is low‑maintenance but usually isn’t refinished.
Calculate total life‑cycle costs, factoring installation, maintenance, refinishing potential, and replacement timing to determine your ROI.
Frequently Asked Questions
You probably have practical questions about eco-impact, appearance, and suitability for wet rooms—like whether linoleum is greener than vinyl, if vinyl can mimic linoleum, and which works best in bathrooms or kitchens.
You’ll also want to know expected lifespans under normal household use and whether linoleum can go over existing flooring.
Let’s answer these clearly so you can choose with confidence.
Is linoleum more eco-friendly than vinyl?
How green is linoleum compared with vinyl?
You’ll usually find linoleum more eco-friendly: it’s made from natural, renewable materials (linseed oil, cork, wood flour), is biodegradable, and often has lower VOC emissions.
Vinyl’s PVC base is petroleum-derived, harder to recycle, and can emit VOCs and harmful chemicals.
Still check certifications, life-cycle impact, and installation adhesives for true environmental performance.
Can vinyl mimic linoleum’s appearance?
Wondering if vinyl can pull off linoleum’s look? You’ll find many vinyl options closely mimic linoleum’s matte finish, flecked patterns, and wood or tile visuals.
High-quality luxury vinyl reproduces textures and color depth convincingly. While purists spot subtle differences under close inspection, vinyl gives you the aesthetic of linoleum at lower cost, wider design variety, and easier installation.
Which is better for bathrooms and kitchens?
Which performs better in wet, high-traffic spaces: linoleum or vinyl?
You’ll usually pick vinyl for bathrooms and kitchens because it’s water-resistant, easier to seal at seams, and tolerates spills without warping.
Linoleum can work if you protect edges and maintain seals, but it needs more care.
If moisture and low upkeep matter, choose vinyl for reliability and practicality.
How long does each last under normal household use?
If you want longevity with minimal fuss, vinyl usually outlasts linoleum in typical homes. Expect 10–20 years for quality vinyl; luxury vinyl can reach 20–30 with good care.
Linoleum often lasts 20–40 years if sealed, maintained, and protected from excessive moisture. Your usage, sunlight, and maintenance habits determine real lifespan—regular cleaning and mats extend both considerably.
Can linoleum be installed over existing flooring?
Can you install linoleum over your current floor? Yes, in many cases you can lay linoleum over stable, flat surfaces like existing vinyl or hardwood, but you shouldn’t over uneven, cushioned, or water-damaged floors.
Remove loose tiles, repair dips, and make certain the substrate is clean and dry. Follow manufacturer guidelines and use proper adhesive; otherwise, remove old flooring first for best results.
Conclusion Final Recommendation Checklist
1 clear checklist helps you weigh linoleum and vinyl at a glance and decide which suits your home, budget, and lifestyle; consider durability, water resistance, installation method, maintenance needs, environmental impact, and cost to reach a confident final choice.
You’ll match priorities, then pick the best fit quickly.
- Durability vs. lifespan
- Water resistance vs. room use
- Cost, installation, and eco impact
