How to Pour a Concrete Floor That’s Smooth, Level, and Long-Lasting
You can pour a smooth, level, long-lasting concrete floor by preparing and compacting a stable subbase, setting accurate forms, and choosing the right mix, slump, and reinforcement (rebar, mesh, or fibers). Work in manageable sections, consolidate with vibration, screed to grade, bull-float, then trowel after bleed water disappears, and cut control joints. Cure properly for days and seal as recommended to protect the surface — keep going for step-by-step techniques, troubleshooting, and pro tips.
How to Pour a Concrete Floor That’s Smooth, Level, and Long-Lasting
You’ll learn what a properly poured slab should look and feel like, so you know the outcome to expect.
Pick the right day and temperature window for pouring, and follow timing guidelines to avoid problems.
Gather a concise tools, materials, and equipment checklist before you start so the job stays smooth and efficient.
What to Expect and the Outcome
When the pour’s done and the surface’s cured, you’ll see whether the floor will be smooth, level, and durable—or whether small fixes are needed; good prep, careful finishing, and proper curing make the difference.
Expect minor color variation, hairline shrinkage cracks, and the need to grind or patch small spots.
Follow maintenance and sealing guidance from how to pour a concrete floor for lasting results.
When to Pour a Concrete Floor (Best Conditions and Timing)
If you schedule the pour for moderate, stable weather and prepare the site properly, you’ll give the concrete the best chance to cure smooth, level, and durable.
Aim for temperatures between 50–80°F, low wind, and no rain forecast for 48–72 hours.
Pour in daylight for visibility, avoid extreme heat or freezing, and plan backups for unexpected weather.
Tools, Materials, and Equipment Checklist
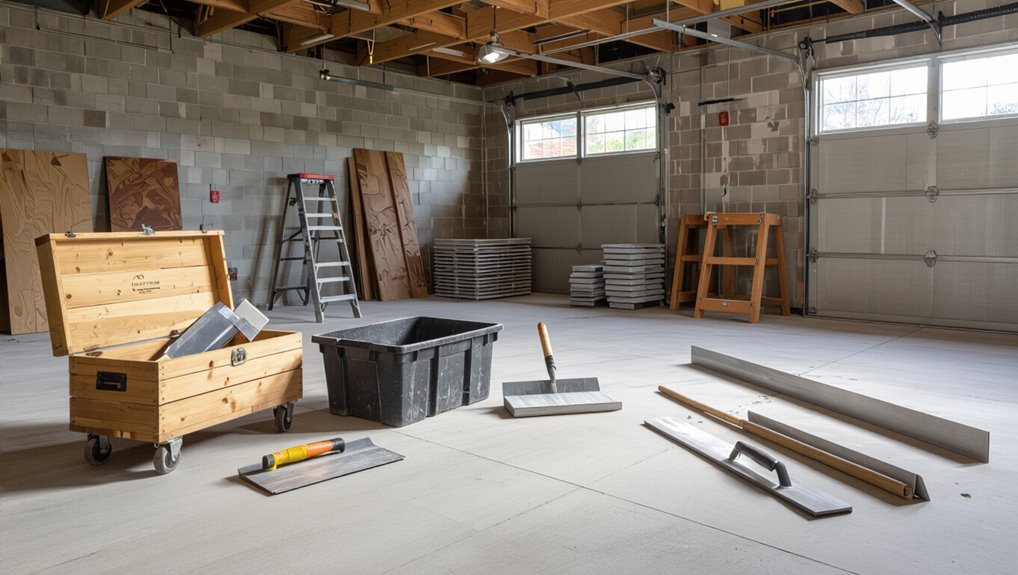
A clear checklist keeps the pour efficient and the finished slab durable, so gather the right tools, materials, and equipment before you start.
You’ll need quality concrete, reinforcement, forms, and curing supplies. Protect yourself with PPE and plan for mixing, placing, and finishing.
- Concrete, rebar/wire mesh, form boards
- Mixer, wheelbarrow, shovels, screed, float
- PPE, curing blankets, trowels, joint tools
Understanding Concrete Floors: Basics You Need to Know
Before you start pouring, you should know what poured concrete flooring is, the common types and where each is used.
Learn the key properties—strength, workability, curing, and shrinkage—because they determine how the mix performs.
Also pay attention to factors that affect smoothness, levelness, and durability so you can plan mixes, forms, and finishing accordingly.
What Is Poured Concrete Flooring? (Types and Uses)
Think of poured concrete flooring as a single, continuous slab formed on-site that gives you a durable, low-maintenance surface for everything from garages and basements to commercial warehouses and modern living spaces.
You’ll choose plain, reinforced, fiber-reinforced, or polished finishes depending on load, aesthetics, and budget. Each type suits different uses—industrial traffic, residential floors, decorative interiors, or exterior slabs.
Key Properties: Strength, Workability, Curing, and Shrinkage
Durability matters when you’re planning a poured concrete floor, and that durability comes from four key properties you’ll want to understand: strength, workability, curing, and shrinkage.
Strength determines load capacity; workability affects placement and finish; curing controls hydration and long-term durability; shrinkage influences cracking risk.
You’ll balance mix design, water content, and curing methods to achieve a resilient, durable slab.
Factors That Affect Smoothness, Levelness, and Durability
When you pour a concrete floor, several controllable factors determine how smooth, level, and long-lasting the slab will be: mix proportions and aggregate size affect finishability; water content and admixtures influence workability and strength; subbase preparation and compaction set the foundation for levelness; placement, consolidation, and screeding techniques control surface uniformity; and curing practices plus jointing minimize cracking and durability issues.
You’ll also monitor slump, timing, and traffic control to guarantee consistent results.
Planning and Preparation
Before you pour, assess the site: check soil type, drainage, and the subgrade to make sure the slab will sit on a stable base.
You’ll also need to confirm permits, local codes, and any structural requirements, then decide slab thickness, reinforcement, and placement of control joints.
Finally, estimate material quantities and costs so your plan and budget line up.
Site Assessment: Soil, Drainage, and Subgrade Evaluation
A thorough site assessment lets you spot soil issues, surface drainage problems, and subgrade weaknesses that could ruin a concrete slab if left unchecked.
You’ll test soil type and compaction, check for organic material and frost susceptibility, and verify slope and water runoff.
Identify low spots, perched water, and soft areas, then plan grading, drainage improvements, and required subbase stabilization before pouring.
Permits, Codes, and Structural Considerations
Because local rules and structural requirements affect every stage of the pour, you’ll need to secure the right permits and verify code compliance before any work begins.
Check zoning, building, and inspection schedules, and submit plans showing load paths and proposed use.
Consult a structural engineer for unusual loads or modifications, keep documentation on-site for inspectors, and address utility locates and easements promptly.
Designing Thickness, Reinforcement, and Control Joints
When you plan slab thickness, reinforcement, and control joints, match the design to the loads, soil conditions, and expected use so the floor performs without cracking or settling. You’ll choose thickness, mesh or rebar, and joint spacing; place reinforcement on chairs and saw or form joints early to control cracking.
| Element | Typical Value | Purpose |
|---|---|---|
| Thickness | 4–6 in | Support loads |
| Reinforcement | Mesh/Rebar | Tensile strength |
| Joints | 8–12 ft | Crack control |
| Base | Compacted fill | Stability |
Estimating Materials and Costs
Start by calculating the slab area and volume so you’ll know exactly how much concrete, reinforcement, and base material to order.
Then price materials, delivery, tools, and labor; add a contingency of 10–15%.
Compare bagged versus ready-mix and local suppliers for best rates.
- Concrete volume, bags or cubic yards
- Rebar/mesh and anchors
- Gravel base and compaction tools
Step-by-Step: Pouring a Smooth, Level, Long-Lasting Concrete Floor
Now you’ll follow the step-by-step process to get a smooth, level, long-lasting concrete floor.
Start by preparing and compacting the subbase, then install formwork and set accurate levels before adding gravel, sand, and any vapor barriers.
Finally, place reinforcement like rebar or mesh and make sure your concrete mix and slump match the job before you pour.
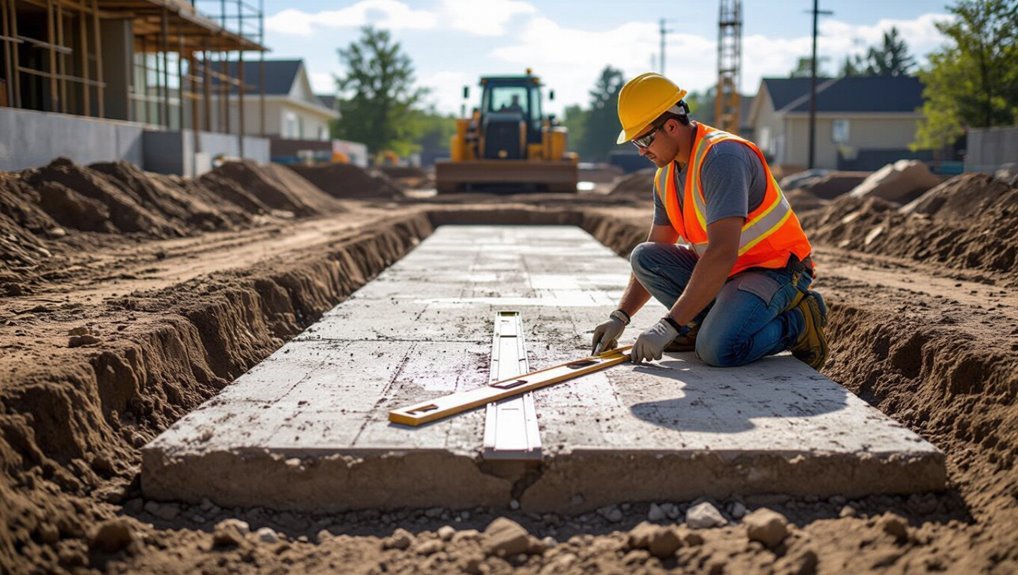
Step 1 Preparing the Subbase and Compacting Soil
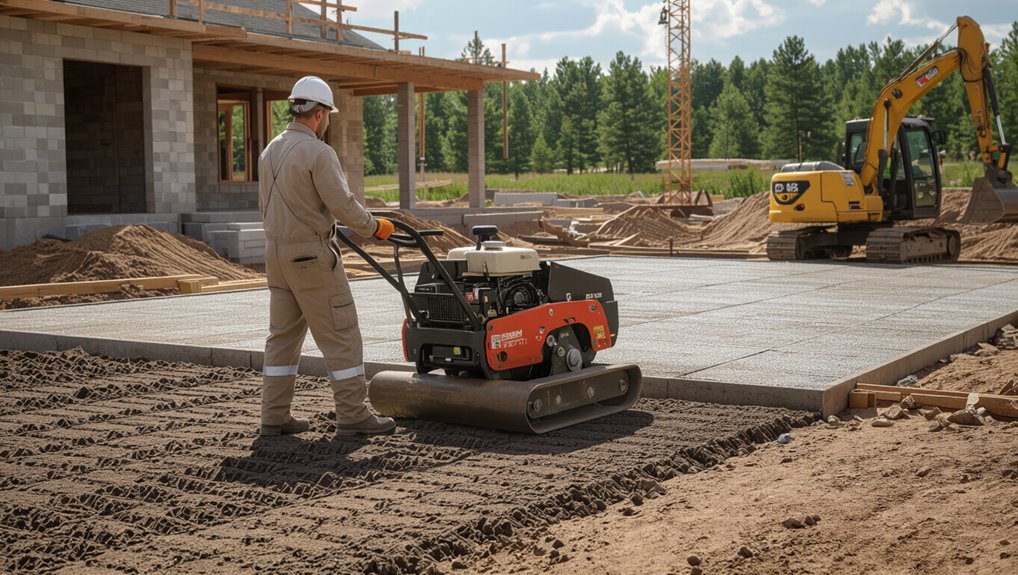
Before you set forms or mix concrete, make sure the subbase is stable and uniformly graded; you’ll be building the slab on whatever you leave beneath it, so a poorly prepared base guarantees cracks and uneven settling.
Remove organic matter, debris, and soft spots. Add and spread suitable aggregate, then compact in layers with a plate compactor.
Check density and rework low areas.
Step 2 Installing Formwork and Setting Levels
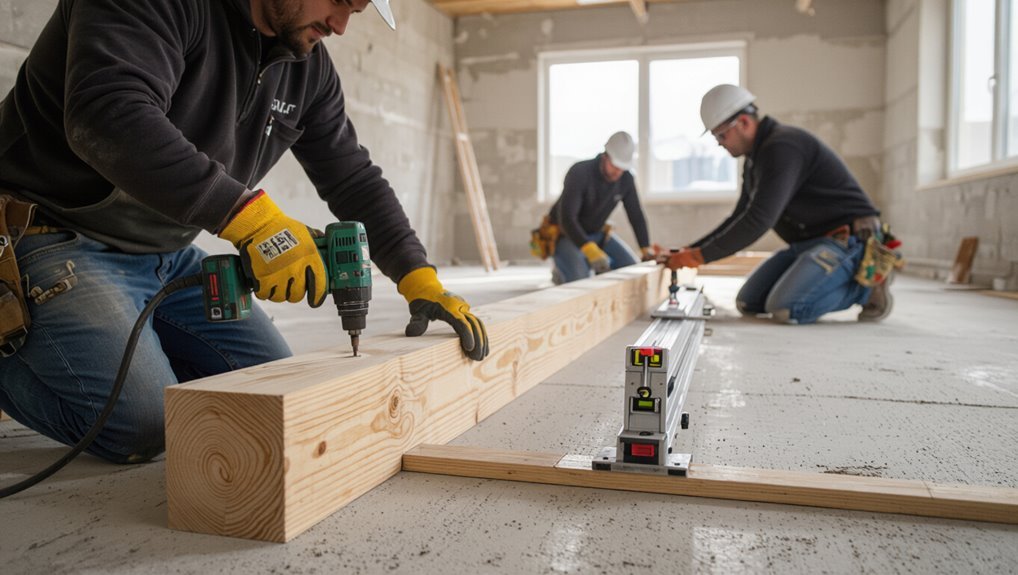
1. You’ll build sturdy formwork with straight, level boards anchored to stakes, spacing them to match slab thickness.
Use a carpenter’s level or laser to set tops uniformly, shim as needed, and brace against concrete pressure.
Check diagonals for squareness.
Install chamfer strips on edges and secure expansion joints locations.
Recheck levels before pouring to avoid costly corrections.
Step 3 Adding Base Layers: Gravel, Sand, and Vapor Barriers
Step 3 prepares the foundation beneath the slab: you’ll compact a uniform gravel base, level a settling layer of coarse sand (if required), and lay a continuous vapor barrier to protect the concrete from ground moisture.
Compact gravel in 2–4 inch lifts to achieve firm, even support. Spread sand only to fill voids and screed smooth.
Overlap and tape vapor-sheet seams, sealing penetrations.
Step 4 Placing Reinforcement: Rebar, Mesh, or Fibers
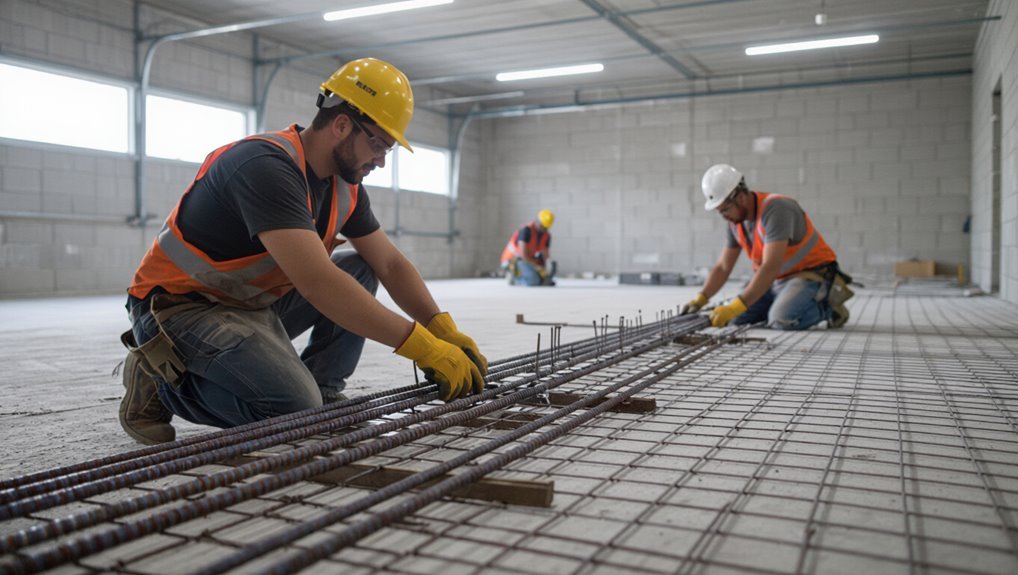
Choose the right reinforcement and place it correctly to control cracking and add structural strength to your slab; you’ll decide between rebar, welded wire mesh, or synthetic fibers based on slab thickness, load, and local code.
Position rebar on chairs to mid-depth, overlap and tie per spacing specs, or roll mesh flat.
If using fibers, distribute evenly and mix into the wet concrete for uniform reinforcement.
Step 5 Mixing and Ordering Concrete: Mix Types and Slump
Order the right mix and slump before the pour so you don’t waste time or compromise the slab.
Choose strength (psi) and admixtures for durability, freeze-thaw, and finishing needs.
Specify slump: low for walkable firmness, higher for tight forms or pumping.
Confirm batch size, delivery timing, and cement type with the supplier.
Double-check water allowances to avoid over‑watering on site.
Step 6 Pouring and Spreading Concrete (Techniques for Even Coverage)
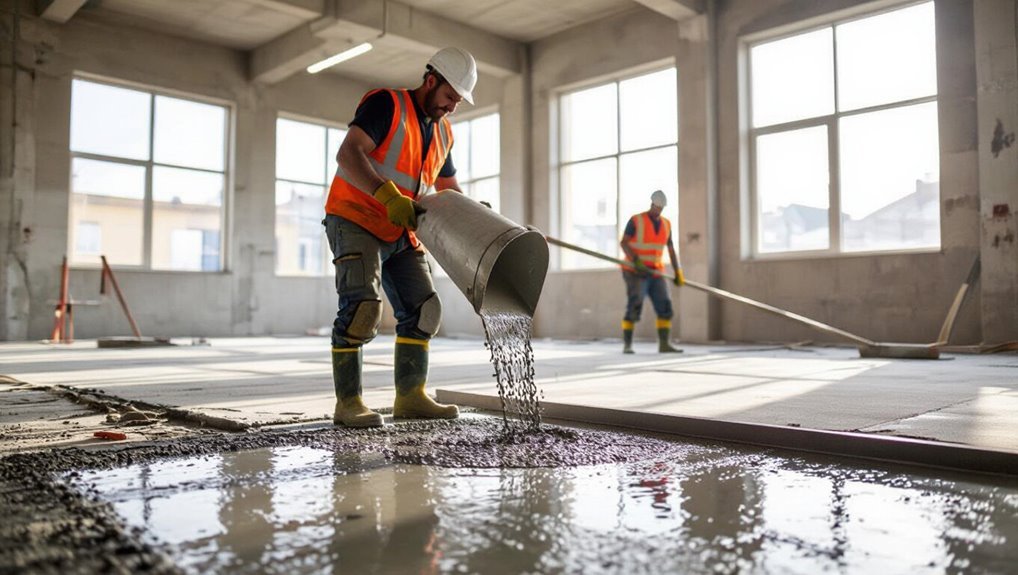
With the mix and slump confirmed, it’s time to get the concrete into place quickly and evenly—once it starts to set you won’t have a second chance.
Work from one end, pour in manageable sections, and use a shovel or come-along to spread.
Keep thickness consistent, avoid overworking, and consolidate with a vibrating screed or hand tamp to eliminate voids and guarantee uniform coverage.
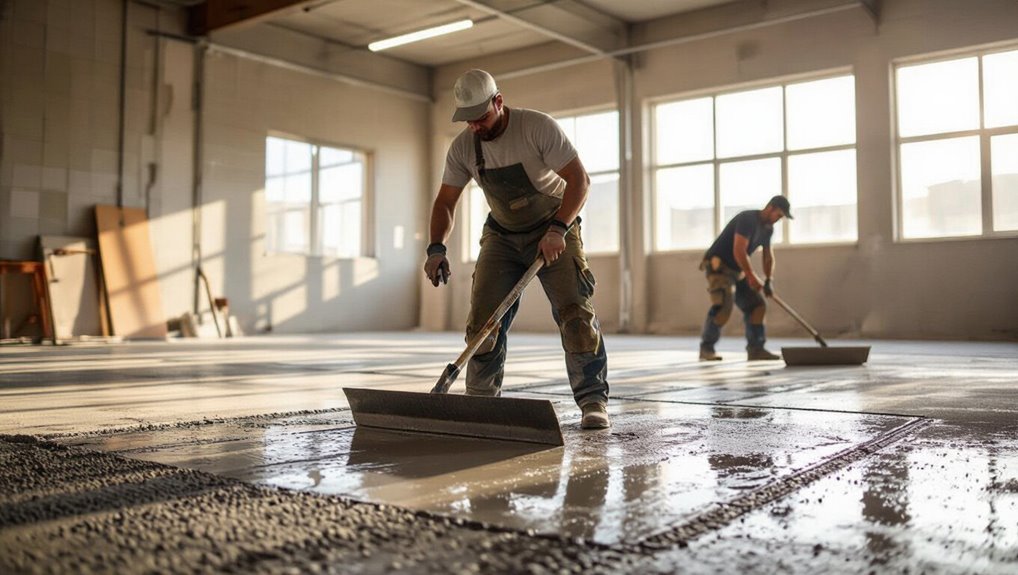
Step 7 Screeding and Strike-Off for Levelness
Begin by aligning your screed guides so they sit straight and at the correct finished height. Then pull the screed across the slab in a smooth, continuous motion to strike off excess concrete and establish a true plane.
Work in overlapping passes, keep the blade slightly tilted forward, and maintain steady speed. Check elevations with a level and refill low spots before final passes.
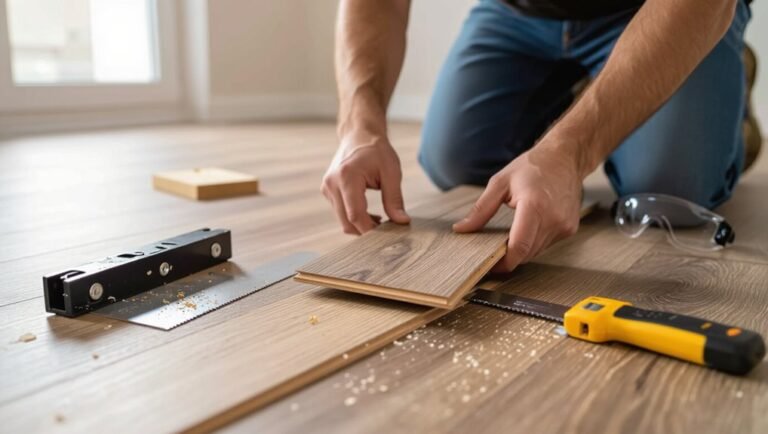
Step 8 Floating, Troweling, and Finishing for Smoothness
After screeding and fixing any low spots, you’ll move on to floating and troweling to refine the surface and close the mix for durability.
Begin with a bull float to level ridges and press aggregate down. Follow with an edging tool, then a wood or magnesium float for texture.
Once bleed water dissipates, trowel with a steel float for a smooth, dense finish.
Step 9 Installing Control and Expansion Joints
Step 9 covers installing control and expansion joints so your slab can crack where you expect and move without damage.
Mark joint locations based on slab size and load, saw-cut or form joints to proper depth (about one-quarter thickness), and space expansion joints at walls or between different slabs.
Install joint filler and sealant where needed to prevent edge spalling and allow orderly movement.
Step 10 Curing: Methods, Timing, and Why It Matters
Curing locks in the strength and durability you’ve worked to create, so you’ll want to control moisture and temperature from the moment finishing ends.
Keep the slab moist for at least seven days (longer for poor weather or high cement content). Use wet burlap, plastic sheets, or curing compounds to prevent rapid drying or freezing, and monitor conditions to guarantee proper hydration and maximum strength.
Step 11 Sealing, Surface Treatments, and Final Protection
With the slab properly hydrated and protected, you’ll turn attention to sealing and surface treatments that lock in durability and finish the look.
Choose a sealer type, test adhesion, then protect edges and joints. Apply finishes for traction or shine, and schedule traffic limits.
- Penetrating sealers for moisture protection
- Film-forming sealers for gloss and easy cleaning
- Non-slip additives for safety
Troubleshooting Common Problems and How to Fix Them
When problems show up—like low spots, cracks, dusting, scaling, or poor drainage—you’ll want to identify the specific cause before you fix it.
Learn how to spot uneven areas, distinguish crack types, and recognize surface weakness so you can choose the right repair: patching, resealing, or correcting drainage and settlement.
With targeted fixes and simple preventative steps you’ll restore strength and keep the slab performing longer.
Uneven Surface or Low Spots Detection and Repair Methods
Uneven spots on a new concrete floor can cause pooling, trip hazards, and poor finishes, so you’ll want to find and fix them before the slab sets or the surface hardens.
Walk the slab, use a straightedge and level to mark low areas.
For fresh concrete, rescreed and bullfloat; for hardened spots, grind or use a polymer-modified patching compound, then recheck levels.
Cracking: Causes, Types, and Repair Strategies
After fixing low spots, you’ll want to check the slab for cracks and understand why they happen so you can stop small issues from becoming big repairs. Identify hairline, shrinkage, and structural cracks; address with patching, epoxy, or control joints. Prevent recurrence by proper curing and load management.
| Fear | Hope |
|---|---|
| Surprise | Repairable |
| Cost | Control |
| Failure | Strength |
| Neglect | Care |
Dusting and Surface Weakness Remedies and Prevention
If you notice a chalky film or powder forming on the slab, it’s a sign the surface has weakened and needs immediate attention to prevent larger issues.
Clean loose dust, then test adhesion with tape.
For minor dusting, apply a penetrating densifier; for widespread weakness, grind and reseal the top 1/8–1/4 inch or overlay with bonded micro-topping.
Improve curing and limit water exposure.
Scaling, Spalling, and Discoloration Causes and Fixes
Many common concrete problems—scaling, spalling, and discoloration—stem from a handful of causes you can address: freeze-thaw cycles and poor air entrainment, improper finishing or curing, excessive surface water or deicing salts, and incompatible sealers or contamination.
Prevent by using air-entrained mix, proper finishing and curing times, prompt sealing with compatible products, and avoiding salts.
Repair with surface patching, diamond grinding, or resealing after cleaning.
Dealing with Poor Drainage or Settlement Post-Pour
Problems like scaling and spalling often point to vulnerabilities in the pour or materials, but poor drainage and post-pour settlement create distinct issues you’ll need to address quickly to protect the slab and surrounding structures.
Fix grading, re-route water, and add drains or swales.
For settlement, jack and grout voids or remove and repour affected panels.
Monitor and repair cracks promptly to prevent water damage.
Common Mistakes to Avoid
Don’t skip the basics: a weak subbase or the wrong mix will ruin the slab before it cures.
You’ll also create long-term problems if you rush finishing, skip reinforcement or joints, or ignore weather conditions.
Follow the right prep, mix, timing, and reinforcement to avoid costly fixes later.
Mistake 1 Poor Subbase Preparation
If you skip proper subbase preparation, your concrete floor will settle, crack, or drain poorly long before its time.
You need uniform compaction, correct aggregate depth, and a stable, well-drained surface. Remove organic material, fix soft spots, and compact in layers with a plate compactor.
Install a vapor barrier and edge forms so the slab stays supported and drains correctly.
Mistake 2 Incorrect Concrete Mix or Slump
Many concrete issues come down to choosing the wrong mix or slump, so you should match the mix design and slump to the job: a flat, dense floor needs a low-slump, properly proportioned mix for strength and finishability, while a broom-finished exterior slab can tolerate a higher slump for workability.
Check specifications, use correct water-cement ratio, and order admixtures or aggregates that meet project requirements.
Mistake 3 Rushing Finishing or Improper Curing
Finish the surface deliberately and cure it properly, because rushing either step wrecks strength, durability, and appearance.
Don’t overwork concrete when bleed water’s present; wait, then float and trowel at the right time.
Start curing immediately—keep the slab moist with blankets, plastic, or curing compound for at least seven days.
Proper timing prevents cracking, scaling, and weak surface wear.
Mistake 4 Skipping Reinforcement or Joints
When you skip reinforcement or neglect control joints, the slab will crack, curl, and fail to handle loads as designed; reinforcing steel or mesh and properly spaced joints control where and how concrete moves.
You should place rebar or wire mesh to add tensile strength, lay control joints at recommended intervals, and anchor slabs correctly so shrinkage and load stresses don’t create random, costly damage.
Mistake 5 Ignoring Weather and Environmental Factors
If you ignore weather and site conditions, your slab can cure improperly, crack, or wash out before it sets, wasting time and money.
Check forecasts, avoid pouring in heavy rain, and protect fresh concrete from sun, wind, and freezing.
Use admixtures, curing blankets, or windbreaks as needed.
Plan pours for moderate temperatures and keep water controls in place to guarantee consistent curing.
Best Practices and Pro Tips for Longevity and Finish Quality
Choose the right concrete mix and additives for your load and finish goals, and use tools like magnesium floats or a power trowel to achieve an ultra-smooth surface.
Plan a maintenance routine—regular cleaning, sealing, and timely repairs—to keep the slab durable and attractive.
Know when the job needs a pro versus what you can handle safely and efficiently yourself.
Choosing the Right Concrete Mix and Additives
Picking the right concrete mix and additives sets the foundation for a durable, smooth floor that meets your load, climate, and finish requirements.
Choose appropriate slump and compressive strength for traffic and slab thickness.
Add air entrainment for freeze-thaw, plasticizers for workability, and fibers for crack control.
Use corrosion inhibitors for embedded metals and set retarders or accelerators to match curing conditions.
Techniques for Ultra-Smooth Finishes (Power Trowels, Magnesium Floats)
Begin with the right timing and tools: for an ultra-smooth finish you’ll strike a balance between when the bleed water has left the surface and when the slab can support the weight of a power trowel or magnesium float without tearing.
Start with a magnesium float to compress and close pores, then progress to blades. Keep blades flat, overlap passes, adjust speed for concrete set, and finish with light passes.
Long-Term Maintenance: Cleaning, Sealing, and Repair Schedule
While proper finishing gives your slab its initial look, long-term performance depends on routine cleaning, timely sealing, and prompt repairs—you’ll extend life and preserve appearance by following a simple schedule.
- Weekly: sweep, mop with pH-neutral cleaner; avoid harsh chemicals.
- Every 1–3 years: inspect and reapply breathable sealer based on wear and traffic.
- Immediate: fill cracks, replace spalled patches, and address drainage to prevent recurrence.
When to Hire Professionals vs. DIY
Routine maintenance tells you a lot about what you can handle on your own and when to call in pros.
If the job’s small—patching, sealing, basic leveling—you can save money doing it yourself with proper tools and prep.
Hire professionals for structural issues, large pours, complex reinforcement, or polished finishes to guarantee durability, warranty coverage, and a consistently smooth, long-lasting surface.
Cost, Timeframe, and ROI Considerations
You’ll want to understand a typical cost breakdown—materials, labor, site prep, and finishes—and the main factors that can push the price up or down.
Expect a project timeline that covers prep, pour, initial set, and several weeks to reach full cure for overlays or heavy use.
Also weigh the ROI: concrete’s durability, potential energy savings from thermal mass, and how a quality floor can boost resale value.
Typical Cost Breakdown and Factors That Affect Price
A clear budget starts by breaking the job into its main cost centers—materials, labor, site prep, forms and reinforcement, finishing, and any permits or disposal fees—so you can see where dollars add up and where you can save. Factor slab thickness, access, finish quality, and local labor rates when estimating. Compare bids and consider lifespan versus upfront cost.
| Cost Center | Typical Percent |
|---|---|
| Materials | 30–45% |
| Labor | 25–40% |
| Site Prep & Extras | 10–25% |
Project Timeline: From Preparation to Full Cure
Now that you know where costs concentrate, map out the timeline so you can align spending with milestones and manage cash flow.
Schedule site prep and permits (1–3 days), formwork and reinforcement (1–2 days), pour and finish (1 day), initial set monitoring (24–72 hours), and controlled cure (7–28 days).
Factor labor, materials, inspections, and contingency to estimate ROI timing.
Value Add: Durability, Energy Efficiency, and Resale Impact
Durability isn’t just about resisting cracks—it’s about lowering long-term repair costs and boosting your floor’s value. Concrete choices like mix design, reinforcement, and proper curing determine those outcomes.
You’ll save money over time with quality materials. Insulated slabs improve energy efficiency and lower bills, and well-finished floors increase resale appeal.
Balance upfront cost, cure time, and expected ROI when deciding.
FAQ
You probably have specific questions about thickness, curing time, weather precautions, crack prevention, and the difference between sealing and polishing.
We’ll answer how thick a slab should be for a garage, basement, or workshop and when it’s safe for heavy use.
You’ll also get practical tips for pouring in extreme temperatures, minimizing cracks, and choosing between sealing and polishing.
How thick should my concrete floor be for a garage, basement, or workshop?
How thick should a concrete floor be for a garage, basement, or workshop?
For typical residential garages and basements, pour 3.5–4 inches slab on compacted subbase; use 4–6 inches where heavier loads, vehicle lifts, or frequent forklift use are expected.
Add steel reinforcement or fiber, and increase thickness at footings, ramps, or seams.
Consult local code and a structural engineer for unusual loads.
How long does concrete take to cure before heavy use?
Once you’ve set the proper thickness and reinforcement for your slab, the next question is when you can put heavy equipment or vehicles on it.
Generally, wait at least 7 days for partial strength and 28 days for near-full design strength. For heavy loads, allow the full 28-day cure; sooner risks cracking or permanent deformation.
Use proper curing methods to guarantee strength.
Can I pour concrete in cold or hot weather and what precautions are needed?
Although concrete can be poured in extreme temperatures, you’ll need specific precautions to guarantee proper curing and strength.
In cold weather, warm aggregates, use heated water, insulated forms, and curing blankets; avoid freezing during first 48–72 hours.
In hot weather, cool materials, mist surfaces, use admixtures to slow setting, pour early morning or late evening, and maintain moisture to prevent rapid drying and weakness.
How do I prevent or minimize cracks in my new floor?
If you want a crack-resistant floor, control placement, curing, and joints from the start: use the right mix, place and consolidate concrete properly, add reinforcement or fibers, install control joints at correct spacing and depth, and keep the slab moist during the critical early cure period.
Also avoid rapid drying, limit heavy loads until strength gains, and repair hairline cracks promptly to prevent worsening.
What’s the difference between sealing and polishing a concrete floor?
Wondering whether to seal or polish your concrete?
Sealing applies a protective coating that repels stains, moisture, and wear; it’s replaceable and preserves texture.
Polishing mechanically grinds and densifies the surface to create a glossy, low-maintenance finish that resists abrasion without a coating.
You’ll choose sealing for protection and easy reapplication, polishing for durable shine and reduced upkeep.