How to Install Floor Heat in Concrete: Radiant Heating Made Simple
You can install radiant floor heat in a concrete slab using electric mats for small areas or hydronic PEX tubing for whole-room comfort, and you’ll need to plan layout, insulation, and wiring or plumbing carefully. Assess your slab, get permits, calculate heat loss, and choose components rated for concrete. Follow manufacturer instructions, pressure-test hydronic loops, and protect elements during the pour. With proper prep and testing you’ll avoid cold spots and leaks — keep going to learn full steps and tips.
How to Install Floor Heat in Concrete Quick Answer and Overview
The quickest answer: electric mat systems or hydronic tubing embedded in new concrete are the best approaches depending on your budget and job size.
This guide is for DIY-savvy homeowners and contractors installing heat in new or refitted concrete slabs, covering scope, tools, and code considerations.
Expect a few days to a week of work, costs ranging roughly $800–$8,000 depending on system and area, and a moderate to advanced skill level for a reliable install.
Direct answer: best approach at a glance
If you’re after a fast, reliable solution for warming concrete floors, hydronic tubing embedded in a thin concrete slab usually gives the best balance of efficiency, longevity, and comfort.
For how to install floor heat in concrete, plan tubing layout, choose proper insulation and slab thickness, connect to a boiler or heat pump, pressure-test loops, and pour concrete.
Finish with manifolds and controls.
Who this guide is for and project scope
Whether you’re a handy homeowner wanting to add cozy radiant heat to a new slab or a contractor planning a retrofit, this guide covers who should take on the job and what it includes.
You’ll find clear guidance for DIY-capable owners and professionals, scope boundaries (new pours, retrofits, slab overlays), required prep steps, system types covered, and when to call a licensed installer or engineer.
Estimated time, cost range, and required skill level
Expect this project to take anywhere from a single long weekend for a small, simple retrofit to several days or a week for a full new-slab installation, depending on slab size, system type (electric vs. hydronic), and crew experience. You’ll pay $500–$8,000+; hydronic costs more. Skill level: DIY possible for electric, professional recommended for hydronic and slab work.
| Item | Typical |
|---|---|
| Time | Weekend–1 week |
| Cost | $500–$8,000+ |
| Skill | DIY–Pro |
| System | Electric/Hydronic |
| Risk | Low–High |
Understanding Radiant Floor Heating in Concrete
When you embed radiant heating in concrete, you’re placing either electric cables or hydronic tubing directly in the slab so the mass becomes the heat source.
You’ll choose between electric systems, which are simpler to install but costlier to run, and hydronic systems, which are more efficient for large areas but need a boiler and more plumbing.
We’ll weigh the pros and cons of concrete installation—long-term efficiency and even heat versus slower response time and higher upfront work.
What is concrete-embedded radiant floor heating?
Think of concrete-embedded radiant floor heating as a hidden, low-profile heating system that uses warmth from tubing or electric elements cast into the slab to heat the room from the ground up.
You’ll get even, comfortable heat with minimal airflow and quieter operation. The slab stores thermal energy, smoothing temperature swings and improving efficiency.
Installation integrates with slab work and finish flooring.
Types of systems for concrete floors: electric vs. hydronic
Now that you know how concrete-embedded radiant heating works, you’ll choose between two main system types: electric and hydronic. You’ll weigh installation complexity, energy source, and control options. Electric uses mats or cables; hydronic circulates warm water. Pick based on project scale, budget, and available utilities.
| Electric | Hydronic |
|---|---|
| Cables/mats | Tubing/water |
| Simple for small areas | Better for large zones |
Pros and cons of installing in concrete slabs
Because concrete holds heat so well, embedding radiant tubing or cables in a slab gives you steady, even warmth and high system efficiency.
However, you’ll also face longer response times, higher upfront labor and material costs, and more challenging repairs if something goes wrong.
You’ll enjoy low operating costs, durable installation, and compatibility with many floor finishes.
Yet, repairs require cutting concrete and system changes are slow.
Pre-Installation Planning and Requirements
Before you start, assess whether your slab type, insulation, and load-bearing conditions will support embedded radiant tubing or mats.
Check local codes, secure any required permits, and plan for inspections so the work meets regulations.
Gather the right tools and materials and wear proper PPE to keep the job safe and efficient.
Assessing suitability: slab type, insulation, and load-bearing concerns
When evaluating whether your concrete slab can support underfloor heating, check the slab type, existing insulation, and load-bearing requirements to avoid performance or structural issues.
Determine slab thickness, age, and reinforcement; thin or cracked slabs may need repair or a topping.
Verify sub-slab insulation and thermal break to prevent heat loss.
Confirm load limits for added materials and equipment before proceeding.
Local codes, permits, and inspections
After confirming your slab’s condition and insulation, check local building codes and permitting requirements so your installation meets safety and legal standards.
Contact your municipal building department to learn permit types, setback or wiring rules, and inspector schedules.
Get required documents, submit plans or load calculations, and schedule inspections at key stages.
Noncompliance risks delays, fines, or forced remediation—don’t skip this step.
Tools and materials checklist
Gather the right tools and materials so your installation goes smoothly and meets code—this typically includes the heating elements (electric mats or hydronic tubing), a compatible thermostat and sensor, appropriate insulation and vapor barrier, a thin-set or self-leveling compound for embedding the system, conduit and junction boxes (for electric systems), manifolds and fittings (for hydronic), fasteners or staple guns, floor probes, a multimeter and pressure test kit, and personal protective equipment like gloves and eye protection.
- Verify system components and spare parts.
- Confirm measurement and testing tools.
- Stage adhesives, compounds, and connectors before work.
Safety considerations and PPE
Because you’ll be working with electrical or pressurized water systems and heavy materials, prioritize safety from the start: wear safety glasses, hearing protection, gloves, steel-toe boots, and a dust mask or respirator.
Lock out power, depressurize plumbing, and follow manufacturer guidelines. Use knee pads and back support for lifting.
Keep a first-aid kit and fire extinguisher nearby, and never work alone when handling live systems.
Design Decisions and Heat Load Calculations
You’ll start by calculating heat loss and the BTU/W per square foot needed to size the system correctly.
Then choose the system type and layout for efficiency—deciding spacing, tube or cable patterns, and manifold placement to match your load.
Finally, plan how the floor heating will integrate with existing HVAC and controls so it operates smoothly and efficiently.
Calculating heat loss and required output (BTU/W per sq ft)
Before you pick a heating mat or tubing layout, calculate the room’s heat loss so you know the BTU (or watt) output required per square foot.
Measure area, ceiling height, insulation R-values, window and door losses, and local design temperature.
Use a heat-loss formula or software to get total BTU/h, then divide by floor area to find BTU/h·ft² (or convert to W/m²) for system sizing.
Selecting system type and layout for efficiency
Now that you know the heat loss and required BTU/W per square foot, pick the system type and layout that matches that load and your floor construction.
Choose between hydronic or electric based on efficiency, ceiling heights, and available boiler or panel capacity.
Match floor thermal mass and insulation to system response time, and confirm control zones and pump/transformer sizing for balanced, efficient operation.
Spacing, tube or cable layout, and manifold placement
When laying out tubing or cables, start by spacing emitters to match your calculated heat load so each floor area gets consistent warmth; closer spacing raises output for cold spots, while wider spacing reduces material cost but can create uneven temperatures.
Plan loops to minimize bends, keep run lengths within manufacturer limits, and place manifolds centrally for balanced flow.
Label circuits and allow access for servicing.
Integration with existing HVAC and controls
After you’ve mapped tubing runs and positioned the manifold, you’ll need to decide how the radiant system will work with your existing HVAC and controls so heat is delivered efficiently and predictably.
Tie the manifold to a dedicated zone on your controller, integrate with your thermostat or building management system, and size boiler or water heater output per heat load calculations.
Include mixing valves, sensors, and failsafes.
Step-by-Step Installation: Hydronic Systems in Concrete
Now you’ll move into the hands-on installation, starting with preparing the sub-slab and adding insulation to control heat loss.
Next you’ll lay a vapor barrier and edge insulation, install rebar or mesh, and fasten the tubing before routing it back to the manifold and pressure-testing the loops.
Finally you’ll pour the concrete carefully and protect the tubing during the pour to avoid kinks or displacement.
Step 1 Sub-slab preparation and insulation
Begin by clearing and grading the sub-slab area so you have a stable, level base for the hydronic system. Compact soil, remove debris, and correct depressions.
Install perimeter insulation strips or rigid panels against formwork to reduce edge heat loss.
Verify load-bearing compaction and slope for drainage. Confirm subgrade moisture control and consult local codes before pouring concrete.
Step 2 Laying vapor barrier and edge insulation
With the sub-slab graded and perimeter insulation set, you’ll lay the vapor barrier and edge insulation to protect the slab from moisture and thermal losses.
Roll polyethylene over the entire sub-slab, overlap seams 6–12 inches and tape them.
Install continuous foam edge insulation around walls to isolate the slab and allow movement.
Seal penetrations and inspect for tears before pouring concrete.
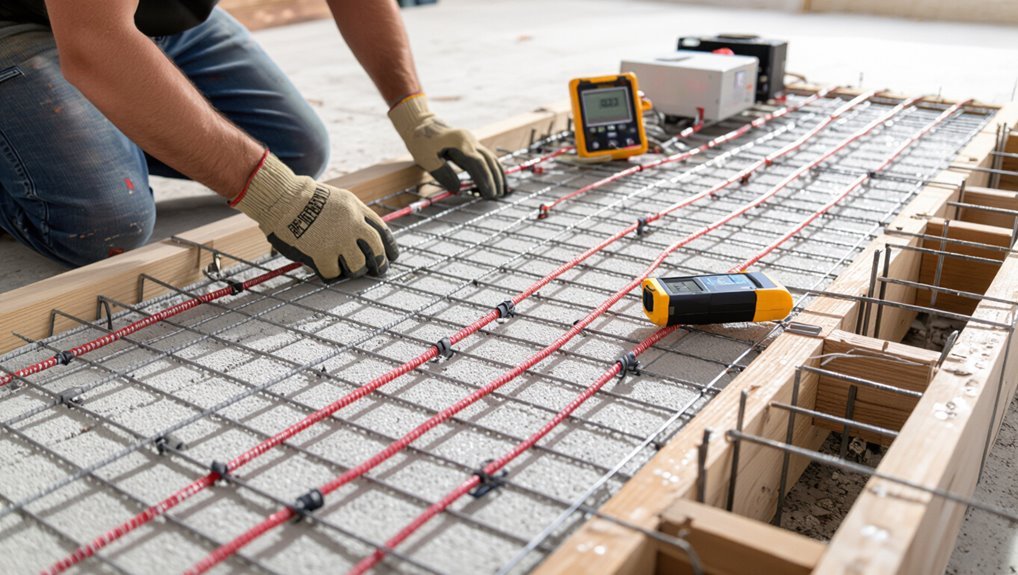
Step 3 Installing rebar/mesh and securing tubing
Before you place concrete, install reinforcement and fasten the hydronic tubing so the system stays exactly where you want it during the pour.
Lay rebar or welded wire mesh on chairs to maintain cover. Secure tubing with zip ties, clips, or specialty staples at regular intervals, keeping loops consistent and avoiding kinks.
Guarantee tubing rests above the vapor barrier and won’t float during the pour.
Step 4 Routing tubing to manifold and pressure testing
Now you’ll route each length of tubing back to the manifold and pressure-test the loops to confirm there’s no damage or leaks before the concrete goes in.
Run tubing neatly to minimize crossings, secure connections with appropriate fittings, and label each loop.
Pressurize with water or air to manufacturer specs, monitor for drops, repair any leaks, and document test pressure and duration before proceeding.
Step 5 Pouring concrete and protecting tubing during pour
After you’ve routed and pressure-tested every loop to confirm there are no leaks, it’s time to pour the concrete and protect the tubing during the pour.
Keep tubing secured to the rebar or mesh, maintain required cover depth, and verify manifold valves remain accessible.
Pour evenly to avoid displacement, work around tubing gently, and monitor pressure—stop and correct any visible movement before finishing the surface.
Step 6 Curing concrete and post-pour pressure test
When the pour’s finished and the surface’s set enough to walk on, start your curing protocol and perform a post-pour pressure test to catch any damage from the pour or shrinkage stress.
Keep tubing pressurized at specified test pressure, monitor for drops, and document readings.
Maintain proper moisture and temperature for at least seven days, protecting surfaces from rapid drying or freezing to prevent cracking.
Step 7 Connecting to boiler/pump, commissioning, and balancing
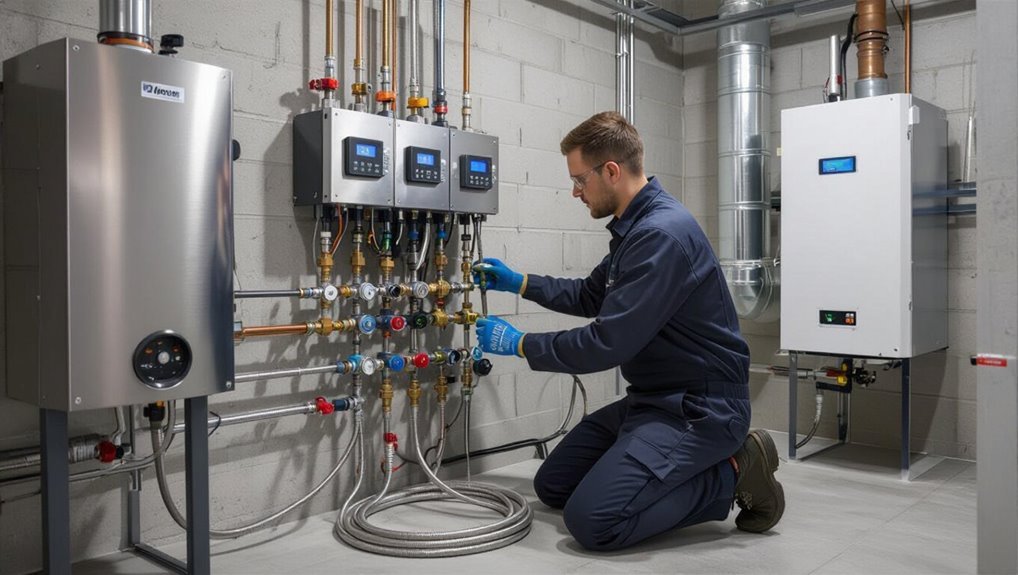
With the concrete cured and your pressure test confirmed, it’s time to hook the in-slab loops into the mechanical system and commission the radiant circuit.
Connect manifold to boiler/pump, install mixing valve and thermostatic controls, purge air, and verify flow rates.
Run a controlled heat-up, monitor supply/return temperatures, and balance each circuit using flow meters and valves until performance matches design specifications.
Step-by-Step Installation: Electric Systems in Concrete
Before you lay any wiring, you’ll prep the slab and add insulation to control heat loss and protect the system.
Then you’ll position mats, cables, or embedment plates, route wiring into junction boxes and conduit, and pour a thin layer of concrete or self-leveler over the elements.
Finally, you’ll complete the electrical hookup, wire the thermostat, and test the system for continuity and proper operation.
Step 1 Surface preparation and insulation needs
Although concrete pours can hide a lot of work, you need to prepare the slab and plan insulation carefully before installing an electric floor-heating system.
Clean, level, and repair cracks; remove debris and moisture.
Decide on thermal-break insulation, vapor barrier, and edge strip to prevent heat loss.
Confirm slab thickness and load limits, and follow local code and manufacturer requirements.
Step 2 Positioning heating mats/cables or embedment plates
Now lay out your heating mats, cables, or embedment plates according to the plan so you can see exactly where everything will sit in the slab.
Secure components with manufacturer-recommended tape or clips, maintain specified spacing and clearances, avoid overlaps, and keep heating elements off control joints and fixture locations.
Verify coverage matches floor zones and mark layout for the pour.
Step 3 Electrical routing, junction boxes, and conduit
Step 3 focuses on routing power and communication wiring, locating junction boxes, and installing conduit so you can protect connections and meet code requirements.
Plan cable paths, keep heater and thermostat wiring separate, and use rated conduit to the slab edge.
Mount accessible junction boxes above finished floor height where required, secure cables with strain relief, and label circuits for inspector verification.
Step 4 Pouring thin concrete or self-leveler over elements
Cover the heating elements with a thin concrete topping or self-leveling compound to embed and protect them while keeping the finished floor height within your design limits.
Mix per manufacturer instructions, pour evenly, and spread with a gauge rake or smoothing tool.
Work quickly to avoid cold joints, maintain proper thickness over wires or mats, and follow cure times before installing final flooring.
Step 5 Electrical hookup, thermostat wiring, and testing
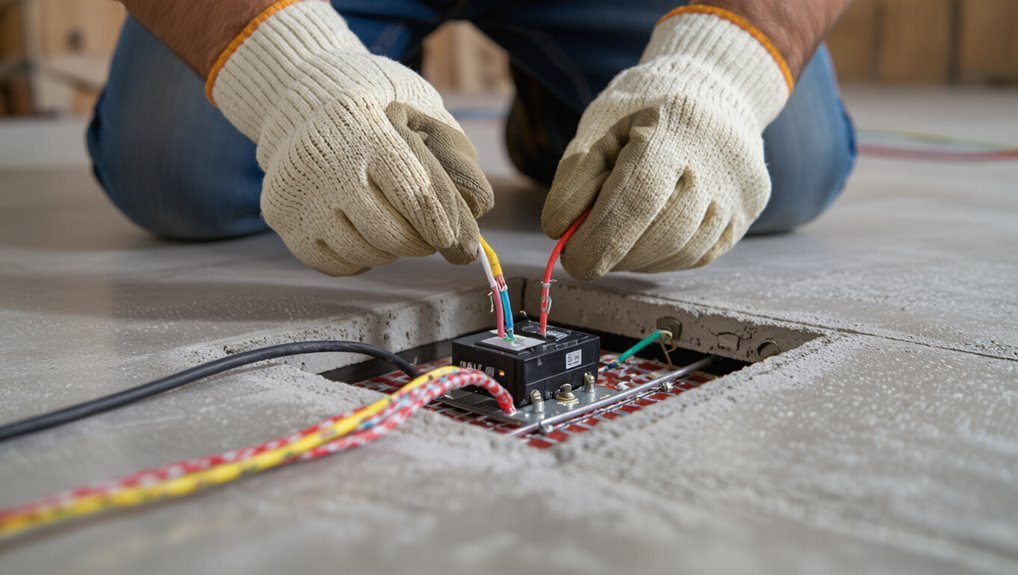
Before you close up the slab, connect the heating mats or cables to the power and thermostat so you can verify the system works and is safely protected.
Shut power at the breaker, pull required conduit, and terminate leads in a junction box.
Install a floor sensor, program the thermostat, restore power, and perform resistance and functional tests.
Label circuits and document settings.
Common Problems, Mistakes to Avoid, and Troubleshooting
When installing floor heat in concrete, you’ll want to avoid common mistakes like improper spacing, inadequate insulation, and poor wire protection that can cause failures down the road.
If you encounter cold spots, leaks, or electrical issues, start by isolating zones, checking continuity and resistance, and inspecting the slab for gaps or damage.
After installation, test the system with a megohmmeter and a thermostat calibration check so you can diagnose performance problems before you pour or finish the floor.
Typical installation mistakes and how to prevent them
Although the idea of embedding heating in concrete seems straightforward, small mistakes during layout, wiring, or pouring can lead to costly repairs or poor system performance.
So you’ll want to follow proven steps and double-check key details.
- Misplacing tubing: plan spacing and secure clamps to avoid movement.
- Poor slab prep: level, insulate, and install vapor barrier first.
- Skipping electrical checks: test circuits and label breakers before pouring.
Troubleshooting cold spots, leaks, and electrical failures
Cold spots, leaks, and electrical failures are the three issues you’ll see most often with concrete floor heating, and each has distinct causes and fixes you should know.
For cold spots, check insulation gaps, improper tubing layout, or airlocks and re-route or purge lines.
For leaks, isolate zones and repair or replace damaged tubing.
For electrical faults, inspect connections, breakers, and replace faulty thermostats or wiring.
How to test and diagnose system performance after installation
After addressing leaks, cold spots, and electrical faults, you’ll need to verify the whole system performs as designed before pouring the final slab or finishing the floor.
Pressure-test circuits, check manifold flow rates and temperatures, and run a heat-up cycle while monitoring each zone with infrared and surface sensors.
Compare readings to design specs, document anomalies, and correct airlocks, balancing issues, or sensor/calibrator faults before completion.
Best Practices, Maintenance, and Long-Term Care
To keep your hydronic or electric floor heat reliable, follow a simple maintenance schedule—annual system checks, periodic pressure and leak inspections for hydronic systems, and thermostat and wiring checks for electric systems.
Use efficient operation habits like setting sensible setback temperatures, programming thermostats, insulating slab edges, and bleeding or flushing circuits when performance drops to save energy.
Before refinishing or changing floor coverings, shut down the system, confirm floor temperature is cool, and check compatibility and adhesive recommendations to avoid damaging the heating elements.
Recommended maintenance schedule for hydronic and electric systems
A regular maintenance schedule keeps both hydronic and electric floor-heating systems running efficiently and helps you spot issues before they turn into costly repairs.
Inspect manifolds, pumps, valves, pressure and antifreeze levels for hydronic systems every 6–12 months; flush and test annually.
For electric systems, check thermostats, wiring connections, and insulation resistance yearly.
Address faults promptly and keep clear service records.
Tips for efficient operation and energy savings
When you run your floor-heating system thoughtfully, you’ll cut energy use and extend its life: set thermostats a few degrees lower, use setback schedules, insulate the slab and perimeter, and avoid rapid temperature swings that force the system to work harder.
Program gradual ramps, seal drafts, use zoned controls, maintain boiler or controller efficiency, and monitor for leaks or electrical issues to prevent waste.
What to do before refinishing or changing floor coverings
Before you pull up flooring or sand a surface, shut off the floor-heat system and confirm it’s fully cooled so you don’t damage heating elements or create safety hazards.
Check plans or schematics to locate wiring and sensors, mark protected zones, and notify occupants.
Use noninvasive fasteners, avoid deep cutting, test thermostats after work, and document changes for future maintenance.
Cost Comparison and ROI
Before you commit, compare upfront costs—materials, labor, and permits—so you know what to budget.
Then weigh operating costs and energy efficiency to see how much you’ll save monthly.
Finally, estimate the payback timeline and the factors (fuel type, insulation, usage) that will influence your ROI.
Upfront costs: materials, labor, and permit estimates
Although the sticker shock can be surprising, you’ll get a clearer picture once you break costs into materials, labor, and permits—each affects your total investment and payback timeline differently.
| Item | Typical Range | Notes |
|---|---|---|
| Materials | $3–$8/sq ft | Tubing, mats, controls |
| Labor | $4–$10/sq ft | Concrete work, electricians |
| Permits | $100–$1,000 | Local fees vary |
Operating costs and energy efficiency comparison
Now that you’ve mapped out upfront costs, you’ll want to compare how much it’ll actually cost to run floor heat and how quickly those expenses pay back.
Compare energy sources: electric mats cost more per kWh, while hydronic systems use cheaper fuel but need a boiler.
Factor thermostat control, insulation, and zoning—these cut runtime and bills.
Estimate seasonal usage for accurate comparisons.
Payback timeline and factors that influence ROI
When you’re weighing payback, focus on how installation costs, energy prices, and usage patterns interact to determine how fast your floor-heat system recoups its investment.
Estimate upfront expense, expected annual energy savings, and maintenance. Factor in local fuel rates, climate, insulation quality, and system lifespan.
Calculate simple payback (cost ÷ annual savings) and consider incentives or increased home value to improve ROI.
When to Hire a Pro vs. DIY
You can handle simple prep and laying electric mats yourself, but call a licensed plumber or electrician for hydronic hookups, wiring, and any work that affects gas or main electrical systems.
When you hire someone, check licenses, insurance, references, and ask for detailed bids, timelines, and warranty terms.
Keep a short checklist of questions so you can compare contractors before you decide.
Tasks you can safely DIY
Although some steps are straightforward, knowing which parts of a concrete floor heat install you can tackle yourself will save time and money.
You can prep the slab, lay insulation, mark tubing layouts, secure mats or tubing to reinforcement, and pour or screed concrete under guidance.
You can also test continuity and pressure-test tubing before final cover—just follow manufacturer instructions and local code.
Tasks that require licensed professionals (plumber/electrician)
If your project involves routing hot-water tubing into existing plumbing, connecting manifolds, tying electric mats into the home’s wiring, or installing controls and sensors, hire licensed pros—these steps demand permits, code knowledge, and certified work.
You should also call a plumber or electrician for boiler hookups, pressure testing, meter upgrades, complex panel changes, or when local codes require inspections.
Safety and liability matter.
How to vet contractors and questions to ask
When should you call in a pro and when can you tackle floor-heat work yourself?
Vet candidates by checking licenses, insurance, and references.
Ask about experience with concrete radiant systems, warranty terms, timeline, permits, and troubleshooting.
Request itemized bids and proof of past projects.
Compare quotes, verify communication style, and trust your instincts—hire the pro who’s transparent, responsive, and confident.
Materials and Product Recommendations
You’ll want to choose proven PEX or cross-linked polyethylene tubing, quality manifolds or electric mats, and a reliable thermostat rated for concrete slab use.
Add rigid foam insulation and consider concrete additives or admixtures that improve thermal conductivity and reduce cracking.
Buy from reputable dealers or manufacturer distributors and look for certifications like ASTM, CSA, or ETL to guarantee performance and safety.
Recommended tubing, manifolds, mats, and thermostats
Choosing the right components makes the system efficient and reliable, so you should pick tubing, manifolds, mats, and thermostats that match your slab type, heating load, and control preferences.
Use cross-linked polyethylene (PEX) tubing, a stainless steel manifold with flow meters, factory-wired electric mats for small zones, and programmable thermostats with floor sensors for accurate temperature control and zoning.
Insulation and concrete additives to improve performance
Because most of your heat goes upward through the slab, install a continuous layer of rigid insulation beneath and around the slab edges and under any slab-on-grade toes to cut heat loss and speed warm-up times.
Add a vapor barrier under insulation in moist soils.
Use concrete additives like air-entraining agents for freeze-thaw durability and microsilica or plasticizers to improve strength and reduce permeability for better heat transfer.
Where to buy and what certifications to look for
Where can you source high-quality materials and how do you verify they meet performance and safety standards?
Buy from reputable HVAC or electrical suppliers, manufacturers, and certified distributors.
Look for certifications like UL, ETL, CSA, CE, and ISO 9001; check radiant-specific listings (AHRI or CEN where applicable).
Verify warranties, read datasheets, confirm installer support, and buy matched components to guarantee compatibility and safety.
Frequently Asked Questions
You’ll find answers here to common questions like whether radiant heat can be retrofitted into existing concrete and how deep tubing or cables need to be embedded.
I’ll also cover concerns about cracking, when you can safely run the system after a pour, and which floor coverings work best.
If you have more specific conditions, mention them and I’ll tailor the guidance.
Can radiant heat be installed in existing concrete floors?
Curious whether radiant heat can be added to an existing concrete floor? Yes—you can.
Options include thin electric mats laid over the slab with a thin underlayment or installing hydronic tubing in a new thin overlay or on top of the slab with a floating system.
Expect added floor height, possible removal of finish, and professional assessment for insulation, load, and heat source compatibility.
How deep should tubing or cables be embedded in concrete?
While installation varies by system and local code, you should generally embed hydronic tubing or electric cables deep enough to protect them and guarantee efficient heat transfer without adding unnecessary mass—typically 1 to 3 inches (25–75 mm) of concrete cover over tubing in poured slabs, or near the slab surface (within ¾ to 1½ inches) when using thin overlays or electric mats.
Follow manufacturer specs and local code, place tubing on chairs or fastening systems to maintain depth, and avoid burying too deep, which slows response and wastes energy.
Will radiant floor heat crack my concrete slab?
Embedding tubing at the right depth helps protect pipes and control thermal movement, but you might still wonder whether the heat itself can crack your concrete slab.
Proper design prevents thermal cracking: control joints, adequate cement mix, and gradual temperature changes keep stresses low.
Maintain modest surface temperatures, avoid rapid heating, and use reinforcement or fibers to distribute loads—then radiant heat won’t cause cracking.
How long before a poured slab can the system be operated?
Before you fire up the system, let the new concrete cure sufficiently so coils and slab aren’t stressed by rapid temperature changes; typically that means waiting at least 7 days before low-temperature testing and 28 days before full operating temperatures.
During curing, increase heat slowly if needed, monitor for leaks, and follow your engineer’s or manufacturer’s specific ramp-up schedule to prevent thermal shock and guarantee system integrity.
Can I use radiant floor heat with all types of floor coverings?
Can you use radiant floor heat with any floor covering? Generally yes, but materials differ.
Tile, stone, and polished concrete conduct heat best. Engineered wood, some laminates, and resilient flooring work if manufacturers approve maximum temperatures.
Solid hardwood, thick carpets, or glued cork may restrict heat transfer or risk damage.
Always check product specs, use proper underlayment, and follow installer recommendations.