How to Hang Ceramic Tile on a Wall Without It Sliding
You can hang ceramic tile on a wall without it sliding by using a non‑sag polymer‑modified thinset, creating a level ledger or batten for the first row, and supporting each course with temporary battens, spacers, or suction cups until the mortar firms. Back‑butter large tiles, use the correct notched trowel, and keep the work area at recommended temperatures. Check alignment often and tap tiles into place with a rubber mallet; keep going and you’ll pick up full installation tips.
Quick Answer How to Hang Ceramic Tile on a Wall Without It Sliding
Use a strong, non-sag thinset and press tiles into place with spacers and a level to prevent sliding.
You’ll need thinset mortar, a notched trowel, tile spacers, a level, and optional temporary support like tape or ledger boards; plan on about 1–2 hours per small section.
With the right materials and steady technique, tiles will stay put while the mortar cures.
One-sentence solution
Keep tiles from sliding by applying a high-quality, non-sag thinset mortar, pressing each tile firmly, and using plastic spacers and temporary supports (like a ledger board or tilted shelf) until the mortar sets.
When you learn how to hang a ceramic tile, work in small sections, check level and plumb often, remove excess mortar, and leave supports until the adhesive cures fully to prevent any slippage.
Key materials and time estimate
For a reliable, non-sag installation you’ll need quality thinset (an anti-sag or polymer-modified formula), a notched trowel sized to your tile, plastic spacers, a level and rubber mallet, a temporary ledger or tilted shelf for support, and cleanup tools like a margin trowel and damp sponge.
Plan to work in small sections and allow at least 24–48 hours for the adhesive to cure (longer for cooler or thicker installations).
- Thinset, trowel, spacers
- Ledger or temporary shelf
- Allow 24–48+ hours cure time
Basic Understanding Why Tiles Slide and What Prevents It
When you hang tile on a wall, gravity and the time the adhesive needs to cure are the main forces trying to pull it down.
Larger, heavier tiles and long, thin formats are more likely to slip than small, lightweight pieces. Choosing the right adhesive or mortar with good initial grab and non-sag properties is what prevents sliding.
Forces acting on wall-mounted tile (gravity, adhesive setting time)
Although gravity constantly pulls downward on each tile, it’s the balance between that load and how quickly the adhesive gains grip that determines whether a tile will stay put or slide.
You must consider shear from weight, any outward leverage from spacers or uneven backing, and the adhesive’s open time and initial grab.
Faster grab and proper coverage resist sliding until full cure.
Tile types and sizes that are prone to sliding
Because larger and heavier tiles exert more shear on fresh adhesive, you’re more likely to see sliding with big-format porcelain or natural stone than with small mosaics.
Thin, large tiles, heavy stone slabs, and tiles with smooth backs slip more easily. Textured or grooved backs, lighter ceramics, and smaller units resist movement.
Corner, vertical cut, and oversized accent pieces demand extra support during setting.
Adhesives and mortars: properties that affect slip resistance
If you want tiles to stay put, the mortar you choose matters as much as the tile size and substrate.
You should pick a non-sag, polymer-modified thinset for vertical work; its improved adhesion and open time reduce slipping.
Look for high bond strength, proper pot life, and thixotropic behavior so the mix holds tiles without slumping.
Match mortar to tile and wall materials.
Tools, Materials, and Safety Preparations
Before you start, gather the essential tools—tile saw or scorer, trowels, grout float, level, and a good set of spacers and shims.
Choose adhesives or mortars with anti-slip (non-sag) formulations and consider optional supports like ledger boards and suction cups for heavy tiles.
Wear safety gear and prep the surface with cleaners, primers, and patching compounds to guarantee a secure bond.
Essential tools
Tools make the job faster and your finished wall stronger, so gather a few essentials before you mix adhesive or cut tile.
You’ll need equipment for measuring, cutting, setting, and safety. Keep items handy and inspect them.
- Tile cutter or wet saw
- Notched trowel and spacers
- Level, tape measure, safety goggles, and gloves
Preferred adhesives and mortars with anti-slip properties
Choose adhesives and mortars that include anti-slip additives or that are specifically formulated for vertical tile installations, because they’ll help keep heavy or large tiles from sliding while the bond sets. You should pick polymer-modified thinset, non-sag mastics for wall tiles, or specialty anti-slip mixes. Check pot life, open time, and manufacturer vertical rating.
| Type | Use | Note |
|---|---|---|
| Polymer-modified thinset | Ceramic/porcelain | Strong bond |
| Non-sag mastic | Wall ceramic | Easy application |
| Anti-slip mix | Large format | Vertical rated |
| Fast-set variant | Quick jobs | Short pot life |
| Flexible mortar | Movement areas | Crack resistance |
Optional supports and hardware (shims, spacers, ledger boards, suction cups)
A few simple supports and hardware can make vertical tile work faster and neater, and they’ll keep tiles plumb and stable while the adhesive cures.
Use these optional aids to speed installation and prevent slippage:
- Shims and plastic spacers for consistent gaps and minor leveling.
- Temporary ledger board to support lower rows.
- Suction cups for holding large tiles while you adjust and set them.
Safety gear and surface prep materials
Before you start sticking tile to the wall, gather the safety gear and surface‑prep materials you’ll need so the job goes cleanly and without injury.
Wear gloves, safety glasses, and a dust mask. Clean and dry the wall; remove loose paint and dust. Use a primer on drywall or cement board before tiling.
- Gloves, goggles, dust mask
- Bucket, sponge, primer
- Scraper, sandpaper, vacuum
Step-by-Step Method to Prevent Tile Slippage
Before you start tiling, you’ll assess the wall and plan the layout so each course sits square and supported.
Then you’ll prepare the substrate—clean, repair, add backing or waterproofing—and pick and mix the right adhesive to the proper consistency.
Finally, apply adhesive with the correct trowel size and back-buttering, and install a temporary ledger or mechanical supports for the first course to prevent slippage.
Step 1 Assess the wall and plan layout
Start by inspecting the wall’s flatness, material, and condition so you know what prep is required and how to lay out your tiles to prevent slippage.
Measure and mark reference lines, find studs, and note obstacles like outlets or trim.
Dry-fit tiles, planning full and cut pieces to minimize small edges.
Choose a balanced layout and record tile orientation before you start.
Step 2 Prepare the substrate (cleaning, repair, backing board, waterproofing)
Prepare the substrate thoroughly so your tiles have a flat, stable surface to bond to and won’t slip during installation.
Clean off dust, grease, and loose material; repair cracks or holes with suitable filler.
Install cement backerboard where drywall’s unsuitable, tape and mud seams, and apply a proper waterproofing membrane in wet areas.
Verify surfaces are dry and firm before tiling.
Step 3 Choose the right adhesive and mix to correct consistency
Choose an adhesive formulated for your tile type and substrate—thinset mortar for ceramic on cement backerboard, an acrylic mastic for small, non-wet wall tiles, or a modified thinset for heavy or large-format pieces—and mix it to a creamy, lump-free consistency that clings to your trowel without sagging.
Test pot life, follow manufacturer water ratios, and mix small batches so adhesive stays workable and bonds strongly.
Step 4 Apply adhesive using proper trowel size and back-buttering technique
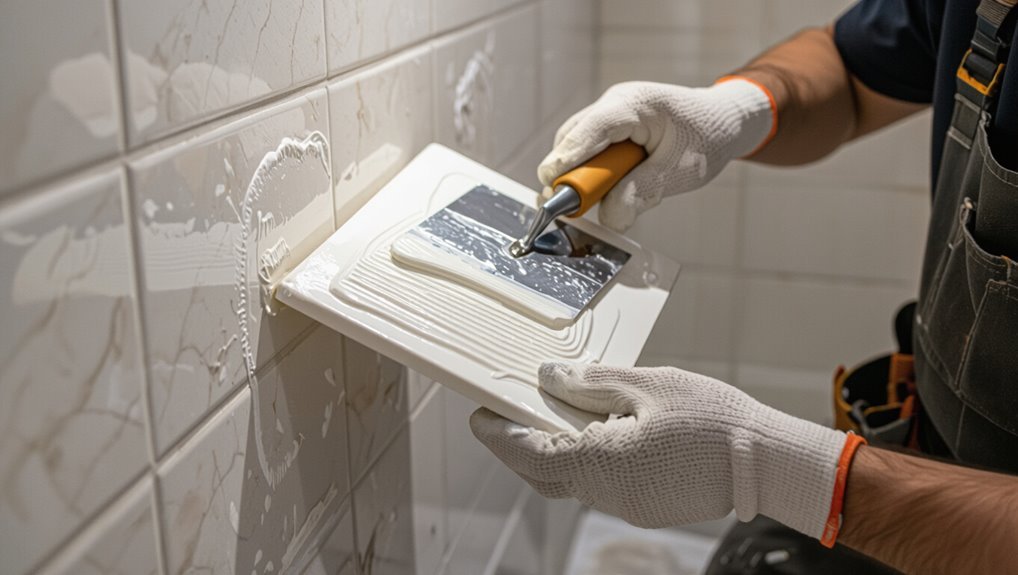
With your adhesive mixed to the right consistency, spread it onto the wall using a trowel sized for your tile—usually a 1/4″ x 1/4″ square-notch for small ceramic or a 1/2″ x 1/2″ for larger pieces—and comb it into straight, even ridges so tiles get full contact.
Butter the tile backs when needed, press firmly, and twist slightly to collapse ridges and expel air.
Step 5 Install a temporary ledger or mechanical support for the first course
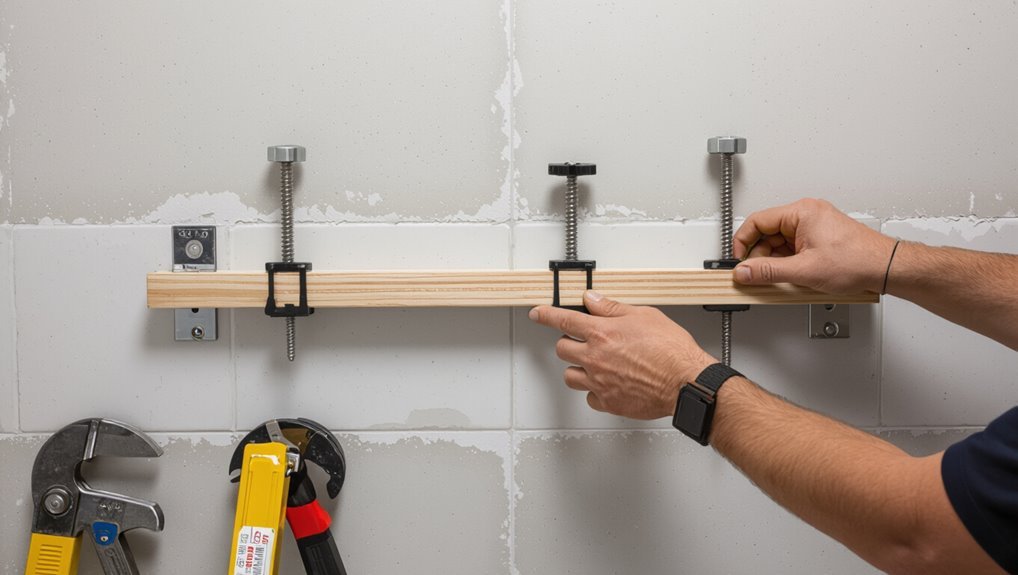
Before you set the first row of tiles, install a temporary ledger or mechanical support to keep them from slipping—this simple step lets you work confidently and accurately.
Screw a straight batten or aluminum angle to studs at the layout line, ensuring level and plumb.
Rest tiles on the ledger as you trowel adhesive above it, then remove supports after grout has cured sufficiently.
Step 6 Set tiles with correct pressure, spacing, and stagger pattern
Begin pressing each tile into the fresh adhesive with firm, even pressure so it bonds fully and sits flush with the ledger; tap gently with a rubber mallet if needed to seat the tile without sliding.
Use consistent spacers for even grout lines, check alignment frequently, and stagger joints per your pattern.
Press tiles until excess adhesive squeezes slightly, then remove it promptly.
Step 7 Use tile leveling systems and edge clips to maintain alignment
Although the adhesive holds the tile, you’ll get the best results by using a tile-leveling system and edge clips to keep each piece perfectly aligned and prevent slippage as the mortar sets.
Insert clips at joints, place wedges or caps, and tighten uniformly.
Work row by row, remove wedges once mortar firms, and trim clips flush so grout lines stay even and straight.
Step 8 Check and adjust for sag immediately; re-support if necessary
Check each row immediately after setting the tiles so you catch any sag before the mortar firms.
If you spot movement, tap tiles up with a rubber mallet, reposition spacers, and shim behind tiles or under temporary ledges.
Re-support with jacks, wedges, or scrap wood until mortar starts to hold.
Inspect again within minutes and correct any new droop to keep grout lines straight.
Step 9 Allow proper cure time before removing supports and grouting
Let the mortar fully cure before you remove temporary supports or start grouting.
Wait the manufacturer’s recommended cure time—typically 24–72 hours—depending on mortar and conditions.
Keep supports in place, avoid disturbing tiles, and maintain steady temperature and humidity.
Test a small area gently before removing all braces.
Proper cure prevents slippage, guarantees bond strength, and keeps tiles aligned for a clean finish.
Step 10 Grout, seal, and final cleanup
Once the mortar has set and you’ve removed any supports, you’re ready to grout, seal, and clean up.
Mix grout to manufacturer specs, force it into joints with a rubber float, and wipe excess with a damp sponge.
After grout cures, apply a penetrating sealer to protect against moisture and stains.
Finish by cleaning haze with a microfiber cloth and re-checking grout lines for touch-ups.
Alternative Methods and Specialized Techniques
For very heavy or large-format tile you’ll need mechanical anchors, screws, or z-clips to support the weight and keep panels secure.
You can also choose lightweight tile or adhesive-mounted systems where structure or thickness is a concern.
Finally, know when to use wet-set mortar versus mastic—wet-set for wet areas and large tiles, mastic for small, dry-wall installations.
Using mechanical anchors, screws, or z-clips for heavy or large-format tile
When you’re dealing with heavy or large-format ceramic tile, adhesive alone won’t always cut it — you’ll often need mechanical anchors, screws, or z-clips to secure the weight and prevent sagging or failure.
Use corrosion-resistant anchors into studs or masonry, countersink screws into routed tile edges or clips, and install z-clips top and bottom for continuous support.
Test load and grout carefully.
Lightweight tile options and adhesive-mounted systems
If heavy tile needs mechanical backing, you can save time and weight by choosing lightweight ceramic, porcelain, or thin-set panels that attach with strong construction adhesive or specialized mounting systems.
You’ll prep the substrate, use recommended adhesives or adhesive-backed panels, and follow manufacturer spacing and curing times. These systems reduce need for anchors, speed installation, and work well on drywall or backerboard when load limits are observed.
Wet-set mortar vs. mastic: when to use each
Although both wet-set mortar and mastic bond tile to walls, you’ll pick one over the other based on tile type, substrate, and exposure to moisture.
Use thin-set or wet-set mortar for porcelain, natural stone, exterior walls, and wet areas; it’s stronger and water-resistant.
Use mastic for small ceramic tiles on dry, interior walls where ease and quick work matter, avoiding showers and floors.
Common Mistakes That Cause Sliding and How to Avoid Them
You’ll cause sliding if you use the wrong trowel size or skim on too little adhesive, so match trowel notch and coverage to the tile.
Don’t skip back-buttering large tiles, always use a ledger or temporary supports on vertical installs, and avoid working on uncured or damp substrates.
Also don’t overload a wall beyond what the substrate can carry—check ratings and spread weight across proper backing.
Using wrong trowel size or under-applied adhesive
When you pick the wrong trowel or skim too little adhesive, tiles won’t grab the wall and they’ll slip before the mortar sets.
Use the manufacturer-recommended notch size so ridges provide full contact.
Comb mortar evenly, achieving 100% coverage on smaller tiles and near-complete coverage on larger ones.
Check periodically by lifting a tile—if you see gaps, add adhesive and re-bed immediately.
Skipping back-buttering on large tiles
If you’ve verified trowel size and full coverage but still see large tiles slipping, the problem may be skipped back-buttering.
You need to apply adhesive to the tile back as well as the wall for large formats. Back-buttering guarantees full contact, eliminates voids, and prevents gravity from pulling tiles down.
Don’t assume wall adhesive alone will hold heavy, large tiles reliably.
Not installing a ledger or temporary support
Although you’ve prepped the wall and mixed the mortar correctly, skipping a ledger or temporary support lets gravity work against you and invites tiles to slip before the adhesive sets.
You should tack a straight ledger board at the first course level or use removable metal clips and spacers. They hold tiles plumb and aligned, prevent sagging, and give adhesive time to cure without redoing work.
Working on uncured or damp substrates
Because uncured or damp substrates weaken bond strength, you’ll risk tile slippage and delayed curing if you install directly over wet or recently finished surfaces.
Wait for full cure per manufacturer instructions, measure moisture with a meter, and only proceed when readings are acceptable.
Dry, stable backing gives adhesives their rated performance.
If needed, improve ventilation, use fans or heaters, and retest before tiling.
Overloading wall with tiles beyond substrate capacity
Once the substrate is dry and sound, don’t assume it can carry any tile you want—overloading a wall with tiles heavier or larger than the backing can support will cause slippage, adhesive failure, or even structural damage.
Check substrate type and load ratings, use lighter tiles or backer board when needed, spread weight with proper adhesive and mechanical anchors, and consult structural guidance for heavy installations.
Prevention, Best Practices, and Pro Tips
Start vertical runs at the top and work downward so gravity won’t pull tiles off your wall as adhesive sets.
For large-format or heavy tiles, use full-bed setting, mechanical supports or temporary bracing and choose an adhesive rated for the tile size and weight.
Keep work area within the adhesive’s recommended temperature and humidity, and seal grout and maintain caulk lines to preserve long-term adhesion.
Best sequencing for vertical installations
A clear, logical sequence makes vertical tile work faster and prevents common problems like slippage and misaligned grout lines.
Start at a stable reference line, firmly butter each tile, and work in small horizontal rows so adhesive stays tacky.
Follow this order:
- establish level baseline and corners
- apply adhesive and set tiles row by row
- check alignment and adjust before adhesive skins over
How to handle large-format or heavy tiles
When you’re working with large-format or heavy tiles, plan for extra support, slower setting times, and tools that reduce strain so you don’t end up with sagging tiles or cracked grout.
Use mechanical supports and proper mortar, spot-bond then back-butter, and lift safely.
- Use a ledger or temporary bracing.
- Back-butter and use medium-bed mortar.
- Use suction lifters and teammates for placement.
Environmental tips: temperature and humidity considerations
Because mortar and grout cure by chemical reaction, temperature and humidity directly affect set time and final strength.
You should monitor conditions and adjust materials and scheduling accordingly. Work between 50–90°F (10–32°C) when possible, avoid direct sun or drafts, and raise humidity for fast drying mixes or lower it for slow-setting adhesives.
Use heaters, fans, or retarders as manufacturer recommends.
Maintenance tips to ensure long-term adhesion
If you want your tile to stay bonded for years, stay proactive with inspection and upkeep: check grout and caulk lines quarterly, clean spills promptly, and address loose or hollow tiles immediately to prevent moisture from reaching the substrate.
Use pH-neutral cleaners, reseal grout annually, tighten moving fixtures, and maintain stable indoor humidity.
Repair cracks fast, and avoid heavy impacts to preserve adhesion.
Troubleshooting Fixes for Sliding, Sagging, and Bond Failures
If a tile has slipped, you’ll want to remove and replace it carefully so you don’t damage the surrounding tiles, using a grout saw and thin-set removal tools to preserve edges.
Inspect whether the failure is in the adhesive bond or the underlying substrate by checking adhesive residue, hollow sounds, or loose backing.
Finally, decide between spot repair and redoing the whole section based on how widespread the problem and substrate damage are.
How to remove and replace a slipped tile without damaging neighbors
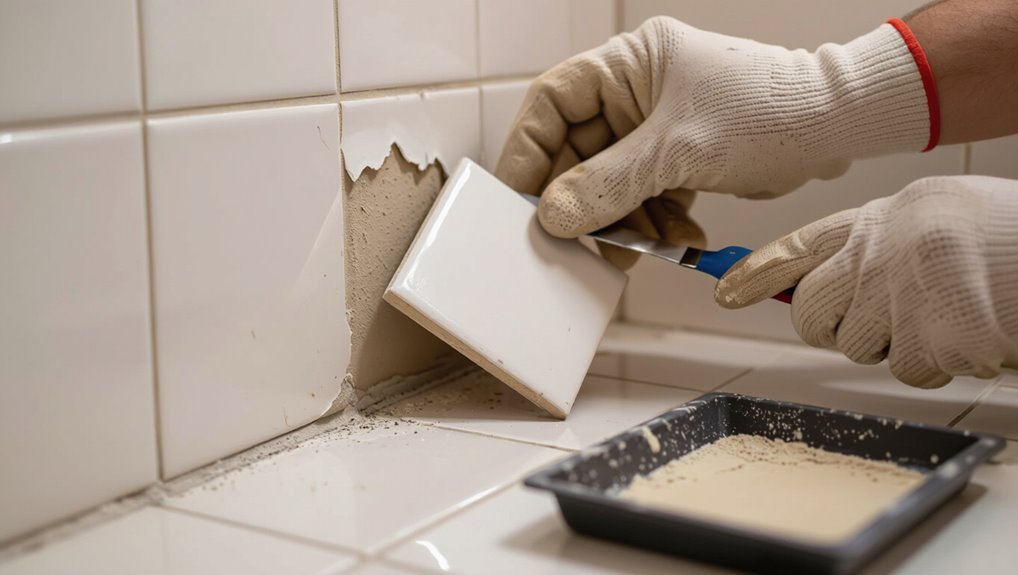
Start by evaluating how the tile slipped and how tightly it’s still bonded to the substrate before you touch the surrounding tiles.
Score grout, chip edges, and probe with a putty knife.
Remove grout around the tile, pry gently from one edge, and lift.
Clean substrate, apply appropriate thinset, bed the replacement, check alignment and spacing, then grout after full cure to protect neighbors.
Assessing adhesive failures vs. substrate failures
When a tile slips or sags, your first job is to figure out whether the adhesive failed or the substrate failed, because the fix differs: an adhesive failure means the thinset or mastic let go and you can usually re-bed the tile with proper prep, while a substrate failure—rotting backerboard, crumbling mortar, or a flexing drywall—means you must repair or replace the substrate before reattaching tiles.
Inspect adhesion, substrate soundness, and moisture.
When to redo the entire section vs. spot repair
After you’ve determined whether the problem is with the adhesive or the substrate, decide whether to tackle just the affected tiles or redo the whole section based on the scope of damage, ease of matching materials, and the wall’s structural integrity.
If multiple tiles, grout lines, or backing are compromised, strip and reapply.
For isolated delamination, remove, clean, replumb, and reinstall with proper adhesive and support.
Estimated Time, Cost, and When to Hire a Pro
For a small backsplash you can expect a few hours to a day, while larger walls will take a weekend or more depending on prep and drying times.
Costs vary with tile type, adhesive, and tools—buy quality basics and reuse tools to save money.
If the wall’s uneven, plumbing or electrical work’s involved, or you’re short on time, call a pro.
DIY time breakdown per small project vs. larger walls
A small backsplash or shower niche usually takes a weekend of active work—about 6–12 hours—while tiling an entire wall runs closer to several days or a couple of weekends, depending on prep and drying times. Plan phased work: prep, tile, grout, cure. Know when to call a pro for large layouts or tricky substrates.
| Task | Time |
|---|---|
| Prep | 1–4 hrs |
| Tile small | 6–12 hrs |
| Tile large | 2–3 days |
| Grout/cure | 24–72 hrs |
Cost factors and budget-saving tips
When you budget for tiling, focus on three big cost drivers—materials, labor, and prep work—because they determine whether the job stays affordable or balloons in price.
Choose mid-range tile, buy mortar and grout in bulk, rent specialty tools, and limit wall repairs you can do yourself.
Track waste, compare contractor quotes, and set a 10–15% contingency.
Signs you should hire a professional
If your tile project involves structural repairs, complex patterns, or plumbing and electrical work behind the wall, you should consider hiring a pro—these issues can quickly turn a simple install into a costly, time-consuming repair if done wrong.
Hire a pro if you lack tools, need waterproofing, face uneven substrates, or require permits.
Pros save time; expect higher upfront cost but fewer mistakes.
FAQ
You probably have specific questions—like whether mastic is OK in a shower or how long to wait before grouting vertical tile.
You’ll also want to know if small tiles can stick without a ledger, how to keep large-format tiles from sagging, and which adhesive works best for porcelain or glazed ceramic on drywall.
Read on for clear, practical answers to each.
Can I use mastic for wall tile in a shower?
Wondering whether mastic will work for shower wall tile? You can use organic mastic for dry or low-moisture areas, but in active showers you should avoid it.
Mastic isn’t waterproof long-term and can break down, staining or loosening tiles. Use a polymer-modified thinset mortar rated for wet areas and follow manufacturer instructions for substrate, backerboard, and waterproofing for durable results.
How long should I wait before grouting vertical tile?
Before grouting vertical tile, wait long enough for the adhesive to set so joints hold the grout without tiles shifting.
Typically you’ll wait 24 to 48 hours for thinset to cure at room temperature; extended time (72 hours) helps in cool or humid conditions.
Check manufacturer instructions and gently test a hidden tile edge before grouting to verify firm adhesion and prevent movement.
Will tile adhesive hold without a ledger for small tiles?
If your tiles are small and the thinset is mixed and applied correctly, you can often skip a ledger; small-format tiles are light enough that the adhesive will grip and support them on a vertical surface once it begins to set.
You should still key the thinset with a notched trowel, apply firm pressure, use proper open time, and work in manageable areas so tiles won’t slip before initial cure.
How do I prevent large-format tiles from bowing or sagging?
When you’re working with large-format tiles, gravity and their weight can make them want to sag or bow on vertical surfaces, so you need a strategy that combines proper backing, bedding, and handling.
Use rigid, fully supported backing (cement board or reinforced substrate), back-butter tiles, apply full-contact mortar with proper open time, use temporary supports or a ledger, and handle tiles upright to prevent bowing.
What adhesive is best for porcelain or glazed ceramic on drywall?
For porcelain or glazed ceramic over drywall, choose a polymer-modified thinset mortar rated for porcelain tile and interior wall use; it gives the bond strength and flexibility you need and tolerates the low absorption of dense tiles.
Use a notched trowel sized to tile back profile, back-butter larger pieces, and follow manufacturer open time and cure recommendations.
Avoid mastic—it’s not suitable.