How to Install Drain Tile: A Step-by-Step Drainage Guide
You can install drain tile yourself if you’re comfortable with digging, measuring slope, and basic plumbing; it uses perforated pipe, gravel, and filter fabric to collect groundwater, reduce hydrostatic pressure, and channel water away from your foundation. Start by evaluating soil, marking the route, calling utility locates, and excavating a sloped trench, then bed gravel, lay perforated pipe with the slit down, wrap with fabric, connect outlets, and backfill. Keep going to learn full step-by-step details.
Quick Answer Can You Install Drain Tile Yourself and What It Achieves
You can install drain tile yourself if you’re comfortable digging, laying perforated pipe, and managing gravel and drainage slope.
It typically stops basement water, reduces hydrostatic pressure, and protects foundations, with results varying by soil and workmanship.
Expect a weekend to a few days of labor and moderate material costs, or higher if you hire pros.
Short summary of purpose, typical outcomes, and time/cost expectations
Although installing drain tile can be a DIY project for someone with basic excavation and plumbing skills, it usually takes a full weekend to a few days and can cost anywhere from a few hundred to several thousand dollars depending on basement size, material choices, and whether you need a sump pump or professional excavation.
You’ll prevent basement flooding, lower humidity, and protect foundations.
Learn how do you install drain tile and plan time, tools, and budget.
What Is Drain Tile and How It Works
Drain tile is a pipe-and-aggregate system—usually perforated PVC or corrugated pipe wrapped in filter fabric and surrounded by gravel—that collects and channels groundwater away from your foundation.
It works by using a slight slope and gravity to move water through the perforations into the pipe and out to an outlet or storm drain.
You’ll choose between perforated vs. solid pipe and PVC vs. corrugated based on flow needs, durability, and installation preferences.
Definition and components (pipe types, aggregate, filter fabric)
Think of drain tile as a buried channel system that collects and redirects groundwater away from foundations and low spots.
You’ll use perforated or smooth pipe—commonly PVC or corrugated ABS—surrounded by clean aggregate to guarantee flow.
Wrap the trench with filter fabric to block soil while letting water pass.
Fittings, outlets, and connectors complete the system for reliable drainage.
How drain tile drains water (gravity, slope, outlet)
A properly installed drain tile uses gravity to move water away from your foundation: you place the perforated pipe on a continuous downhill grade so groundwater flows into the pipe, through the aggregate, and out the outlet without pumps.
You guarantee slope (typically 1% or more), maintain clear aggregate and fabric to prevent clogging, and route outlets to storm drains, daylight, or sump systems for safe discharge.
Differences: perforated pipe vs. solid pipe, PVC vs. corrugated
Once you’ve got slope, outlet, and clean aggregate right, you’ll need to pick the pipe that actually carries the water: perforated versus solid, and within those choices PVC versus corrugated.
Perforated pipe collects along the trench; solid pipe transports to the outlet.
PVC is rigid, smooth, and durable; corrugated is flexible and cheaper but clogs easier.
Choose based on site, budget, and longevity.
When and Why You Need Drain Tile
If you’re dealing with basement flooding, water pressure against your foundation, or perpetually soggy yards, drain tile can fix those problems.
Look for signs like damp walls, persistent puddles, or bowing foundation walls to know when you need it.
You’ll want to weigh DIY cost and skill limits against safety and complexity to decide if you should hire a pro.
Common problems solved (basement flooding, foundation water pressure, soggy yards)
When water starts pooling near your foundation or seeping into the basement, drain tile stops the problem at the source by redirecting groundwater away from your home.
You’ll prevent basement flooding, reduce hydrostatic pressure that cracks or shifts foundations, and eliminate soggy yards that kill grass and attract pests.
Properly installed drain tile protects structural integrity, improves soil drainage, and lowers long‑term repair costs.
Signs you need drain tile
Because water rarely announces itself before it causes damage, you should watch for clear signs that indicate a drain tile is needed.
- Persistent damp, musty basement or water pooling along foundation.
- Cracks with efflorescence or bowed walls from hydrostatic pressure.
- Soggy, poorly draining yard or foundation perimeter that stays wet after rain.
When to hire a pro vs. DIY considerations
Although installing drain tile can feel like a manageable weekend project, you should weigh the scale of the job, local soil and water conditions, and your comfort with excavation before deciding to go DIY.
Hire a pro if you face clay soil, high water table, complex grading, permits, or basement waterproofing ties.
DIY if trenching is shallow, access is easy, and you’re confident with tools and slope control.
Planning Your Drain Tile Installation
Before you start digging, you should assess the site—note soil type, slope, and where water collects—to determine the best drain tile layout.
Check permits, local codes, and call utility locating so you don’t hit anything underground.
Finally, measure the runs and calculate required linear feet, pipe diameter, and aggregate so you can buy the right materials.
Site assessment: soil type, slope, water source mapping

A quick, accurate site assessment sets the stage for an effective drain tile system: identify your soil type, measure the slope, and map all water sources so you can size and place drains correctly.
Test permeability with a percolation hole, note clay versus sandy zones, record grade changes with a level or laser, and mark down gutters, downspouts, springs, and soggy areas for planning.
Permits, local codes, and utility locating checklist
Permits and local codes matter because they set the legal and safety boundaries for your drain tile project; you’ll need to check zoning rules, building permits, and any watershed or stormwater regulations that apply to your property.
- Contact local building department and get permit checklist.
- Call utility-locate services (811) and mark lines before digging.
- Keep permits, diagrams, and inspector contacts on-site for compliance and inspections.
Required measurements and material calculation (linear feet, pipe diameter, aggregate)
When you plan drain tile, measure every run’s linear feet, decide pipe diameter based on soil and flow, and calculate aggregate volume so you buy the right amounts and avoid costly shortfalls.
Mark depths for slope, add fittings and extra length for turns, and factor in outlet distance.
Convert trench cross-section to cubic yards for gravel, and order 10–15% extra for compaction and waste.
Tools and Materials You’ll Need
You’ll need a few essential tools—trench shovel or trencher, level, and tape—to get accurate trenches and slopes.
Gather materials like perforated pipe, gravel, filter fabric, catch basins, and fittings, and consider optional equipment such as a mini-excavator or sump pump for bigger jobs.
If you don’t own everything, renting heavy equipment and specialty tools can save time and money.
Essential tools (trench shovel, trencher, level, tape)
Before you dig, gather the right tools: a trench shovel for clean, narrow beds; a trencher for long runs or tough soil; a reliable level to set pipe slope; and a tape measure to keep depth and spacing accurate.
- Use the shovel for precise edging and hand adjustments.
- Deploy the trencher to speed long trenches and conserve energy.
- Check slope frequently with the level and tape to guarantee consistent drainage.
Materials (perforated pipe, gravel, filter fabric, catch basins, fittings)
After you’ve assembled your tools and laid out the trench, gather the materials that will make the drain tile system work: perforated pipe to collect water, clean gravel to promote flow, filter fabric to keep fines out, catch basins where surface water concentrates, and fittings to connect and divert lines.
- Lay fabric first, then gravel bed.
- Position pipe with holes down.
- Cap and connect to basins and outlets.
Optional equipment (mini-excavator, sump pump) and rental tips
1 useful piece of optional equipment is a mini-excavator, which can speed trenching and reduce physical strain on larger projects.
You may also want a sump pump if the job involves collecting and discharging groundwater.
Rent machines from reputable dealers, inspect hydraulics and tracks, reserve for weather windows, bring appropriate transport and fuel, and choose a pump sized to your expected flow and head.
Step-by-Step Installation Guide
Now you’ll follow a clear sequence to install the drain tile, starting with marking the route and locating utilities.
You’ll excavate the trench to the proper depth and width, set the correct slope with base gravel, then lay filter fabric and position the pipe.
Finally, you’ll connect fittings, outlets, and any catch basins before backfilling.
Step 1 Marking the route and locating utilities
Begin by tracing the drain tile route on the ground and marking any planned trench lines with spray paint or flags so you can see them clearly as you work.
Next, call utility services for locates, verify marked lines with a probe or locator, and adjust your route to avoid utilities, trees, and irrigation.
Record reference points before digging.
Step 2 Excavating the trench to proper depth and width
Dig the trench to the marked route, keeping the bottom smooth and sloped toward the outlet at about 1/8 to 1/4 inch per foot (1%–2%) so water will flow freely; excavate to the depth specified for pipe cover and frost protection, typically below the footing or frost line.
Make the trench wide enough for pipe plus working space, remove loose soil, and tamp edges for stability.
Step 3 Ensuring correct slope and adding base gravel
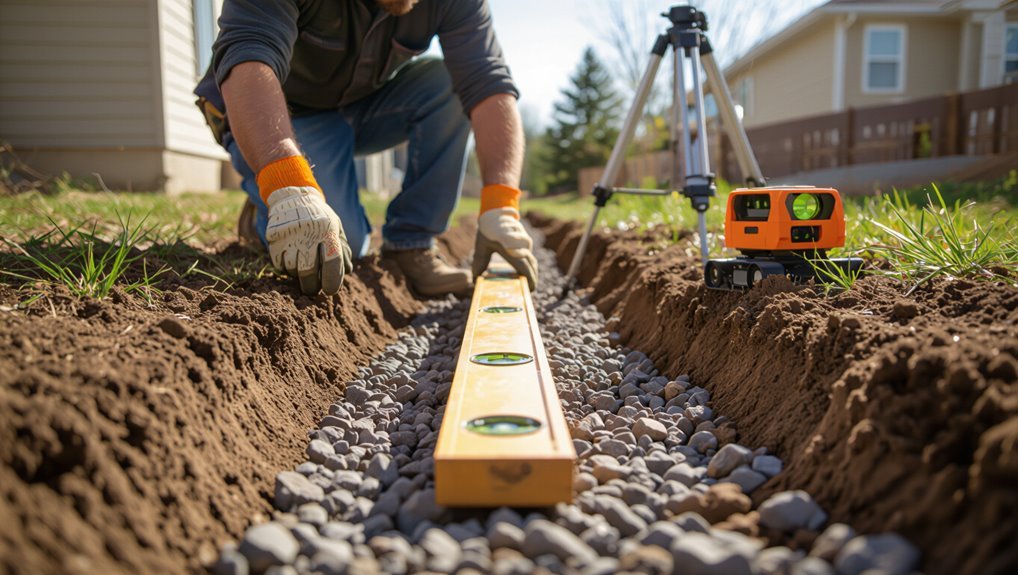
With the trench set and the bottom smoothed to your marked slope, check grade carefully before adding any material: a consistent fall of about 1/8 to 1/4 inch per foot (1%–2%) keeps water moving toward the outlet.
Compact a thin bedding layer of coarse gravel, recheck slope, then add remaining base gravel in lifts, tamping gently to maintain grade and prevent future settling.
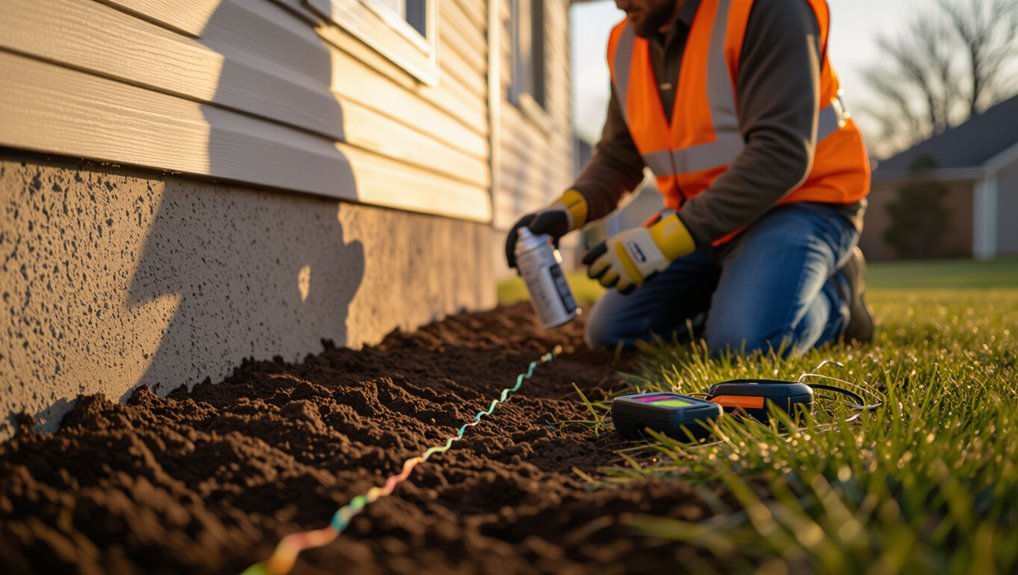
Step 4 Laying filter fabric and positioning pipe
Roll out the filter fabric along the trench so it overlaps the sides by 6–12 inches. Then anchor it temporarily with stakes or a few clumps of gravel to keep it from shifting as you lay pipe.
Place the perforated drain tile on the fabric, slit side down, maintaining the established slope. Space joints tightly, secure with couplings, and cover with gravel as you progress.
Step 5 Connecting fittings, outlets, and catch basins
Now connect the fittings, outlets, and any catch basins so the system can channel water off the property reliably.
Confirm pipe slope toward outlets, secure couplers and adapters with solvent weld or gasketed seals, and use proper clamps.
Position catch basins at low points, tie into main drain with tight connections, and test flow using water to detect leaks or misalignments before proceeding.
Step 6 Backfilling with gravel and wrapping fabric
Start by laying a 2–3 inch layer of clean, washed gravel over the drain tile to protect it and promote drainage, keeping the gravel level and compact enough to prevent settling but loose enough to allow water flow.
Add more gravel to bring the trench nearly flush, then wrap a breathable geotextile fabric over the gravel, tucking edges to keep soil out while allowing water to pass.
Step 7 Final backfill, compacting, and surface restoration
1. You’ll cover the trench with native soil, layering and compacting in 6–8 inch lifts to prevent settling.
Tamp each lift firmly, maintaining pipe protection and original grade.
Reinstall topsoil, amend as needed, and grade away from foundations for runoff.
Restore sod, seed, or hardscape promptly.
Keep traffic off restored areas until vegetation establishes.
Step 8 Testing the system and troubleshooting initial flow
Before you backfill completely, you’ll test the drain tile to confirm water flows freely and fittings are watertight.
Run water from a hose or pour buckets into the inlet, watching for steady discharge at the outlet and no leaks along joints.
Clear any clogs, reseat or tighten leaking connections, adjust slope if flow stalls, then retest until flow is consistent before finishing backfill.
Variations and Special Cases
When you run into unusual layouts or soil conditions, the basic drain-tile method needs adjustments.
You’ll look at perimeter/foundation specifics, choosing between a yard French drain or a linear trench, and planning tie-ins to storm sewers, dry wells, or sump pumps.
Also prepare for high groundwater, heavy clay, or ledge, since each requires different materials and techniques.
Perimeter/foundation drain installation specifics
Perimeter and foundation drain installation varies a lot with site conditions, so you’ll need to adapt layout, pipe type, and depth to each special case.
Inspect soil, slope, and footing depth. Choose perforated pipe, solid pipe, or high-capacity drains as needed.
Place gravel envelope, fabric wrap, and proper fall to outlet or sump.
Tie into foundation weeps or interior system carefully.
French drain across yard vs. linear trench drain
After handling foundation drains, you’ll often face yard drainage choices: a buried French drain that moves water through gravel and perforated pipe, or a surface-oriented linear trench drain that channels runoff quickly to a discharge point.
You’ll pick based on slope, soil, aesthetics, and maintenance: choose a French drain for infiltration and invisibility, a trench drain for concentrated surface flow and easy debris clearance.
Tie-ins to storm sewer, dry well, or sump pump
You’ll need to decide whether to discharge your drain tile into a storm sewer, a dry well, or a sump pump system based on site grade, local codes, and how much water you expect to handle. Choose per runoff volume, permit needs, and maintenance. Tie-ins must be permitted, use proper fittings, and guarantee frost protection.
| Option | When to use |
|---|---|
| Storm sewer | Large-volume, permitted |
| Dry well | Low volume, permeable soil |
| Sump pump | High groundwater or low grade |
Working with high groundwater, clay soils, or ledge
If your site has high groundwater, heavy clay, or bedrock near the surface, you’ll need different tactics than a standard drain-tile run to get reliable drainage.
Excavate deeper or slope to a sump, install larger perforated pipe with crushed stone and geotextile, or use sealed shallow channels against ledge.
Consider dewatering pumps, drainage matting, and consulting a geotechnical pro for long-term stability.
Common Mistakes and How to Avoid Them
Watch for a few common mistakes that undermine drain tile performance, like improper slope or a trench that’s too shallow.
Make sure you install and overlap filter fabric correctly to prevent clogging, place outlets where they meet local codes and avoid illegal discharges, and plan for accessible outlet locations.
If problems pop up after installation—poor flow, backups, or silted lines—you can usually correct them by regrading the slope, clearing or replacing fabric, relocating the outlet, or jetting and relaying sections as needed.
Improper slope or shallow trench errors
Because water follows the path of least resistance, giving your drain tile the right slope and depth is critical to avoid pooling and system failure.
Small deviations in grade or a trench that’s too shallow can turn an otherwise sound installation into a maintenance headache.
Check with a level or laser, maintain a consistent 1%–2% grade, dig deep enough for pipe, stone, and cover, and recheck before backfill.
Poor filter fabric use and clogging causes
Start by choosing and installing the right filter fabric—it’s the first line of defense against sediment clogging your drain tile.
Use a permeable, nonwoven geotextile, overlap seams, and secure edges to prevent soil intrusion.
Don’t fold or bunch fabric into the pipe; that restricts flow.
Inspect and replace damaged fabric during maintenance to avoid gradual clogging and system failure.
Inadequate outlet placement and legal/discharge mistakes
If you place the drain outlet poorly or ignore local discharge rules, your system can fail even if the pipe and fabric are perfect. You must plan outlet location and follow ordinances.
- Check local codes and permitted discharge points.
- Avoid directing water onto neighbors or foundations.
- Use proper outlets, extensions, or sump pumps per regulations to guarantee compliance and functionality.
How to fix common post-installation problems
Once you’ve confirmed your outlet placement and met local discharge rules, you’ll still want to inspect the system periodically for common post-installation problems and know how to fix them.
Check for blockages, silt buildup, and collapsed pipe sections. Flush lines, clear roots mechanically or with targeted herbicide, replace damaged tile, and regrade soil to restore proper slope.
Monitor discharge and adjust as needed.
Maintenance, Inspection, and Longevity
Set a routine inspection schedule so you can spot clogs, crushed sections, and poor connections early.
Learn simple cleaning methods, how to tell when pipe replacement is necessary, and when to call a pro.
You can extend system life with small upgrades like better filter traps, higher-grade pipe, or improved outlet grading.
Routine inspection schedule and what to look for
Inspect your drain tile system at least twice a year—spring and fall—and after any major storm, so you catch clogs, root intrusion, and shifts in grading before they cause damage.
- Check visible outlets for standing water and slow drainage.
- Walk the perimeter for soft spots, settling, or new depressions.
- Look for exposed pipe, displaced gravel, or vegetation pushing into the system.
Cleaning methods and when to replace pipe
Those twice-yearly checks will tell you when it’s time to clean or replace parts of the drain tile system.
Use a wet/dry vacuum, plumber’s snake, or pressure washer to clear blockages; flush with water to confirm flow.
Replace perforated pipe if crushed, split, heavily silted, or failing joints.
Swap fittings and regrade sections showing persistent pooling or collapse.
Extending system life with simple upgrades
A few targeted upgrades can add years to your drain tile system with minimal expense and disruption.
Replace old perforated pipe with corrugated or PVC, add cleanouts for easy flushing, and install a sump pump or backup battery.
Improve grading and extend outlet piping away from the foundation.
Inspect annually, clear debris, and address minor issues promptly to prevent costly failures.
Costs, Timeframe, and When to Hire a Professional
You’ll want to compare typical DIY costs (materials and rental tools) with contractor quotes so you know what you can reasonably handle.
Expect a simple DIY job to take a weekend, while complex excavations or basement-wide installs can stretch to several days or more.
Call a pro if you find persistent groundwater, structural cracks, or unclear utility locations—those are red flags you shouldn’t ignore.
Typical DIY vs. contractor cost breakdown
One key decision is whether to tackle drain tile yourself or hire a contractor, since costs, time, and complexity vary widely and can affect your home’s foundation and resale value. You can save on labor but risk mistakes; pros cost more yet offer warranty and speed. Decide based on skill, budget, and risk tolerance.
| Choice | Cost Range | Emotion |
|---|---|---|
| DIY | Low–Moderate | Hopeful |
| Contractor | Moderate–High | Relieved |
| Hybrid | Moderate | Cautious |
Estimated project duration by complexity
Expect most drain tile jobs to fall into three tiers—simple, moderate, and complex—with each tier having distinct costs and timeframes that should shape whether you DIY or call a pro.
Simple jobs take a day or weekend.
Moderate projects often span 2–4 days with excavation and batching.
Complex installs, involving structural work or deep sump systems, can take a week or more and need coordinated crews.
Red flags that indicate you should call a pro
If your basement shows active leaks, persistent hydrostatic pressure, or recurring mold despite previous fixes, call a pro—these signs mean the problem’s bigger than a weekend DIY.
Also hire help if trenching risks structural damage, utilities run through the work area, permits are required, or repair costs and time exceed your budget or skills.
Pros offer diagnostics, warranties, and efficient remediation.
Best Practices and Tips for a Successful Install
Before you start, make safety measures and erosion control to protect yourself and the site, like shoring trenches and using silt fences.
Pick a season with stable, dry weather to make digging and backfilling easier and less damaging to the yard.
Choose durable materials—proper pipe size, gravel, and corrosion-resistant fittings—so the system lasts with minimal maintenance.
Safety tips and erosion control during work
While you dig and lay pipe, keep safety and erosion control front and center so your work stays safe and your landscape intact.
Wear PPE, mark utilities, shore trenches, and use proper tools.
Divert runoff with silt fences, straw wattles, or temporary berms.
Stabilize exposed soil with seed, mulch, or erosion control matting, and inspect regularly to prevent washouts and hazards.
Seasonal timing and weather considerations
Because ground conditions and rainfall patterns dictate how easily you can trench and backfill, pick your installation window around stable, drier months to avoid muddy trenches and collapsed pipe lines.
Schedule work when frost has left the soil but before heavy rains return.
Monitor forecasts, start early in dry spells, and pause for unexpected storms to protect trench integrity, equipment, and newly laid drainage.
Material selection and future-proofing recommendations
Choose durable, appropriate materials now so your drain tile lasts and stays serviceable as conditions change.
Pick pipe, filter fabric, and gravel that resist clogging and chemical exposure. Plan capacity for heavier storms and easy access for repairs. Consider warranty and local codes. Prioritize longevity.
- Use perforated PVC with geotextile wrap.
- Size gravel and slope correctly.
- Include access ports for inspection.
FAQ
You’ll probably have questions like how deep to set the pipe, whether you can run it uphill or around obstacles, and how to stop roots from clogging it.
You’ll also want to know the real difference between a French drain and drain tile, and whether drain tile will fix every basement water problem.
I’ll answer each of these so you can pick the right approach for your situation.
How deep should drain tile be installed?
When you install drain tile, aim to place it at or just below the bottom of the footing so it can intercept groundwater before it reaches the foundation; in most homes that means 6–12 inches below the footing or basement slab, though local codes and soil conditions can require adjustments.
Dig to that depth, maintain consistent slope (1/8–1/4 inch per foot), bed pipe in gravel, and cover to protect against settling.
Can I run drain tile uphill or around obstacles?
Can you run drain tile uphill or around obstacles? You shouldn’t run tile uphill; it relies on gravity.
If you must change direction, keep slopes downhill toward the outlet, using fittings or short daylighted drops around obstructions.
Tunnel under or route around fixed obstacles, maintain at least 1%–2% slope, and avoid long horizontal runs that trap sediment or slow flow.
Will root intrusion clog drain tile and how to prevent it?
Although roots seek moisture and will exploit tiny joints or perforations, they don’t always clog drain tile if you take preventive steps.
Install root-resistant pipe, a fabric-wrapped envelope of clean gravel, and a physical root barrier near sensitive areas.
Maintain surrounding vegetation, avoid planting trees close to lines, and inspect periodically.
If intrusion occurs, use mechanical cutting or replace compromised sections promptly.
What’s the difference between a French drain and drain tile?
How do they differ?
You’ll see a French drain is a trench filled with gravel (often wrapped in fabric) that redirects surface and shallow subsurface water.
Drain tile refers to perforated pipe—usually laid at footing level—to collect and transport groundwater.
French drains manage broad drainage; drain tile handles concentrated subsoil water and ties into sump pumps or outlets for removal.
Can drain tile solve all basement water problems?
Wondering whether drain tile will fix every basement leak?
It helps most footing and perimeter seepage by collecting and redirecting groundwater, but it won’t stop roof leaks, plumbing failures, or rising groundwater if your property grading, gutters, or sump system are inadequate.
You should inspect sources, repair interior leaks, and combine drain tile with proper exterior drainage and a working sump pump for reliable results.