
How to Remove Scuff Marks From Vinyl Flooring Without Damaging the Surface
You can remove most scuff marks from vinyl flooring without damage by starting with the gentlest options: wipe with a microfiber cloth and warm water plus mild dish soap, use a soft rubber eraser or nylon brush, then try a melamine sponge very lightly. For stubborn marks, dab isopropyl alcohol or mineral spirits sparingly and spot-test first. Avoid steel wool, harsh solvents, and heat. Follow up with a vinyl-safe polish, and keep reading for step-by-step tips and precautions.
How to Remove Scuff Marks from Vinyl Flooring Without Damaging the Surface
You can usually lift scuff marks quickly and safely using household items like a soft eraser, microfiber cloth with mild detergent, or a bit of baking soda paste.
Test any method in an inconspicuous spot first and work gently to avoid scratching or discoloring the vinyl.
If marks won’t budge or the flooring shows wear, call a professional to prevent further damage.
Quick Answer Fast safe methods to remove scuff marks
Got scuff marks on your vinyl floor?
Quickly try a soft eraser or baking soda paste, gently rubbing until marks lift.
Use a microfiber cloth with warm water and mild dish soap for residue.
For stubborn spots, a magic eraser works but test first.
Rinse and dry to protect the finish.
These simple steps show how to remove scuff marks from floor vinyl safely.
When to call a professional
If scuff removal methods you’ve tried don’t lift marks or you’re unsure about the floor’s finish, call a professional to avoid accidental damage.
A pro can assess finish type, test safe cleaners, and use specialized tools or restoratives.
Contact a flooring contractor when scuffs penetrate the wear layer, cover large areas, or cleaning risks voiding a warranty.
Get an estimate and timeline before work begins.
Understanding Scuff Marks and Vinyl Flooring
Scuff marks are surface abrasions or transferred pigments from shoes and furniture that form when something rubs against your vinyl.
Different vinyl types—luxury vinyl plank, sheet vinyl, and vinyl tile—have unique layers and finishes, so they respond differently to cleaning.
Use care because harsh abrasion, strong solvents, or heat can strip finishes, melt seams, or permanently discolor the material.
What are scuff marks and how they form on vinyl
Everyday traffic and furniture movement leave dark, waxy streaks on vinyl that you’ll recognize as scuff marks. They’re caused when rubber, shoe soles, or debris rub microscopic particles into the surface finish, leaving pigment or softened material behind.
Scuffs sit on or slightly embed in the wear layer, so you can often remove them with gentle cleaning rather than aggressive scraping or harsh chemicals.
Types of vinyl flooring and how they react to cleaning (luxury vinyl plank, sheet vinyl, vinyl tile)
Because vinyl comes in several constructions—luxury vinyl plank (LVP), sheet vinyl, and vinyl tile—each type responds differently to cleaning and scuff removal. You’ll want gentler methods on LVP’s wear layer, moderate scrubbing on sheet vinyl, and careful spot cleaning on vinyl tile seams.
| Type | Surface | Cleaning tip |
|---|---|---|
| LVP | Layered | Use soft cloth |
| Sheet | Continuous | Mild cleaner |
| Tile | Seamed | Spot treat grout-friendly |
Why some removal methods damage vinyl (abrasion, solvents, heat)
Those different vinyl constructions tolerate cleaning differently, and that matters when you pick a removal method.
You’ll avoid damage by steering clear of harsh abrasion that scratches wear layers, strong solvents that strip finishes or discolor backing, and excessive heat that warps or softens vinyl.
Test cleaners in an inconspicuous spot, use gentle cleaners and soft cloths, and proceed slowly to protect the surface.
Safety and Preparation Before You Start
Before you start, make sure you’ve gathered the right tools and supplies—cleaning solution, soft cloths, a soft-bristled brush, and a gentle eraser or magic sponge—and that you’ve got gloves and ventilation if using chemicals.
Test any cleaner on an inconspicuous spot to check for discoloration or damage and follow basic safety precautions like wearing gloves and avoiding mixes of cleaners.
Sweep and remove debris, move furniture out of the way, and protect baseboards and edges so you’re working on a clean, safe surface.
Tools and supplies you should have on hand
Gather a few basic tools and gentle cleaners before you start so you won’t need to stop mid-job to hunt for supplies.
Have everything ready to work efficiently and protect the finish.
- Soft microfiber cloths, melamine sponge, and soft-bristle brush
- Mild dish soap, rubbing alcohol, and vinyl-safe cleaner
- Warm water bucket, mop, and rubber gloves
Safety precautions and spot tests
While vinyl is durable, you should still protect yourself and the floor: wear rubber gloves when using cleaners, ventilate the room, and avoid abrasive tools that can scratch the finish.
Test any cleaner on an inconspicuous spot, wait recommended dwell time, and check for discoloration or softening.
Note product labels for compatibility with vinyl and follow manufacturer guidance to prevent finish damage or health risks.
Preparing the floor area (sweeping, removing debris, protecting edges)
Start by clearing the area so you’ve got unobstructed access to every scuff: sweep or vacuum thoroughly, pick up small grit and debris with a damp microfiber cloth, and move furniture or rugs out of the way.
Tape baseboards and edges with low‑tack painter’s tape to protect trim, and place protective pads under furniture legs before returning items to prevent new marks.
Step-by-Step Methods to Remove Scuff Marks (from safest to stronger)
Start with the least aggressive options and only move on if a scuff won’t come off.
You’ll begin with dry methods, then try gentle cleaners, mild abrasives like rubber erasers or a melamine sponge, and — if needed — solvent spot treatments used safely.
Finally, consider commercial vinyl-safe scuff removers or polishes as a last resort.
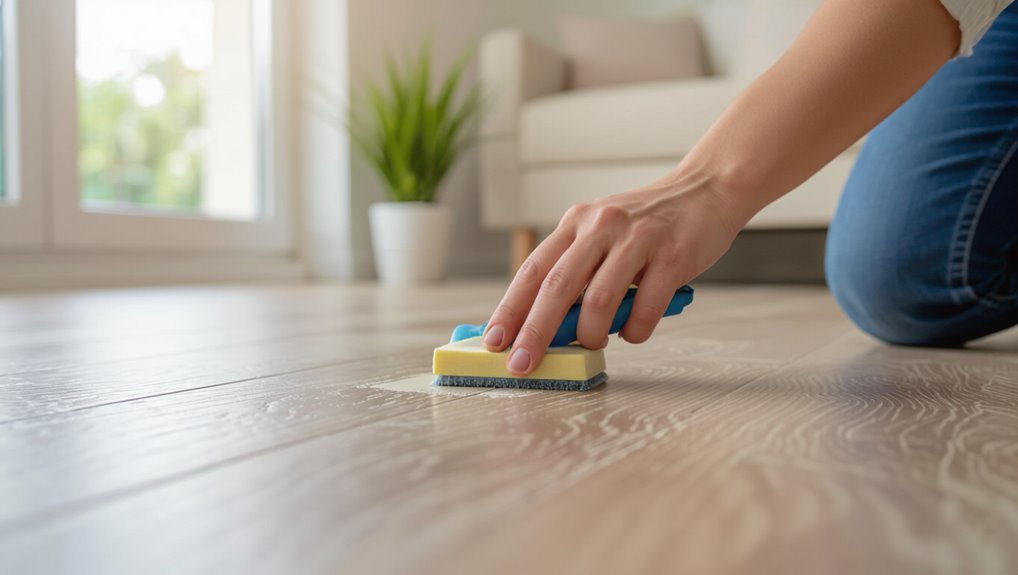
Step 1 Dry removal techniques
Before trying liquids or cleaners, try dry methods to lift scuff marks without risking damage—use a soft eraser or a microfiber cloth to rub gently.
A tennis ball or melamine sponge can be used for slightly tougher scuffs, and a nylon brush helps to loosen embedded grime.
Work in small circular motions, check progress frequently, and wipe away debris.
Repeat gently until the mark fades.
Step 2 Gentle household cleaners and solutions
If dry methods don’t fully remove the scuff, it’s time to try mild household cleaners and simple solutions that won’t harm vinyl.
Dampen a microfiber cloth with warm water and a few drops of dish soap, gently rub, then rinse.
For stubborn marks, mix equal parts water and white vinegar, test in an inconspicuous spot, blot lightly, and dry thoroughly.
Step 3 Mild abrasives and erasers (rubber erasers, melamine sponge)
Reach for a rubber eraser or a melamine (magic) sponge when gentle cleaners don’t fully lift the scuff; these mild abrasives can remove surface marks without damaging vinyl when used carefully.
Test an inconspicuous area first. Rub gently with light pressure, keeping the sponge slightly damp.
Wipe residue with a damp cloth, then dry. Repeat once if needed, avoiding vigorous scrubbing.
Step 4 Solvent-based spot treatments (isopropyl alcohol, mineral spirits) with safe use tips
1. Use isopropyl alcohol or mineral spirits sparingly: dampen a soft cloth, test an inconspicuous spot, and gently rub scuffs.
Work small areas, rinse with a mild detergent solution, then dry.
Ventilate, wear gloves, and avoid open flames.
Don’t soak seams or use on glossy finishes without testing.
Stop if finish dulls or vinyl softens; switch to a gentler method.
Step 5 Commercial vinyl-safe scuff removers and polishes
Now you’ll move on to commercial products designed specifically for vinyl—scuff removers and polishes—that offer a convenient middle ground between gentle home remedies and stronger solvents.
Choose a vinyl-safe label, test in an inconspicuous area, follow product instructions, and use a soft microfiber cloth.
Apply sparingly, buff gently, and repeat only if needed. Rinse residues to avoid buildup.
Step 6 Persistent marks: controlled mechanical methods (buffing with soft pad) and when to stop
When gentle cleaners and vinyl-safe products don’t budge a stubborn scuff, try controlled mechanical methods like buffing with a soft, non-abrasive pad to lift the mark without damaging the finish.
Work lightly in circular motions, check progress frequently, and stop as soon as the scuff fades.
If gloss dulls or fibers abrade, discontinue and consult a professional or consider targeted repair.
Comparison of Common Removal Agents and Tools
You can often remove scuff marks with simple household items like a microfiber cloth, baking soda paste, or a melamine sponge.
But sometimes a gentle commercial cleaner is faster. I’ll recommend specific products that work well on vinyl and point out what to avoid—no harsh solvents, abrasive powders, or strong bleaches that can dull or damage the surface.
Follow those guidelines and you’ll pick an effective method that won’t harm your floor.
Household items vs. commercial products
Although DIY solutions can tackle many scuffs, commercial products are formulated specifically for vinyl and often deliver faster, more consistent results; you’ll want to weigh cost, convenience, and potential surface effects when choosing between common household agents (like baking soda, toothpaste, or rubbing alcohol) and store-bought removers and cleaning pads.
| Option | Speed | Risk |
|---|---|---|
| Baking soda | Moderate | Low |
| Rubbing alcohol | Fast | Moderate |
| Commercial remover | Fastest | Low–Moderate |
Recommended products and what to avoid (harsh solvents, abrasive powders)
Because vinyl’s finish can be sensitive, pick products that remove scuffs without stripping protective layers: mild cleaning solutions, melamine foam (magic erasers used gently), isopropyl alcohol diluted for quick spots, and vinyl-specific commercial removers are good choices, while harsh solvents (acetone, lacquer thinner), strong bleach, and gritty powders or steel wool can permanently dull or damage the surface and should be avoided.
Use soft microfiber cloths and plastic scrapers.
Step-by-Step Example Clean Routine (Action Plan)
For a single scuff, you can usually do a quick 5-minute fix with a soft cloth and a mild cleaner.
If you’ve got multiple scuffs across a room, follow a focused 20-minute routine to treat each mark and buff the area.
For older or widespread wear, use the deep-clean and restoration checklist to plan a thorough strip, clean, and protect session.
Quick 5-minute fix for single scuff
A quick 5-minute fix can make a single scuff on vinyl flooring nearly disappear; gather a soft cloth, a mild cleaner (or plain water), a magic eraser or non-abrasive sponge, and a bit of rubbing alcohol or white vinegar before you start.
Dampen cloth, wipe scuff, try magic eraser gently, then blot with cleaner. If residue remains, dab alcohol or vinegar, rinse, dry.
20-minute routine for multiple scuffs in a room
If that quick spot-fix handled the lone mark but you’re facing several scuffs across a room, a focused 20-minute routine will save time and keep the floor uniform.
Gather a soft broom, microfiber mop, vinyl-safe cleaner, magic eraser, and warm water.
Sweep, pre-treat scuff clusters, gently scrub with eraser, mop with cleaner, rinse, and air-dry—inspect and repeat any stubborn spots.
Deep-clean and restoration checklist
Start by gathering your tools and products so you won’t stop mid-job: a soft-bristle broom, microfiber mop, vinyl-safe cleaner, diluted white vinegar or pH-neutral solution, soft scrub pad or magic eraser, microfiber cloths, a bucket of warm water, and optional vinyl polish or restorative product.
Sweep, mop with cleaner, spot-treat scuffs, rinse with clean water, dry thoroughly, inspect for damage, and apply polish or restorative coat if needed.
Common Mistakes That Damage Vinyl
Don’t use abrasive scrubbers or steel wool, because they’ll scrape the wear layer and leave permanent marks.
Avoid strong solvents or bleach and don’t overheat or overscrub the floor, since those actions can warp or discolor the vinyl.
Always spot-test cleaners and act quickly on mistakes to prevent small issues from becoming irreversible damage.
Using abrasive scrubbers or steel wool
Scrubbing hard with abrasive pads or steel wool can seem like a quick fix, but it actually gouges and dulls vinyl’s protective wear layer, leaving permanent scratches and a rough finish.
You’ll remove scuffs by rubbing away the top coat, not just marks. Instead, use soft microfiber, nonabrasive sponges, or a vinyl-safe cleaner and gentle circular motions to preserve appearance.
Applying strong solvents or bleach
Reach for a powerful cleaner and you can strip vinyl’s protective finish or discolor the flooring in minutes.
Don’t use acetone, paint thinner, undiluted bleach, or harsh commercial solvents. They break down vinyl, fade color, and leave residue that attracts dirt.
Test any mild cleaner in an inconspicuous spot first, dilute as directed, and rinse thoroughly to protect the surface.
Excessive scrubbing or heat exposure
If you go at scuff marks with too much force or heat, you can wear through vinyl’s protective layer and warp or discolor the floor.
Use gentle, circular motions with a soft cloth or nonabrasive pad. Don’t apply steam cleaners, hot irons, or scrubbing brushes.
Work gradually with mild cleaners, rinse well, and dry to prevent lingering damage or color changes.
Skipping spot tests and immediate corrective actions
Because products and finishes vary, you should always spot-test cleaners and repair methods on an inconspicuous patch before treating visible scuffs.
Don’t skip this step or jump to strong solvents; you’ll risk discoloration, softened seams, or finish loss.
Test, wait, and inspect. If a test damages the vinyl, stop and choose a milder option or consult a professional before applying any corrective action to the main area.
Prevention and Best Practices to Avoid Future Scuffs
To keep scuffs from coming back, use simple protective measures like furniture pads, area rugs, and entry mats.
Set a regular maintenance schedule—sweeping, spot-cleaning, and a gentle mop—to prevent buildup that attracts abrasives.
For high-traffic zones and seasonal changes, rotate rugs, trim pet nails, and increase cleaning frequency.
Protective measures (furniture pads, rugs, entry mats)
When you outfit high-traffic areas with good protection, you’ll cut down on scuffs before they ever happen; simple tools like felt furniture pads, area rugs, and sturdy entry mats act as a first line of defense by cushioning feet and furniture and trapping grit that scratches vinyl.
- Use felt pads under legs.
- Place low-profile rugs in walkways.
- Install coarse entry mats to trap debris.
Regular maintenance schedule for vinyl floors
Those protective measures cut scuffs down, but you’ll keep floors looking their best by sticking to a simple maintenance schedule.
Sweep or vacuum daily to remove grit, mop weekly with a manufacturer-safe cleaner, and spot-clean scuffs immediately.
Check pads monthly, replace worn ones, and dry spills promptly.
Consistent care prevents abrasion and keeps vinyl resilient without harsh treatments.
Tips for high-traffic areas and seasonal care
Since high-traffic zones take the brunt of wear, focus preventive efforts there first: place walk-off mats at every entrance, use heavy-duty felt or rubber pads on furniture, and rearrange seating to spread foot traffic.
Rotate rugs seasonally, trim outdoor debris with regular sweeping, inspect for worn spots monthly, and address scuffs quickly with gentle cleaners to prevent permanent damage.
Troubleshooting and When Marks Won’t Come Off
If a scuff doesn’t lift with cleaners, you’ll need to determine whether it’s a surface mark or permanent damage to the wear layer.
For seriously damaged areas you can try vinyl repair kits or replace the affected plank or tile.
If you’re unsure or the damage is widespread, consult a flooring professional for best results.
Determining permanent damage vs. surface scuffs
When a scuff won’t lift with gentle cleaning, you’ll need to figure out whether it’s just surface residue or actual damage to the vinyl’s wear layer.
Check texture: run your fingernail—if it snags or the pattern is worn, it’s likely damage. Surface marks will feel smooth and often rub away with a cleaner or eraser.
Photograph for comparison before further action.
Options for severely damaged areas (repair kits, replacement plank/tile)
Assess your options quickly once you’ve confirmed the scuff has penetrated the wear layer: you can use vinyl repair kits to fill gouges, match texture, and blend color for small areas.
For larger or irregular damage, remove and replace the affected plank or tile. Keep replacement pieces from the original batch for color match, and test adhesives and seam seals before finishing.
When to consult a flooring professional
Wondering whether it’s time to call a pro? If scuffs persist after gentle cleaning, abrasive removal, and repair attempts, or if scratches penetrate the wear layer, consult a flooring professional.
They’ll assess damage, recommend repair versus replacement, prevent warranty voiding, and guarantee color and texture match.
Hire a pro when DIY risks worsening the floor or when repairs exceed your skill set.
Frequently Asked Questions
You probably have quick questions like whether toothpaste, vinegar, or baking soda will safely remove scuffs without harming your vinyl.
You’ll also want to know how to get black shoe marks off without stripping the finish, if a steam cleaner is safe, and how often to polish or recoat.
Read on for clear, practical answers you can try at home.
Can I use toothpaste to remove scuff marks?
Though it isn’t a traditional cleaner, toothpaste can work on light scuff marks because its mild abrasive helps lift surface grime.
Rub a small amount of non-gel white toothpaste onto the mark with a soft cloth, rinse, and wipe dry to check results.
Test first in an inconspicuous spot, avoid colored or gel varieties, and don’t scrub hard to prevent dulling the vinyl finish.
Will vinegar or baking soda harm my vinyl floor?
If toothpaste worked for that faint scuff, you might be tempted to reach for household staples like vinegar or baking soda next—both are common go-to cleaners, but they behave differently on vinyl.
Vinegar’s acidity can dull or weaken some vinyl finishes if used undiluted; dilute it (one part vinegar to four parts water).
Baking soda is mildly abrasive—use sparingly as a paste and test first.
How do I remove black scuff marks from shoes without stripping finish?
Wondering how to lift black shoe scuffs without stripping the finish? Use a soft microfiber cloth with a mild, pH-neutral cleaner or diluted dish soap; rub gently in circular motions.
For stubborn marks, try a melamine sponge dampened slightly—test an inconspicuous spot first.
Avoid abrasive powders, harsh solvents, and excessive scrubbing to protect the vinyl’s protective layer and sheen.
Can I use a steam cleaner on vinyl to remove scuffs?
Can you use a steam cleaner on vinyl to remove scuffs? You can, but only cautiously.
High heat and moisture can warp or delaminate some vinyl. Test a hidden spot first, use the lowest steam setting, keep the nozzle moving, and avoid prolonged contact.
For stubborn marks, try safer methods (rubber eraser, gentle cleaner) before resorting to steam.
How often should I polish or recoat vinyl flooring?
How often you should polish or recoat vinyl depends on foot traffic, the product type, and whether the floor has a factory wear layer.
Generally, low-traffic areas need polishing every 1–2 years; high-traffic zones may benefit from touch-ups every 6–12 months.
If your vinyl has a durable factory wear layer, recoating is rarely necessary—inspect for dullness, scratches, or wear to decide.