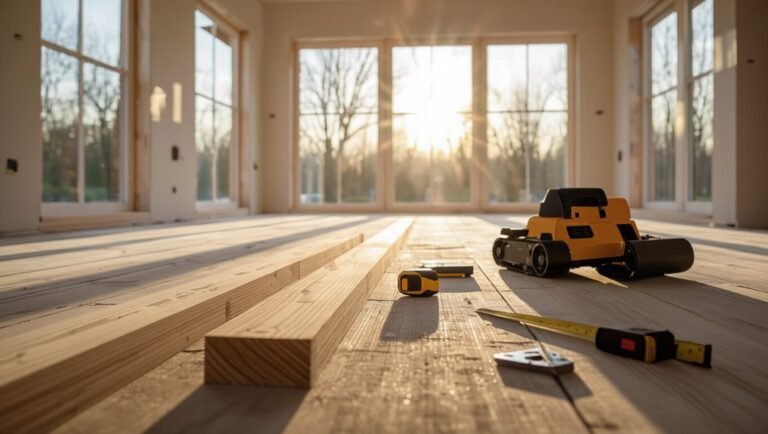
How to Stain Concrete Floors: Colors, Techniques, and What to Avoid
You can turn dull concrete into durable, designer floors by picking the right stain—acid, water-based, or dye—testing for moisture, and prepping the slab thoroughly. Clean, etch, and repair cracks, then apply stain evenly with a sprayer or roller, watch for mottling, and seal for protection. Use safety gear and allow proper drying between coats. Avoid skipping prep or the wrong sealer to prevent failures, and keep going to learn techniques, costs, and pro tips.
How to Stain Concrete Floors Quick Answer
For a quick answer, you’ll get the best results by cleaning and etching the concrete, applying a stain (acid or water-based) that suits your look, then sealing for durability—this gives rich, long-lasting color and minimal maintenance.
Staining’s a smart choice when you want permanent color on sound, porous concrete and a natural, variegated finish.
If the slab’s damaged, sealed, or you need a completely different color/texture, consider overlays, epoxy, or coatings instead.
One-paragraph direct answer: Best approach and common outcomes
Although staining concrete takes some prep and patience, the best approach is to clean and etch the floor, repair cracks, apply the stain evenly, and seal it. Doing those steps in order gives the most consistent, durable results.
When you ask how do I stain concrete floors, expect varied color depth, occasional mottling, and long-lasting protection if you prep, test a patch, and use the right sealer.
When staining is a good choice vs alternatives
When you want a durable, low-maintenance finish that soaks into the slab and creates rich, permanent color, staining is a great choice—especially on sound concrete that you can etch and clean well.
You’ll pick stains when you want longevity, subtle variation, and breathable finishes; choose alternatives for heavy damage or full coverage.
- cost-effective
- low-maintenance
- permanent color
- limited repair needs
- not for damaged slabs
Understanding Concrete Stains: What They Are and Why Use Them
You’ll choose between acid stains, water‑based stains, and dyes, each giving different colors and effects.
Staining can boost your floor’s appearance, durability, and cost‑effectiveness compared with other finishes.
Still, know the limits—color variation, surface prep, and maintenance expectations will shape your final result.
Types of concrete stains (acid stain, water-based stain, dye)
Anyone tackling a concrete-staining project will want to know the main types available: acid stains, water-based stains, and dyes. You’ll choose based on color range, permanence, and application. Below’s a quick comparison to guide you.
| Type | Penetration | Color Range |
|---|---|---|
| Acid | Deep | Earthy |
| Water | Moderate | Broad |
| Dye | Surface | Vivid |
Benefits of staining concrete floors (appearance, durability, cost)
Appearance matters: staining turns plain concrete into a finished surface that mimics stone, terrazzo, or even wood grain while letting you choose subtle tones or bold hues.
You’ll get lasting color that resists fading, low-maintenance floors that clean easily, and enhanced abrasion resistance when sealed.
Staining is often cheaper than replacing or installing new flooring, making it a cost-effective upgrade with strong visual and practical returns.
Limitations and realistic expectations
Staining can transform and strengthen your concrete, but it isn’t a cure-all. You’ll still see cracks, spalled areas, or heavy staining that need repair first.
Colors vary with porosity and age, so samples are essential. Stains won’t hide structural issues, and maintenance—sealing, cleaning—matters.
Expect subtle, variegated results rather than uniform paint-like coverage.
Planning Your Project: Materials, Tools, and Safety
Before you start staining, gather a checklist of materials and tools—stains, sealers, applicators, cleaners, and a concrete etcher—so you won’t stop mid-job.
Wear proper safety gear and guarantee good ventilation to protect your eyes, skin, and lungs from fumes and dust.
Test color samples on your floor’s base concrete and consider undertones and finish options to pick the look that actually shows up once sealed.
Required materials and tools checklist
To get reliable results, you’ll want a clear checklist of materials, tools, and safety gear so you don’t stop mid-project hunting for supplies.
Gather stain, concrete cleaner/etcher, sealers, and mixing buckets.
Have these tools ready:
- Concrete stain (acid or water-based)
- Cleaner/etcher and neutralizer
- Roller, sprayer, brushes
- Mixing sticks and buckets
- Floor buffer or grinder and pads
Safety gear and ventilation requirements
Although concrete stains and cleaners can transform your floor, they also release fumes and dust you’ll want to control, so equip yourself with proper safety gear and set up good ventilation before you begin.
Use the right PPE and airflow to protect health:
- NIOSH-rated respirator (organic vapor/particulate)
- Safety goggles or face shield
- Chemical-resistant gloves
- Knee pads and durable footwear
- Portable exhaust fans and open windows
How to choose stain color and finish (undertones, base concrete color, samples)
With safety gear on and the room ventilated, you’ll next pick the stain color and finish that’ll define the room’s look.
Consider base concrete tone and undertones—warm or cool—and how they shift stains. Test small samples in different light, let them cure, then evaluate gloss levels.
Choose a finish that matches traffic needs and desired sheen for longevity and appearance.
Surface Assessment and Preparation
Before you stain, thoroughly inspect the slab for cracks, efflorescence, moisture issues, and surface defects so you know what needs fixing.
You’ll run moisture tests (like calcium chloride or in-situ relative humidity) and compare results to the stain manufacturer’s acceptable limits, then clean and degrease the floor.
Finally, repair cracks and spalls with appropriate patching products and choose the right profiling method—mechanical or chemical—to guarantee the stain bonds properly.
Inspecting concrete for cracks, efflorescence, and moisture problems
Start by carefully inspecting the concrete for visible cracks, efflorescence, and signs of moisture so you can address problems that will affect stain adhesion and appearance.
Note hairline versus structural cracks, map efflorescence (white powder) to locate water sources, and check for damp spots, discoloration, or salt deposits.
Mark defects, clean surfaces, and plan repairs before staining.
Moisture test methods and acceptable moisture levels
After you’ve mapped cracks and efflorescence, test concrete moisture so stains will adhere and won’t blister or peel.
Use a calcium chloride test for accurate vapor emission readings or a relative humidity probe in drilled cores for slab testing. You can also use a simple plastic sheet (72 hours) as a quick check.
Aim for manufacturer-recommended limits—typically under 3–5 lbs/1000 ft²/24 hrs or 75% RH.
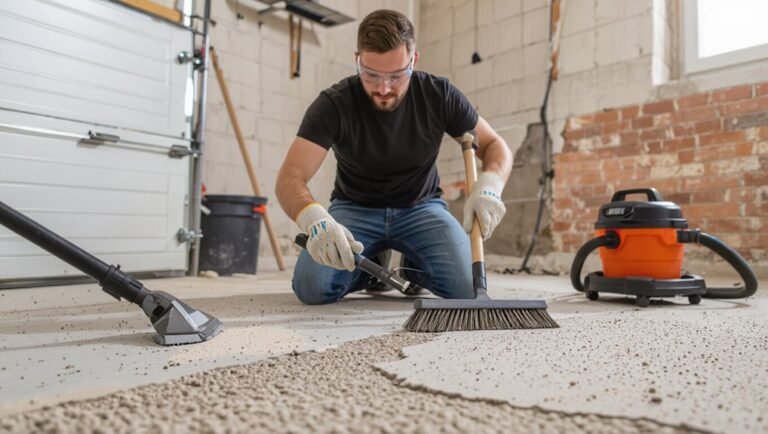
Cleaning and degreasing steps
Tackle cleaning and degreasing systematically so stains bond evenly and last.
Remove dust with a broom or vacuum, then scrub with a pH-neutral cleaner for general grime.
For oil or grease, use a commercial concrete degreaser and a stiff brush, rinsing thoroughly.
Allow full drying, retest for residue, and repeat localized cleaning until the surface shows no visible contaminants before staining.
Repairing cracks, spalls, and surface defects (products and techniques)
With the floor clean and fully dry, you’ll assess and repair any cracks, spalls, or surface defects so the stain goes on smoothly and bonds properly.
Use epoxy or polymer-modified patching compounds for spalls, and flexible polyurethane or epoxy fillers for hairline to structural cracks.
Chase and widen defective areas, remove loose material, apply primer where recommended, then trowel, sand, and clean before staining.
Etching and profiling (mechanical vs chemical) when and how
When you’re prepping concrete for stain, etching and profiling create the right surface texture so the stain bonds evenly and lasts.
Choose chemical etching for light contamination and minimal equipment; follow dilution and rinse instructions.
Use mechanical profiling (grinders, shot blasting) for heavy coatings, sealers, or smooth slabs.
Test first, protect surrounding areas, and remove dust completely before staining.
Step-by-Step Staining Process
Before you stain, finish final prep and mask off adjoining areas so you won’t have cleanup headaches.
Mix and test the stain on a small sample to confirm color and reaction, then follow the proper application for each product: acid stains require specific techniques, dwell times, and neutralization, while water-based stains and dyes need different application and drying times.
If you want a custom look, you can add marbling, mottling, or layered colors once you’ve mastered the basics.
Step 1 Final prep and masking
Although you’ve already cleaned and repaired the slab, final prep and masking sets the stage for an even, professional-looking stain—so take the time to get it right.
Remove dust with a tack cloth or vacuum, verify surface is dry, and outline edges.
Use quality painter’s tape, plastic sheeting to protect walls, fixtures, and trim, and secure seams to prevent bleed or overspray.
Step 2 Mixing and testing the stain (sample area and color approval)
Since color and coverage can vary between batches and surfaces, mix a small test batch of stain and apply it to an inconspicuous area or a prepared sample slab to confirm hue and absorption.
Adjust ratios, dilution, or additives until satisfied. Let the sample cure fully, evaluate in different lighting, and get final approval before mixing larger volumes to guarantee consistent, predictable results across the floor.
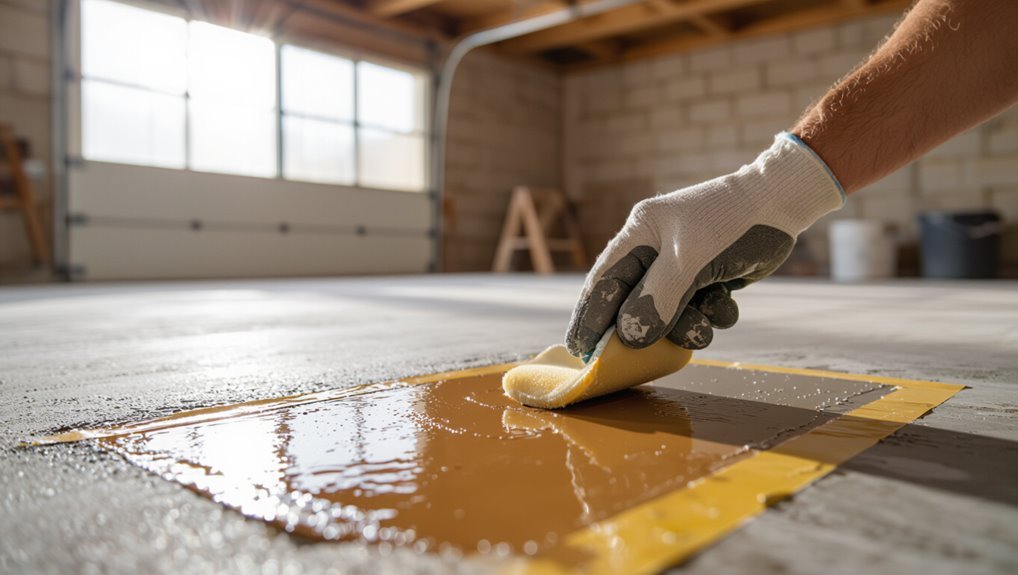
Step 3 Applying acid stains: technique, dwell time, neutralization
Begin by dividing the floor into manageable sections and work methodically so you can control application and reaction time; acid stains react chemically with the concrete, so apply evenly with a pump sprayer or low-pressure garden sprayer.
Allow the stain to dwell until the desired color develops, then neutralize promptly to stop the reaction.
Rinse thoroughly, mop neutralizer residue, and let the slab dry before sealing.
Step 4 Applying water-based stains and dyes: technique and drying times
Now you’ll switch to water-based stains and dyes, which behave differently than acid stains and require a gentler, more controlled application; use a low-pressure pump sprayer or a microfiber roller to apply thin, even coats, working in small sections so you can monitor coverage and prevent lap marks.
Keep humidity low, temperature moderate, allow 1–4 hours between coats, and fully cure 24–72 hours before sealing.
Step 5 Creating special effects (marbling, mottling, layered colors)
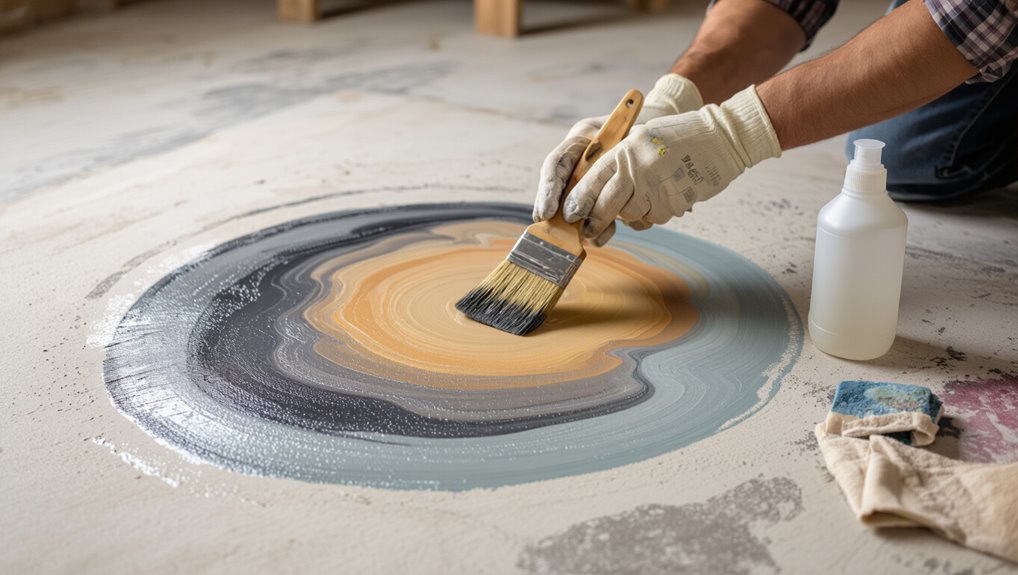
Layer colors and textures deliberately to get marble, mottled, or layered effects—work in small, well-lit sections and plan each pass before you apply stain.
Use diluted washes, sponges, rags, and brushes to lift or push color. Blend edges while wet for soft shifts, add concentrated spots for depth, and test combinations on scrap concrete.
Seal once satisfied with the look.
Step 6 Rinsing, neutralizing, and drying
Flush the surface thoroughly to remove excess stain and residues, then neutralize any acid-based products so the pH is balanced for sealing.
Rinse repeatedly with clean water until runoff tests neutral.
Squeegee and wet-vacuum to extract water and contaminants.
Allow the slab to air-dry fully—often 24–72 hours depending on humidity—before proceeding, ensuring moisture content meets your sealer’s requirements.
Step 7 Sealing options and application (penetrating vs topical sealers)
Once the slab’s dry and pH-balanced, choose a sealer that matches the look and durability you want: penetrating sealers soak in to protect from within and keep a natural matte finish, while topical sealers form a surface film that enhances sheen and abrasion resistance.
Apply penetrating sealers with a low-pressure sprayer or roller; for topical, use a phenolic or microfiber roller in thin, even coats, avoiding puddles.
Step 8 Curing time and post-application care
After the sealer’s applied, let it cure fully before heavy use — curing times vary by product but typically range from 24 hours for light foot traffic to 7 days for full chemical and abrasion resistance.
During curing, keep temperature and humidity stable, avoid moisture, and restrict traffic.
Clean gently with pH-neutral cleaners, use mats at entrances, and recoat or touch up per manufacturer intervals to maintain protection.
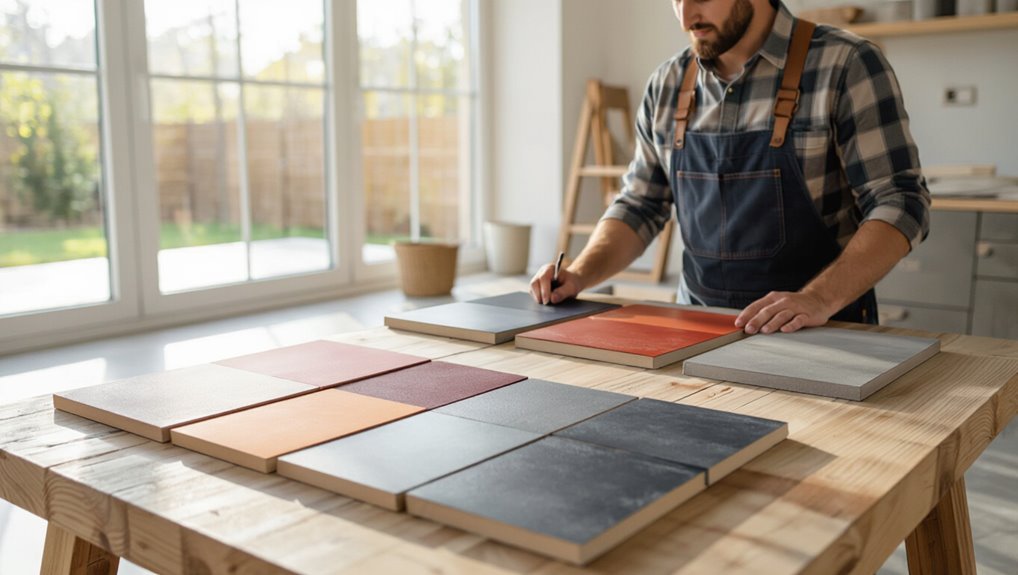
Color Selection, Techniques, and Aesthetic Strategies
When you pick colors, think about the space—durable neutrals for garages, warm tones for basements, bold accents for retail, and weather-resistant hues for patios.
Use layering, glazes, and stencils to add depth and controlled variation, and match your stain choice to the concrete’s age and texture for best adhesion and appearance.
If you’re working with overlays or planning to polish, choose compatible stain systems and test the full process on a sample patch first.
Choosing palettes for different spaces (garage, basement, retail, patio)
Color is your quickest tool for setting a room’s mood, and choosing the right palette for garages, basements, retail spaces, and patios makes a bigger difference than you might think.
For garages pick durable, forgiving neutrals; basements suit warm, cozy tones; retail benefits from brand-aligned, high-contrast hues; patios call for natural, earthy shades that blend with outdoor elements and weather gracefully.
Techniques for depth and variation (layering, glazes, stencils)

Though concrete takes a single base tone, you can build rich, dimensional floors by layering stains, glazes, and stencils to mimic depth, texture, and pattern.
Start with a base wash, add translucent glazes to deepen color, then apply stencils or sponged layers for focal interest.
Seal between stages to control bleed, test samples, and work in small sections for consistent results.
Matching stain to concrete age and texture
Because older concrete soaks and reacts differently than new pours, you’ll need to match your stain choice and technique to the slab’s age and surface texture.
Test small areas to gauge absorption and color. Use lighter, water-based stains on porous, aged slabs and stronger acid or multiple coats on dense, new concrete.
Adjust dilution, application speed, and sealer to balance tone and consistency.
Using stains with overlays and polishing
Older slabs and new pours respond differently to pigments, and that difference becomes even more important when you’re working with overlays or planning to polish.
Choose penetrating stains for existing concrete, dye or acrylic for overlays, and test adhesion first.
If you’ll polish, pick colors that reveal depth and mask blemishes; schedule staining before final grind or use compatible topical stains afterward.
Comparing Stain Types and Sealers
Now you’ll compare acid stain, water‑based stain, and concrete dye to see how each affects color depth, application, and longevity.
Then you’ll weigh penetrating sealers against acrylic, urethane/polyurethane, and epoxy finishes for protection, sheen, and repairability.
Finally, you’ll look at cost, durability, and maintenance to pick the best combo for your budget and traffic.
Acid stain vs water-based stain vs concrete dye
When choosing a color method for your concrete, you’ll want to weigh how each reacts to the slab, how durable the finish will be, and how much control you need over color and consistency. Acid stain etches and yields variegated earth tones, water-based gives consistent translucent color, dyes deliver vivid hues but sit near-surface.
| Type | Strength |
|---|---|
| Acid | Natural variegation |
| Dye | Bright, precise color |
Penetrating sealers vs acrylic/urethane/polyurethane vs epoxy
After you pick a staining method, you’ll need to choose a sealer that matches your look and use: penetrating sealers soak in and protect without changing the finish, acrylic/urethane/polyurethane films sit on the surface and offer varying gloss and durability, and epoxy creates a thick, hard coat that’s highly durable but can alter color and texture.
| Type | Finish | Typical Use |
|---|---|---|
| Penetrating | Matte | Natural look |
| Acrylic/Urethane | Gloss options | Residential |
| Epoxy | High gloss | Heavy traffic |
Cost, durability, and maintenance comparison
Although the upfront cost varies, you’ll find clear trade-offs between stain types and sealers: acid stains and water-based stains are inexpensive per square foot but need more frequent resealing.
Decorative overlays and epoxy coatings cost more initially yet deliver superior durability and lower long-term maintenance.
Penetrating sealers are cheap and low-profile but don’t protect surface wear the way film-forming acrylics, urethanes, or epoxies do.
You’ll balance budget, traffic, and upkeep: choose penetrating sealers for low-traffic, acrylics or urethanes for moderate use, and epoxy or overlays where heavy wear demands longevity despite higher initial expense.
Common Mistakes and What to Avoid
Don’t skip moisture testing — trapped damp will cause staining failures and bonding problems.
If you rush surface prep, over-apply products, pick the wrong sealer, or shortchange drying times you’ll end up with blotches, peeling, bubbling, yellowing, or uneven gloss.
Follow each step methodically to avoid these common—and costly—mistakes.
Skipping moisture testing and consequences
If you skip moisture testing, you’re gambling with the adhesion and appearance of your stain—excess damp can cause blotching, peeling, or a failure to cure properly.
You should test for moisture vapor transmission and relative humidity before staining. Ignoring results risks costly rework: stain lift, discoloration, and compromised sealers.
Retest after repairs and only proceed when moisture levels meet product specs.
Inadequate surface prep and resulting failures
When you skip proper surface prep, you’re setting the stage for stains that won’t penetrate evenly or bond at all—dust, laitance, old coatings, grease, and efflorescence all block adhesion and cause blotches, peeling, or patchy color.
You need to clean, degrease, etch or grind, and repair cracks. Test a small area, remove contaminants, and guarantee a consistent, porous surface before staining.
Over-applying stain or sealer and aesthetic problems
Although you might think heavier coats mean richer color and longer protection, over-applying stain or sealer causes problems like blotching, tacky surfaces, and uneven gloss that are hard to fix.
You should apply thin, even coats, follow manufacturer recoat times, and wipe excess promptly.
Test small areas, sand between coats if needed, and stop when color and sheen are consistent to avoid costly remedies.
Incorrect sealer choice and bubbling, yellowing, or peeling
Over-applying sealers can mask problems you’ll later blame on the product itself, so pick the right sealer before you coat the floor.
Choose a sealer compatible with your stain and traffic: acrylics can yellow, solvent-based coatings may bubble over moisture, and breathable silanes resist peeling.
Test a small area, follow manufacturer instructions, and avoid incompatible topcoats to prevent bubbles, yellowing, or delamination.
Rushing drying/curing times
If you rush drying or curing times, you’ll undo hours of careful prep and ruin the finish: stains can blush, sealers may trap solvents and later bubble, and cured strength will be compromised, leading to premature wear.
Wait full manufacturer times, control temperature and humidity, and avoid foot traffic or recoating early.
Patience prevents discoloration, adhesion failure, and costly repairs.
Tips, Best Practices, and Maintenance
To get consistent color and effects, test stains on a hidden patch and follow application timing and dilution guidelines.
Keep a simple maintenance routine—use pH-neutral cleaners, mop spills quickly, and reseal according to traffic (typically every 1–3 years).
In high-traffic or seasonal conditions, add entry mats, use felt pads on furniture, and spot-treat worn areas promptly.
Pro tips for achieving consistent color and effects
When you want consistent color and controlled effects, prep and testing are everything: clean and etch thoroughly, fix cracks and spalls, and always spray or dab a small test patch in an inconspicuous area so you can tweak dilution, application technique, and timing before doing the whole floor.
Use consistent application patterns, work in manageable sections, keep tools clean, record mix ratios and times, and blend edges promptly to avoid lap marks.
Maintenance routine for stained concrete (cleaners, resealing intervals)
Although stained concrete is durable, it needs a simple, regular care routine to keep the color and finish looking their best:
- Sweep or dust-mop daily to remove grit
- Mop weekly with pH-neutral cleaner and damp mop
- Wipe up spills immediately to prevent staining
- Use protective pads under furniture
- Reseal every 2–5 years depending on wear; test finish annually
Seasonal and high-traffic care recommendations
You’ve covered daily care and resealing—now focus on seasonal and high-traffic steps that protect color and finish under tougher conditions.
In winter, use mats and grit traps, avoid deicing salts, and mop regularly to remove tracked grime.
In summer, control humidity and UV exposure with shades.
For busy areas, add extra sealer coats yearly, use protective pads, and schedule prompt spot repairs.
Cost, Timeframe, and When to Hire a Pro
You’ll typically spend a weekend to a week on a staining project depending on prep and drying times, with labor often taking the bulk of the hours.
Expect materials to be a modest portion of the cost if you DIY, while hiring a pro raises total price but can cut labor time and guarantee quality.
Call a professional if you’re facing large repairs, persistent moisture, or uneven slabs that could ruin the finish.
Typical project timeline and labor estimates
When planning a concrete staining project, expect work to span from a single weekend for small, simple areas to several days or more for larger or heavily damaged floors.
Factoring in prep, curing, and multiple coats gives you a realistic schedule and helps decide whether to DIY or hire a pro.
Typically, prep takes 2–8 hours per 200–400 sq ft, staining/coats 4–12 hours, and curing 24–72 hours.
Cost breakdown: materials vs DIY vs professional
A clear cost comparison helps you decide whether to tackle staining yourself or hire a pro:
Materials (stain, sealer, pads, cleaners) typically run $100–$400 for average rooms.
DIY saves labor but adds time and risk of mistakes.
Pros charge $2–$6 per sq ft including prep, stain, and seal—higher for specialty finishes—yielding faster, guaranteed results and less hassle.
Signs you should hire a professional (complex repairs, moisture issues)
If your concrete has deep cracks, significant spalling, or persistent moisture, call a pro—these issues raise costs and can derail a DIY job.
You should also hire someone if slab movement, efflorescence, or high RH readings appear.
Professionals diagnose vapor barriers, structural repairs, and substrate prep, saving time and preventing stain failure.
Expect higher cost but reliable, long-lasting results and warranties.
Before-and-After Examples and Case Studies
You’ll see a residential garage transformed into a polished living space and a commercial retail floor upgraded for durability and style.
Each case study highlights common challenges—like staining unevenness or moisture—and shows the practical fixes that worked.
Use these examples to compare approaches and pick solutions that fit your project.
Residential garage to finished floor example
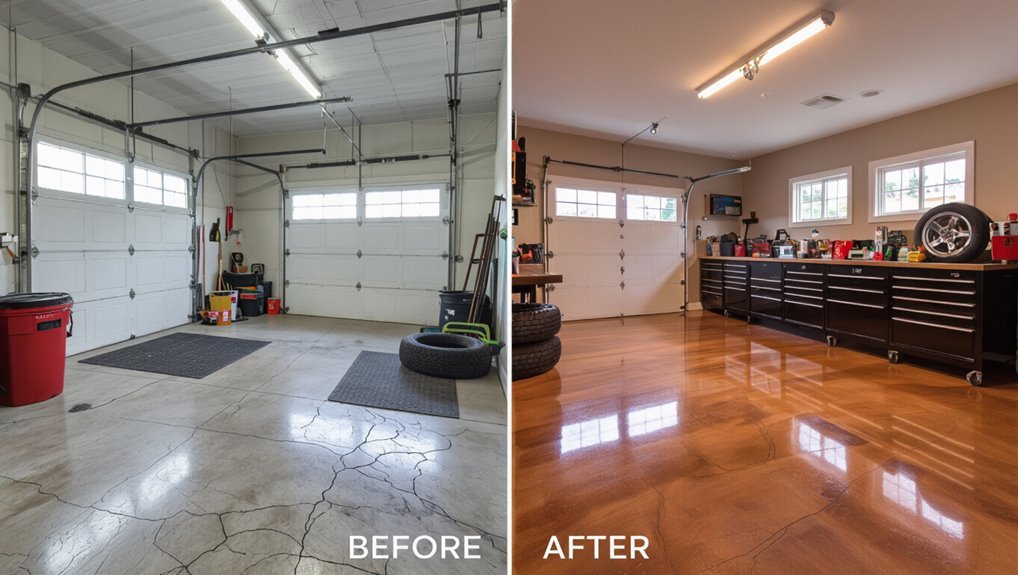
When transforming a utilitarian garage into a polished, stain-finished space, you’ll see how simple prep, the right stain choice, and proper sealing turn dull concrete into a durable, attractive floor that’s easy to maintain.
You’ll clean, etch, repair cracks, apply layered acid or water-based stain for depth, then seal with a high-build urethane for protection and slip resistance, creating a showroom-quality finish.
Commercial retail floor example
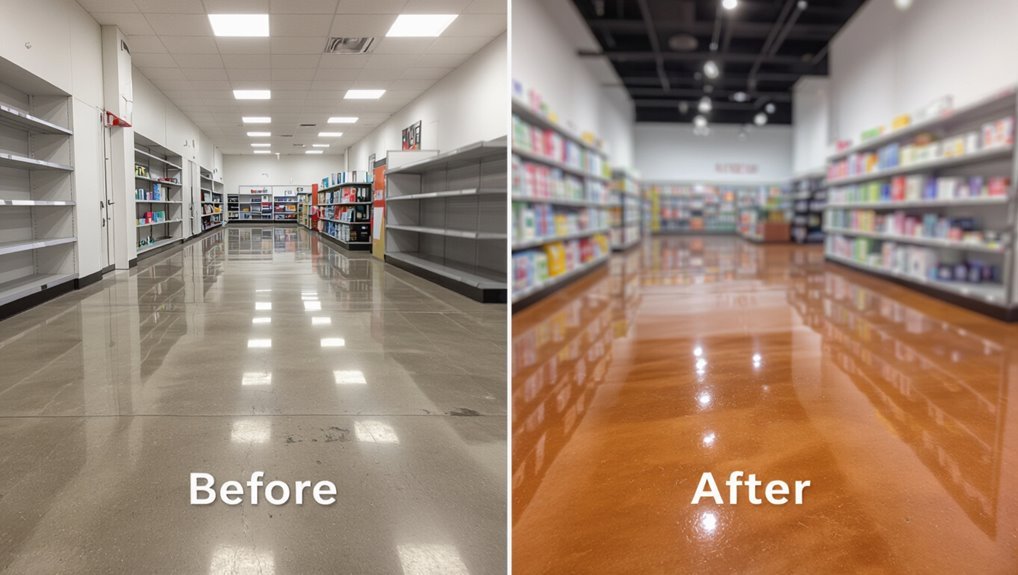
Moving from a single-car garage to a busy retail space means scaling up prep, durability, and aesthetics to handle heavy foot traffic and brand presentation.
You’ll choose tougher stains and high-build sealers, coordinate color with branding, and schedule work to avoid business disruption.
The before-and-after shows matte, uniform color transforming worn concrete into a polished, low-maintenance storefront surface.
Common challenges shown with solutions
Although every concrete floor brings its own quirks, the common problems you’ll see—stains, efflorescence, spalling, uneven porosity, and traffic wear—have proven fixes that show dramatic before-and-after results.
You’ll learn to clean, neutralize salts, patch and grind, profile for even absorption, and apply appropriate stain and sealer.
Each case study highlights steps, materials, and measurable outcomes so you can replicate success.
Frequently Asked Questions
You probably have a few practical questions before you start, like how long stained concrete lasts and when to reseal it.
You’ll also want to know whether you can stain over paint, epoxy, or old sealer, if staining hides cracks, and how to fix blotchy or discolored spots.
Finally, learn whether stained concrete gets slippery when wet and what you can do to improve traction.
How long does stained concrete last and when should I reseal it?
How long will stained concrete last? Properly stained and sealed floors can last decades with normal wear.
Lifespan depends on traffic, maintenance, and sealer quality. Reseal every 2–5 years for high-traffic areas; 5–10 years for light use.
Check for dullness, water absorption, or staining—those signs mean it’s time. Regular cleaning extends the finish.
Can I stain over paint, epoxy, or old sealer?
Can you stain over existing coatings like paint, epoxy, or sealer?
You generally can’t apply penetrating stain over these barriers—coatings block absorption. You’ll need to remove paint or strip/etch epoxy, and grind or chemically strip old sealer to expose raw concrete.
For topical stains or dyes, follow manufacturer guidelines and test a small area. Proper prep guarantees adhesion and consistent color.
Will staining concrete hide cracks and imperfections?
After stripping paint, epoxy, or sealer to expose the concrete, you’ll still need to address cracks and surface flaws—stain won’t magically erase them.
You’ll want to repair large cracks, spalls, and uneven areas before staining; otherwise they’ll remain visible, sometimes more pronounced.
Small hairline cracks may blend slightly with translucent stains, but don’t expect staining to replace proper patching or surface prep.
How do I fix a discoloration or blotchy stain?
Notice a blotchy or uneven stain? First, neutralize and clean the floor thoroughly, then test a small area.
You can reapply a diluted stain or use a contrasting glaze to blend spots. For stubborn discoloration, gently sand or diamond-grind affected areas, then restain.
Always follow product instructions, allow full curing between steps, and wear proper protection.
Is stained concrete slippery when wet and how to improve traction?
How slippery a stained concrete floor gets when wet depends on the finish, sealers, and surface texture—smooth, high-gloss sealers tend to be slick, while textured or matte finishes offer better grip.
You can improve traction by choosing non-slip additives, abrasive coatings, or acid-etched/textured finishes, and by using slip-resistant topcoats.
Regular cleaning removes contaminants that reduce grip.
Resources, Product Recommendations, and Next Steps
Now that you’ve got the FAQs covered, let’s look at practical resources: I’ll recommend stain and sealer brands based on use-case, link to clear instructional videos and reliable suppliers, and give a quick checklist to get your project started today.
You’ll see which products work best for garages, patios, or interior floors and where to buy them. Follow the checklist to assess, prep, and schedule your staining steps so you can begin with confidence.
Recommended stain and sealer brands by use-case
When you’re choosing stains and sealers, pick products matched to your floor’s condition and planned use so the finish lasts and looks right; consider these brand-use pairings to guide purchases.
- For garages: Rust-Oleum oil-based stains + epoxy sealer
- For patios: Valspar concrete stain + UV acrylic sealer
- For interiors: BASF/Cheng concrete acid stains + water-based polyurethane
- For high-traffic: Quikrete penetrating sealer
- For decorative: Sherwin-Williams stain and clear coat
Links to instructional videos and suppliers
To turn those brand recommendations into successful results, you’ll want quick access to step-by-step demonstrations and reliable suppliers.
Use curated video playlists, manufacturer how-tos, and local dealer links to avoid guesswork.
- Official manufacturer tutorial playlists
- Independent pro walkthroughs (prep to seal)
- Local supplier locators
- Tool rental partners
- Stain and sealer safety datasheets and FAQs
Quick project checklist to start today
Ready to start? Gather tools, pick stain type, and plan timing. Follow this quick checklist to begin:
- Inspect and repair concrete for cracks and stains
- Choose acid or water-based stain and matching sealer
- Rent or buy grinder, pads, and safety gear
- Test stain in an inconspicuous area
- Schedule prep, staining, curing, and sealing steps