How to Install Bamboo Flooring: A Complete Step-by-Step Guide
You can install bamboo flooring yourself if you’re handy and plan carefully: choose solid or engineered planks, acclimate them 48–72 hours, test and level the subfloor, lay underlayment and a moisture barrier, then install with click‑lock, glue‑down, or nail‑down methods while maintaining expansion gaps and staggered joints. Cut and fit around obstacles, install trim, and follow humidity and maintenance tips to protect the floor. Keep going to get the full step‑by‑step process and pro tips.
Quick Answer Can You Install Bamboo Flooring Yourself?
You can often install bamboo flooring yourself by acclimating the planks, preparing a flat subfloor, and locking or nailing boards into place. A typical room takes a weekend for a DIYer.
Hire a pro if your subfloor needs major repair, you want complex patterns, or you’re unsure about moisture barriers and connections.
We’ll cover the simple step-by-step process and signs it’s time to call an expert.
Short summary of process and time estimate
If you’re handy and willing to follow instructions, you can install most floating or click-lock bamboo floors yourself in a weekend; glue- or nail-down installations and rooms needing lots of prep will take longer.
Plan steps: acclimate planks 48–72 hours, prep subfloor, lay underlayment, click or glue boards, trim edges, add trim and connections.
Ask “how do I install bamboo flooring” for detailed steps.
When to hire a pro vs. DIY
Having a realistic sense of the job from the summary helps decide whether to DIY or hire a pro.
You can install bamboo yourself if you’re handy, have proper tools, and a simple room layout.
Hire a pro for uneven subfloors, complex layouts, floating-to-glue changes, or limited time.
Factor warranty requirements, moisture issues, and desired finish for the best outcome.
What Is Bamboo Flooring? Basics You Need to Know
Bamboo flooring comes in solid, engineered, and strand-woven types, and you’ll want to know which suits your project.
Compare its pros and cons to hardwood and laminate—bamboo can be harder and more sustainable but varies in stability and finish.
Also consider environmental factors and durability, since manufacturing and installation affect how long it’ll last.
Types of bamboo flooring (solid, engineered, strand-woven)
Flooring comes in three main bamboo styles—solid, engineered, and strand-woven—each built differently and suited for specific rooms and budgets. You’ll choose based on stability, installation type, and traffic. Consider humidity, subfloor, and finish when planning.
| Type | Best use |
|---|---|
| Solid | Low-moisture rooms |
| Engineered | Basements, flexibility |
| Strand-woven | High-traffic areas |
Pros and cons compared to hardwood and laminate
While it looks similar at a glance, bamboo performs differently than hardwood and laminate, so you should weigh durability, cost, and environmental impact when choosing. Bamboo feels modern, often costs less than solid hardwood, and can be more stable than laminate. Consider appearance, maintenance, and resale appeal.
| Emotion | Choice | Note |
|---|---|---|
| Pride | Bamboo | Distinctive look |
| Relief | Laminate | Low upkeep |
| Confidence | Hardwood | Timeless value |
Environmental and durability considerations
Because it’s a rapidly renewable grass rather than a slow-growing timber, choosing bamboo can greatly lower the environmental footprint of your floors, but you should still check manufacturing and finish details to be sure.
Look for FSC certification, low-VOC finishes, and responsible harvesting.
Durability varies by strand-woven or horizontal/vertical construction; strand-woven is hardest.
Maintain humidity, avoid standing water, and use proper underlayment.
Tools, Materials, and Preparations
Before you start, gather a clear tools checklist and the materials and accessories you’ll need so nothing slows you down.
Make sure the jobsite is prepped—acclimate the planks, inspect the subfloor, and do moisture testing to prevent future problems.
Wear proper safety gear and follow basic best practices to keep the project safe and efficient.
Tools checklist
You’ll need a compact set of reliable tools and materials to install bamboo flooring efficiently: a tape measure, chalk line, jigsaw or miter saw, pry bar, tapping block and pull bar, spacers, hammer, nailer or stapler (if required), underlayment, adhesive (for glue-down), moisture barrier, and safety gear like eye and ear protection.
- Measure accurately
- Cut and fit planks
- Secure and fasten
- Protect subfloor
- Use PPE
Materials and accessories checklist
Now that you’ve got the right tools lined up, compile the materials and accessories you’ll need to complete the job: the bamboo planks (ordered with a bit of extra for cuts and waste), underlayment or moisture barrier specific to your installation method, appropriate adhesive or fasteners, junction pieces and moldings, and finishing trim.
- Bamboo planks (extras)
- Underlayment/moisture barrier
- Adhesive or nails/staples
- Connector pieces and thresholds
- Baseboard and quarter round
Jobsite preparations (acclimation, subfloor inspection, moisture testing)
Start by acclimating your bamboo and verifying the subfloor and moisture levels so the installation won’t warp or fail later.
You should:
- Remove baseboards and clean the subfloor.
- Check for levelness and repair dips.
- Measure moisture with a reliable meter.
- Maintain room temperature and humidity for 48–72 hours.
- Store planks flat, off the floor, in original packaging.
Safety equipment and best practices
Before you begin cutting or laying planks, gather the proper safety gear and set up your workspace so hazards are minimized and work proceeds smoothly.
You’ll protect yourself and follow best practices by using appropriate tools, keeping the area tidy, and planning cuts.
Wear, use, and check:
- Safety glasses
- Hearing protection
- Dust mask/respirator
- Knee pads
- Push sticks and guards
Planning Your Bamboo Flooring Project
Measure the room carefully and add a waste factor so you know how many boxes you’ll need.
Plan plank direction and the layout pattern, and mark where expansion gaps and trim will go.
Schedule when each stage—acclimation, subfloor prep, installation, and finishing—will happen so the work flows smoothly.
Measuring the room and calculating materials (waste factor)

A quick, accurate room measurement is the foundation of a smooth bamboo flooring install, so you’ll want to map the space and note doors, closets, alcoves, and any irregular shapes.
Measure length and width in each section, calculate square footage, and add a waste factor—typically 5–10% for straight runs, 10–15% for irregular rooms.
Buy whole boxes, round up.
Layout planning and direction of planks
When you plan the layout, think about how plank direction, room shape, and light will affect the look and performance of your bamboo floor.
Run planks parallel to the longest wall or main light source to visually widen space and reduce visible seams.
Stagger end joints at least 6–8 inches for stability, and test patterns dry before fixing to guarantee a balanced appearance.
Expansion gaps and trim planning
Because bamboo expands and contracts with humidity and temperature, you’ll need to leave consistent expansion gaps around the room’s perimeter and at any fixed obstacles so the floor can move without buckling.
Plan gap width per manufacturer (usually ¼”–½”), mark locations, and install undercut jambs where needed.
Choose matching baseboards or quarter-rounds to cover gaps while allowing movement and easy maintenance access.
Scheduling timeline and staging work
If you schedule tasks in logical stages and build in buffer time, you’ll keep the project on track and avoid costly delays.
Create a timeline: prep and acclimation (48–72 hours), subfloor checks, underlayment, primary installation, trim and changes, and final checks.
Stage work by room, moving furniture and protecting finished areas.
Pad contingency days for unexpected repairs or material delays.
Step-by-Step Installation Guide
Before you start nailing or clicking boards together, you’ll acclimate the flooring and make sure your subfloor is clean, level, and ready.
Lay down the underlayment and moisture barrier, then establish a straight starter line for the first row.
From there you’ll continue installing using the method your planks require—click-lock, glue-down, or nail-down.
Step 1 Acclimate the flooring
When you bring your new bamboo into the room where it’ll be installed, let the planks sit flat and unopened for 72 hours so they can adjust to the home’s temperature and humidity; this prevents gaps, cupping, and other moisture-related problems after installation.
Stack cases off the wall on pallets or stickers, keep climate controls steady, and periodically check moisture content with a meter before you begin.
Step 2 Prepare and level the subfloor
Step 2 is where you make the subfloor flat, clean, and stable so your bamboo planks sit properly and last—remove old flooring or adhesive, sweep and vacuum thoroughly, fix any loose boards, and repair or replace sections that are soft or damaged.
Check for level with a straightedge, shim or sand high spots, and fill low areas with a suitable patching compound until surface is uniformly flat.
Step 3 Install underlayment and moisture barrier
3 simple layers—underlayment, moisture barrier, and seam tape—give your bamboo floor the support and protection it needs, so lay them carefully and in the right order.
Roll out cushioning underlayment perpendicular to planned planks, trim to fit, and butt seams tightly.
Cover with a polyethylene moisture barrier, overlap seams by 6 inches, and seal with seam tape.
Keep edges loose for expansion.
Step 4 Laying the first row and establishing a straight starter line
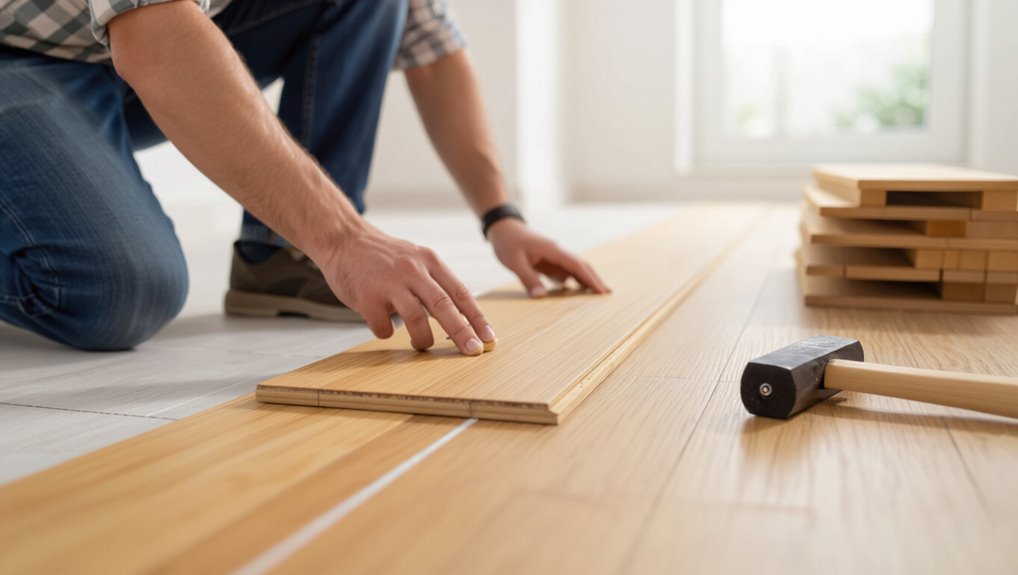
Begin by snapping a straight chalk line across the room as your reference.
Position the first plank with its tongue facing the wall, maintaining the manufacturer’s recommended expansion gap using spacers.
Check alignment frequently against the chalk line, trimming the final plank of the row for fit.
Secure the starter row per your chosen installation method, ensuring it stays straight and stable.
Step 5 Continue installation (click-lock vs. glue-down vs. nail-down techniques)
With the starter row secured and squared to your chalk line, you’ll proceed down the room using the method that matches your flooring: click-lock, glue-down, or nail-down.
- For click-lock, angle and snap planks tightly together.
- For glue-down, spread adhesive evenly and press firmly.
- For nail-down, use proper fasteners and spacing.
Check alignment frequently and stagger end joints.
Step 6 Cutting planks for ends, doorways, and obstacles

When you reach the room edges, doorways, or any obstacle, you’ll measure and cut each plank so it fits snugly while maintaining the staggered joint pattern.
Use a pull saw, miter saw, or jigsaw for precise cuts; protect the face with painter’s tape to prevent splintering.
Cut expansion gaps per manufacturer specs, test-fit pieces, then trim for pipes or irregular openings before final placement.
Step 7 Installing transition pieces and reducers
7. Install connectors and reducers to bridge floor height differences and doorways. Measure openings, cut profiles to fit, and dry-fit before fastening.
Use manufacturer-recommended clips or adhesive, leaving the recommended expansion gap. Screw or nail visible trims through the flange, not the flooring.
Check alignment and secure end caps. Clean adhesive squeeze-out and inspect for smooth connectors.
Step 8 Installing baseboards and trim without restricting expansion
Now it’s time to attach baseboards and trim, but don’t fasten them to the flooring itself—you’re securing them to the wall so the bamboo can expand and contract freely.
Leave the manufacturer-recommended expansion gap visible behind the trim. Nail or screw through the baseboard into studs, not the floor.
Use caulk or quarter-round to cover the gap, allowing movement without binding.
Step 9 Clean-up and post-installation checks
Step 9: After the trim’s in place, clean the floor and perform a few quick checks to make sure your bamboo installation will last—vacuum or sweep up all debris, wipe with a manufacturer-approved cleaner, inspect seams and junctions for gaps or unevenness, and confirm the expansion gap remains unobstructed.
Then tighten loose trim, replace vent covers, test doors for binding, and note any issues for warranty claims.
Common Problems During Installation and How to Fix Them
You’ll run into a few common issues during installation, but most have straightforward fixes.
Learn what causes gaps between planks and how to tighten them, how to stop buckling or cupping from moisture, and how to correct uneven seams or replace damaged planks.
Follow simple corrective steps for alignment, repairs, and moisture control to keep your floor looking professional.
Gaps between planks causes and fixes
Several common causes can make gaps appear between bamboo planks, and knowing them lets you fix the problem quickly.
Check for improper acclimation, uneven subfloor, incorrect installation angle, or loose locking mechanisms.
To fix gaps, acclimate boards longer, level and clean the subfloor, reseat or replace damaged locks, and use appropriate tapping blocks or filler strips.
Recheck alignment regularly.
Buckling or cupping moisture issues and remedies
Gaps often point to moisture or installation issues, but more severe moisture problems can make planks cup or buckle—warping upward at the edges or along their length as boards absorb or lose moisture unevenly.
If you spot cupping, stop traffic, raise humidity slowly or use dehumidifiers to stabilize conditions, tighten loose planks, and replace severely warped boards.
Always acclimate new flooring beforehand.
Uneven seams or misalignment corrective steps
If seams look uneven or boards don’t line up, address the problem quickly to prevent gaps widening or edges catching shoes.
Stop installation, loosen surrounding rows, and realign boards using a tapping block and pull bar.
Check tongue-and-groove engagement and subfloor flatness.
Shim or plane edges if needed, then re-tighten rows.
Reinspect alignment frequently as you proceed.
Damaged planks repair and replacement options
When you spot a damaged plank—cracked, chipped, swollen, or badly scratched—stop and deal with it right away rather than letting the defect spread or affect surrounding boards.
Remove the affected plank, check tongue-and-groove integrity, and replace with a matching piece. For minor scratches, sand lightly and refinish.
If moisture caused swelling, locate and fix the source before reinstalling to prevent recurrence.
Best Practices, Tips, and Tricks
Keep your layout tight and use spacers, a chalk line, and frequent checks with a square to get straight lines and snug seams.
Protect the floor with rosin paper or felt during work and use pads or rugs afterward to prevent scratches.
Account for humidity and temperature changes, and choose a maintenance-ready finish or plan an onsite coat when conditions and traffic allow.
Tips for straight lines and tight seams
1 simple trick will improve both straight lines and tight seams: start with a perfectly straight reference line and work outward.
Use spacers, a chalk line, and consistent tapping with a tapping block to seat joints.
Stagger end joints at least 6–8 inches, check alignment frequently with a carpenter’s square, and trim irregular boards for snug, uniform seams as you go.
Protecting the floor during and after installation
Protecting your new bamboo floor starts the moment the last plank’s tapped into place: cover the surface with breathable rosin paper or floor protection mats to shield against scratches, dirt, and heavy foot traffic while work continues.
Use felt pads under furniture, lift rather than slide items, avoid staining agents, and wipe spills immediately.
Keep traffic minimal until adhesives or finishes fully cure.
Seasonal and climate-related considerations
Because bamboo reacts to humidity and temperature changes, you should plan seasonal routines to maintain its stability and appearance.
Monitor indoor humidity with a hygrometer, keeping it between 40–60%. Use humidifiers in winter and dehumidifiers in summer as needed.
Inspect for gaps or cupping after seasonal shifts, tighten loose boards, and adjust HVAC settings to minimize rapid moisture swings that stress the floor.
Maintenance-ready finish choices and when to finish onsite
Seasonal upkeep shapes how long your bamboo finish lasts, so pick a maintenance-ready option that fits your climate and traffic patterns.
Choose durable factory-applied UV-cured polyurethane for minimal upkeep, or oil-based finishes for easier spot repairs.
Finish onsite if you need seamless edges, color adjustments, or extra coats after acclimation.
Always follow manufacturer cure times before heavy use and cleaning.
Cost Breakdown and Time Estimates
You’ll want to compare material costs—engineered, strand-woven, and solid bamboo each fall into different price ranges—before deciding.
We’ll also weigh labor versus DIY expenses so you can see potential savings or extra costs.
Finally, I’ll outline typical project durations by room size so you can plan time and disruption.
Material cost ranges by bamboo type
Bamboo flooring materials vary widely in price depending on type and quality, so you’ll want to pick the style that fits both your budget and durability needs. Expect natural strand-woven to cost more than engineered or horizontal boards. Choose based on traffic, moisture resistance, and finish.
| Type | Cost per sq ft | Durability |
|---|---|---|
| Horizontal | $2–$4 | Moderate |
| Engineered | $3–$6 | Good |
| Strand-woven | $4–$8 | High |
Labor vs. DIY cost comparison
Want to save money or speed up the job? If you DIY, you’ll pay only materials plus tool rental—typically $1.50–$4.50 per sq ft and a day’s learning curve; labor cuts physical effort and errors but adds $3–$8 per sq ft.
Factor skill level, time value, and warranty needs. Choose DIY for savings, pros for faster, guaranteed results.
Typical project duration by room size
Now that you’ve weighed DIY versus hiring pros, let’s look at how long installations actually take by room size so you can plan time and costs.
Small rooms (100–200 sq ft) often take a weekend (8–16 hours).
Medium rooms (200–400 sq ft) usually require 1–2 days.
Large areas or open plans (400+ sq ft) may need 2–4 days, longer if prep or changes are complex.
When to Choose Glue-Down, Nail-Down, or Floating Installation
You’ll weigh the pros and cons of glue-down, nail-down, and floating installations to match performance needs and budget.
Check your subfloor type and moisture levels first, since compatibility often dictates which method will work best.
With the right pairing of method and subfloor, you’ll get a durable, stable bamboo floor.
Pros and cons of each method
Although all three installation methods can yield a durable, attractive bamboo floor, each has distinct advantages and trade-offs that make it better suited to certain rooms, subfloors, and budgets. You’ll pick glue-down for strong hold, nail-down for solid permanence, or floating for ease and flexibility. Consider cost, noise, repairability, and moisture tolerance when deciding.
| Method | Strength | Trade-off |
|---|---|---|
| Glue-down | Strong bond | Harder repairs |
| Nail-down | Stable | Requires skill |
| Floating | Easy install | Slight movement |
Subfloor suitability and compatibility
Because the subfloor determines how well your bamboo will perform, match the installation method to the surface and moisture conditions:
Choose nail-down for solid, structural wood subfloors; glue-down for concrete or when extra firmness and moisture control are needed; floating for uneven, radiant-heated, or DIY-friendly installs.
Test moisture, level the surface, and follow manufacturer limits—wrong pairing causes movement, cupping, or adhesive failure.
Preventive Maintenance and Long-Term Care
To keep your bamboo floor looking great, you’ll want a simple cleaning routine using pH-neutral cleaners and soft mops, and avoid harsh chemicals or steam.
Use felt pads, area rugs, and controlled humidity to prevent scratches, dents, and moisture damage.
When wear shows—dull finish, deep scratches, or lasting stains—you’ll need to refinish or repair sections before problems spread.
Cleaning routines and recommended products
When you stick to a simple, regular cleaning routine, your bamboo floors will stay beautiful and last longer. You should sweep daily, mop weekly with a damp microfiber, and dry promptly.
Use pH-neutral cleaners and avoid harsh chemicals.
Consider these recommended products:
- Microfiber broom or vacuum with hard-floor setting
- Damp microfiber mop
- pH-neutral hardwood cleaner
- Gentle spot-cleaner
- Soft towels
Tips to prevent scratches, dents, and moisture damage
Keeping up with regular cleaning helps, but you’ll also want to proactively protect your bamboo floors from scratches, dents, and moisture to preserve their look and lifespan.
Use felt pads under furniture, lift rather than drag heavy items, place mats at entrances, control indoor humidity (35–55%), avoid high heels and pet nails, wipe spills immediately, and use area rugs in high-traffic zones to distribute wear.
When to refinish or repair
If your bamboo floor starts showing dullness, deep scratches, or areas where the finish has worn thin, it’s time to contemplate refinishing or targeted repairs.
Inspect boards for gouges, cupping, or separation.
Sand and refinish solid or strand-woven bamboo when finish loss is widespread.
Patch or replace individual planks for localized damage.
Refinish every 7–10 years depending on traffic and care.
Frequently Asked Questions
You’ll probably have a few practical questions as you finish your project, like whether you can install bamboo over existing flooring, how long it lasts, and if it’s waterproof.
You might also wonder about using it in bathrooms or basements and how to match replacement planks to your current floor.
I’ll answer each of these so you can make the right choices and avoid common mistakes.
Can bamboo flooring be installed over existing flooring?
While you can often install bamboo flooring over existing floors, whether you should depends on the current surface and condition.
Solid, level, and dry subfloors like well-adhered hardwood, plywood, or concrete are usually fine, but problematic coverings—loose tiles, warped planks, thick carpets, or damp substrates—must be removed or corrected first.
You’ll need proper underlayment, moisture testing, and to guarantee connections and height work.
How long does bamboo flooring last?
How long will bamboo flooring last? Expect 20–25 years for standard strand-woven or solid bamboo with proper care; high-traffic commercial areas may wear faster.
Durability depends on quality, finish, installation, humidity control, and maintenance.
Refinishing can extend life for solid or thick-strand planks.
Engineered bamboo may last slightly less but still offers long-term value when installed and cared for correctly.
Is bamboo flooring waterproof?
Knowing how long bamboo lasts helps when weighing its resistance to moisture.
Bamboo isn’t inherently waterproof; it’s water-resistant to varying degrees depending on strand quality and finish. You should wipe spills quickly, maintain humidity between 35–55%, and avoid prolonged standing water.
Finished, high-quality plank with proper sealing improves protection, but you’ll still need preventive care to prevent warping and staining.
Can I install bamboo flooring in bathrooms or basements?
Can you install bamboo flooring in a bathroom or basement? You can, but choose engineered or marine-grade bamboo and guarantee proper moisture barriers, subfloor prep, and professional-grade sealants.
In bathrooms, avoid standing water and seal all edges.
In basements, control humidity, install a vapor barrier, and consider floating installations to allow movement.
Improper prep risks cupping, swelling, or mold.
How do I match replacement planks to existing bamboo flooring?
Looking for replacement planks that blend in seamlessly? Match grain, color, and finish by bringing a sample to stores or ordering matching planks from the original manufacturer.
Check plank width, thickness, and installation profile. Compare tones in natural light and test a spare plank in an inconspicuous spot.
If exact matches aren’t available, opt for intermediary pieces or refinish nearby boards for consistency.