How to Install Metal Ceiling Tiles for a Stylish Industrial Look
You can get an industrial look by measuring your ceiling, choosing metal tiles (tin, aluminum, or faux-metal), and deciding between a suspended grid or furring strips for support. Prep the surface, account for lights and vents, and allow 10–15% extra for cuts. Cut tiles with snips or a score-and-bend method, dry-fit rows from a straight wall, and secure tiles with screws, clips, or adhesive. Finish edges with trim and sealant, and keep going for full step-by-step guidance.
How to Install Metal Ceiling Tiles Quick Answer and Overview
Yes — you can often install metal ceiling tiles yourself if you’re comfortable measuring, cutting, and working on a ladder.
Consider hiring a pro for complex layouts, high ceilings, or electrical/plenum work that requires permits or specialized tools.
Before you start, picture the finished look and scope so you know how many tiles, trim pieces, and hours the project will need.
Quick Answer Can you install metal ceiling tiles yourself?
Curious whether you can tackle metal ceiling tiles yourself? Yes—you can.
With basic tools, patience, and a clear plan for how to install metal ceiling tiles, you’ll measure, prep, and cut tiles, mount a grid or glue panels, and finish edges for a polished look.
Small rooms and non-structural ceilings are ideal starter projects if you’re comfortable with DIY tasks.
When to hire a pro vs. DIY considerations
If you’ve decided metal ceiling tiles are a doable DIY, next figure out whether your specific project really suits a weekend effort or calls for pros.
Assess your comfort with ladders, cutting tiles, electrical or plumbing obstructions, and precise layout.
Hire a pro for high ceilings, complicated framing, or historic homes.
DIY smaller, straightforward rooms if you’re confident and have proper tools.
Visual preview of finished look and project scope

A quick visual preview helps you decide if metal ceiling tiles will deliver the look and effort you want.
Use photos, mood boards, or a digital mockup to compare finishes, patterns, and lighting.
Measure room size to estimate tile count, tools, and time.
Factor in access, repairs, and removal.
That’ll clarify scope, budget, and whether you can DIY or need a pro.
What Are Metal Ceiling Tiles and Why Choose Them
Metal ceiling tiles come in materials like tin, aluminum, steel, and lighter faux‑metal options, each with different weight, cost, and finish.
You’ll pick them for durability, fire resistance, and the aesthetic — from polished elegance to raw industrial — and some types can help with acoustics.
Consider how the material and finish support the room’s style and functional needs before you start installing.
Types of metal ceiling tiles (tin, aluminum, steel, faux-metal)
Ceiling tiles come in several metal-based options—tin, aluminum, steel, and faux-metal—each offering different looks, weights, corrosion resistance, and installation needs so you can pick what’s best for your room and budget. Pick tin for vintage detail, aluminum for light corrosion resistance, steel for strength, and faux-metal for budget-friendly looks.
| Type | Best for |
|---|---|
| Tin | Decorative |
| Aluminum | Humid areas |
| Steel | Durability |
Benefits: durability, aesthetics, fire resistance, acoustic impact
When you choose metal tiles, you’re getting more than a decorative surface: they’re tough, fire-resistant, and can improve how a room sounds.
You’ll enjoy long-lasting durability against dents and moisture, low maintenance, and modern or vintage aesthetics that elevate spaces.
Their noncombustible nature adds safety, and with appropriate backing or perforation they help control reverberation and reduce ambient noise.
Style considerations for an industrial look
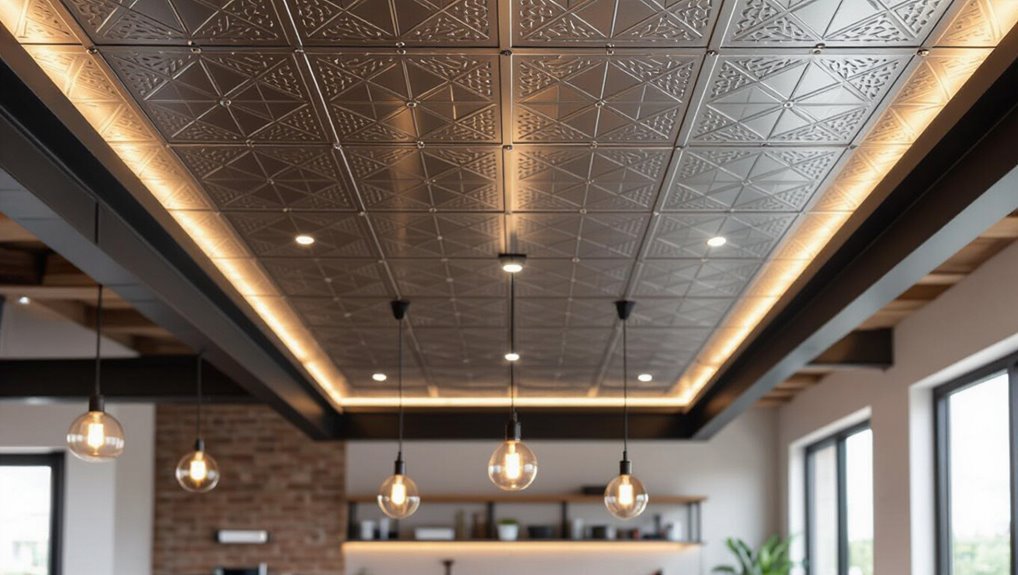
If you want an industrial look, choose tiles that emphasize raw materials, simple geometry, and visible hardware to create that workshop-to-loft feel.
Pick matte or brushed finishes—galvanized, zinc, or copper tones—paired with exposed beams and black grid frames.
Mix large panels with smaller accents, keep patterns minimal, and coordinate lighting and ductwork so the ceiling feels cohesive, utilitarian, and intentionally rugged.
Tools, Materials, and Cost Estimate
Before you start, gather essential tools like a tape measure, level, snips, drill, and safety gear so you won’t interrupt the job to hunt for basics.
You’ll also need the metal tiles, grid or furring strips, adhesive or fasteners, trim pieces, and any insulation or backing materials.
Finally, we’ll cover typical cost ranges and a simple breakdown so you can budget for materials, tools, and any professional help.
Essential tools list
You’ll need a compact set of tools and materials to install metal ceiling tiles efficiently: tile cutters or aviation snips, a chalk line, measuring tape, level, ladder or scaffolding, drill with bits and self-tapping screws (or a clip system), adhesive (if required), safety gear (gloves, eye protection, hearing protection), and a modest supply of tiles and trim—I’ll break down quantities and estimated costs next.
- Measure carefully
- Cut precisely
- Secure tiles firmly
- Prioritize safety
Materials and supplies (tiles, grid, adhesive, trim, insulation)
Materials matter: choose tiles, grid components, adhesive, trim, and any insulation with the final look, ceiling type, and budget in mind.
Pick metal tile style and finish, compatible suspension or furring channels, and adhesive rated for metal. Include starter strips, edge trim, screws, and washers.
If noise or temperature control matters, add thin acoustic or thermal insulation that fits between tiles and joists.
Typical cost breakdown and budget ranges
A simple budget for installing metal ceiling tiles breaks into three main buckets: tools, materials, and labor or permit fees, so you can quickly see where your money goes and where to save. Expect tools $50–$200, materials $3–$12/ft², labor or permits $0–$8/ft² depending on DIY or pro.
| Item | Typical Cost |
|---|---|
| Tools | $50–$200 |
| Materials | $3–$12/ft² |
| Labor/Permits | $0–$8/ft² |
Preparation and Planning
Before you order tiles, measure the room carefully and calculate how many tiles you’ll need — include a waste allowance for cuts and mistakes.
Inspect the existing ceiling or substrate for flatness, rot, or loose material, and note any electrical, lighting, or HVAC fixtures that will affect layout.
Plan safety measures and PPE (gloves, eye protection, dust mask, and ladder safety) before you start work.
Measuring the room and calculating tile quantity (including waste)
Start by measuring the room’s length and width in feet (or meters) and multiplying them to get the total ceiling area. Then double-check measurements across the room to account for irregularities.
Divide that area by one tile’s coverage to get base quantity. Add 10–15% for cuts, mistakes and pattern matching; round up to whole tiles and note extra for borders and focal areas.
Inspecting and preparing the existing ceiling/substrate
When you inspect the existing ceiling, check for sagging, water stains, loose drywall or plaster, and any signs of mold or pest damage that would compromise adhesion or support.
Remove loose material, repair or replace damaged sections, and guarantee joists or furring strips are solid and level.
Clean surfaces of dust, grease, and flaking paint so tiles or adhesive will bond properly.
Electrical, lighting, and HVAC considerations
While planning your metal ceiling install, account for electrical, lighting, and HVAC needs so fixtures and vents sit correctly and safely within the new layout.
Map existing wiring, junction boxes, and duct runs, then relocate or extend them before tiling.
Coordinate lighting placement with tile pattern, choose low-profile fixtures compatible with metal panels, and verify clearances for diffusers and access panels.
Safety precautions and PPE
After you’ve laid out electrical, lighting, and HVAC locations, protect yourself and others before cutting or handling metal tiles.
Wear proper PPE, secure the workspace, and plan safe cuts to avoid injury.
- Safety glasses or face shield
- Cut-resistant gloves and long sleeves
- Respirator or dust mask for debris
- Hard hat and non-slip footwear
Step-by-Step Installation Guide
Now you’ll follow a clear sequence to get the tiles in place: remove old coverings and prep the substrate, install or adjust a supporting grid or furring strips, then cut and fit your first row using a starting-point strategy.
From there you’ll secure tiles with the appropriate fasteners or adhesive and trim edge pieces for a clean fit.
Finish by installing perimeter molding to conceal cuts and complete the look.
Step 1 Remove old ceiling coverings and prep substrate
Start by clearing the room and protecting floors and furniture. Then remove any existing ceiling coverings—drywall, popcorn texture, acoustic tiles, or plaster—using a utility knife, pry bar, and scraper as needed.
Inspect the exposed substrate for damage, mold, or rot. Repair or replace compromised sections, fasten loose areas, and clean dust and debris so the surface’s flatness and integrity are ready for tile installation.
Step 2 Install or modify a supporting grid or furring strips
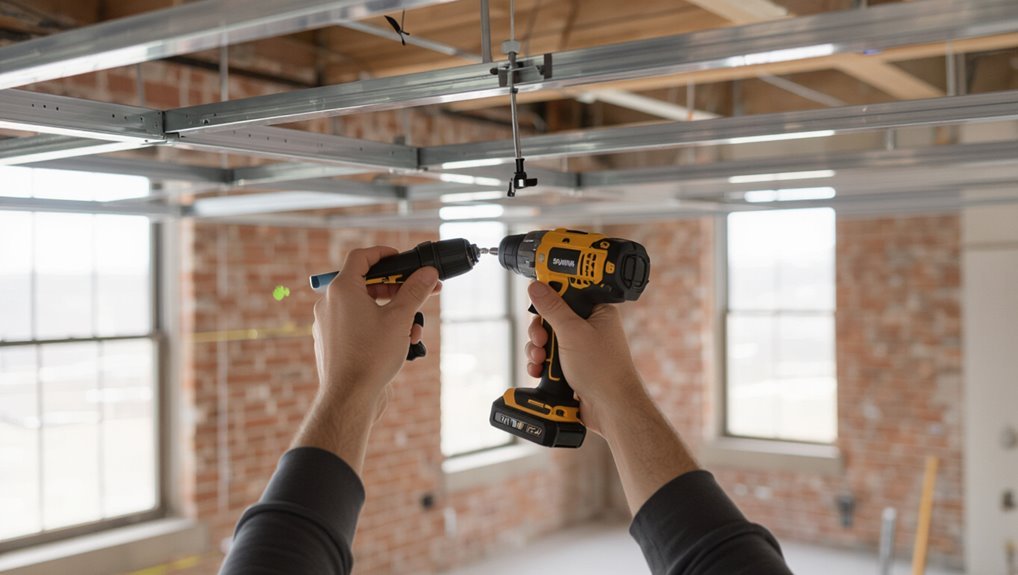
With the substrate repaired and clean, you’ll set up the support system that holds the metal tiles—either a suspended grid or wood furring strips—so the ceiling stays flat and tiles sit squarely.
Measure and mark joist locations, snap level lines, and fasten main supports to structure.
Space furring strips or grid members per tile size, check level, and reinforce seams for rigidity.
Step 3 Cut and fit first row of metal tiles (starting point strategy)
After you’ve confirmed the grid or furring strips are level and square, pick a straight, visible starting wall and work outward so tiles align and cut edges end up at the room perimeter.
Measure and mark the first row, allowing for reveal and trim. Score and bend or use snips for precise cuts.
Dry-fit tiles, adjust spacing, and guarantee pattern and seams remain consistent.
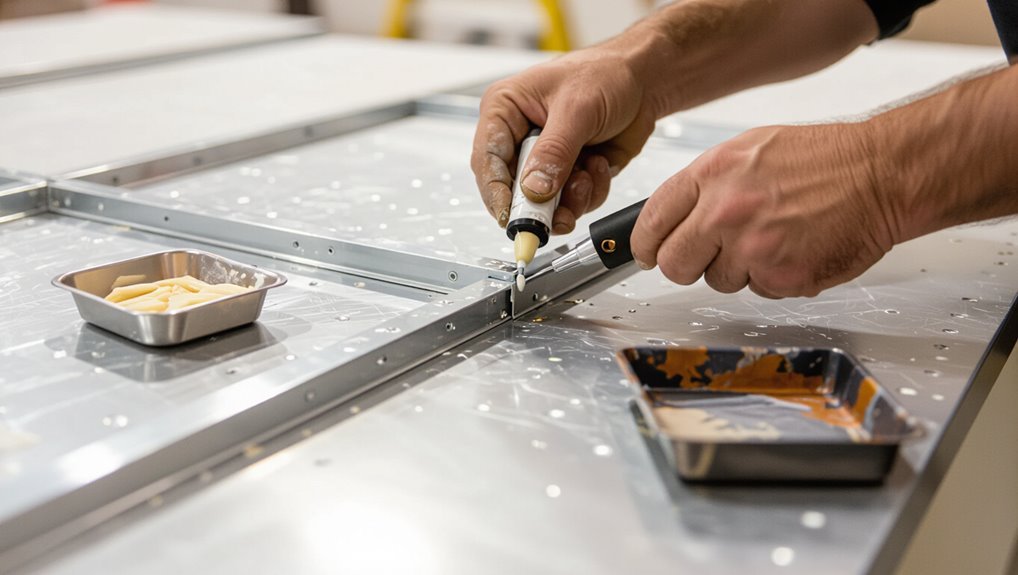
Step 4 Secure tiles to the substrate or grid (nails, screws, clips, adhesive)
Fasten each tile securely to the substrate or grid using the method you chose—nails, screws, clips, or adhesive—making sure fasteners sit flush and don’t distort the metal.
Work row by row, aligning panels and checking level. Use corrosion-resistant fasteners for longevity.
If using adhesive, apply manufacturer-recommended beads; press firmly and allow proper cure time before stressing seams or moving to adjacent tiles.
Step 5 Trim and fit edge tiles and install perimeter molding
Measure and mark each edge tile carefully, then cut and fit them so they sit flush against walls and fixtures. Trim with metal shears or a nibbler, test-fit, and adjust for gaps.
Install perimeter molding—snap or screw it into studs or substrate, align seams, and caulk joints for a clean finish.
Paint or touch up exposed edges to match tiles.
Step 6 Work around fixtures, vents, and recessed lighting
When you reach fixtures, vents, and recessed lights, work deliberately so each opening gets a snug, safe fit without damaging the tile or the fixture.
Turn off power, remove trim, and template each opening with cardboard.
Transfer cut lines to the tile, cut with metal snips or a rotary tool, file edges smooth, and test-fit.
Reinstall fixtures, sealing gaps with non-corrosive caulk as needed.
Step 7 Finish touches: sealing seams, painting/aging for industrial patina
Wrap up your installation by sealing seams and applying any paint or aging treatments to create the final look and protect the metal.
Use a clear, flexible sealant along joints to prevent moisture and rattling.
Scuff, prime, then spray or brush chosen finish; for patina, use layered washes and light sanding to reveal highlights.
Let cures fully before resuming use.
Step 8 Clean-up and inspection checklist
1 final sweep will make your metal ceiling look professional and last longer: clear all debris, collect fasteners and trim off any stray sealant, then inspect seams, tiles, and fixtures for gaps, loose screws, or finish flaws so you can correct them before returning the space to service.
Follow this checklist and finish cleanly:
- Remove dust and debris thoroughly
- Tighten or replace loose fasteners
- Re-seal visible gaps
- Touch up finish flaws
Alternative Installation Methods and Comparisons
Now that you’ve seen the standard install, let’s compare drop-in grid, direct-adhere, and screw-down methods so you can pick the best fit.
Each approach has trade-offs in appearance, durability, and installation time that affect an industrial look.
You’ll weigh ease and cost against how rugged and authentic the finished ceiling will feel.
Drop-in grid vs. direct-adhere vs. screw-down installations
When choosing between drop-in grid, direct-adhere, and screw-down installations, consider your ceiling structure, access needs, and budget, because each method offers different trade-offs in ease, durability, and appearance. You’ll pick based on access, permanence, and prep work; grids ease access, adhesive is fastest, screws are most secure.
| Method | Access | Permanence |
|---|---|---|
| Drop-in | High | Medium |
| Direct-adhere | Low | Low |
| Screw-down | Low | High |
Pros and cons of each method for an industrial aesthetic
For an industrial look, each installation method brings distinct visual and practical trade-offs you should weigh:
Drop-in grids let you expose utilities and swap tiles easily but feel commercial;
direct-adhere creates a seamless, flush metallic plane ideal for minimalist lofts yet hides access and can be permanent;
screw-down shows hardware for raw authenticity but requires precise layout and can be more labor-intensive to install.
Common Problems and Mistakes to Avoid
Watch for warping, buckling, and poor adhesion caused by moisture, improper fasteners, or uneven substrates so tiles stay flat and secure.
Keep patterns aligned and seams tight, and measure carefully before cutting around fixtures to avoid crooked joints and gaps.
If a tile gets damaged after installation, you’ll want to know quick repair options—like replacing a panel or using patching strips—to keep the ceiling looking seamless.
Warping, buckling, and poor adhesion causes
Although metal tiles look sturdy, they can warp, buckle, or fail to adhere if installation steps are rushed or materials are wrong.
You’ll cause problems by skipping surface prep, using incompatible adhesives, or installing in high-humidity or temperature-fluctuating spaces.
Poor framing, uneven substrates, and over-tight fastening also stress panels.
Follow manufacturer specs, acclimate tiles, and secure surfaces to prevent distortion and adhesion failure.
Misaligned patterns and visible seams
When patterns don’t line up or seams stand out, the finished ceiling looks amateurish and draws attention to installation errors. You can avoid this by planning layout, checking tile orientation as you go, and making precise cuts so joints sit tight and consistent.
Stay aware of pattern repeats, stagger seams for balance, dry-fit tiles before fastening, and use leveling tools so lines remain straight and visually seamless.
Improper cutting around fixtures
If you cut too roughly or measure fixtures poorly, you’ll end up with gaps, jagged edges, or tiles that won’t sit flush around lights, vents, and sprinklers.
Always measure twice, mark cut lines precisely, and use proper snips or a nibbler for clean edges.
Test-fit each tile before fastening, trim incrementally, and protect finish from tool slips to prevent visible mistakes.
How to repair damaged tiles after installation
Spot damaged metal tiles quickly so you can fix them before rust or loose edges worsen; small dents, scratches, and misaligned seams are usually repairable without replacing the whole panel.
Assess damage, clean and sand rust, then use body filler for dents and touch-up paint for scratches.
Reseal seams with silicone, tighten loose fasteners, and replace only irreparably warped tiles to save time and money.
Best Practices and Professional Tips for an Industrial Look
To get a true industrial look, pick finishes and patinas that read as aged or raw and avoid overly polished metals.
Use accent trims, exposed fasteners, and strategic lighting to highlight texture and joinery.
Keep the look intentional with simple maintenance—regular dusting, spot-cleaning patinas, and checking fasteners so the ceiling stays rugged without falling into neglect.
Choosing finishes and patinas for authenticity
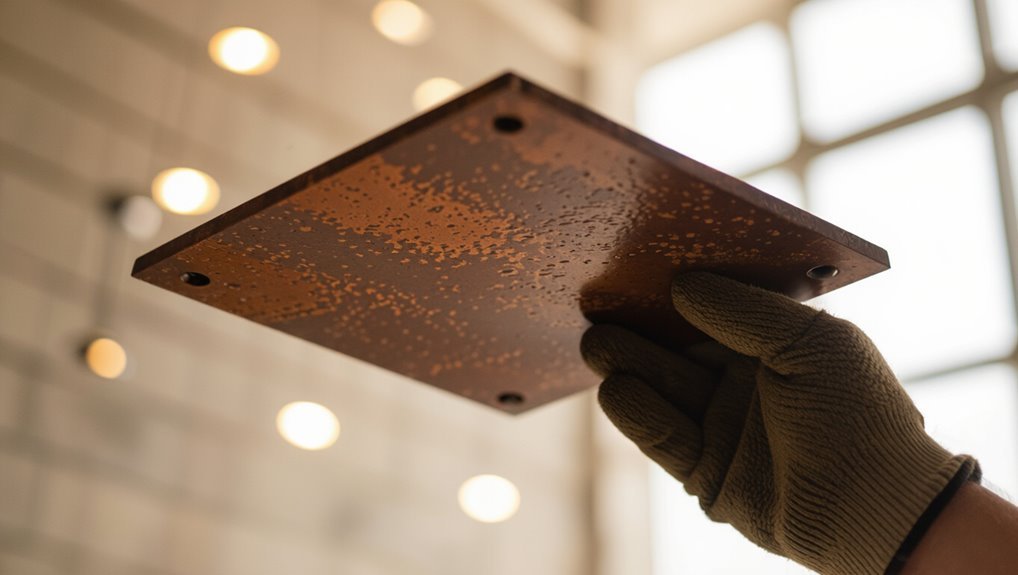
When you want an industrial look that actually reads as authentic, choose finishes and patinas that mimic real aging—think subtle verdigris on copper, soft gunmetal on steel, or worn zinc with faint white bloom.
Test samples under your room’s light, match tones to surrounding materials, and prefer matte or low-sheen layers.
Seal appropriately to protect the effect without making it look artificial.
Using accent trims, exposed fasteners, and lighting to enhance style
Any installer can boost your metal ceiling’s industrial character by pairing bold accent trims, visible fasteners, and targeted lighting that celebrate the materials rather than hide them.
Use contrasting trim profiles, staggered screw patterns as a deliberate design, and low-profile puck or track lights to cast texture and shadow.
Aim for harmony: let fixtures highlight seams, patina, and panel geometry without overpowering the room.
Maintenance tips to keep metal ceilings looking industrial
Regularly inspect and gently clean metal ceilings to preserve that raw, industrial look without stripping away its character.
Wipe dust with a soft cloth, spot-clean stains with mild detergent, and avoid abrasive pads or harsh chemicals.
Touch up chips with matching finish, protect exposed seams from moisture, and schedule periodic professional checks for corrosion or loose panels to maintain integrity and aesthetic.
Project Timeline and When to Seek Professional Help
For a small room you can usually finish in a day. Medium rooms take a weekend, and large spaces may stretch over several days or weekends depending on prep and complexity.
If the ceiling is uneven, has electrical or HVAC obstacles, or you’re short on time or experience, it’s smart to hire a contractor.
Get a pro when permits are required, structural changes are needed, or you can’t safely access the work area.
Typical timeline for small, medium, and large rooms
If you’re tackling a metal ceiling tile install, expect timeframes to scale with room size and prep needs: a small room can take a weekend, a medium room a couple of days to a long weekend, and a large space or one with complex prep (removed fixtures, damaged subceilings, or intricate layouts) may need several days to a week or more and might be worth hiring a pro.
For planning, add time for measurements, cutting, pattern alignment, and drying or curing of adhesives; factor in cleanup and minor touchups.
Signs you should hire a contractor
When your ceiling has extensive damage, complex electrical or HVAC fixtures, or an unusual layout, you should hire a contractor rather than tackle the job yourself.
Call a pro if you lack experience with wiring or load-bearing work, if permits are needed, or if time and quality matter.
A contractor will guarantee code compliance, safe mounting, and a clean, durable finish.
FAQ
You’ll find answers to common concerns like installing over popcorn ceilings, using metal tiles in kitchens and bathrooms, and how they impact acoustics and insulation.
You’ll also learn whether you can paint or refinish existing metal tiles and what warranty or lifespan to expect.
If you still have questions after this FAQ, I’ll help clarify specifics for your project.
Can metal ceiling tiles be installed over popcorn or textured ceilings?
Wondering whether you can install metal ceiling tiles over a popcorn or textured ceiling? You can, but prep matters.
Smooth the surface by scraping or applying a skim coat to guarantee a flat, stable substrate. Use furring strips or a resilient grid if needed to create a level plane and proper fastening.
Verify adhesion and local codes before proceeding.
Are metal ceiling tiles safe in kitchens and bathrooms?
Because metal tiles resist moisture and heat, they’re a great option for kitchens and bathrooms—so long as you pick the right finish and install them correctly.
Choose corrosion-resistant coatings (stainless, aluminum, or powder-coated steel), seal seams and edges against steam, and guarantee proper ventilation to prevent condensation.
Avoid bare metals near salts or acidic cleaners, and follow manufacturer guidelines for wet-area installations.
How do metal tiles affect acoustics and insulation?
How will metal ceiling tiles change the way your room sounds and holds heat?
Metal reflects sound, so untreated tiles can make rooms brighter and more echoey; add acoustic backing, furring strips, or insulation to absorb noise.
Metal conducts heat, so pair tiles with proper thermal insulation or an insulated grid to prevent heat loss, condensation, and cold spots while maintaining the look.
Can I paint or refinish existing metal tiles?
Yes—you can paint or refinish most metal ceiling tiles, and doing so is a quick way to refresh their look or match a new décor.
Clean thoroughly, sand lightly to scuff the surface, use a metal primer, then apply high-quality spray or brush-on paint rated for metal.
Test a small area first and allow proper drying between coats for durable, even results.
What warranty or lifespan can I expect?
Warranties and lifespan vary by manufacturer and material, but you can generally expect metal ceiling tiles to last decades with proper care.
Most manufacturers offer limited warranties from 1–25 years covering defects, finish, or corrosion; premium finishes often carry longer guarantees.
To preserve lifespan, avoid moisture exposure, clean gently, touch up scratches, and follow installation guidelines so your tiles meet warranty terms and perform well.