
How Ceiling Tiles Are Installed and What You Need to Get Started
You can install ceiling tiles yourself if you’ve got basic carpentry skills, a ladder, tape measure, utility knife, level and either a grid kit or adhesive rated for the tile type. Start by prepping and priming the surface, snap chalk lines from center, then fit tiles—either into a suspended grid or pressed to the ceiling with adhesive—cutting around fixtures as needed. Follow safety, moisture and code checks, and keep going below to learn detailed steps and tips.
Can You Install Ceiling Tiles Yourself and What You Need
You can often install basic ceiling tiles yourself if you’re comfortable with measurements, cutting, and working on a ladder.
You’ll need a tape measure, utility knife or saw, straightedge, adhesive or grid system, ladder, safety gear, and replacement tiles.
Below is a short list of those essential tools and materials to get you started.
One-sentence summary of feasibility and required skills
Although installing ceiling tiles can be a DIY project for many homeowners, it does require basic carpentry skills, steady measurements, and comfort working on a ladder.
You can tackle it if you’re handy, patient, and willing to learn how ceiling tiles are installed, but expect precise cutting, accurate layout, and safe ladder work; otherwise, hire a pro to guarantee a straight, durable finish.
Short list of essential tools and materials
If you decide to tackle ceiling tile installation yourself, plan on having a few specific tools and materials ready before you start.
You’ll need reliable basics and a few extras for neat, safe work.
- Tape measure, utility knife, straightedge
- Adhesive or grid kit, screws, anchors
- Ladder, safety goggles, gloves
Basic Understanding What Ceiling Tiles Are and Why Choose Them
You’ll find ceiling tiles come in several materials—acoustic, mineral fiber, PVC, tin, and gypsum—each suited to different looks and functions.
Choose tiles for sound control, improved insulation, or a cleaner aesthetic, keeping in mind whether the space is commercial or residential.
Also weigh limitations like weight, moisture sensitivity, and fire ratings before you pick a type.
Types of ceiling tiles (acoustic, mineral fiber, PVC, tin, gypsum)
Five common types of ceiling tiles—acoustic, mineral fiber, PVC, tin, and gypsum—cover most needs for sound control, moisture resistance, budget, and aesthetics, so you can pick the one that fits your room and priorities.
| Type | Strength | Typical use |
|---|---|---|
| Acoustic | Absorbs sound | Offices |
| Mineral fiber | Inexpensive | Drop ceilings |
| PVC | Moisture-proof | Bathrooms |
| Tin | Decorative | Historic homes |
| Gypsum | Smooth finish | Dry areas |
Benefits and common applications (soundproofing, aesthetics, insulation, commercial vs. residential)
Because ceiling tiles do more than hide wiring and ducts, they can shape a room’s function and feel—improving sound control, adding insulation, and boosting aesthetics with a range of finishes.
You’ll reduce noise in offices or home theaters, raise thermal efficiency, and pick styles from sleek modern to decorative tin.
Use durable tiles in commercial spaces and softer acoustical options for residential rooms.
Limitations and considerations (weight, moisture sensitivity, fire rating)
While ceiling tiles can transform a room, you should weigh a few practical limits before choosing them.
Check tile weight so your grid or joists can support it; heavier materials need reinforced framing.
Account for moisture—fiber or mineral tiles swell or mold, so pick moisture-resistant or PVC in damp areas.
Verify fire ratings for code compliance and safety before installation.
How Ceiling Tiles Are Installed Overview of Methods
You’ll typically choose between a suspended (drop) ceiling, glue-up tiles that stick directly to the ceiling, or gridless and specialty systems like clip-in metal or interlocking panels.
Each method has trade-offs in cost, accessibility, and appearance you’ll want to weigh.
Next, we’ll look at when each approach makes the most sense and the pros and cons of glue-up versus suspended and specialty options.
Drop (suspended) ceiling installation when it’s used
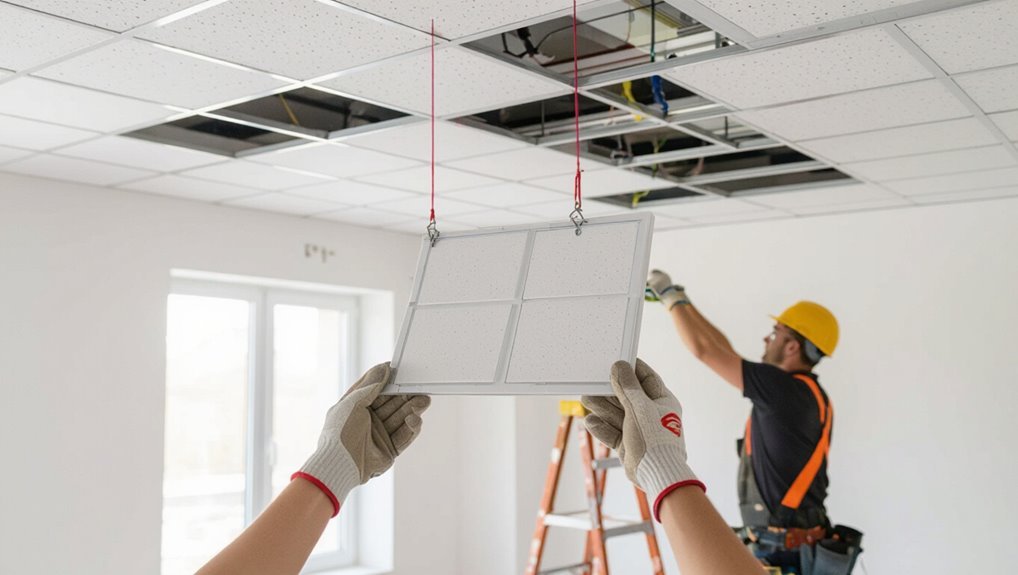
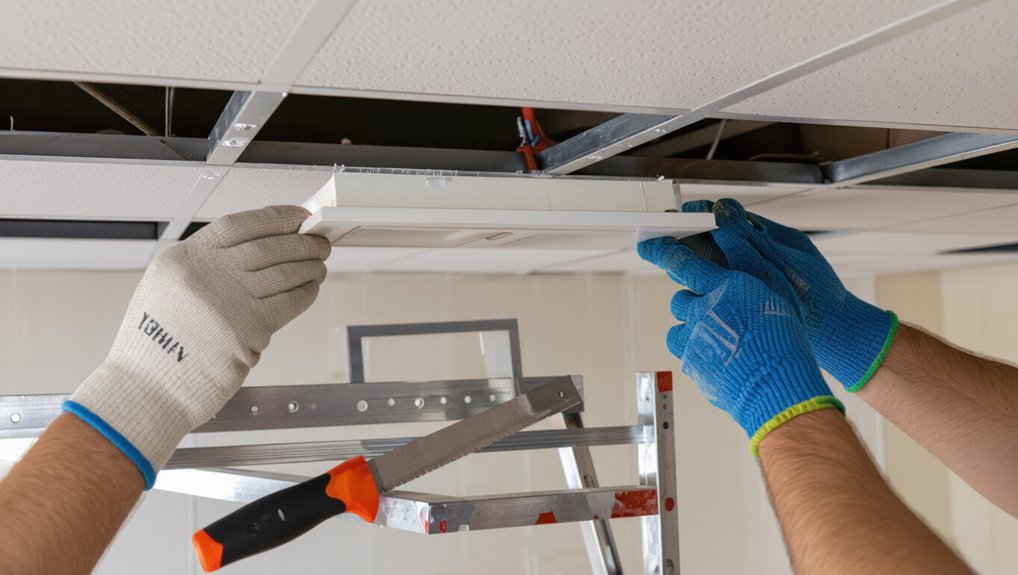
When you need quick access to ductwork, wiring, or pipes and want a clean, finished look without tearing out the existing ceiling, a drop (suspended) ceiling is a practical choice that hangs a grid from the structural ceiling and lays lightweight tiles into the framework.
You’ll measure, install perimeter channels, suspend main tees with wires, cut tiles for fixtures, and drop them into the grid.
Glue-up (direct-adhere) ceiling tile installation pros/cons
If you don’t need the easy access a suspended grid gives, glue-up (direct-adhere) ceiling tiles offer a low-profile, economical alternative that sticks tiles directly to a solid substrate.
You’ll save headroom and install faster, but you’ll lose easy access for wiring or repairs and face permanent attachment challenges if moisture or future removal occurs.
Choose stable, clean surfaces and proper adhesive.
Gridless/clip-in and specialty systems (metal/tin, interlocking)
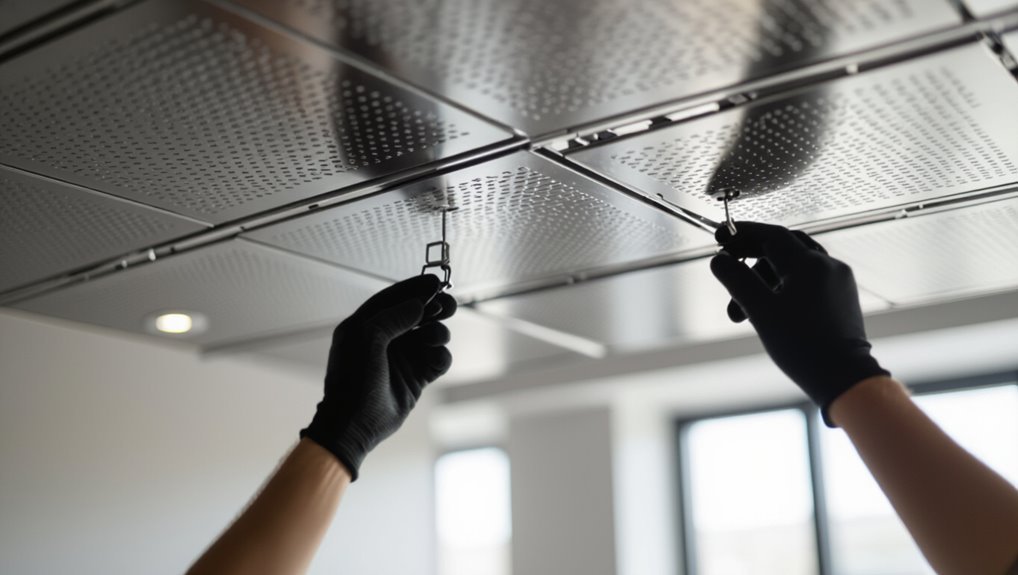
Although they don’t rely on a traditional exposed grid, gridless clip‑in and specialty ceiling systems still give you quick access and a finished look by locking panels into concealed tracks or interlocking seams.
You’ll find metal, tin, and engineered options that snap or clip for secure installation, resist moisture, and suit decorative or commercial needs.
Installation needs precise layout, proper fasteners, and occasional trim work.
Step-by-Step Installation Guide Drop (Suspended) Ceiling
You’ll start by planning and measuring the room so your grid and tiles fit properly.
Next you’ll lay out and install the main tees, cross tees, perimeter pieces, and hangers, then level the grid before cutting tiles to fit around fixtures and edges.
Finally you’ll place the tiles and add finishing touches like diffusers and access panels.
Step 1: Planning and measuring the room

Start by measuring the room’s length and width and noting the location of lights, vents, and other fixtures you’ll need to work around.
Calculate total area, mark obstruction centers, and decide tile orientation.
Record measurements and sketch a simple layout to guide cuts and material estimates.
- Area and dimensions
- Fixture locations
- Sketch and notes
Step 2: Choosing and laying out the grid (main tees, cross tees, perimeter)

Step 2 sets up the metal grid that supports your tiles: choose main tees sized for your tile dimensions and ceiling height, plan cross tees to create consistent modules (typically 2×2 or 2×4 feet), and lay out perimeter trim so tiles sit flush against walls and fixtures.
Measure and mark a precise layout, cut tees to fit, and dry-fit components ensuring alignment before final assembly.
Step 3: Installing hangers and leveling the grid
Once the grid’s perimeter and cross-tees are dry-fit, install hanger wires at the marked locations and level the framework so the ceiling plane is true; attach wires to structural members, twist or secure them to the main tees, and adjust their length until the grid sits perfectly level.
You’ll then:
- Fasten hangers at layout points.
- Use a laser or spirit level.
- Fine-tune wire twists to plumb.
Step 4: Cutting and fitting tiles around fixtures and edges
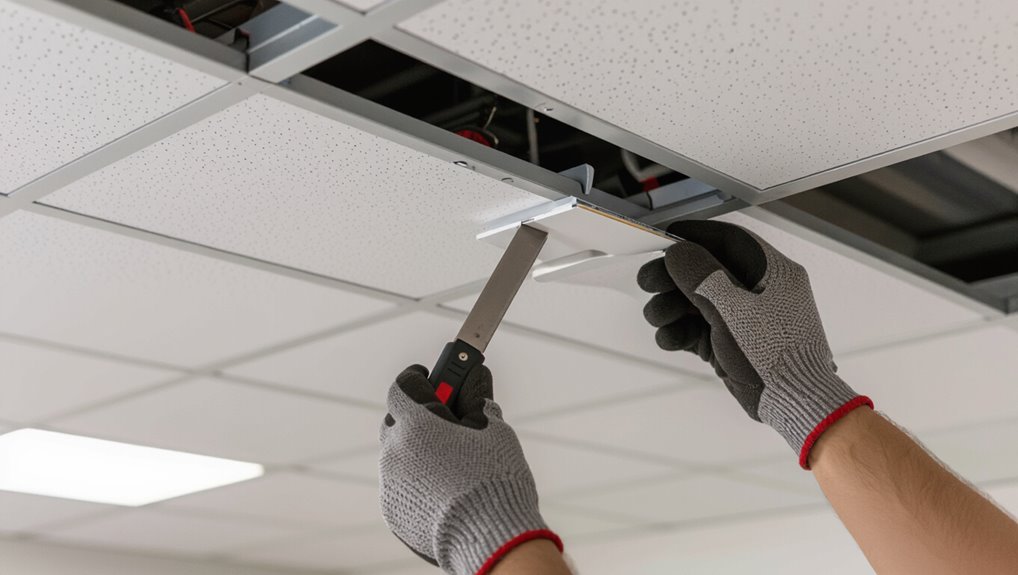
With the grid leveled and hangers secured, you’re ready to cut and fit tiles around lights, vents, and perimeter walls.
Measure openings carefully, mark tiles, and use a straightedge and utility knife or jab saw for clean cuts.
Trim edges to fit snugly against walls and T-bars, dry-fit pieces, then adjust for wiring or piping so tiles sit flat and even.
Step 5: Installing tiles and finishing touches (diffusers, access panels)
Begin placing tiles into the grid by angling each panel slightly and lowering it onto the T-bars so it sits flush and supported.
Fit tiles around diffusers and access panels, trimming as needed. Secure edges and check alignment.
Finish by reinstalling fixtures and cleaning debris.
- Trim and fit openings precisely
- Install diffusers/access panels securely
- Inspect alignment and clean up
Step-by-Step Installation Guide Glue-Up (Direct-Adhere) Tiles
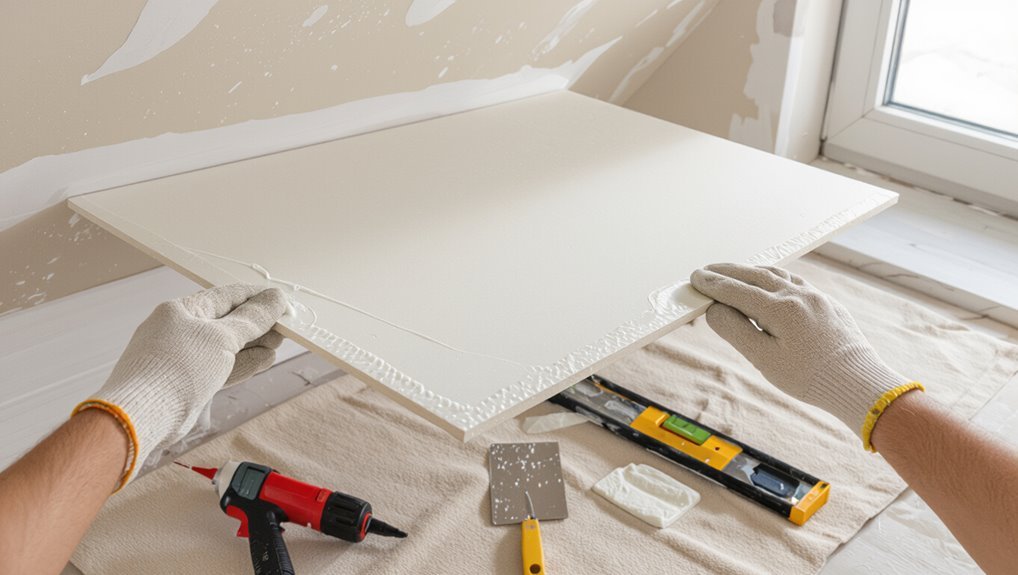
Before you start gluing tiles, make sure the ceiling is clean, dry, and primed so the adhesive bonds properly.
Snap chalk lines for alignment, choose the right adhesive and apply it as recommended, then press and trim each tile into place.
Finish by sealing joints and painting if needed for a seamless look.
Step 1: Surface preparation and priming
Clear the ceiling area and inspect the substrate for dust, loose paint, grease, or water damage so you can guarantee a solid bond for glue-up tiles.
Remove contaminants, repair damage, and sand glossy spots.
Apply primer compatible with both substrate and adhesive, following drying times.
Use a roller for even coverage and ventilate the room.
- Clean surface
- Repair defects
- Prime and dry
Step 2: Layout and chalk lines for alignment

1 good layout will save you time and keep your tiles straight: measure the room, find and mark the centerlines for both length and width, and snap chalk lines to create a precise grid that guides each glue-up tile.
Use the grid to plan edge cuts, set starter rows, and guarantee patterns align.
Verify squareness before you begin installing tiles.
Step 3: Adhesive selection and application techniques
Adhesive choice makes or breaks a glue-up ceiling installation, so pick a product rated for your tile material, substrate, and room conditions (moisture, temperature, and traffic).
Use contact or construction adhesive labeled for ceiling tiles, follow open time, and apply even beads or dabs. Press firmly per manufacturer instructions and clean excess immediately.
- Test adhesion and cure time.
- Use proper trowel/nozzle.
- Store adhesives per label.
Step 4: Setting, pressing, and trimming tiles
Begin placing tiles from your layout lines, aligning each tile carefully with adjacent ones and the chalk lines to maintain straight rows.
Press each tile firmly into the adhesive, working outward and wiping excess glue immediately.
Use a straightedge and utility knife for precise edge cuts, and a snips or small saw for curves.
Check alignment frequently and adjust before adhesive skins over.
Step 5: Sealing joints and painting (if applicable)
After the tiles are set and the adhesive has cured per the manufacturer’s instructions, seal all joints with an appropriate caulk or joint compound to prevent moisture and dust infiltration.
Smooth seams with a putty knife, wipe excess, and allow drying.
If you’ll paint, use a primer suited to tile material, then apply a compatible low-VOC paint for uniform finish and durability.
Tools, Materials, and Costs What You Need to Get Started
Before you start, you’ll want a clear checklist of tools for both suspended and glue-up ceilings plus the specific materials like tile types, grid components, adhesives, and fasteners.
I’ll also outline a typical cost breakdown—materials versus labor—and share budget tips to help you plan.
That way you can decide what to buy, what you can DIY, and where to expect professional costs.
Full tool list for suspended ceilings
To install a suspended ceiling you’ll need a concise set of tools and materials—many are common and a few are specialized—so you can plan purchases, rentals, and the budget up front.
You’ll want basics plus suspension-specific gear: grid tees, wall angles, hanger wire, cutters, a laser or level, ladder, drill, and safety kit.
- Structural and layout tools
- Cutting and fastening tools
- Safety and accessory items
Full tool list for glue-up ceilings
1 essential kit will get you started installing glue-up ceiling tiles: a reliable adhesive, a caulking gun, a straightedge and utility knife for precise cuts, a chalk line or laser for layout, a cordless drill with screwdriver bits, a tape measure, safety gear (glasses, gloves, dust mask), and a ladder or scaffold sized to the room.
- Prep and layout tools
- Cutting and fastening tools
- Safety and access equipment
Materials list (tiles types, grid components, adhesives, fasteners)
Now that you’ve got the basic tools lined up, you’ll pick the materials that determine how your ceiling looks, performs, and holds up. Choose tile type (acoustic, mineral, PVC), grid components (main tees, cross tees, perimeter trim), and adhesives/fasteners (construction adhesive, screws, clips).
| Tiles | Grid | Fasteners |
|---|---|---|
| Acoustic | Main tees | Screws |
| PVC | Cross tees | Clips |
Typical cost breakdown (materials vs. labor) and budget tips
Although prices vary by region and project size, you’ll typically spend about 30–40% of a ceiling-tile job on materials and 60–70% on labor when hiring pros; for DIY, labor drops to near zero but you should still budget for tools, waste, and a few specialty items.
Compare tile prices, buy excess (~10%), rent cutting tools, get multiple contractor quotes, and prioritize durable grids to avoid costly rework.
Comparison Choosing the Best Installation Method
You’ll weigh drop, glue-up, and specialty systems against criteria like ceiling height, access needs, budget, and moisture resistance to pick the right approach.
Think about room type too—bathrooms and basements often need moisture‑resistant or removable options, while offices and kitchens may favor cleaner, budget‑friendly installs.
Drop vs. glue-up vs. specialty (criteria: ceiling height, access needs, budget, moisture)
Choosing between drop, glue-up, and specialty ceiling tile installations comes down to four practical criteria—ceiling height, access needs, budget, and moisture—and each method has clear trade-offs you should weigh.
| Feature | Quick image |
|---|---|
| Drop | Grid with removable panels |
| Glue-up | Seamless, low-clearance fit |
| Specialty | Moisture-resistant, custom fit |
| Access | Easy (drop) vs permanent (glue) |
Best methods by room type (bathroom, basement, office, kitchen)
When you pick a ceiling-tile installation, match the method to the room’s demands: bathrooms need moisture resistance and often glue-up or specialty tiles.
Basements benefit from drop systems for easy access and moisture-tolerant panels.
Offices usually favor drop grids for accessibility and sound control.
Kitchens demand grease- and moisture-resistant options—sometimes a sealed glue-up for low-clearance spots.
Choose materials and methods that prioritize ventilation, access, and maintenance.
Common Mistakes and How to Avoid Them
You’ll want to watch for common mistakes like poor measurements, wrong adhesive or grid choice, and tiles that sag or aren’t level.
Spotting symptoms—uneven seams, tiles pulling away, or messy cuts around vents—helps you pick the right fix and tools.
With careful layout, correct materials, and proper cutting techniques you’ll avoid most problems and save time.
Measurement and layout errors (how to prevent)
Because a precise layout sets the whole project up for success, avoid guessing or rushing your measurements. Measure room dimensions twice, mark centerlines, and account for tile borders so you don’t end with narrow edge pieces.
Use a chalk line, straightedge, and level. Lay out a dry run of tiles to confirm spacing and symmetry before cutting or fixing anything permanently.
Improper adhesive or grid selection (symptoms and fixes)
After you’ve squared the room and confirmed your layout, pick the right adhesive and grid—wrong choices will show up fast.
If tiles detach, bubble, or chip edges, your adhesive or grid likely mismatches tile weight, substrate, or humidity.
Check manufacturer specs, use adhesives rated for tile type and environment, and upgrade grid components for heavier tiles.
Test a small area before full installation.
Poor leveling and sagging tiles (diagnose and correct)
Spotting and fixing poor leveling and sagging early saves time and prevents a crooked ceiling finish.
Check grid alignment with a level and straightedge; identify bowed runners or loose hangers.
Tighten or replace hangers, shim or realign main tees, and guarantee tiles sit fully on flanges.
For sagging tiles, swap warped tiles and address moisture or insulation issues to prevent recurrence.
Cutting mistakes around fixtures and vents (tips and tools)
When you’re cutting tiles for lights, speakers, or vents, small errors can leave rough edges, misaligned openings, or gaps that show the ceiling grid.
Measure twice, mark clearly, and use a sharp utility knife or hole saw sized to the fixture.
Score and snap for clean edges, file or sand cutouts, and test-fit before installing to avoid rework and visible gaps.
Best Practices, Tips, and Maintenance
Before you start, check electrical wiring, HVAC runs, and insulation so nothing’s hidden above the grid.
Install tiles with acoustics and thermal performance in mind, use moisture-resistant materials and mold-prevention measures, and seal any leaks.
Schedule routine inspections and learn how to swap out damaged tiles quickly to keep the ceiling functioning and looking good.
Pre-install checks (electrical, HVAC, insulation)
Although the ceiling tiles go in last, you’ll need to verify electrical, HVAC, and insulation conditions now so installations stay safe and perform well; inspect wiring, fixtures, and junction boxes for code compliance and secure mounting.
Confirm HVAC vents and clearances won’t obstruct tiles, and guarantee insulation is dry, properly supported, and non-combustible.
Document issues, fix them before tiling, and coordinate trades.
Installing for acoustics and insulation performance
1 clear goal guides tile placement: maximize sound control and thermal performance by matching tile type, placement, and sealing to your room’s needs.
Choose high-NRC tiles for noisy spaces and denser panels for insulation.
Stagger seams, add perimeter gasketing, and guarantee tight fits around fixtures.
Test acoustics, adjust layout, and replace damaged tiles to maintain performance over time.
Moisture and mold prevention strategies
When you control moisture and stop mold early, ceiling tiles stay functional and safe—so prioritize ventilation, humidity control, and prompt repairs.
Use exhaust fans, dehumidifiers, and properly sealed roof penetrations to limit dampness.
Choose mold-resistant tiles and paints, monitor humidity (below 60%), inspect prone areas regularly, and address leaks immediately.
Quick action prevents spread and costly replacements.
Routine maintenance and how to replace damaged tiles
Keep a simple schedule of visual checks and quick fixes so small issues don’t become big, expensive repairs.
Inspect tiles quarterly for stains, sagging, or damage. Replace damaged tiles promptly: lift adjacent tiles, slide out the broken one, and insert a matching replacement.
Clean regularly with a soft brush and mild cleaner. Address leaks and humidity to prevent recurring problems.
Safety, Building Codes, and When to Hire a Pro
Before you start, make sure you’re using safe ladder techniques, dust control, and proper PPE, and consider testing for lead or asbestos if your ceiling is old.
Check fire ratings, insulation compatibility, and local building codes so your work won’t create hazards or fail inspection.
If the job involves structural changes, hazardous materials, or permits, hire a licensed pro—look for experience, references, and proper insurance.
Safety precautions (ladders, dust, PPE, lead/asbestos considerations)
Ladder safety, dust control, proper PPE, and testing for lead or asbestos are essential steps you shouldn’t skip when installing ceiling tiles; they protect you and anyone who uses the space afterward.
Use a sturdy ladder, secure footing, and spotter when needed.
Wear a respirator, eye protection, gloves, and coveralls.
If tests show hazards, stop and hire a certified abatement pro.
Fire, insulation, and local code considerations
When you’re installing ceiling tiles, consider fire ratings, insulation placement, and local building codes as integral parts of the project rather than optional details.
Check tile and adhesive fire classifications, maintain required clearances around fixtures and vents, and guarantee insulation doesn’t block ventilation or violate rating requirements.
Pull permits when required and follow local inspection guidelines to keep your installation safe and compliant.
Signs you should hire a professional and how to choose one
If code questions, fire ratings, or insulation concerns feel overwhelming—or if your ceiling involves electrical work, structural changes, or work above a live space—you should hire a professional.
Choose licensed contractors, check references, and verify insurance. Ask for permits and written estimates. Prefer those with drywall/ceiling experience and positive reviews.
- Verify license and insurance
- Check experience and references
- Get written estimates and permits
FAQ
You’ve probably got questions about timing, prep, and whether tiles work over drywall or popcorn ceilings.
You’ll also want to know which tiles suit bathrooms and kitchens, how they affect acoustics, and what kind of warranty or lifespan to expect.
Let’s answer those concerns so you can plan the right installation for your space.
How long does a typical ceiling tile installation take?
How long will your ceiling tile installation take?
It depends on room size, tile type, and prep. A small room with straightforward layout often takes a few hours; a standard living room or kitchen typically finishes in a day.
Complex patterns, dropped-grid setups, or extensive prep can extend time to one or two days.
Plan for cleanup and inspections.
Can ceiling tiles be installed over existing drywall or popcorn ceilings?
Can you install ceiling tiles over existing drywall or a popcorn ceiling? Yes—you can, but prep matters.
For drywall, clean, repair, and make certain it’s flat; adhesives or grid systems work.
For popcorn, scrape or stabilize loose texture first; tiles can adhere if surface is sound.
Check weight limits, use proper adhesive or furring strips, and test a small area before completing the job.
Are ceiling tiles suitable for bathrooms and kitchens?
If your bathroom or kitchen has moisture or cooking fumes, consider tile material and installation methods before you start.
Choose moisture-resistant tiles like PVC, vinyl, or mold-resistant mineral fiber. Guarantee proper ventilation, sealed edges, and corrosion-resistant grid or adhesive.
Avoid untreated gypsum or cardboard-backed panels.
Regularly inspect for mold and replace damaged tiles promptly to maintain hygiene and longevity.
How do I improve ceiling acoustics with tiles?
Want to reduce echo and improve speech clarity? Choose acoustic tiles with high NRC ratings, like fiberglass, mineral fiber, or specialized foam.
Install them across the ceiling evenly, avoiding gaps and hard reflective surfaces. Combine with insulated plenum and soft furnishings to absorb sound.
Seal edges and use mounting clips recommended by the manufacturer to prevent vibration and maintain performance.
What warranty or lifespan can I expect from different tile types?
Because materials and installation vary, warranties and lifespans for ceiling tiles differ widely, so you should match expectations to tile type and environment.
Mineral fiber and fiberglass often last 10–25 years; metal and PVC can exceed 30 years. Moisture-prone areas shorten life; commercial installers may offer longer warranties.
Check manufacturer coverage for defects, staining, and installation requirements before buying.