How to Start Vinyl Plank Flooring: Layout, Direction, and First Row Tips
Start by measuring the room, acclimating planks 48–72 hours, and choosing plank direction based on the longest wall and light flow. Snap a chalk starter line and decide whether to begin with full planks or a trimmed starter row. Use spacers for a 1/4″–1/2″ expansion gap, check alignment frequently, and secure the first row per the manufacturer’s method. Stagger subsequent rows, address changes, and keep tools handy—keep going to learn detailed tips and troubleshooting.
How to Start Vinyl Plank Flooring Quick Answer and Project Overview
Start by laying your first row along the longest, straightest wall with spacers to maintain an expansion gap, and run planks parallel to the main light source for the best look.
The project typically covers room prep, underlayment, cutting and locking planks—plan a few hours to a weekend depending on room size, and gather a saw, spacers, pull bar, tapping block, measuring tools, and the planks and underlayment.
Hire a pro if subfloor repairs, complex layouts, or stair/riser work are needed, but you can DIY simple, level rooms with basic straight cuts.
Quick Answer Best starting point, direction, and first-row tip in one sentence
Although you’ll usually work from the longest, straightest wall toward the room’s entrance, begin by laying a dry row to confirm your plank alignment and adjust the first row so the final cut along the far wall is at least 2–3 inches wide.
For how to start vinyl plank flooring, pick a straight baseline, run planks lengthwise toward light, and shim the first row for a consistent 1/4-inch expansion gap.
Project overview: scope, time, tools, and materials needed
Scope-wise, this job covers preparing the subfloor, laying underlayment if required, fitting and clicking or gluing down planks, and trimming finish pieces and connections.
Plan on a single small room (up to 200 sq ft) taking a competent DIYer a day or a weekend depending on prep work, while larger or complicated layouts add time.
- Tape measure, chalk line, utility knife.
- Underlayment, spacers, adhesive (if needed).
- Rubber mallet, tapping block, pull bar.
- Safety gear, threshold strips, trim pieces.
When to hire a pro vs. DIY indicators
When should you tackle vinyl plank flooring yourself and when should you call a pro?
You can DIY if you’re comfortable with precise measuring, cutting, leveling subfloor, and have basic tools and time.
Hire a pro for complex layouts, uneven subfloors, shifts to other flooring, plumbing/electrical obstacles, or if you want guaranteed warranties and faster, polished results.
Basic Understanding What Is Vinyl Plank Flooring and Why Layout Matters
You’ll choose from types like LVP or SPC and installation styles such as click-lock or glue-down, and each one changes how you plan the job.
Pay attention to expansion gaps, subfloor prep, and plank dimensions because they dictate stagger patterns and seam placement.
Also pick a laying direction that suits the room — it can make the space look larger and influence how the floor performs over time.
Vinyl plank types (LVP, SPC, click-lock, glue-down)
Although vinyl plank flooring looks simple at first glance, there are several distinct types—LVP (luxury vinyl plank), SPC (stone plastic composite), click-lock, and glue-down—that change how you’ll install, finish, and live on the floor.
- LVP: flexible, comfortable.
- SPC: rigid, durable.
- Click-lock: floating, easy DIY.
- Glue-down: permanent, smooth for commercial spaces.
Key properties affecting layout: expansion gaps, subfloor requirements, plank length/width
Three things really dictate how your vinyl planks should be laid out: you need room for expansion gaps, a flat and compatible subfloor, and the right plank dimensions for the room.
Leave manufacturer-recommended perimeter gaps for seasonal movement, guarantee the subfloor is level, clean, dry, and suitable for your product, and choose plank lengths/widths that minimize seams and staggering for stability and visual coherence.
How flooring direction affects room appearance and performance
Many factors change when you run planks along the room versus across it, and the direction you pick will alter both how big the space feels and how the floor handles traffic.
You’ll make rooms look longer by running planks lengthwise toward focal points, wider by laying them across.
Direction also affects seam visibility, wear patterns, and ease of installation around doors and cabinets.
Planning Your Layout Measuring, Direction, and Pattern Choices
Before you cut a single plank, you’ll measure the room precisely, pick a plank direction that complements light, walls, and traffic, and decide on a pattern—straight, staggered, herringbone, or diagonal—based on the look you want.
Use simple tools and step-by-step math to calculate total square footage, then add a waste allowance for cuts, starter rows, and matching. That planning keeps material costs predictable and the install tidy.
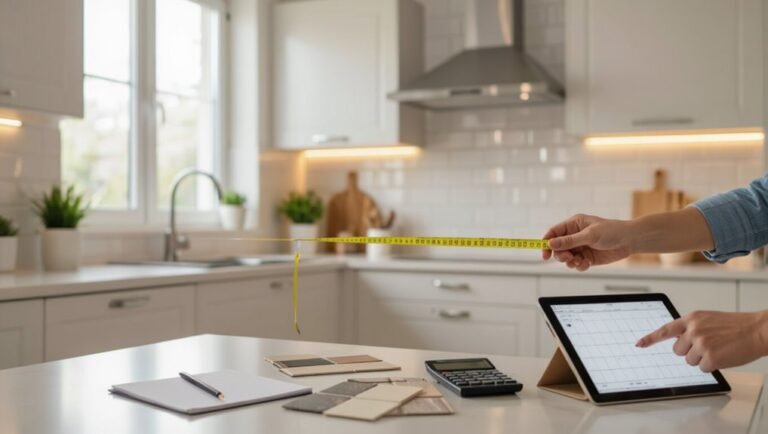
Measuring the room accurately: tools and step-by-step math
Accurate measurements make the rest of the install go smoothly, so gather a tape measure, straightedge, chalk line, and a notepad before you start.
Measure room length and width at several points, note high and low spots, and record doorways and alcoves.
Subtract fixed obstacles, calculate total square footage, add 5–10% waste, and sketch dimensions for reference.
Choosing plank direction: rules of thumb (light source, longest wall, traffic flow)
If you want your new vinyl planks to look their best and wear evenly, choose a direction that considers the room’s primary light source, the longest continuous wall, and how people will move through the space.
- Lay planks parallel to incoming light to minimize visible seams.
- Run boards along the longest wall for a balanced look.
- Align with main traffic flow to reduce wear.
- Test orientation with a few loose planks.
Layout patterns: straight, staggered, herringbone, diagonal (visual considerations)
While your plank direction sets the room’s flow, the pattern you pick—straight, staggered, herringbone, or diagonal—determines the overall visual impact and how seams read across the floor.
Choose straight for simplicity and elongation, staggered for natural randomness and strength, herringbone for elegance and movement, or diagonal to widen tight spaces.
Consider room size, focal points, and trim visibility when deciding.
Calculating material needs and waste allowance (cutting loss, starter rows)
Once you’ve picked a pattern and plank direction, you’ll need to figure out how many boxes to buy and how much extra to allow for cuts, starter rows, and mistakes. Measure room area, add 10–15% for straight runs, 15–20% for angled or herringbone, and include extra for starter rows and damaged planks.
| Item | Recommendation |
|---|---|
| Area | Measure accurately |
| Straight | +10–15% |
| Angled | +15–20% |
| Starter rows | +5% |
Preparing the Subfloor and Work Area
Before you lay a single plank, inspect the subfloor for soft spots, gaps, or moisture and make any necessary repairs.
Test for dampness, clean and level the surface, and choose the proper underlayment for your subfloor type.
Finally, let your vinyl planks acclimate in the room for the recommended time and conditions so they’ll perform correctly after installation.
Inspecting and repairing subfloor: common issues to check
As you get ready to lay vinyl plank, inspect the subfloor carefully—small problems now can cause big issues later.
Check for loose or squeaky boards, high or low spots, gaps, and damaged or delaminated plywood. Fasten loose boards, level low areas with patching compound, sand high spots, and replace rotten sections.
Make certain the surface is clean, dry, and flat before installing.
Moisture testing and mitigation for different subfloors
After you’ve fixed structural problems and smoothed the surface, check for moisture—it’s one of the biggest causes of vinyl failure.
Use a moisture meter for concrete, plywood, and OSB; perform calcium chloride or relative humidity tests on concrete slabs.
If levels exceed manufacturer limits, install a vapor barrier, use a moisture-mitigating primer or epoxy, or delay installation until dry.
Cleaning, leveling, and underlayment selection
1 step you can’t skip is a thorough clean and level of the subfloor—dirt, adhesive residue, and even small bumps will telegraph through vinyl plank and shorten its life.
You should:
- Remove debris, old glue, and grease.
- Patch low spots with leveling compound.
- Grind high spots smooth.
- Choose underlayment for subfloor type, sound control, and moisture barrier.
Acclimating vinyl planks: timing and conditions
Give the planks time to acclimate in the room where they’ll be installed—typically 48 to 72 hours—to let them reach the same temperature and humidity as the subfloor so they expand or contract before you lock them in.
Keep windows closed, HVAC running at normal settings, and stacks flat off the floor on pallets or cartons.
Check moisture and avoid wet areas; follow manufacturer limits.
Step-by-Step Installation Workflow
Now you’ll run a dry layout and snap chalk lines to establish a true starting line.
Decide whether to start with full planks or a cut starter row, then install the first row focusing on alignment, spacing, and secure fastening.
From there you’ll stagger subsequent rows, tap and lock planks into place, and handle doorways, changes, and vents as you go.
Step 1 Dry layout and chalk lines: establishing a starting line
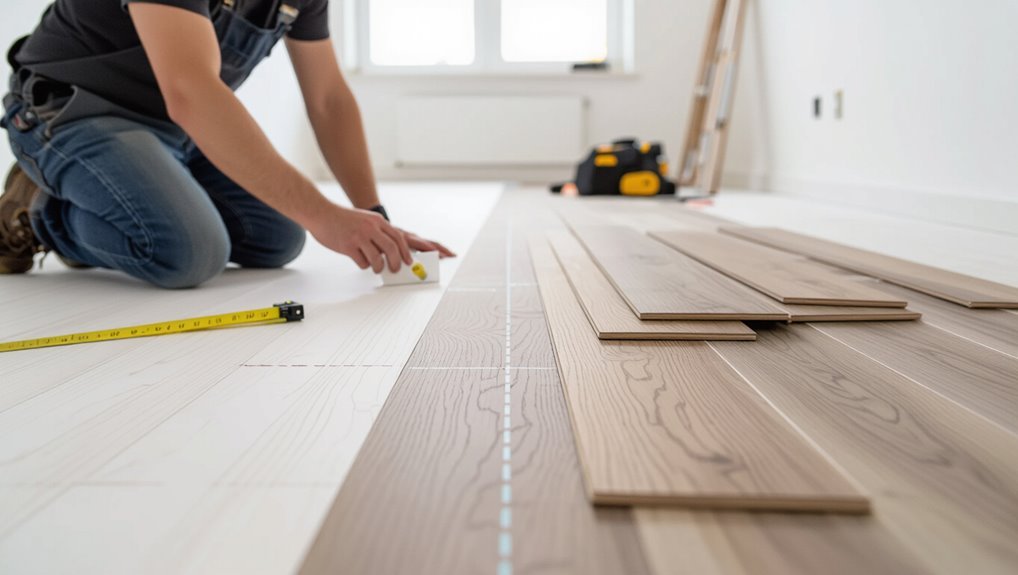
Before you glue or click anything together, lay out a row of planks along the longest, straightest wall to confirm fit and pattern.
Then snap a chalk line to mark your starting edge so every subsequent row stays square and true. Use spacers at walls for expansion, check butt joints align, and re-snapping guarantees accuracy before fastening or adhering the first installed rows.
Step 2 Deciding the first row: full planks vs. cut starter row
With your chalk line set and the first dry row checked, decide whether to start with full-width planks or a cut starter row based on how the edges will look and how much you’ll need to trim at the far wall.
Choose full planks for a balanced layout and fewer seams; pick a cut starter to avoid very narrow end pieces at the opposite wall and to maintain visual symmetry.
Step 3 Installing the first row: alignment, spacing, and securing techniques
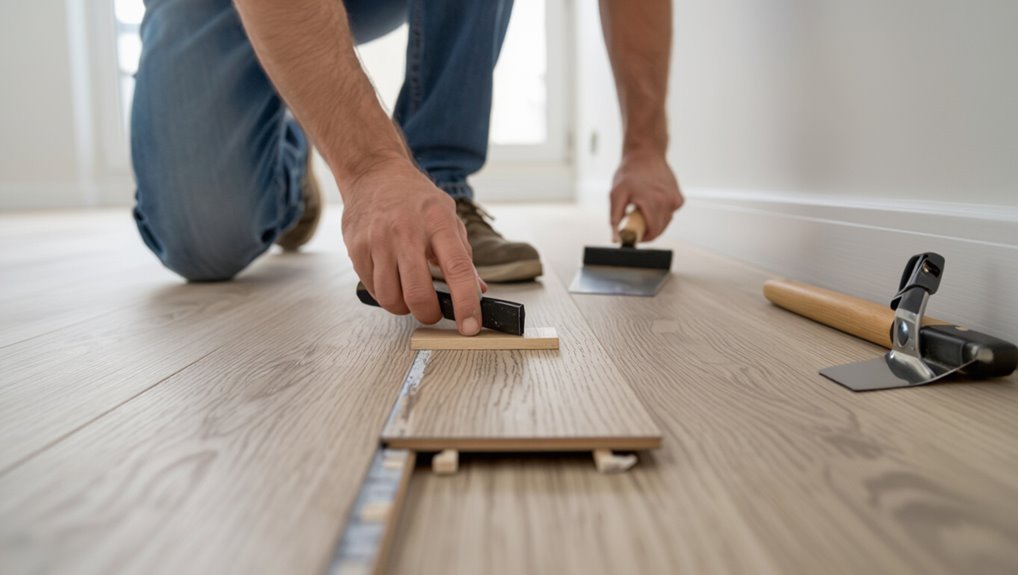
1. You’ll align the first row against the starter wall, tongue toward the wall, using spacers to keep a consistent expansion gap.
Check straightness frequently with a chalk line. Secure planks per manufacturer—click-lock angled in, or adhesive/tape where required.
Stagger seams later but don’t fasten through the plank face. Trim ends precisely for a tight, even start.
Step 4 Continuing installation: stagger patterns, tapping, and locking planks
Continue by laying subsequent rows row-by-row, locking each plank’s long edge first and tapping ends snug as you go so seams stay tight.
Stagger end joints at least 6–12 inches for stability and visual appeal.
Use a pull bar for tight fits and a tapping block to avoid damage.
Check alignment frequently and trim starter pieces to maintain consistent stagger and straight rows.
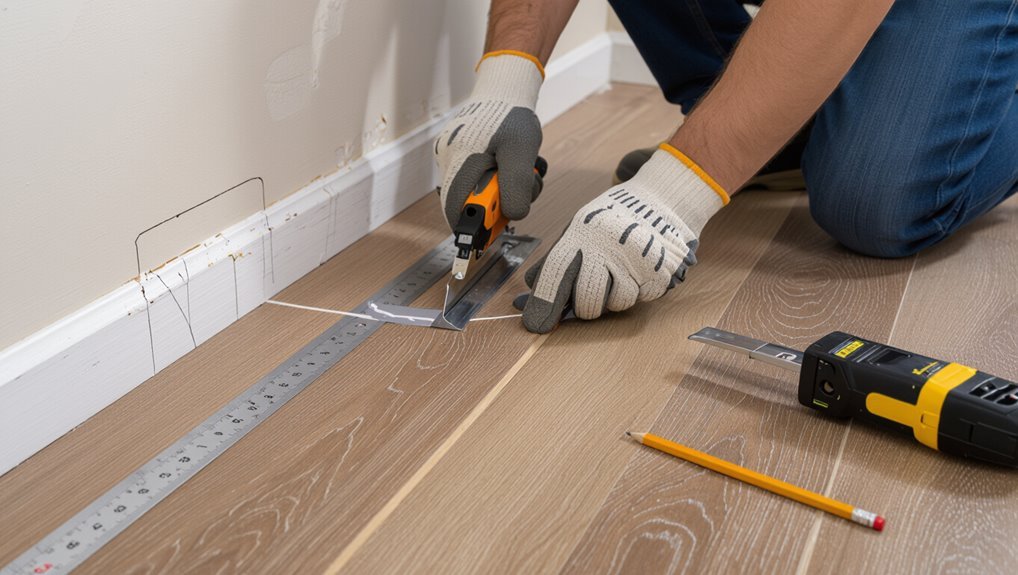
Step 5 Dealing with doorways, transitions, and vents
Now you’ll tackle cutouts and clearances around doorways, thresholds, and vents so the floor looks professional and functions properly.
Measure openings, transfer shapes to planks, and cut precisely with a jigsaw or utility knife. Leave manufacturer-recommended expansion gaps at jambs.
Fit junction strips where flooring meets other surfaces, secure them per instructions, and trim vent grilles so airflow isn’t blocked.
Step 6 Last row fitting and finishing trims
You’ll fit the last row by measuring carefully, transferring the profile to each plank, and trimming them so they lock into place while maintaining the required expansion gap.
Work from wall to row, cut planks to exact widths, dry-fit each piece, then tap them into the previous row.
Install baseboards or quarter-rounds without pinning the planks, and seal connections and thresholds.
First Row Specific Tips and Tricks
Get your first row perfectly straight by sighting off a chalk line or snap a starter board against a rigid straightedge, and make adjustments as you go.
Use a sharp utility knife, jigsaw, or coping tools for clean cuts around irregular walls, and always leave the correct spacer gap for expansion.
For stubborn sections, clamp or weight boards temporarily and apply a bit of adhesive where recommended to hold things tight while you lock the seams.
How to get a perfectly straight first row (common alignment methods)
A straight first row makes the whole installation look professional, so take the time to align it carefully before you click anything together.
Use these common alignment methods to start true and simple:
- Snap a chalk line from a measured reference wall.
- Dry-lay a few planks to check spacing.
- Use spacers and a straightedge against the wall.
- Trim the starter row to maintain a consistent gap.
Cutting techniques for clean edges and irregular walls
When you’re cutting the first row to fit, measure twice and cut once: precise, repeatable marks and the right blade will give you clean edges on straight runs and confusing curves around door jambs.
Use a sharp utility or fine-tooth blade, score and snap or use a jigsaw for curves, clamp a scrap as guide, sand burrs, dry-fit pieces and trim small amounts for perfect contact.
Using spacers and expansion gaps correctly
If you want the floor to settle without buckling, leave a consistent expansion gap along walls and fixed objects and hold it with spacers as you lay the first row.
Use manufacturer-recommended gap width, typically 1/4″–1/2″. Place spacers every 8–12 inches and at ends.
Check alignment frequently, remove spacers only after adjacent rows lock, then install baseboards to conceal the gap.
Temporary clamps, weights, and adhesives for tricky first rows
Grab a few temporary clamps, weights, or a dab of adhesive to hold your first row steady while you work—these aids prevent gaps, rocking, and misalignment before the lock system engages.
Use soft clamps or small sandbags to avoid damaging planks. Apply pressure evenly, remove adhesive residue promptly, and release clamps only after adjacent rows lock securely to maintain a straight, stable starter edge.
Common Problems and How to Fix Them
You’ll likely run into a few common issues—gaps between planks, uneven seams or lippage, buckling or cupping, and visible end joints or pattern mismatches—and you should know how to spot the typical causes like improper acclimation, subfloor irregularities, or poor installation technique.
For each problem I’ll explain quick checks and practical fixes, from re-seating and tapping planks to sanding low spots, adding adhesive or relief cuts, and reconfiguring end joints for a cleaner pattern.
Follow these steps and you’ll prevent most issues and correct the ones that slip through.
Gaps between planks causes and fixes
When planks start to separate, it usually points to a few predictable causes—improper acclimation, fluctuating humidity, or poor installation—and knowing which one you’re facing makes the fix straightforward.
Check acclimation time, maintain stable indoor humidity (35–65%), and tighten loose click joints by re-seating or replacing damaged tongues.
For glue-down boards, reapply adhesive where gaps form.
Monitor and repair promptly to prevent moisture intrusion.
Uneven seams or lippage diagnosis and correction
Spotting lippage—the raised edge where two planks meet—tells you there’s a problem with alignment, subfloor flatness, or improper locking during installation.
Check joins to find high edges, lift and reseat loose planks, and use a tapping block to fully engage locks.
Shim or sand localized high spots in the subfloor, replace warped planks, and guarantee rows stay tightly aligned as you proceed.
Buckling or cupping after installation prevention and remedies
Lippage often signals alignment or subfloor issues, and those same moisture and fastening problems can cause planks to cup or buckle after installation.
Prevent by acclimating planks, controlling humidity, and ensuring a flat, dry subfloor with proper underlayment.
Refasten loose boards, relieve edge pressure, and replace severely deformed pieces.
Monitor room climate to avoid recurrence.
Visible end joints or pattern mismatch corrective options
Noticing end joints that line up or a repeating pattern that screams “installed” rather than “designed”?
Rotate or stagger starter rows to break joint alignment, cut random-length planks to vary seams, and mix planks from different boxes to reduce pattern repeats.
If already installed, remove select rows and re-lay with proper staggering or add border strips to disguise visible joints.
Best Practices, Maintenance, and Longevity Tips
Start by following installation best practices—accurate acclimation, tight seams, and a level subfloor—to prevent problems down the road.
After the planks are in, you’ll protect them with proper cleaning, felt pads on furniture, and entry mats to keep grit and moisture away.
Stick to a regular maintenance routine and you’ll know when wear warrants refinishing or replacement based on scratches, delamination, or persistent staining.
Best practices during installation to ensure long-term performance
Because proper installation sets the stage for decades of trouble-free service, you should follow a few key practices—control subfloor moisture and flatness, leave correct expansion gaps, stagger seams, and use recommended adhesives or underlayment—to minimize movement, prevent damage, and guarantee the warranty stays valid.
- Check and level the subfloor.
- Measure and plan staggered seams.
- Maintain expansion gaps.
- Use manufacturer-approved products and fasteners.
Post-installation cleaning and protection
After you finish laying the planks and securing expansion gaps, focus on cleaning and protecting the floor so your work keeps looking and performing its best.
Sweep or vacuum with a soft brush to remove debris, then damp-mop with manufacturer-approved cleaner.
Use felt pads on furniture, area rugs in high-traffic zones, and avoid harsh chemicals or steam cleaners to preserve finish and seams.
Routine maintenance and when to refinish or replace
1 simple, regular routine will keep vinyl plank flooring looking great for years: sweep or vacuum weekly, damp-mop with a manufacturer-approved cleaner as needed, and address spills immediately to prevent stains or seepage into seams.
Inspect seams and edges monthly, replace damaged planks promptly, and use felt pads and mats.
Refinish only if surface wear is cosmetic and product allows; otherwise replace.
Comparison: Click-Lock vs. Glue-Down First Row Techniques
Choosing the right first-row method sets the tone for your entire vinyl plank install, so you’ll want to weigh the pros and cons of click-lock versus glue-down before you begin. You’ll prefer click-lock for faster, floating installs and easier repairs; glue-down gives firmer feel and better adhesion on challenging substrates.
| Feature | Click-Lock | Glue-Down |
|---|---|---|
| Speed | Fast | Slower |
| Repair | Easy | Difficult |
| Stability | Moderate | High |
| Substrate needs | Flexible | Strict |
Tools, Materials, and Cost Considerations
Before you start laying planks, you’ll want a compact starter kit—tape measure, utility knife, straightedge, spacers, rubber mallet, and a pull bar—while optional pro tools like a flooring cutter or pneumatic stapler can speed the job.
I’ll outline typical costs for materials, underlayment, and tools so you can budget accurately.
With those figures and a few budgeting tips, you’ll know whether to rent specialty gear or buy what you need.
Essential tools checklist (starter kit)
A compact starter kit will save you time and frustration when installing vinyl plank flooring, so gather the basic tools and a few consumables before you begin.
- Tape measure, chalk line, and straightedge
- Utility knife with extra blades
- Rubber mallet and pull bar
- Spacers, adhesive (if needed), and cleaning rags
Optional professional tools that speed up the job
1. You can speed installation with optional pro tools: a flooring jack for tight seams, a pneumatic flooring nailer for faster fastening, a heavy-duty snap cutter for clean straight cuts, and a track saw for precision miters.
Add a knee kicker, laser level, and flooring roller to improve accuracy and adhesion. These aren’t required but boost speed and finish quality.
Typical cost breakdown and budgeting tips
While costs vary by region and choices, you can expect three main expense categories: tools, materials, and labor (if you hire help).
Budget roughly $1–$4 per sq ft for basic tools, $1.50–$5+ per sq ft for planks, plus underlayment and adhesives.
If hiring pros, add $1–$4 per sq ft labor. Leave a 10–15% contingency for waste and unexpected issues.
Mistakes to Avoid When Starting Vinyl Plank Flooring
Don’t skip subfloor prep or moisture testing, because trapped moisture or an uneven base will ruin your install.
Pay attention to plank direction, stagger joints properly, and always leave the required expansion gaps to prevent buckling or visible seams.
I’ll cover each of these common mistakes and how to avoid them.
Skipping subfloor prep or moisture testing
If you skip proper subfloor prep or skip moisture testing, you’ll probably pay for it with warped, buckled, or loose vinyl planks down the line.
You need a clean, level, dry surface and a moisture check before installation.
Address high spots, fill low areas, remove debris, and use a vapor barrier or mitigation if tests exceed limits.
Don’t assume conditions are fine.
Incorrect plank direction for room lighting or shape
One key mistake is laying planks without considering how light and room shape affect their appearance, because wrong direction can make seams more visible and narrow rooms feel awkward.
You should test plank orientation by laying a few rows dry, observe glare and perceived width, then choose the direction that minimizes seam visibility and enhances flow before permanently installing.
Failing to stagger joints properly
When you skip proper staggering, your floor will look repetitive and weak where seams line up, and the joints become stress points that can pop or separate over time.
Stagger joints at least 6–8 inches between rows, vary plank lengths, and avoid patterns that create continuous seams.
Proper staggering improves strength, hides end joints, and prevents concentrated movement or buckling over traffic areas.
Ignoring expansion gap requirements
Because vinyl expands and contracts with temperature and humidity, you’ve got to leave the proper expansion gap around the room’s perimeter and at fixed obstacles.
If you skip or minimize gaps, planks can buckle, warp, or push against trim.
Follow manufacturer gap specs, use spacers while installing, and cover gaps with appropriate molding so the floor can move without damage.
FAQs
You probably have a few practical questions before you start, like which wall to begin from and whether you can lay planks over existing flooring.
You’ll also want to know how much expansion gap to leave and where, what stagger to aim for at end joints, and how long planks should acclimate.
I’ll answer each point clearly so you can get your layout and installation right.
How do I choose the best starting wall for vinyl planks?
Which wall should you start against? Choose the longest, straightest wall that’s most visible when you enter the room.
Run planks parallel to incoming light for a natural look, and start away from doorways to minimize awkward seams.
Account for focal points like fireplaces or cabinets so cut boards at edges look balanced.
Test layout before fixing the first row.
Can I install vinyl planks over existing flooring?
Picking the best wall also shapes how your floor meets existing surfaces, so you’ll want to know whether you can lay vinyl planks over what’s already down.
You can install over many sound, level floors like vinyl, tile, or hardwood if glued or interlocking systems are compatible.
Remove loose, uneven, or cushioned underlayment and thoroughly clean the surface before proceeding.
How much expansion gap is required and where should it be placed?
Most vinyl plank systems need a 1/4-inch to 1/2-inch expansion gap around the room perimeter and at fixed obstacles, and you should always follow the manufacturer’s exact recommendation.
Place the gap at walls, door jambs, pipes, cabinets, and thresholds. Use spacers during installation and cover gaps with baseboard or quarter-round.
Allow for larger gaps in very long runs or sunny rooms.
What is the ideal stagger for end joints?
After you’ve set consistent expansion gaps around the room, pay attention to how the plank ends line up. Staggering end joints prevents weak seams and gives the floor a natural look.
Aim for random offsets between 6 and 12 inches, avoid T-shaped intersections, and keep adjacent rows’ joints at least two to three planks apart. This improves strength and appearance.
How long should vinyl planks acclimate before installation?
How long should you let vinyl planks acclimate before installation?
Let them sit in the installation room for 48 to 72 hours, unopened. This equalizes temperature and humidity, preventing gaps or buckling.
If conditions are extreme—very cold, hot, or humid—extend acclimation to a week.
Keep HVAC running at normal operating conditions during this period for best results.