How to Install Floor Trim for a Clean, Professional Look
You can install floor trim yourself to give any room a clean, professional finish while hiding gaps and protecting walls. Start by choosing baseboard and molding materials, gather a miter saw, coping saw, nail gun, caulk, filler and safety gear, then clear the workspace. Measure twice, cut and test-fit pieces, cope inside corners or miter outside ones, nail securely, fill holes, caulk seams and paint. Keep going to learn tips, timing and pro vs. DIY trade-offs.
Quick Answer Can You Install Floor Trim Yourself and What It Achieves?
Yes—you can usually install floor trim yourself, and it gives a clean finished look while hiding gaps and protecting walls.
Expect a few hours for a single room, moderate difficulty if you can use basic tools, and a cost range of about $20–$100 for materials plus any tool purchases.
With careful measuring and patience you’ll save on labor and get professional-looking results.
Short summary of results, time, difficulty, and cost range
A quick DIY trim job typically takes a few hours for a single room and gives you a clean, finished look that hides gaps and protects walls.
You can install basic baseboard yourself with moderate skill, common tools, and a budget-friendly materials cost ranging from $1–$6 per linear foot for standard MDF or pine.
More decorative or hardwood options raise the price to $5–$15 per linear foot and add installation time and difficulty.
You’ll finish with neat edges, moderate effort, and predictable costs if you follow how to install floor trim step by step.
Basic Understanding What Is Floor Trim and Why It Matters
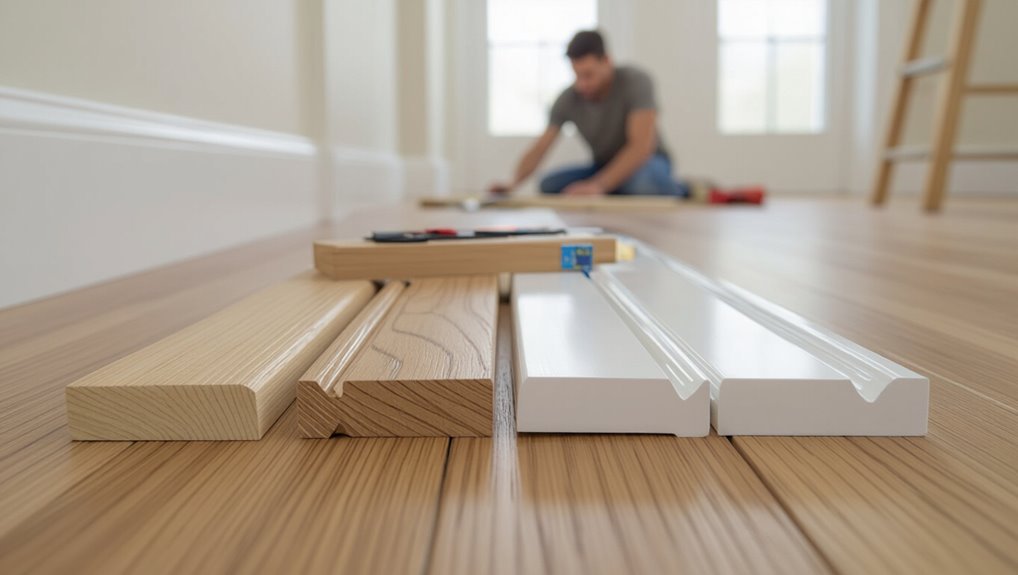
Floor trim includes baseboards, shoe molding, quarter round and base shoe, and you’ll pick profiles based on the room’s style and where the trim sits.
It protects walls and hides expansion gaps while adding a finished look, and materials like MDF, pine, hardwood, PVC and metal each have trade-offs in cost, durability and paintability.
Knowing common profiles and their best uses helps you choose the right trim for function and appearance.
Types of floor trim (baseboard, shoe molding, quarter round, base shoe)
Because trim ties your walls and floors together, you’ll want to know the common types—baseboard, shoe molding, quarter round, and base shoe—so you can pick the right profile for your room and flooring.
- Baseboard: taller, visible connection, styles vary.
- Shoe molding: slim, hides gap at floor.
- Quarter round: rounded profile, softer look.
- Base shoe: narrow, subtle finishing touch.
Functions: aesthetic, protection, covering expansion gaps
When you install trim, it does more than look finished—it protects walls from scuffs and hides the gaps left for flooring movement, so your room stays neat and functional.
You’ll enhance visual cohesion, mask uneven cuts, and create clean sightlines.
Trim also prevents damage from vacuums and feet, keeps debris out of expansion gaps, and helps maintain your floor’s longevity and appearance.
Materials: MDF, pine, hardwood, PVC, metal pros and cons
Now that you know what trim does—protecting walls, hiding gaps, and tying a room together—you’ll want to pick the right material for the job. Choose MDF for smooth paint jobs and affordability; pine for easy shaping; hardwood for durability; PVC for moisture resistance; metal for modern, durable edges.
| Material | Strength |
|---|---|
| MDF | Smooth, affordable |
| Pine | Shapeable, economical |
Common trim profiles and where to use them
The right trim profile can change a room’s look and function, so pick one that matches your style and the space’s needs.
Choose simple square or beveled baseboards for modern rooms, colonial or ogee for traditional spaces, and taller, ornate profiles for formal areas.
Use shoe molding to cover gaps and quarter round in tight corners; match scale to ceiling height.
Tools and Materials You’ll Need Before Starting
Before you start, gather the essential tools like a miter saw, coping saw, nail gun, pry bar, tape measure, and level.
Stock up on materials and consumables—trim, nails, adhesive, caulk, wood filler, and paint—and have safety gear ready.
Also clear and prep your workspace so you can work safely and efficiently.
Essential tools (miter saw, coping saw, nail gun, pry bar, tape measure, level)
A few key tools will make installing floor trim faster and give you cleaner results: a miter saw for precise angled cuts, a coping saw for inside corners, a nail gun for secure fastening, a pry bar for removals, and a tape measure and level to keep everything straight and true.
Use these to cut, fit, fasten, and adjust trim accurately.
- Measure carefully
- Cut accurate angles
- Fasten with consistency
- Check alignment
Materials and consumables (trim, nails, adhesive, caulk, wood filler, paint)
Good materials make the job look professional and last for years: pick trim that matches your style and room conditions, nails sized for your base and wall type, adhesive for any gaps or engineered flooring, paintable caulk for seams, wood filler for nail holes, and paint or stain for the final finish.
- Choose trim material and profile carefully.
- Match nail type to wall and trim.
- Use construction adhesive where needed.
- Keep paintable caulk and filler on hand.
Safety gear and workspace prep
Set yourself up with the right safety gear and a clear workspace so you can work confidently and quickly: wear eye protection, a dust mask or respirator, hearing protection, and sturdy gloves; clear furniture and cover floors with drop cloths; lay out tools (miter saw, nail gun or hammer, measuring tape, level, pry bar, caulk gun, sanding block) and materials within easy reach; and make sure you have good lighting and ventilation.
Use knee pads, keep a first-aid kit nearby, secure cords to avoid trips, and plan breaks to avoid fatigue.
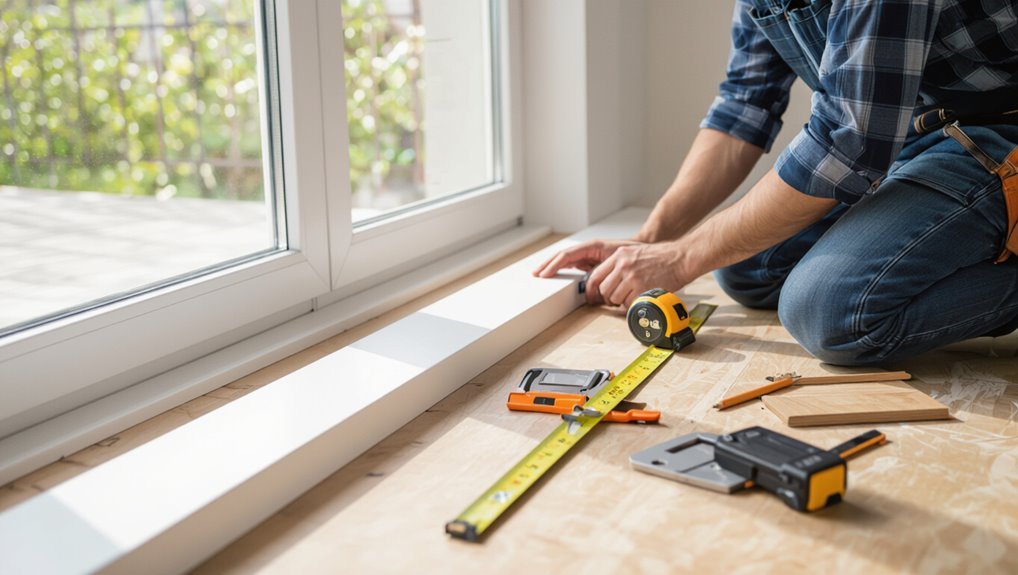
Preparation Measuring, Planning, and Layout
Start by measuring the room perimeter and adding a waste allowance so you know how much trim to buy.
Pick a profile height that lines up with your door casings and flooring, and note any adjustments where heights differ.
Finally, plan seam locations, butt joints, and changeover points so cuts fall in inconspicuous spots and pieces fit neatly.
Measuring perimeter and calculating material needs (waste allowance)
Before you cut any trim, measure the room’s perimeter to know exactly how much material you’ll need and factor in waste for mistakes and angled cuts.
Walk each wall, recording lengths and noting corners. Add 10–15% waste for standard rooms; increase to 20% for many angles or pattern-matched trim.
Round up to full board lengths and buy an extra piece for backups.
Choosing profile height and aligning with door casings and flooring
With your perimeter and waste calculated, choose a baseboard height that lines up cleanly with existing door casings and the finished floor height so installation looks intentional rather than tacked on.
Measure casing reveal and floor-to-casing gap at several spots, pick a profile that conceals small height variations, and make certain trim thickness and top edge align visually with door stops for a cohesive, professional appearance.
Planning seams, joints, and transition points
Plan seams and joints so they fall in discreet, accessible spots and don’t create awkward short pieces at corners or doorways.
Measure runs, mark splice locations where seams can be caulked or coped.
Stagger joints away from high-traffic sightlines, align connections with thresholds, and plan back-to-back seams in closets or against cabinets.
Account for expansion gaps and leave access for future repairs.
Step-by-Step Installation Process
Now you’ll follow a clear sequence to install the trim, starting with removing old pieces and prepping surfaces.
Measure and cut straight runs, handle inside corners with coping or mitering, and manage outside corners and scarf joints for long spans.
Finish by securing the trim with the proper nailing pattern, adhesive, and spacing.
Step 1 Remove old trim and prepare wall/floor surfaces
Start by removing the old baseboard carefully so you don’t damage the wall or floor underneath.
Pry off trim with a flat bar, cut caulk, and pull nails. Clean adhesive and dust, repair gouges with spackle, and sand smooth.
Check floor for loose boards and protruding nails.
- Pry trim slowly
- Cut caulk seams
- Fill and sand holes
- Vacuum debris
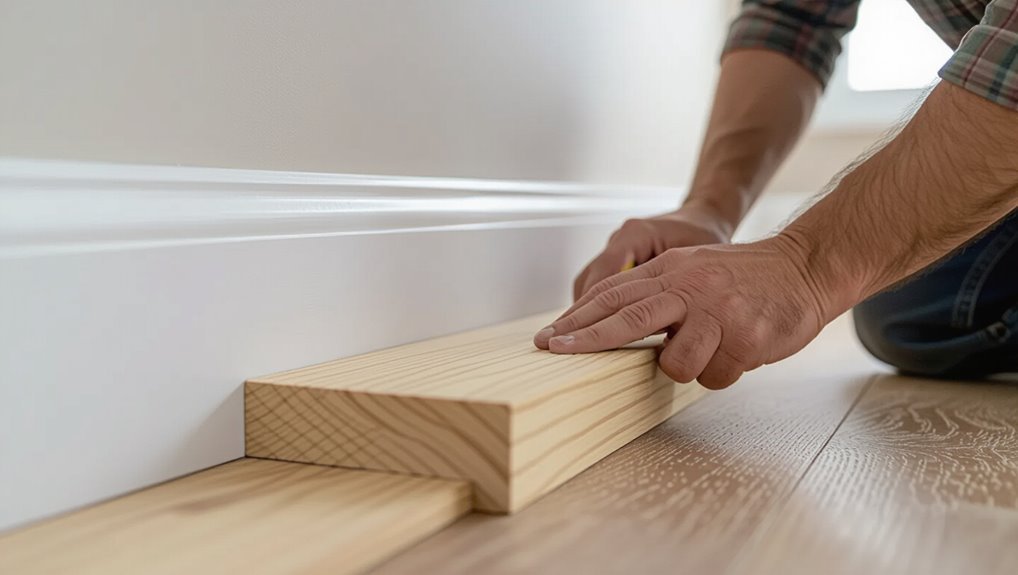
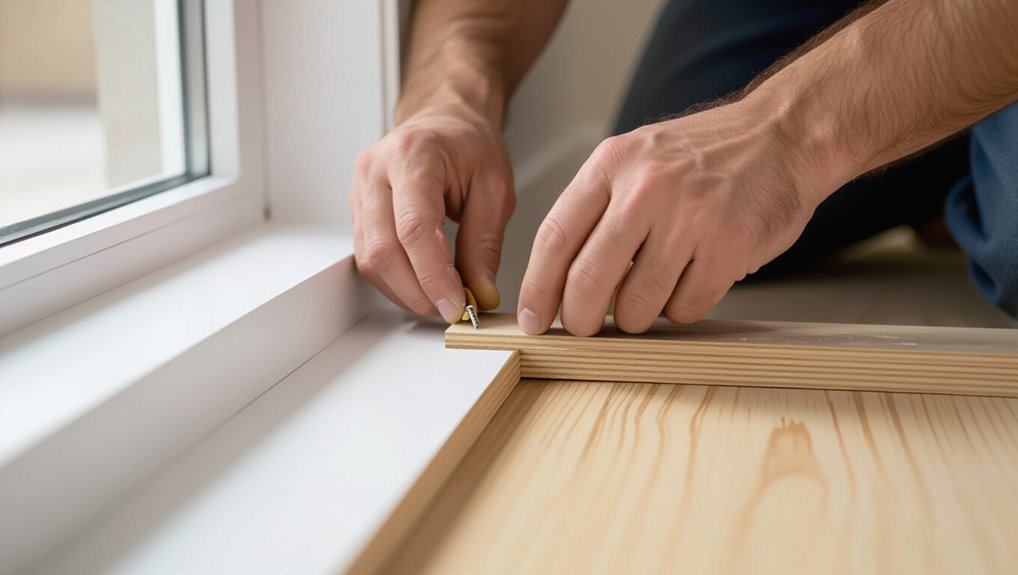
Step 2 Cut and fit straight runs (measuring and miter cuts)
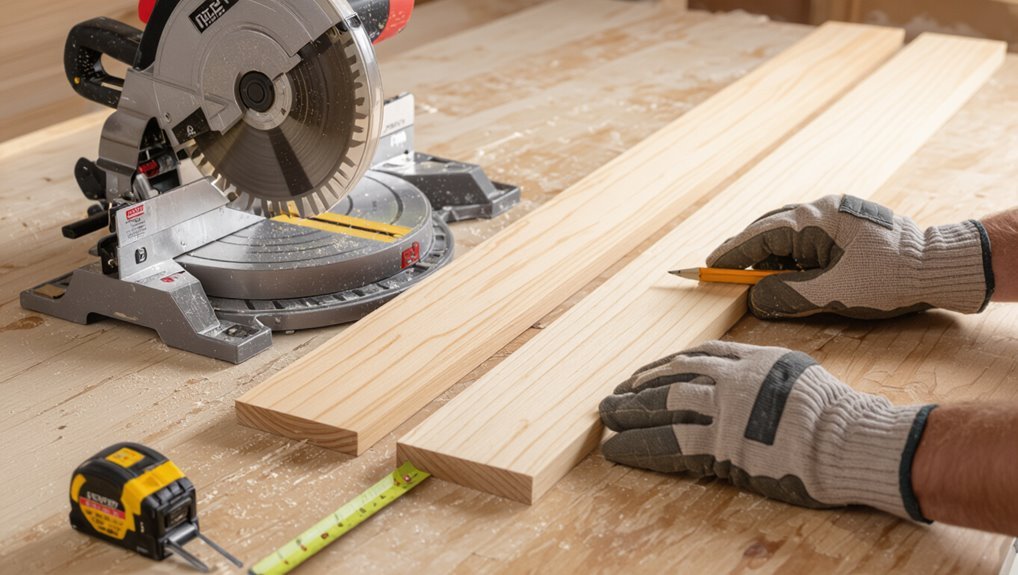
With the wall and floor prepped, measure each straight run from corner to corner and record lengths along the base of the wall; always measure twice and subtract the width of any corner returns or overlap.
Transfer measurements to trim, mark miter angles for end cuts, and cut with a miter saw.
Test-fit each piece, trim as needed, then sand and bevel edges for tight seams.
Step 3 Inside corners: coping vs. mitering when to use each
Inside corners can make or break a clean trim job, so you’ll want to choose the right method—coping or mitering—based on the wall condition and your skill level.
Cope for imperfect walls and tight fits; miter for speed on square corners. Choose based on fit and tools, then practice a test piece.
- Use coping for warped walls
- Miter for perfect 90°
- Test cuts first
- Fill gaps minimally
Step 4 Outside corners and scarf joints for long runs
After you’ve handled inside corners, you’ll face outside corners and long runs where neat joints matter just as much.
For outside corners, miter both pieces to form a tight, visible seam; test-fit and trim for gaps.
For long runs, use scarf joints—cut opposing 45° or shallow long-angle joins—to stagger seams and create a virtually invisible connection.
Sand and touch up.
Step 5 Securing trim: nailing patterns, adhesive, and spacing
Start fastening the trim by planning your nailing pattern, adhesive use, and spacing so each piece sits flat and stays secure.
Drive finish nails into studs or use a pneumatic brad nailer every 12–16 inches, closer near joints.
Apply construction adhesive sparingly where substrate is uneven.
Countersink nails, fill holes, and check alignment as you go to prevent gaps and buckling.
Step 6 Installing shoe molding or quarter round for gaps
Now you’ll install shoe molding or quarter round to cover the gap between the baseboard and floor.
Measure and cut pieces to length, mitering corners and coping inside joints. Test-fit each piece, then nail into the baseboard—avoid nailing into the floor.
Use a level for alignment and trim excess. Work steadily around the room, keeping joints tight and consistent.
Step 7 Filling nail holes, caulking seams, sanding
With the shoe molding secure, you’ll finish the look by filling nail holes, caulking seams, and sanding for a smooth, paint-ready surface.
Press wood filler into holes, wipe excess, let dry, then sand flush.
Run a bead of paintable caulk along joints and where trim meets floor, tool it smooth, and sand any rough spots once cured so surfaces are seamless and even.
Step 8 Priming and painting or staining for a professional finish
Seal and finish the trim to protect it and give the room a polished look by priming any bare wood, then painting or staining in thin, even coats.
Let each coat dry fully and lightly sand between coats for smoothness. Use painter’s tape to protect floors and walls, and work from top to bottom.
- Choose quality primer
- Thin coats, steady brush
- Sand between coats
- Remove tape carefully
Special Situations and Material-Specific Guidance
You’ll encounter a few special situations—like installing trim over baseboard heat registers or HVAC vents—that need specific cuts and clearance.
Pay attention to changes between tile, hardwood, vinyl, and carpet, and plan for uneven floors, warped walls, or differences between plaster and drywall.
For tall baseboards or heavy hardwood trim, use stronger fasteners and consider adhesive or blocking to guarantee a secure fit.
Installing over baseboard heat registers or HVAC vents
Because vents and baseboard registers need airflow, you’ll have to plan your trim layout to keep openings clear while still looking finished.
Measure register dimensions, leave a gap or notch in the baseboard trim, and use removable vent grilles or magnetic covers for access and cleaning.
Secure trim away from heat sources with adhesive and short nails, avoiding direct contact that could warp or block airflow.
Working with tile, hardwood, vinyl, and carpet transitions
Changes between tile, hardwood, vinyl, and carpet demand different strips, clearances, and fastening methods, so plan each junction based on material thickness and movement.
Use junction profiles: T-molding for equal heights, reducer for drop-offs, and threshold bars for tile-to-vinyl.
Nail or glue per substrate recommendations, allow expansion gaps under trim, and trim carpet with a tack strip left exposed for secure attachment.
Dealing with uneven floors, warped walls, and plaster vs. drywall
After you’ve planned junctions between flooring types, address irregular surfaces and wall materials that can undermine a clean trim job.
Shim or scribe base to uneven floors, trim low spots, and rout gaps for sealant.
For warped walls, pack with thin shims behind trim or use flexible molding.
On plaster, locate studs carefully; use compatible anchors and predrill to avoid cracking.
Installing on tall baseboards or heavy hardwood trim
When you’re working with tall baseboards or heavy hardwood trim, plan for extra support and different fasteners so the weight and profile don’t pull away or split the material.
Use longer finish nails or screws into studs, add adhesive where needed, and consider scarfs or blocking behind corners.
Pre-drill to prevent splitting, clamp while fastening, and check alignment frequently for a tight, stable fit.
Common Mistakes and How to Avoid Them
You’ll save time and look professional if you avoid common errors like measurement mistakes, poor coping or mitering, and over-nailing that splits the trim.
Use the right adhesive and fastener size, fill gaps and seams correctly, and stop to fix visible flaws before finishing.
Finally, prep and test your paint or stain so it doesn’t highlight imperfections after installation.
Measurement errors and improper coping/mitering
Because accurate cuts depend on exact measurements and clean joints, measurement errors and poor coping or mitering are the leading causes of visible gaps and wasted trim.
Measure twice, mark once, and account for reveal and wall irregularities. Use a reliable miter saw, cut test pieces, and cope inside corners.
Adjust scribe lines before final installation to guarantee tight, professional joints.
Over-nailing, splitting trim, and improper adhesive use
In working with trim, over-nailing, splitting the wood, and misusing adhesives are the quickest ways to ruin hours of careful fitting.
Don’t blast nails too close to edges; pre-drill or use thinner brads. Tap gently and countersink.
Use adhesives sparingly and choose products rated for trim—too much glue makes a mess, too little fails. Clamp briefly and clean squeeze-out immediately.
Poor gap filling and visible seams causes and fixes
After you’ve nailed and glued trim properly, the last thing you want is gaps and visible seams undoing your work.
Check and sand joints before filling, use flexible paintable caulk for small gaps, and wood filler for larger voids.
Press filler fully into seams, remove excess, and sand smooth.
Caulk again if movement occurs and re-sand for a seamless finish.
Painting/staining mistakes that reveal flaws
When you rush into painting or staining, mistakes like uneven coats, visible brush strokes, and missed seams will highlight any imperfections in your trim.
Take time: sand smooth, wipe dust, and use primer. Apply thin, even coats with quality brushes or a sprayer, overlap strokes, and inspect seams between coats.
Sand lightly between layers for a flawless, professional finish.
Tips and Best Practices for a Clean, Professional Look
Set up the right tools and simple jigs to speed cuts and keep corners tight.
Pay attention to finishing—use caulk where seams show, choose brush or spray based on the profile, and match paint carefully for a seamless look.
Finally, follow a few maintenance tips so your trim stays crisp and new for years.
Tool setup and jigs that speed work and improve accuracy
A few well-chosen jigs and a tidy tool setup will cut your trimming time and make every joint fit like it was cut by a pro.
Organize tools, pre-set stops, and test cuts before you start. Use fixtures to repeat angles and hold delicate trim without marring it.
- Miter box with clamp
- Stop block for consistent lengths
- Backup pad for clean cuts
- Caulking gun holder
Finishing touches: caulk techniques, paint brush vs. spray, color matching
Although trim can look good off the saw, the final caulk bead, paint choice, and application method are what make it read as finished—so pay attention to technique, tools, and color to get a pro result.
Run thin, consistent caulk beads, smooth with a damp finger, then paint after curing.
Use brush for control, spray for speed, and match trim color to baseboard or wall contrast.
Maintenance tips to keep trim looking new
When you finish installation and painting, keep trim looking fresh by cleaning, touching up, and protecting it on a regular schedule; a little care now prevents costly repairs later.
Wipe dust weekly with a microfiber cloth, address scuffs with matching touch-up paint, recaulk gaps annually, and apply a clear protective finish in high-traffic areas.
Inspect regularly and fix minor damage promptly to avoid bigger jobs.
Comparison: DIY vs. Hiring a Pro
You can save money by doing trim yourself, but weigh that against the time, skill required, and the finish you want.
If the layout is complex, you’re on a tight schedule, or you want a guaranteed result, hiring a pro makes sense.
Also consider warranty and resale value when deciding.
Cost, time, skill level, and expected finish quality
Deciding whether to install floor trim yourself or hire a pro comes down to balancing cost, time, skill level, and the finish you want; DIY saves labor money but takes longer and demands carpentry skills, while a pro charges more upfront yet delivers faster, cleaner results.
| Aspect | DIY | Pro |
|---|---|---|
| Cost | Lower material+time | Higher labor |
| Time | Longer | Faster |
| Finish | Variable | Consistent professional |
When to hire a pro: complexity, timelines, warranty considerations
If your project involves tricky cuts, tight timelines, or you want a warranty, hiring a pro makes sense.
You’ll save time, get cleaner miters and seamless joints, and receive guarantees on workmanship and materials.
Hire a pro when rooms are irregular, floors need leveling, or you can’t afford delays.
For simple straight runs on a weekend, DIY still saves money.
Project Checklist and Timeline
Before you start, make a quick pre-installation checklist of materials, tools, and room measurements so you won’t run back to the store mid-job.
Then follow a step-by-step timeline for a typical room—what you can finish in a few hours versus what needs a full day or an overnight wait.
This keeps the work organized and helps you set realistic expectations for the project.
Pre-installation checklist (materials, tools, measurements)
Start by gathering everything you’ll need so the job flows smoothly: a list of trim pieces and extra stock, measurement tape, miter saw or miter box and backsaw, coping saw, nail gun or finishing nails and hammer, wood filler and caulk, sandpaper, paint or stain, safety gear, and adhesive if your trim requires it.
Measure each wall, note corner types, locate studs, check floor level, and verify paint/stain matches.
Step-by-step timeline for a typical room (24 hour, full-day estimates)
A clear timeline helps you pace the work and know when to stop for drying or touch-ups. The following outline gives a practical sequence with 24-hour and full-day estimates so you can plan one- or two-day projects without surprises.
- Day 1 morning: remove old trim, measure, cut pieces (3–4 hours).
- Day 1 midday: fit and nail trim, copes/miters (2–3 hours).
- Day 1 afternoon: fill gaps, caulk, sand (1–2 hours).
- Day 2: prime/paint and final touch-ups; allow drying between coats (4–6 hours).
Frequently Asked Questions (FAQ)
You’ll find answers to common concerns here, like how tall baseboards should be for different room styles and whether you can install trim over existing baseboards or flooring.
We’ll explain the best way to cope inside corners and how to hide gaps between trim and flooring.
You’ll also learn whether you can paint trim after installation without repainting the walls.
How high should baseboards be for different room styles?
Because baseboards frame a room, their height should match the space’s scale and style: for traditional or formal rooms pick taller profiles (5–8 inches or more), while modern, minimalist spaces suit lower ones (3–4 inches).
Small rooms often benefit from slimmer trim to avoid overwhelm.
Consider ceiling height, furniture scale, and door proportions; taller ceilings handle taller boards, while lower ceilings need restraint.
Can I install trim over existing baseboard or flooring?
If you want to change your look without ripping things out, you can often install new trim over existing baseboards or flooring—but there are limits.
Make sure the substrate is flat, secure, and not too tall; otherwise trim won’t sit flush or may create trip hazards.
Check door clearances, thresholds, and HVAC vents. Use shims, adhesive, and longer fasteners where needed for a solid fit.
What is the best way to cope inside corners?
Coping inside corners gives you a tighter, cleaner joint than trying to miter imperfect walls or trim—so learn the coping cut.
Mark, square and cut one piece at a 90° profile with a coping saw, following the profile back about 1/8″ for paint clearance.
Fit the coped piece against the fixed trim, test, adjust with a file, then glue and finish with a small nail.
How do I hide gaps between trim and flooring?
How do you hide gaps between trim and flooring without making the room look unfinished?
Use flexible silicone or acrylic caulk for small gaps; color-match it to trim for a seamless look.
For larger gaps, install a thin quarter-round or shoe molding, nailing into the baseboard, not the floor.
Fill nail holes, sand, and touch up paint or stain for a polished finish.
Can I paint trim after installation without repainting walls?
Yes — you can paint trim after it’s installed without repainting the walls, and most pros do it that way to avoid extra work.
Use painter’s tape along the wall, sand and prime the trim, and choose a durable trim paint.
Paint carefully with an angled brush, remove tape while paint is tacky, and touch up any wall scuffs with a small brush afterward.