How Thick Is Laminate Floor and Why It Matters for Your Subfloor
Laminate floors usually range from about 6mm to 12mm thick, with entry-level boards around 6–7mm, mid-range at 8–10mm, and heavier-duty planks up to 12mm or more for commercial use. Thickness affects stiffness, durability, and how much your subfloor can flex—too thin and you’ll get squeaks, gaps, or premature wear; too thick and you may need door trims or junctions. Keep these factors in mind, and you’ll find guidance on matching boards to your subfloor below.
Quick Answer How Thick Is Laminate Floor and Why It Matters for Your Subfloor
Most laminate planks fall between about 6mm and 12mm thick, with entry-level options near 6–7mm and higher-quality boards at 8–12mm.
You’ll also see specialty or commercial laminates that are slightly thicker. That thickness affects how well the floor hides subfloor imperfections and how much underlayment or leveling you’ll need.
Direct summary of typical laminate thickness ranges
When you’re choosing laminate, thickness usually falls into three common ranges: 6–8 mm for budget or light-use rooms, 8–10 mm for general residential use, and 10–12+ mm for heavier traffic or a sturdier feel. You’ll want to know how thick is laminate floor to match durability and feel.
| Range | Use |
|---|---|
| 6–8 mm | Light use |
| 8–10 mm | Typical use |
| 10–12+ mm | Heavy use |
One-sentence explanation of subfloor implications
Because laminate transfers loads to the subfloor, choosing the right thickness matters—you’ll need a flatter, stiffer subfloor for thinner boards to prevent sagging and a smoother surface for thinner wear layers to avoid visible imperfections.
Match board thickness to joist spacing and subfloor rigidity, level and repair any deflection, and use underlayment to improve support, sound insulation, and moisture protection for a durable, even floor.
Basic Understanding What Is Laminate Flooring and How Thickness Is Measured
You’ll want to know a laminate plank’s four layers—wear layer, decorative layer, core, and backing—because each affects durability and feel.
Thickness is given in millimeters or inches and you’ll see industry terms like 6 mm, 8 mm, 12 mm or “AC” ratings that describe abrasion resistance rather than total depth.
Keep in mind manufacturers report raw thickness, while AC ratings tell you expected wear performance.
Components of laminate plank (wear layer, decorative layer, core, backing)
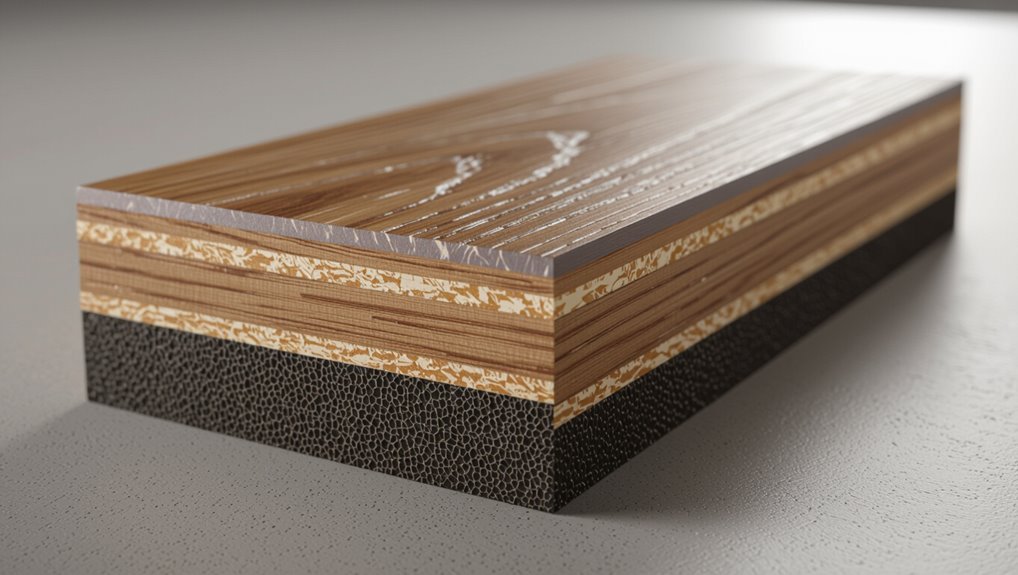
Think of a laminate plank as a miniature layered system, with each layer doing a specific job: the clear wear layer resists scratches and stains, the decorative layer gives the plank its wood or stone look, the high-density core provides stability and impact resistance, and the backing balances moisture and prevents warping.
You’ll choose planks based on wear rating for traffic, core density for durability, and backing for moisture control.
Common thickness measurements (mm and inches) and industry terms
Laminate planks typically come in a few standard thicknesses—6mm, 8mm, 10mm, and 12mm (about 1/4″, 5/16″, 3/8″, and 1/2″)—and knowing these numbers helps you match performance to your space.
You’ll also see terms like “thin,” “standard,” and “thick,” plus nominal measurements in mm and inches.
Manufacturers sometimes list plank depth and overall thickness; check specs when comparing options.
How manufacturers measure and report thickness vs. AC rating
Those standard thickness numbers give you a quick sense of stiffness and feel, but manufacturers measure and report thickness differently than they rate wear—so you’ll want to compare both specs. You should check thickness (mm) for rigidity, AC rating for abrasion, and core type for stability to pick flooring suited to traffic and subfloor conditions.
| Spec | Measures | Impact |
|---|---|---|
| Thickness | mm/in | Stiffness |
| AC Rating | 1–5 | Wear |
| Core Type | HDF/MDF | Stability |
| Finish | Coating | Durability |
Why Laminate Thickness Matters for Your Subfloor
When you pick laminate thickness, you’re also choosing how well the floor spreads weight and supports traffic, which affects structural performance and load distribution.
Thicker boards usually improve sound insulation, feel underfoot, and perceived quality, but they can complicate height shifts and door clearances.
You’ll also want a thickness that matches your subfloor’s moisture tolerance and type to avoid problems down the road.
Structural support and load distribution
Because the thickness of your flooring directly affects how weight travels to the subfloor, choosing the right laminate matters for structural support and load distribution.
Thicker panels resist bending under concentrated loads, reducing stress on joists and subfloor joints. You’ll get more even load transfer, fewer deflection issues, and better durability under furniture or foot traffic, especially over imperfect or spaced subflooring.
Sound insulation and acoustic performance
Although you mightn’t notice it at first, laminate thickness has a big impact on how sound travels through your floor and into the rooms below.
Thicker boards reduce impact noise and airborne transmission, especially when paired with quality underlayment. That lowers echo and neighbor complaints, protects vibrating joists, and helps you meet building or condo acoustic requirements without relying solely on subfloor upgrades.
Feel underfoot and perceived quality
Beyond quieter rooms, thickness changes how the floor actually feels under your feet and how people judge its quality.
Thicker planks flex less, giving a firmer, more solid step that feels premium. Thinner boards can feel hollow or springy, undermining perceived value.
Your choice affects comfort, confidence in durability, and first impressions—important when you want the room to feel well-built and substantial.
Height transitions and door clearances
If your laminate sits higher or lower than adjacent floors, you’ll have to plan for visible changes and check door clearances so doors don’t scrape or stick.
Measure thresholds and hinge-to-floor gaps before installation. Choose connector strips—reducers, T-molds, or ramps—matching thickness differences.
Adjust or trim doors if needed. Proper planning avoids tripping hazards, uneven wear, and annoying door operation issues.
Moisture tolerance and compatibility with subfloor types
When choosing laminate, remember that thickness affects how it handles moisture and what subfloors it’ll work with; thicker boards generally resist minor dampness better and bridge small subfloor imperfections, while thinner ones need drier, flatter bases.
You should match thickness to subfloor type: concrete benefits from moisture barriers and thicker laminate, while plywood or OSB need proper sealing and flatness for any thickness to perform well.
Typical Thickness Categories and Where They’re Best Used
You’ll usually choose from three laminate thickness ranges:
6–7 mm for budget or light residential use,
8–10 mm for most homes,
and 10–12 mm and above for premium, commercial, or heavy-traffic areas.
You’ll find performance—durability, sound absorption, and feel underfoot—improves as thickness increases.
Next, we’ll compare how each thickness performs so you can pick what fits your space and budget.
67 mm budget/light residential use
Though meant for light residential spaces, 6–7 mm laminate delivers a budget-friendly, serviceable floor that works well in low-traffic rooms like spare bedrooms, closets, and small home offices. You’ll get basic durability and easy installation, but expect thinner feel and limited sound insulation. Consider underlayment for comfort and moisture control.
| Feature | Expectation |
|---|---|
| Cost | Low |
| Durability | Light use |
| Comfort | Thin feel |
| Installation | Easy |
| Best rooms | Low-traffic |
810 mm most common residential installations
If 6–7 mm covers budget and light-use rooms, 8–10 mm is what most homeowners pick for everyday living spaces. You’ll find 8 mm balances cost and durability for bedrooms and living rooms; 9–10 mm adds stability where traffic is higher. Choose based on subfloor flatness and underlayment quality.
| Thickness | Best For | Notes |
|---|---|---|
| 8 mm | Bedrooms | Affordable, stable |
| 9 mm | Living rooms | Better stiffness |
| 10 mm | Hallways | Increased durability |
1012 mm and above premium, commercial, and heavy-traffic areas
For areas that see serious daily wear—like retail spaces, restaurants, and busy office corridors—choose laminate from about 12 mm and up to get the stability and lifespan you need. You’ll get superior impact resistance and reduced bounce, easier maintenance, and longer warranty options. Visualize options:
| Use | Thickness | Benefit |
|---|---|---|
| Retail | 12–14 mm | Durability |
| Office | 14–20 mm | Stability |
| Industrial | 20+ mm | Longevity |
Comparison of performance by thickness
1 clear rule helps you pick laminate: thicker boards generally perform better under heavier use. You’ll choose 6–7mm for light rooms, 8–10mm for living areas, 12mm for active family spaces, and 14mm+ for commercial or heavy-traffic zones. Match thickness to traffic, subfloor quality, and underlayment for durability and comfort.
| Thickness | Best Use |
|---|---|
| 6–7mm | Low traffic |
| 8–10mm | Living rooms |
| 12mm | Family spaces |
| 14mm+ | Commercial/high traffic |
How to Assess Your Subfloor Before Choosing Laminate
Before you pick a laminate thickness, check what your subfloor is made of—plywood, OSB, concrete, or existing vinyl/wood—and whether it needs removal or leveling.
Use a straightedge and level to confirm flatness meets industry tolerances, measure moisture with a meter and plan any required vapor barrier, and inspect joist spacing and rigidity to guarantee the floor will support your laminate.
These quick checks will help you choose the right thickness and underlayment for a stable, long-lasting installation.
Identifying subfloor material: plywood, OSB, concrete, existing vinyl/wood
When you’re getting ready to install laminate, the first step is identifying what your subfloor is made of—plywood, OSB, concrete, or existing vinyl/wood—because each material needs different prep and underlayment choices.
You’ll inspect, tap, and probe to tell materials apart, then choose moisture barriers, adhesives, or underlay accordingly.
- Plywood: solid, nail/screw pattern
- OSB: rough, layered flakes
- Concrete: cold, dense
- Existing vinyl/wood: removable or coverable
Checking flatness and levelness tolerances (industry standards)
A level subfloor matters because laminate needs a flat, stable base to lock together and last. You’ll measure for dips, humps, and slope so you can decide if leveling, sanding, or a new underlayment is required.
Use a 6-10 ft straightedge or laser level; industry tolerance is typically 3/16″ over 10 ft or 1/8″ over 6 ft. Correct deviations before installation.
Measuring moisture levels and required moisture barriers

You’ve checked flatness and corrected any high or low spots; now assess moisture because damp subfloors will ruin laminate quickly.
Use a reliable moisture meter for concrete and wood; follow manufacturer limits (usually <3% for plywood, <4–5% for concrete with relative humidity tests).
Install vapor or polyethylene barriers where recommended, and use a moisture-resistant underlayment to protect your laminate from subfloor moisture.
Evaluating joist spacing and structural rigidity
Because laminate needs a stable, evenly supported base, check joist spacing and stiffness before you pick a product: walk the room, measure between joists (typically 16″ or 24″ on center), and look for excessive deflection or bounce that could cause boards to flex or click.
If spacing is wide or joists sag, add bridging, sister joists, or a thicker underlayment to meet manufacturer rigidity limits.
Step-by-Step Installation Considerations Tied to Thickness
When you install laminate, you’ll start by matching underlayment to the plank thickness to guarantee support and sound control.
You’ll also adjust transition strips and door trims to the finished height, leave proper expansion gaps around the perimeter, and account for whether your system is floated or fastened.
These choices all hinge on thickness and will determine the tools, clearances, and sequencing you use.
Step 1: Selecting appropriate underlayment for your laminate thickness
1 key decision before laying your laminate is matching the underlayment to the plank thickness and subfloor type, because the wrong combo can compromise comfort, sound control, and warranty coverage.
You’ll choose based on thickness, moisture barrier needs, sound rating, and subfloor flatness:
- 2mm foam for basic cushioning
- 3–5mm cork for sound and comfort
- Vapor barrier for concrete slabs
- High-density for heavier, thicker planks
Step 2: Adjusting transition strips and door trims for plank height
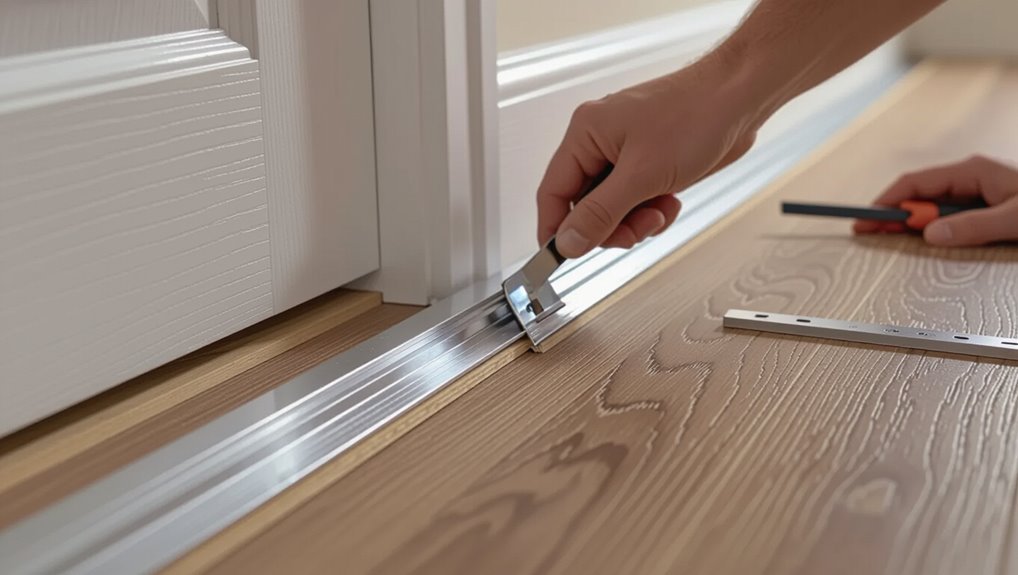
Now that you’ve matched underlayment to plank thickness and subfloor type, you’ll need to address how plank height affects fittings at doorways and between rooms.
Measure finished floor height, then trim door jambs or use a router to undercut doors for clearance.
Choose transition strips rated for the combined thicknesses and secure them so they’re level, neat, and won’t impede movement.
Step 3: Managing expansion gaps and perimeter clearances
Because laminate expands and contracts with temperature and humidity, you need to plan and maintain consistent perimeter gaps based on plank thickness and the manufacturer’s specs.
Measure and mark gaps around walls, pipes, and fixed objects, increasing clearance slightly for thicker planks.
Use spacers during installation, keep gaps uniform, and cover them with appropriate trim or reducer pieces to preserve movement and avoid buckling.
Step 4: Fastening and floating installation differences by thickness
When choosing between floating and fastened installations, consider how plank thickness affects stability and locking performance: thicker laminate generally provides a sturdier floating floor with stronger locks and better resistance to compression.
On the other hand, thinner planks may benefit from occasional fastening at thresholds or long runs to reduce movement and edge lift. You’ll anchor thinner boards at junctions, but rely on thicker planks’ interlocks for most spans.
Problems and Mistakes Related to Choosing the Wrong Thickness
If you pick the wrong laminate thickness, you’ll often skimp on underlayment, ignore subfloor flatness, or bunglingly plan connections.
Those mistakes show up as squeaks, buckling, and premature wear that shorten the floor’s life.
To tell if thickness is the culprit, compare symptoms to installation details—check underlayment type and thickness, measure gaps/unevenness, and review connection heights.
Common mistakes (inadequate underlayment, ignoring subfloor flatness, poor transition planning)
Even with the right laminate thickness, you’ll run into trouble fast if you skimp on underlayment, ignore subfloor flatness, or fail to plan changes—these oversights amplify gaps, squeaks, and premature wear.
- Skip thin underlayment: worsen sound insulation and moisture protection.
- Ignore flatness: boards won’t lock properly.
- Poor connections: create trip hazards and stress joints.
- Neglect acclimation: boards can swell or contract unexpectedly.
Symptoms and consequences (squeaks, buckling, premature wear)
Pick the wrong laminate thickness and you’ll see problems show up fast: squeaks between poorly supported boards, buckling from inadequate rigidity, and premature wear where the surface can’t handle foot traffic.
You’ll notice gaps widening, joints separating, and finish abrasion in high-traffic zones. Thinner panels transmit impact and noise more, reduce lifespan, and force costly repairs or replacement sooner than properly matched, thicker options.
How to diagnose if thickness is the root cause
Wondering whether thickness is really behind your laminate problems? Check symptoms: gaps, wobble, uneven wear.
Measure plank thickness with calipers and compare to manufacturer recommendations for your subfloor.
Test across rooms—thinner boards flex more over joists.
Temporarily lay thicker sample or underlayment; if issues disappear, thickness was likely the cause.
Document findings before replacing flooring.
Prevention and Best Practices
When choosing laminate thickness, consider how the room will be used and what type of subfloor you have so you pick the right rigidity and sound performance.
Match your underlayment to both the laminate thickness and the subfloor—use moisture barriers over concrete and thicker pads under thinner boards for better stability.
Follow installer tips like acclimating boards, measuring changes for height differences, and sealing edges to prevent moisture and trip hazards.
How to choose laminate thickness based on room use and subfloor type
Because room function and subfloor type directly affect performance, you should match laminate thickness to how the space will be used and what’s beneath it.
Choose heavier boards for high traffic or uneven subfloors, lighter for bedrooms. Consider moisture exposure and support.
- High traffic: 12–14 mm
- Bedrooms: 7–10 mm
- Uneven subfloor: thicker boards
- Moisture-prone: water-resistant options
Underlayment selection guidelines by thickness and subfloor
Matching laminate thickness to room use and subfloor sets you up for success, but underlayment choices can make or break performance—especially for different board thicknesses and subfloor conditions.
Choose foam for 7–8mm over flat, dry plywood; cork or rubber for 10–12mm to improve acoustics and comfort; use moisture barrier underlay on concrete.
Thicker underlays help minor irregularities but need stable subfloors.
Pro tips for installers and DIYers to avoid height and moisture issues
If you want to prevent height and moisture problems, start by measuring room changes and door clearances so your laminate and underlayment won’t create trip hazards or block doors.
Use proper vapor barriers on concrete, leave expansion gaps per manufacturer, trim door jambs when needed, and choose matching threshold strips.
Check moisture with a meter, acclimate boards, and follow adhesive and fastening instructions precisely.
Cost Considerations and Value Trade-offs
You’ll notice thicker laminate usually carries a higher price because of denser cores and better wear layers.
Thicker planks often come with longer warranties and greater longevity, which can offset the upfront cost over time.
Choose thinner options for low-traffic or budget projects, but invest in thicker boards where durability and warranty matter.
Price differences by thickness and why thicker often costs more
Because thicker laminate uses more material and often a denser core, it usually costs more up front, but that price reflects both better durability and improved feel underfoot.
You’ll pay extra for enhanced acoustic dampening, stronger locking systems, and truer plank edges.
Budget options cut cost with thinner cores and simpler wear layers, so weigh upfront expense against your performance and comfort priorities.
Longevity and warranty implications tied to plank thickness
When you choose thicker laminate planks, you’re usually buying longer usable life and stronger warranty protection because manufacturers tie coverage to expected performance.
Thicker cores resist sagging and edge wear, so brands often offer longer residential or commercial warranties on these SKUs.
You’ll pay more upfront, but reduced replacement frequency and broader coverage can lower lifetime cost and risk, especially in high-traffic areas.
When thinner options make sense vs. when to invest in thicker planks
Having covered how thicker planks boost lifespan and warranty coverage, let’s look at cost trade-offs so you can pick what makes sense for your budget and usage.
If you’re renovating low-traffic rooms or renting, thinner laminate saves money and still looks good.
For high-traffic areas, uneven subfloors, or long-term resale value, invest in thicker planks for durability, sound reduction, and better underlayment compatibility.
Real-World Scenarios and Recommendations
If you’re laying laminate over a plywood subfloor in a living room, 8–12 mm with a quality foam or cork underlayment usually gives the best balance of comfort and durability.
For concrete slabs, you’ll want a moisture barrier plus at least 8 mm thickness, and consider thicker panels if the slab is uneven.
When renovating over existing flooring, plan for height changes and thresholds so door clearances and adjacent rooms line up neatly.
Scenario A: Installing over plywood subfloor in living room recommended thickness and underlayment
For a living room with a plywood subfloor, choose a laminate plank that’s 8–12 mm thick to balance durability and comfort;
pair it with a 2–3 mm foam or cork underlayment that provides cushioning, sound reduction, and a moisture barrier if the plywood isn’t fully sealed.
Confirm subfloor is level, dry, and securely fastened;
use underlayment seams taped and leave proper expansion gaps.
Scenario B: Installing over concrete slab moisture precautions and thickness choices
When you’re installing laminate over a concrete slab, controlling moisture is the priority because even small amounts of dampness can warp planks or ruin the locking system.
Test the slab with a moisture meter or calcium chloride test, apply a vapor barrier or moisture-mitigating underlayment, and choose 8–12 mm laminate for rigidity.
Allow acclimation, guarantee proper slope and perimeter expansion gaps, and follow manufacturer moisture limits.
Scenario C: Renovation over existing flooring height transition solutions
Renovating over existing flooring often means you’re juggling different heights, door clearances, and junction aesthetics, so plan junctions that keep traffic smooth and seams secure.
Use tapered reducers, overlap thresholds, or underlayment build-up to match levels.
Check door swing and trim, secure connections with adhesive or screws, and test for trip hazards.
Document adjustments for future maintenance and resale.
FAQs
You’ll find answers to common questions about thickness, from the minimum you should use in a bedroom to whether thicker planks always mean better quality.
You’ll learn when thin laminate can be used over uneven subfloors, how thickness can affect warranty coverage, and whether thicker planks need a different underlayment.
If you still have specific concerns, ask and we’ll clear them up quickly.
What is the minimum laminate thickness I should use for a bedroom?
How thick should your laminate be for a bedroom? Aim for at least 8mm to balance comfort, durability, and cost. If you want extra longevity or plan heavier furniture, choose 10–12mm. Thicker boards feel sturdier underfoot, reduce noise, and better hide minor subfloor imperfections. Always pair with appropriate underlayment for cushioning and moisture control.
Can I install thin laminate over uneven subflooring?
If you picked an 8–10mm laminate for your bedroom, you might wonder if those thinner boards can handle an uneven subfloor.
You can install thin laminate over slight irregularities, but you’ll need to level the subfloor first—sanding high spots, filling low areas, or using a self-leveling compound.
Use an underlayment to smooth minor imperfections and protect the planks from movement and noise.
Does thicker laminate always mean better quality?
While thicker laminate often feels sturdier and can perform better in high-traffic areas, it doesn’t automatically mean higher quality—core construction, wear layer thickness, and locking system matter just as much.
You should evaluate those factors rather than judging solely by millimeters. Look for a robust HDF core, a durable AC-rated wear layer, and a tight locking system to guarantee lasting performance.
How does laminate thickness affect warranty coverage?
Because warranty terms tie closely to product specifications, laminate thickness can influence coverage—especially for wear, structural issues, and commercial use.
You should check manufacturer warranties: thicker boards often carry longer residential or light-commercial guarantees, while thin planks may have limited protection.
Also watch installation, subfloor, and maintenance requirements—failing those can void coverage regardless of thickness, so document compliance.
Do I need a different underlayment for thicker planks?
Wondering whether thicker laminate planks need a different underlayment?
Generally, you don’t need a special underlayment just for thickness, but choose one that matches subfloor conditions and planned use.
Thicker boards can handle minor imperfections, so standard foam or cork often works.
For moisture, sound reduction, or uneven subfloors, select vapor barriers, dense fiber, or leveling underlayments accordingly to protect performance.