How to Paint Indoor Concrete Floors for a Durable, Polished Finish
Yes — you can paint indoor concrete floors to get a durable, polished finish if you prep and choose the right system. Start by testing for moisture, cleaning, degreasing, and profiling the surface with etching or grinding, then patch cracks and prime. Apply thin, even base coats (epoxy or polyaspartic for highest durability), add anti‑slip grit if needed, and finish with a clear topcoat. Follow cure times and maintenance guidelines, and keep reading to learn the full process.
Quick Answer Can You Paint Indoor Concrete Floors and What to Expect
Yes—you can paint indoor concrete floors: you’ll clean and etch the surface, prime, then apply a concrete floor paint for a finish that lasts several years with normal use.
Painting is a good, affordable choice for basements or light-traffic rooms, while concrete stain or epoxy are better if you want a longer-lasting, more durable, or decorative result.
Consider traffic, moisture, and budget to decide which option fits your space.
Short summary of process and expected durability
You can paint indoor concrete floors, and when done right the results last: prep the surface (clean, etch or mechanically profile, and repair cracks), apply a quality primer and concrete-specific paint or epoxy, and finish with a durable topcoat or sealer to protect against abrasion and chemicals.
Follow proper curing times, expect several years of wear depending on traffic, and touch up or recoat as needed for longevity when learning how to paint indoor concrete floors.
When painting is a good option vs alternatives (stain, epoxy)
When budget, appearance, and traffic needs line up, painting is a practical choice for indoor concrete floors: it’s cheaper and quicker than many alternatives, gives solid color coverage, and is easy to touch up or recoat as wear demands.
Choose paint for low- to moderate-traffic rooms, garages, or basements.
Pick stain for a natural, variegated look and epoxy for heavy-duty, chemical-resistant surfaces.
Basic Understanding What Painting Concrete Involves
Before you start, know that indoor concrete is porous and sensitive to moisture and temperature, which affects how coatings adhere and cure.
You’ll choose from options like latex paint, epoxy, polyaspartic, concrete stain, or a sealer, each with different durability and appearance.
The floor’s lifespan then depends on prep, moisture vapor control, traffic levels, and product quality.
Characteristics of indoor concrete (porosity, moisture, temperature sensitivity)
Concrete’s porous nature, variable moisture content, and sensitivity to temperature all affect how paint will adhere and cure, so you’ll need to assess these factors before starting.
Check porosity to know if priming or sealing’s required, measure moisture with a meter, and consider ambient and slab temperatures for proper curing.
Addressing these prevents peeling, bubbling, and uneven finishes.
Types of floor coatings (latex paint, epoxy, polyaspartic, concrete stain, sealer)
Although each product works differently, you’ll choose from five main coating types for indoor concrete: latex paint, epoxy, polyaspartic, concrete stain, and sealers. Each balances cost, durability, appearance, and application ease differently; pick based on use and look.
| Type | Durability | Look |
|---|---|---|
| Latex | Low | Matte |
| Epoxy | High | Gloss |
| Polyaspartic | Very High | Gloss |
| Stain | Permanent | Varied |
| Sealer | Protective | Clear |
Factors that affect longevity (preparation, moisture vapor, traffic, product quality)
If you want your indoor concrete paint to last, you’ll need to manage four key factors: surface preparation, moisture vapor, expected traffic, and product quality.
You should clean and etch or mechanically profile concrete, test and mitigate moisture with appropriate membranes or primers, choose coatings rated for your traffic level, and invest in reputable systems.
Proper curing and maintenance extend life considerably.
Preparation How to Get Concrete Ready for Painting
Before you pick a paint, you’ll need to assess the slab for moisture, cracks, and level issues, then clean thoroughly—sweeping, degreasing, etching, or pressure washing as needed.
Repair any damage by patching cracks, filling divots, and grinding high spots, and choose a profiling method (acid etch, shot blast, or diamond grind) to guarantee good adhesion.
Finally, decide if a primer is required and which type matches your paint and slab conditions.
Assessing the slab: moisture test, cracks, levelness
Start by thoroughly evaluating the slab so you know what surface you’re working with: test for moisture, inspect and measure cracks, and check for levelness or dips that will affect paint adhesion.
Use a calcium chloride or humidity probe for moisture, note crack width and depth, and mark low spots.
Decide on repairs—epoxy filler, patching, or self-leveler—before cleaning and priming.
Cleaning: sweeping, degreasing, etching, pressure washing
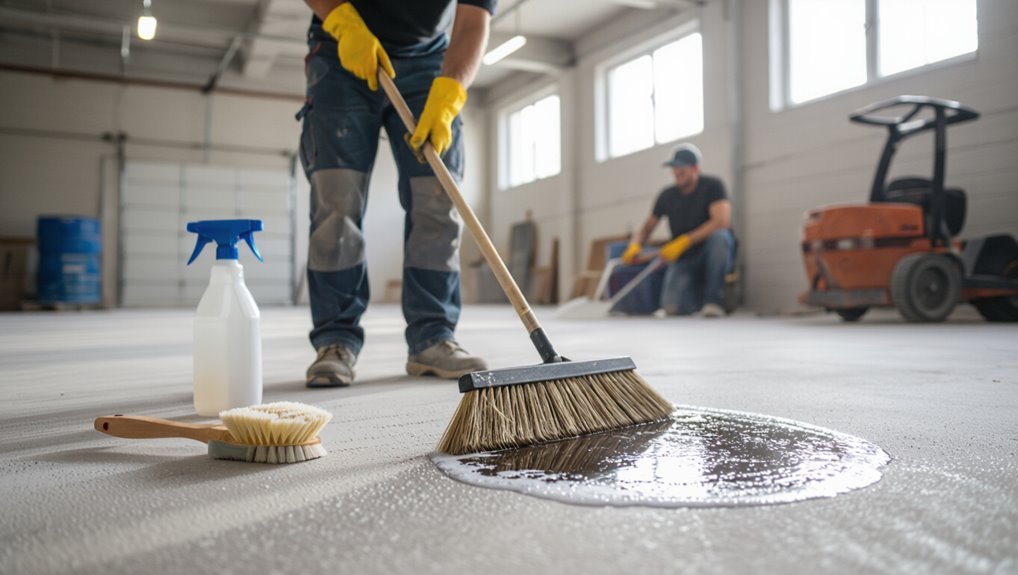
Once your slab is assessed and any major repairs are planned, get the surface absolutely clean so paint can bond.
Sweep thoroughly, vacuum dust, and degrease oil or grease stains with a concrete cleaner.
Etch according to product instructions to open pores, rinse well, and pressure wash if needed.
Let the floor dry completely before proceeding to repairs or priming.
Repairing: patching cracks, filling divots, grinding high spots
After cleaning, inspect the slab for cracks, divots, and high spots so you can plan repairs that’ll give paint a smooth, lasting surface.
Cut out loose edges, widen hairline cracks slightly, then use a concrete patch or epoxy filler per product instructions.
Trowel divots flush, sand cured patches, and grind any high spots smooth.
Remove dust before priming and painting.
Profiling the surface: acid etching vs mechanical shot blasting vs diamond grinding
Before you paint, you need a consistent surface profile so coatings will bond; that means choosing between chemical etching, mechanical shot blasting, or diamond grinding based on the slab condition, desired roughness, and budget.
Etching’s cheap for light profiles on clean slabs.
Shot blasting removes coatings and profiles quickly on thicker slabs.
Diamond grinding gives precise, dust-controlled profiles for heavily contaminated or high-spec floors.
Priming basics: when you need a primer and primer types
With a consistent surface profile in place, you’ll next decide whether the floor needs a primer and which type to use; the right primer promotes adhesion, seals porous concrete, and can block stains that would telegraph through paint.
Use an acrylic water-based primer for sound, clean concrete; epoxy primers for high-traffic, stained, or moisture-prone slabs; masonry primers for very porous surfaces.
Step-by-Step Painting Process
Now you’ll follow a clear sequence to paint your indoor concrete floor, starting with choosing the right product for your space.
Gather the tools and safety gear—rollers, squeegees, respirator, knee pads—then apply primer and let it cure fully.
Mix and roll on base coats with proper technique and wet-edge coverage, then add any patterns, stencils, or anti-slip additives as a final touch.
Step 1 Choose the right product for your space
Product choice makes or breaks the result, so match the paint to how you’ll use the room: choose a high-quality epoxy or acrylic floor paint for garages and heavy-traffic areas, a low-VOC latex or water-based epoxy for living spaces, and a primer if the concrete is porous or previously coated.
- Epoxy for durability and chemical resistance
- Acrylic for UV-stable, easy maintenance
- Low-VOC latex for indoor air quality
- Primer for adhesion on porous or old surfaces
Step 2 Gather tools and safety gear (rollers, squeegees, respirator, knee pads)
Gather the right tools and safety gear before you open a can—doing so keeps the job efficient and protects you from dust, fumes, and strain.
You’ll need a high‑nap roller and extension pole, a squeegee for thin coats, angled brushes for edges, mixing paddle, quality trays, respirator with appropriate cartridges, knee pads, gloves, and safety glasses.
Check batteries and ventilation.
Step 3 Apply primer and allow proper cure time
Start by rolling or brushing a high‑quality concrete primer onto the clean, dry floor, working from the far corner toward the exit so you won’t trap yourself in the room.
Apply thin, even coats, cut in edges with a brush, and maintain a wet edge.
Follow manufacturer cure times—usually 24–48 hours—ensure good ventilation and avoid foot traffic until fully cured.
Step 4 Mix and apply base coats (technique, coverage, wet edge)
Mix the base coat thoroughly to a uniform consistency, then pour it into a paint tray and work in manageable sections so you can maintain a wet edge.
Use a roller for even coverage and a brush for edges and corners. Roll in overlapping passes, keep a consistent film thickness, and avoid reworking areas.
Allow recommended dry time before a second coat.
Step 5 Apply pattern or decorative coatings (stencils, anti-slip additives)

Once the base coats are fully dry, plan your pattern and assemble stencils, tape, and any anti‑slip additives so you can work in controlled sections.
Position stencils, secure edges with low‑tack tape, and apply decorative coats with a roller or brush.
For traction, broadcast fine anti‑slip grit into wet paint or mix additives per instructions.
Remove stencils carefully for clean lines.
Step 6 Topcoat and sealing for durability (types, recoat windows)
A clear topcoat protects your work and makes the floor easier to clean, so you’ll want to choose the right sealer and follow the proper recoat windows.
Pick a polyurethane or epoxy clear coat for high traffic; water‑based polyurethanes emit less odor and yellowing.
Apply thin, even coats, observe manufacturer recoat times, and lightly scuff between coats for adhesion.
Step 7 Curing time, ventilation, and when to walk/drive on the floor
With the topcoat down, focus next on proper curing and ventilation so the finish reaches full hardness and won’t trap odors.
Keep temperatures and humidity within the product’s recommended range, run fans and open windows, and avoid dust.
Wait at least 24–48 hours for light foot traffic, 72 hours for heavy walking, and 7 days (or manufacturer’s cure time) before driving or placing heavy equipment.
Tools, Materials, and Cost Considerations
Next you’ll look at which products suit each room—durable epoxy for garages, moisture-tolerant coatings for basements and laundry rooms, and low-VOC, kitchen-safe paints.
I’ll give you a concise tools checklist with each item’s purpose and budget-friendly alternatives.
Finally, you’ll get a typical cost breakdown covering materials, tools, and a ballpark labor estimate so you can plan the project.
Recommended products by room type (garage, basement, laundry room, kitchen)
Think about the room’s purpose and traffic when choosing products—you’ll pick different coatings and tools for a garage, basement, laundry room, or kitchen based on durability, slip resistance, moisture tolerance, and appearance. Choose epoxy or polyaspartic for garages, moisture-resistant epoxy for basements, anti-slip epoxy for laundry rooms, and low-VOC acrylic or polyurethane for kitchens.
| Room | Recommended Coating | Key Trait |
|---|---|---|
| Garage | Epoxy/polyaspartic | High durability |
| Basement | Moisture-resistant epoxy | Vapor tolerance |
| Laundry | Anti-slip epoxy | Slip resistance |
| Kitchen | Low-VOC acrylic/polyurethane | Safe appearance |
Tools checklist with purpose and alternatives
Gathering the right tools before you start will save time and prevent costly mistakes—here’s a concise checklist of essentials, why each matters, and suitable alternatives if you’re on a budget.
- Diamond grinder: preps surface for adhesion; alternative—acid etch kit.
- Shop vacuum: removes dust; alternative—broom and tack cloth.
- Roller with extension: applies paint evenly; alternative—short-nap roller.
- Painter’s tape and brushes: clean edges and touch-ups; alternative—foam brushes.
Typical project cost breakdown (materials, tools, labor estimate)
Now that you know which tools will make the job easier, you’ll want a clear picture of what the whole project will cost.
Expect materials (cleaner, patch, primer, epoxy/latex paint, sealant) $100–400, tools (sander, rollers, scrapers) $50–300 if you buy, less to rent, and labor $200–1,000+ depending on size and prep.
Budget contingency 10–20% for surprises.
Common Problems and How to Fix Them
You’ll run into a few common issues—peeling or flaking, blisters or fish-eyes, powdery efflorescence from moisture, and uneven adhesion or color.
For each problem you’ll want to diagnose the cause (poor prep, trapped moisture, contamination) and follow targeted fixes like spot-scuffing, patching, acid etch or neutralizer, full strip-and-recoat, or using a moisture-mitigation system.
I’ll walk you through quick checks and the step-by-step repairs so you can pick the right remedy.
Peeling or flaking causes and repair steps
If paint on your concrete floor starts to peel or flake, it’s usually a sign that adhesion failed—often because of moisture, dirt, poor surface prep, or incompatible products.
Remove loose paint with a scraper and grinder, clean thoroughly, etch or acid-wash if needed, allow full drying, repair cracks, then prime with a compatible concrete primer and recoat using recommended paint for lasting adhesion.
Blisters, bubbles, or fish-eyes diagnosis and remediation
When blisters, bubbles, or fish-eyes appear in your floor coating, they’re signs that something disrupted the paint’s surface tension or adhesion—commonly trapped moisture, contamination (oil, silicone, or wax), solvent entrapment, or applying the next coat too soon.
Stop, strip or sand affected areas, clean with a solvent or detergent, let the slab fully dry, then recoat using correct primer, proper flash times, and contamination-free tools.
Powdery or failing finish (efflorescence/moisture) treatment options
Because moisture migrating through concrete can leave a powdery white residue called efflorescence, you’ll often see a failing, chalky finish on painted indoor concrete floors that flakes or crumbles under light abrasion.
Remove loose material, etch and neutralize salts with a masonry cleaner, allow thorough drying, then apply a breathable, moisture-tolerant primer and paint system or a vapor-permeable sealer designed for damp concrete.
Uneven adhesion or color touch-up and full-strip options
Though uneven adhesion can show up as peeling, patchy color, or blistering, you can usually fix the problem without starting over.
Scrape loose paint, sand feathered edges, clean dust and oils, then spot-prime and recoat with the same product.
For widespread failure or multiple layers delaminating, strip to bare concrete, etch or grind, then apply a fresh primer and full repaint for lasting adhesion.
Best Practices for Long-Lasting, Polished Results
To keep your painted concrete looking its best, you’ll want a simple maintenance routine: sweep regularly, mop with a pH-neutral cleaner, and avoid harsh chemicals that strip finish.
Use preventive measures like entry mats, furniture glides, and humidity control to reduce wear and staining.
If the area is large, high-traffic, or needs a flawless finish, consider professional installation; smaller, low-traffic rooms are usually fine as DIY projects.
Maintenance routine (cleaning agents, frequency, avoiding harsh chemicals)
If you want your painted concrete floors to keep their polished look, follow a simple maintenance routine:
Sweep or dust-mop daily, wet-mop weekly with a pH-neutral cleaner, and spot-clean spills immediately.
Rinse thoroughly and dry to prevent residue.
Avoid bleach, ammonia, and acidic or abrasive cleaners that dull or damage the finish.
Recoat or touch up high-traffic areas as needed.
Preventive tips (entry mats, furniture glides, humidity control)
When you control what gets tracked onto the floor and how furniture contacts it, your painted concrete will stay polished far longer.
Place durable entry mats outside and inside to trap grit, use soft furniture glides or felt pads under legs, and lift instead of dragging heavy items.
Maintain indoor humidity between 30–50% to prevent coating stress and adhesion problems.
When to choose professional installation vs DIY
You’ve done the prep: mats, glides, and humidity control will protect your painted concrete, but deciding whether to hire a pro or tackle the job yourself affects how long that finish will actually last.
Choose a pro if the floor has extensive repairs, severe cracks, large area, moisture issues, or you want warranty-backed epoxy.
DIY suits small, sound surfaces, basic epoxy kits, and confident, patient homeowners.
Comparison Paint vs Epoxy vs Stain vs Tiles
Now let’s compare paint, epoxy, stain, and tile so you can pick the right finish for your space.
We’ll look at durability, cost, appearance, and maintenance, plus the best uses and limitations of each option.
This will help you weigh trade-offs and choose the solution that fits your needs and budget.
Durability, cost, appearance, maintenance
Longevity matters, and choosing between paint, epoxy, stain, or tiles comes down to how you balance durability, cost, appearance, and upkeep. You’ll weigh upfront price, lifespan, scratch resistance, and cleaning ease to match your needs.
| Option | Durability | Maintenance |
|---|---|---|
| Paint | Moderate | Recoat often |
| Epoxy | High | Low |
| Stain | Variable | Low–moderate |
Best uses and limitations for each option
Having weighed durability, cost, appearance, and upkeep, it’s time to match each finish to specific uses and limits so you can pick what fits your space.
- Paint: Cheap, easy for low-traffic rooms; chips under heavy wear.
- Epoxy: Durable, garage-ready, resists chemicals; needs good prep, pricier.
- Stain: Natural look, low maintenance; limited color options.
- Tiles: Stylish, durable, replaceable; higher install cost.
Project Timeline and Checklist
Start by mapping out the typical timeline from surface prep through paint application to full cure so you know how long each step will take.
Use a one-page checklist that lists tools, materials, safety gear, and each task in order to keep the job on schedule.
Follow the timeline and tick items off the checklist to avoid missed steps and guarantee a durable finish.
Typical timeline from prep to full cure
A clear timeline helps you plan each step from cleaning and repairs through coating and final cure, so you know when the floor will be walkable, usable, and at full strength.
Expect 1–2 days for cleaning and repairs, 24 hours for primer, 24–48 hours between coats, and 7 days for light use.
Full chemical cure usually takes 28 days; avoid heavy loads until then.
One-page checklist for a successful paint job
Use this one-page checklist to keep your project on track from prep through full cure:
- Clean and degrease; repair cracks and allow 24–48 hours to dry.
- Etch or grind for adhesion; vacuum and tack cloth.
- Prime, apply two thin paint coats with proper drying time between coats.
- Add topcoat/sealant; wait full cure before heavy use (usually 7 days).
FAQ
You’ll find answers here to common questions like how long paint lasts, whether you can coat over existing paint or sealer, and what to do about slab moisture.
We’ll also cover slip-resistance options and how easy it’s to change colors later.
If you have a specific situation, ask and we’ll address it.
How long will a painted indoor concrete floor last?
How long your painted indoor concrete floor lasts depends on traffic, prep, and the products you pick.
With proper surface preparation, a quality epoxy or concrete floor paint, and a clear topcoat, expect 5–15 years in garages or basements with moderate use.
High-traffic commercial areas may need recoating every 2–5 years.
Regular cleaning and prompt repairs extend lifespan.
Can I paint over existing paint or sealer?
Can you paint over existing paint or sealer? Yes, but only after testing adhesion and compatibility.
Scrape loose paint, sand glossy surfaces, and clean thoroughly. If the old coating is peeling, flaking, or a flexible sealer, remove it.
Use a primer designed for concrete and the existing coating type. Always patch and cure repairs before applying the new floor paint.
How do I handle moisture coming through the slab?
If moisture’s coming up through the slab, don’t paint until you diagnose and stop it—moisture trapped under paint will cause blistering, peeling, and failure.
Test with plastic or calcium chloride kits to confirm vapor drive.
Fix sources: improve drainage, install exterior vapor barriers, repair plumbing leaks, or add a sump/pump.
After remediation, retest; use moisture-tolerant primers only when levels meet manufacturer limits.
Is slip resistance possible on painted floors?
Want floors that grip instead of slip? You can add slip resistance by broadcasting fine grit (silica sand, aluminum oxide) into wet paint or using anti-slip additives mixed into the coating.
Choose appropriate grit size for foot traffic or tires, apply evenly, and seal with a clear topcoat.
Clean regularly to maintain traction and inspect for worn areas to reapply as needed.
Can I change paint color later and how difficult is it?
Adding grit for traction won’t lock you into a color choice forever; you can change the paint later, but the effort depends on the coatings involved.
If you used an epoxy or multiple sealers, you’ll need sanding or chemical strippers before recoating. For simple acrylic paints, clean, scuff, and prime.
Expect more prep with thicker systems—plan time, materials, and ventilation accordingly.