How to Install Porcelain Tile the Right Way, Start to Finish
You’ll start by confirming a flat, dry substrate and planning a chalk-line layout to minimize cuts and sightline issues. Use polymer-modified thin-set, matched notched trowel, and back-butter large tiles for full contact. Snap lines, use spacers, press and twist tiles, and check for level as you go. After curing, grout appropriately, seal grout or unglazed edges, and install thresholds and caulk. Keep going and you’ll get step-by-step tips and product picks.
Can You Install Porcelain Tile the Right Way, Start to Finish?
You can install porcelain tile correctly by preparing a flat, clean substrate, setting tiles with the right thinset and spacers, and grouting and sealing once the adhesive cures.
Expect a typical DIY job to take a weekend for a small room but plan several days for prep, drying times, and larger areas.
You don’t need pro-level skills for simple layouts, but basic tiling experience and patience will make the result much better.
One-sentence summary of the correct process
Plan carefully, prep the subfloor, lay out and cut tiles, set them with a suitable thinset using the proper trowel and back-buttering for large formats, grout after the mortar cures, and seal as needed to finish a durable, professional porcelain tile installation.
When you ask how do you install porcelain tile, follow those steps in sequence, check level and joints, and allow proper cure times for lasting results.
Typical timeline and skill level required
Having a clear timeline and an honest sense of your skill level will help you decide whether to tackle porcelain tile yourself or hire a pro.
Small rooms take a weekend; complex layouts, wet areas, or large-format tiles can demand several days to a week plus curing time.
If you’re comfortable with measuring, cutting, and thinset techniques, DIY is feasible; otherwise hire an experienced installer.
What Is Porcelain Tile and Why Choose It?
Porcelain tile is a dense, low-porosity ceramic that’s tougher and less absorbent than standard ceramic, so you’ll notice better durability and water resistance.
You’ll commonly use it for floors, walls, and showers where strength and moisture resistance matter, though its hardness can make cutting and installation more demanding.
It isn’t ideal for outdoor freeze-thaw conditions unless rated for exterior use, and you might choose a softer tile if you need easier cutting or more warmth underfoot.
Porcelain vs. ceramic: key differences
If you’re deciding between porcelain and ceramic, the choice comes down to composition, durability, and where you’ll install the tile. Porcelain is denser, less porous, and harder; ceramic is lighter and easier to cut. Match tile to traffic and moisture.
| Feature | Difference |
|---|---|
| Density | Porcelain denser |
| Porosity | Porcelain lower |
| Workability | Ceramic easier to cut |
Advantages and common uses (floors, walls, showers)
Because it resists moisture, stains, and heavy traffic, porcelain tile’s advantages make it a top choice for many projects.
You’ll get durability, low maintenance, and long-lasting appearance. Use it on busy floors, wet-area shower walls, and kitchen backsplashes.
It handles underfloor heating, high-traffic entryways, and commercial spaces, while offering varied finishes and sizes to match style and function.
Limitations and when not to use porcelain
While porcelain tile offers many benefits, it isn’t the right choice for every job. You should avoid it where flexibility or impact absorption matters—like gym floors, playrooms, or outdoor areas with frequent freeze-thaw cycles if the tile isn’t rated for that.
It’s heavy, costly to install, and tricky to cut, so don’t pick porcelain when budget, quick installation, or lightweight materials are priorities.
Tools, Materials, and Cost Checklist
Before you start, you’ll want a clear checklist of essential tools, materials, and likely costs so you don’t get halfway through and have to stop.
Gather basic tools (trowel, tile cutter or wet saw, level, spacers), materials and consumables (tile, thin-set, grout, spacers, backerboard, membrane), and consider optional or professional gear that can speed the job.
I’ll also outline a simple cost breakdown showing materials versus typical labor so you can budget accurately.
Essential tools for a DIY install
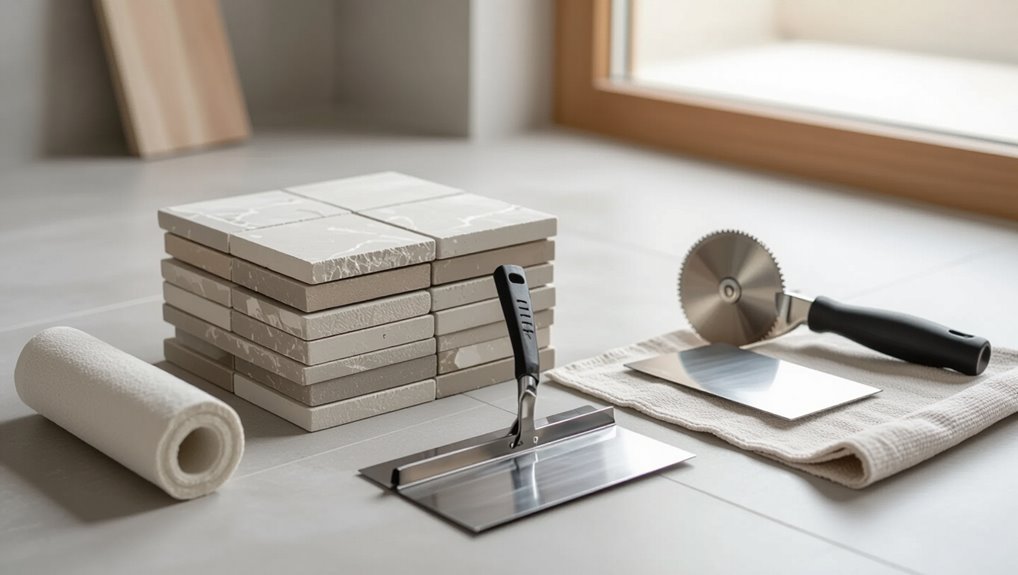
A sturdy notched trowel, a quality wet tile saw, and a reliable level are the core tools you’ll need to install porcelain tile yourself.
You’ll also want measuring, cutting, and finishing gear to work safely and efficiently.
- Tape measure and straightedge
- Tile nippers and wet saw blades
- Rubber grout float and sponge
- Knee pads and safety glasses
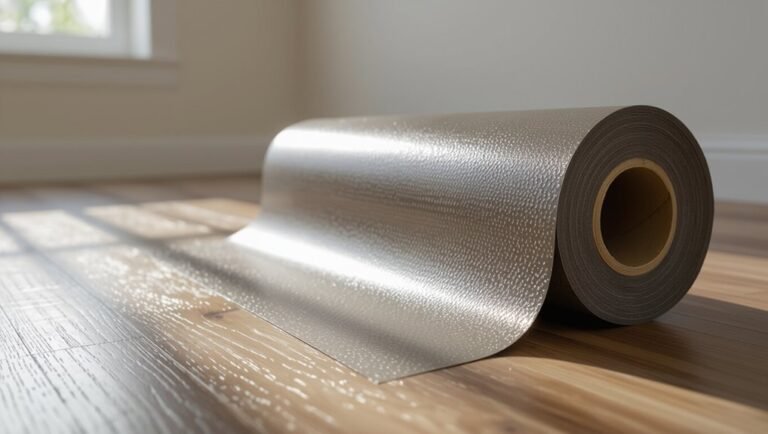
Materials and consumables (tile, thin-set, grout, spacers, backerboard, membrane)
Now that you’ve lined up the right tools, you’ll need to gather the materials and consumables that actually make the installation hold up over time.
Choose porcelain tiles, polymer-modified thin-set, suitable grout, and proper backerboard or uncoupling membrane. Don’t skimp—quality prevents failures.
- Porcelain tiles
- Polymer thin-set mortar
- Grout and spacers
- Backerboard or membrane
Optional/professional tools that speed the job
One set of professional tools can cut your labor and improve results: think wet saw for clean cuts, a large-notched trowel suited to your tile size, a powered mixer for thin-set, a long straightedge and laser level for layout, and a floor scraper or rotary grinder for prep—these items cost more up front but speed work, reduce mistakes, and pay back in time saved.
- Wet saw
- Powered mixer
- Laser level
- Floor grinder
Estimated cost breakdown (materials vs labor)
Expect to spend roughly half your budget on materials and the rest on labor, though that split can shift depending on tile quality, site prep, and whether you DIY or hire pros. Plan for tile, mortar, grout, underlayment, plus labor for removal, leveling, and installation. Estimate:
| Item | Typical cost |
|---|---|
| Materials | $5–$15/sq ft |
| Labor | $5–$15/sq ft |
Preparing the Job Site
Before you lay any tile, inspect and test the subfloor or substrate for soundness, moisture, and flatness so you know if backerboard, plywood, or concrete needs repair or replacement.
Make necessary repairs or install the correct substrate to meet moisture limits and level tolerances (and maintain slope in showers).
Finally, plan your layout and do a dry layout to set tile orientation and focal points for the cleanest, most balanced install.
Inspecting and testing the subfloor or substrate
When you start inspecting the subfloor, focus on level, rigidity, and moisture—these three factors determine whether the substrate can support porcelain tile.
Check flatness with a straightedge and measure deflection across spans. Tap for hollow spots, note squeaks, and document movement.
Test moisture with a meter and perform spot adhesive or plastic-sheet tests.
Record findings to guide your next steps.
Repairing or replacing substrate: cement backerboard, plywood, concrete
If the subfloor showed problems in your inspection, you’ll need to repair or replace it with a suitable substrate—cement backerboard, exterior-grade plywood, or patched/repoured concrete—so the tile has a flat, rigid, and dry foundation.
Remove damaged sections, fasten backerboard with proper screws and joints sealed, replace rotten plywood with exterior-grade panels, and repair concrete spalls before proceeding.
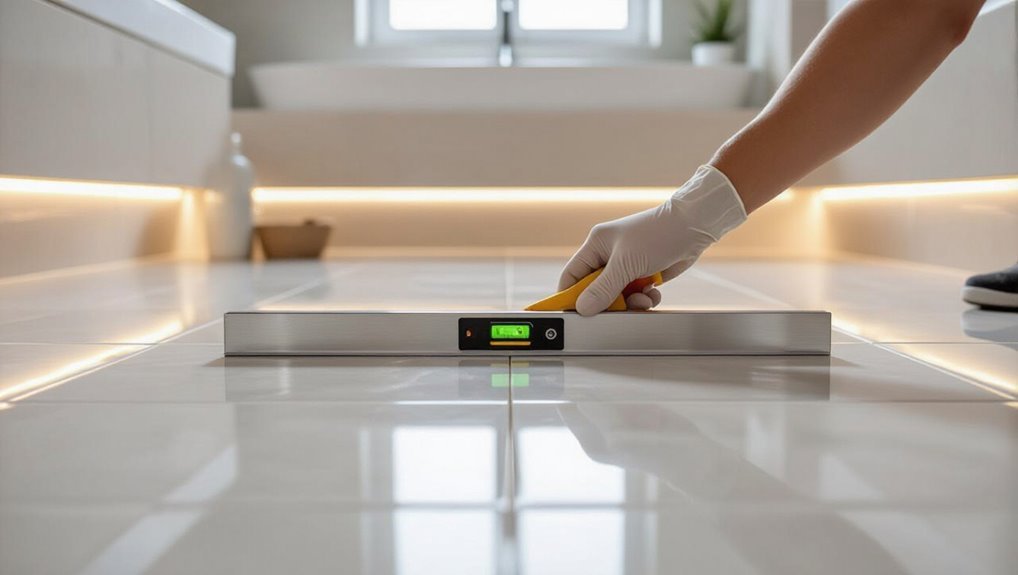
Moisture and flatness requirements (level tolerance, slope for showers)
Moisture and flatness are nonnegotiable for a lasting porcelain tile installation, so make sure your substrate is dry, level within industry tolerances, and properly sloped where water drains.
Check moisture with a meter; remediate damp concrete or backerboard.
Verify flatness: max 1/8″ variance in 10 feet for large tiles.
Create 1/4″ per foot slope in shower pans to drains.
Layout planning and dry layout (tile orientation, focal points)
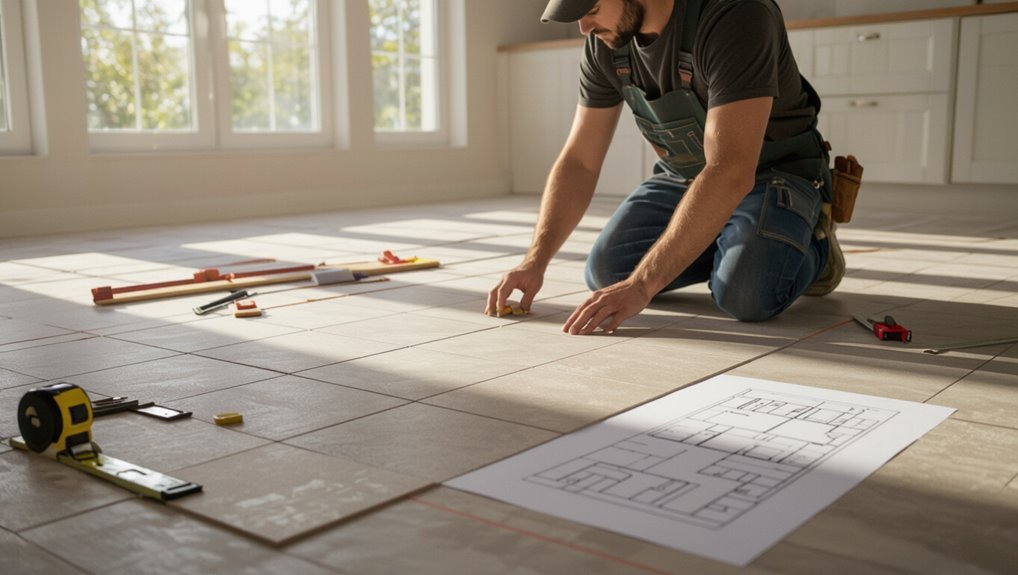
Now that your substrate is dry, flat, and properly sloped, plan the tile layout before you mix mortar.
Snap reference lines from center or focal point, dry-lay tiles to confirm orientation, grout joint widths, and pattern.
Shift layout to avoid narrow edge cuts.
Mark high-visibility starting lines, test changes to other materials, and adjust so your finished installation looks balanced and intentional.
Quick Planning Decisions Before You Start
Before you set any tile, decide on tile size and pattern since that determines cuts, sightlines, and how much material you’ll need.
Pick grout color, joint width, and edge treatments now because they shape the final look and influence maintenance.
Also plan for expansion joints, thresholds, and changes to prevent cracking and guarantee smooth connections to other floors.
Choosing tile size and pattern and how it affects layout
When you pick a tile size and pattern, you’re deciding how the whole room will read—large-format tiles make spaces feel bigger and need fewer grout lines, while smaller tiles or mosaics add texture and require more cuts and care around edges and fixtures.
Consider focal points, traffic flow, and sightlines; run a dry layout, stagger joints or align them, and plan cut placement to minimize visible small pieces.
Selecting grout color, joint width, and edge treatments
Although grout and joint choices might seem minor, they dramatically shape your floor or wall’s final look and performance, so decide them early.
Pick grout color to blend for seamless, contrast for pattern, or a neutral compromise.
Set joint width for tile size and movement—narrow for rectified porcelains, wider for rustic pieces.
Choose edge trims or bullnose for clean, durable finishes.
Expansion joints, thresholds, and transitions
Grout, joint width, and edge choices set your aesthetic and movement allowances, but you also need to plan for larger changes in plane and material that affect long-term performance.
Include expansion joints at perimeters and control joints where slabs meet; use flexible sealant in those gaps.
Select thresholds and shift strips to accommodate height differences, movement, and waterproofing, ensuring clean, durable joins and tripping-safety.
Step-by-Step Installation Process
Now you’ll follow a clear sequence: prepare and waterproof the surface, snap reference lines and a layout grid, and mix thin-set to the right consistency.
Then you’ll spread the mortar, set each porcelain tile accurately, and make precise cuts where needed.
Stay methodical so each step builds a flat, durable installation.
Step 1 Surface preparation and waterproofing
Before you lay any tile, clean and prime the substrate so adhesives bond properly.
For wet areas, you’ll install a waterproof membrane and proper flashing to stop moisture from reaching the substrate.
Take your time on this step—skipping it leads to failures later.
Cleaning and priming surfaces
Although your subfloor or wall might look clean, you’ll want to remove dust, grease, and any loose material so adhesives and primers bond properly.
Sweep and vacuum, then degrease with a mild detergent or trisodium phosphate solution. Rinse and let dry.
Spot-sand glossy areas, repair cracks with patching compound, then apply manufacturer-recommended primer evenly. Allow full cure before tiling.
Installing waterproof membranes and flashing for wet areas
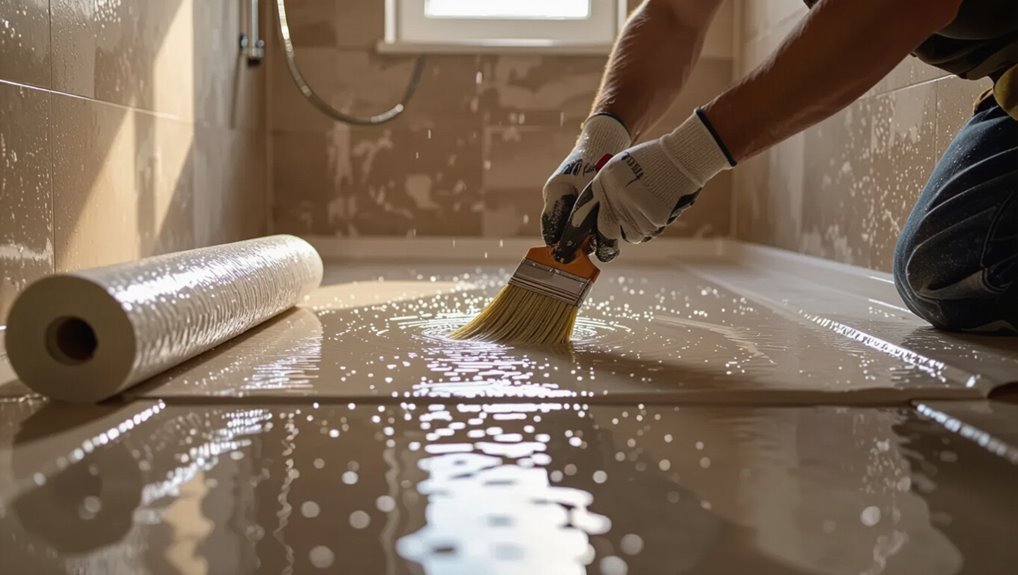
Since wet areas demand a watertight base, you’ll install a continuous waterproof membrane and properly fitted flashing to prevent leaks and mold.
Measure and dry-fit membrane, seal seams with manufacturer tape or liquid waterproofing, and bond to substrate with recommended thinset.
Flash penetrations, corners, and junctions. Extend membrane onto curb and up walls.
Test for continuity before tiling.
Step 2 Setting up reference lines and layout grid

Start by snapping chalk lines to mark your main reference axes so your tiles stay square to the room.
Run additional lines as needed for rows and use consistent spacers between tiles to maintain even grout joints.
Check alignment frequently against the lines and adjust spacers before the adhesive sets.
How to chalk lines and use spacers to keep alignment
Before you lay a single tile, snap straight chalk lines to establish your grid and plan how spacers will keep every joint uniform; this gives you a reliable reference for alignment as you work across the room.
Work from your intersecting mains, press each tile into thinset, insert correct-width spacers at every corner, and periodically recheck lines.
Remove spacers before grout.
Step 3 Mixing and applying thin-set mortar
Now you’ll mix and apply the thin-set mortar, starting with the right product: use a modified thin-set for porcelain over cement backerboard or modified substrates, and unmodified only where required by the manufacturer or for certain setting beds.
Choose a notched trowel matched to the tile size and backing to achieve proper coverage, and comb the mortar in straight lines for consistent ridges.
For large or dense tiles, butter the tile back and also key mortar on the floor (backbuttering) so you get full contact and avoid voids.
Choosing modified vs unmodified thin-set
When you’re deciding between modified and unmodified thin-set, focus on the tile type, substrate, and any manufacturer requirements.
Use modified thin-set for large-format porcelain, moisture-prone areas, or membranes needing polymer.
Choose unmodified only when the tile or membrane manufacturer expressly requires it (e.g., certain uncoupling or resinous membranes).
Always follow manufacturer specs for warranty and bond strength.
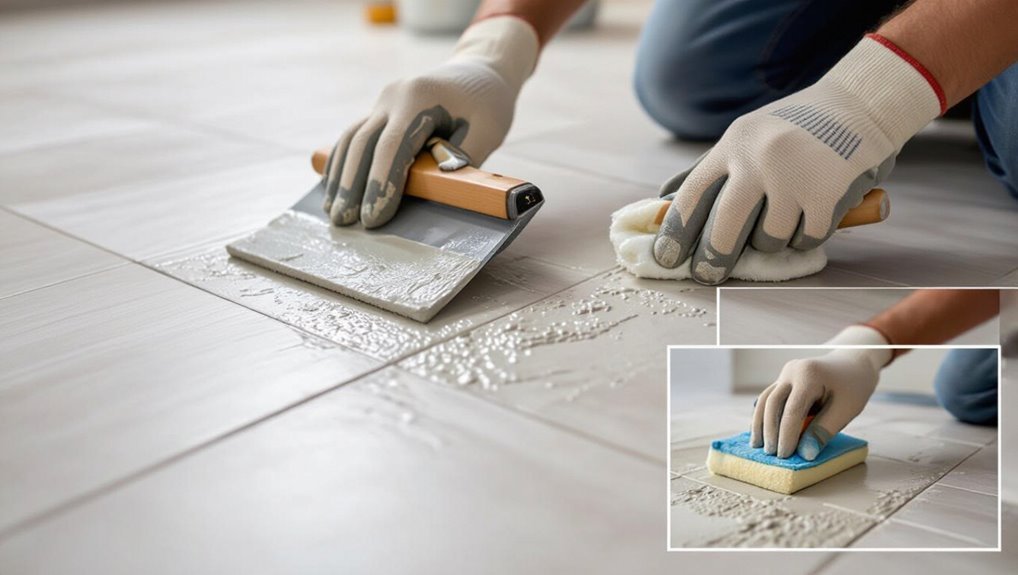
Trowel selection and proper butter-and-butter/backbuttering technique

A properly chosen trowel and a clean butter-and-butter (backbuttering) technique are what give your porcelain tile a full, even bond and prevent hollow spots under large pieces.
Choose a notch size matched to tile size and substrate. Apply thin-set to the substrate, butter the tile’s back with a solid coat, then comb with the trowel.
Press, twist slightly, and check coverage.
Step 4 Setting porcelain tiles correctly
Now you’ll set each porcelain tile into the fresh thin-set by pressing and giving a slight twisting motion to seat it.
Tap edges gently with a rubber mallet to level high spots, and keep joint widths consistent with spacers.
Use a tile leveling system as needed to maintain an even, flat surface across the whole field.
Pressing, twisting, and using a rubber mallet
Start by pressing each porcelain tile firmly into the mortar, then give it a slight twist to help the adhesive spread evenly beneath the tile; if the edge still sits high or the tile doesn’t feel fully set, tap it gently with a rubber mallet on a wooden block to avoid chipping.
Check for full contact, adjust quickly, and clean excess mortar before it skins over.
Maintaining consistent joints and using leveling systems
With tiles pressed, twisted, and tapped into place, turn your attention to keeping the grout lines uniform and preventing lippage across the field.
Hold consistent joint width with spacers, checking frequently. Use a tile leveling system—wedges or clips—to align edges, tighten gently, and remove pieces per manufacturer timing.
Verify flatness with a straightedge, adjust as needed before adhesive cures.
Step 5 Cutting tiles accurately
When you need to fit tiles, a wet saw will be your go-to for straight cuts. It’s essential you follow safety steps like eye protection, gloves, and keeping fingers well clear of the blade.
For trims and curves, use a handheld wet tile nipper, angle grinder with a diamond blade, or a tile file to shape pieces precisely.
I’ll show proper setup, cutting technique, and safety checks so you get clean edges without risking injury.
Wet saw use and safety tips

Although using a wet saw can feel intimidating at first, it’s the fastest way to get clean, precise cuts in porcelain—if you follow a few safety and technique basics.
Always wear eye and hearing protection, a respirator, and gloves.
Secure tile on the sliding table, mark cuts clearly, feed slowly with steady pressure, keep the blade water-cooled, and unplug before blade changes.
Alternative cutting methods for trims and curves
A wet saw handles most straight cuts, but trims and curves call for different tools and techniques.
Use an angle grinder with a diamond blade for tight curves, scoring wheel for shallow arcs, and tile nippers for small notches.
Mark carefully, cut slowly, and support the tile.
Sand edges with a rubbing stone or diamond pad to smooth and fit trim pieces precisely.
Step 6 Allowing mortar cure time and inspection
Because the mortar needs time to gain strength, you’ll let the setting phase proceed undisturbed and then inspect the work before grouting.
Leave tiles untouched per manufacturer cure times, usually 24–72 hours.
Check for levelness, full contact (no hollow spots), consistent joints, and any shifting.
Note imperfections, mark areas needing rework, and allow full cure before proceeding to the next steps.
Step 7 Grouting and sealing
Now you’ll choose the right grout—sanded for wide joints, unsanded for narrow—and apply it with a rubber float, pressing firmly into the seams.
After the grout skins over, you’ll wipe haze with a damp sponge and polish residue with a dry cloth once fully cured.
Finally, seal grout and porous tiles as recommended to protect against stains and make future cleaning easier.
Grout types and application techniques
Grout choice affects durability, appearance, and ease of maintenance, so pick the right type—sanded for joints 1/8″ or wider, unsanded for narrower gaps, or epoxy for high‑traffic or moisture‑prone areas—and prepare to mix and apply it according to the manufacturer’s instructions.
Use a rubber float to press grout into joints, work diagonally, remove excess, shape joints with a grout tool, and allow proper cure time before sealing.
Cleaning haze and final sealing recommendations
After you’ve worked the grout and shaped the joints, you’ll often see a fine, dusty haze on the tile surface that must be removed before sealing.
Wet-sponge haze removal followed by a microfiber buff prevents grout residue. Rinse thoroughly and let dry.
Apply an appropriate penetrating or topical sealer per manufacturer instructions, test in an inconspicuous area, and avoid heavy traffic for the recommended cure time.
Step 8 Finishing touches and trim installation
Now that your grout’s cured, it’s time to finish the job by installing thresholds, baseboards, and caulk to create clean, durable edges.
You’ll pick transition strips for doorways and level changes, reinstall or trim baseboards to fit the new tile height, and run a neat bead of silicone or acrylic caulk where tile meets walls or fixtures.
Do each step carefully to guarantee a professional look and prevent moisture or movement issues.
Installing transitions, baseboards, and caulking
When your tiles are clean and the grout has cured, you’ll install thresholds, baseboards, and caulking to finish the room and protect edges from moisture and wear.
Select border strips that match height and traffic. Nail or adhesive-mount baseboards, coping to tile edges.
Run continuous bead of mildew-resistant silicone in gaps, tool smooth, wipe excess, and allow full cure before use.
Common Problems and How to Fix Them
You’ll run into a few common issues—lippage and uneven tiles, hollow spots from poor bonding, cracked tiles after installation, and grout stains or efflorescence—and you should know what causes each so you can fix them.
I’ll show how to detect hollow tiles, correct unevenness, prevent and repair cracks, and treat grout staining or efflorescence.
Follow those checks and fixes to keep your floor flat, bonded, intact, and clean.
Lippage and uneven tiles causes and corrections
Although a slight height difference between adjacent tiles might seem minor, lippage can create tripping hazards, collect dirt, and ruin a finished look.
So you’ll want to address its causes and corrections early. Check substrate flatness, bed thickness, and trowel technique.
Use proper thinset, back-butter large tiles, employ a leveling system, adjust spacers, and remove high tiles before set.
Hollow tiles or poor bond detection and remedies
If tiles sound hollow or you can rock them slightly, they’re not bonded properly and need attention before grout goes in.
Tap across the field to map voids. Remove hollow tiles, clean substrate and tile back, apply proper thin-set using full bed techniques or back-buttering, reset with correct coverage and cavity-free trowel grooves, tamp and check for full contact before grouting.
Cracked tiles after installation prevention and repair
Once hollow or poorly bonded tiles are fixed, watch for another common issue: cracking.
Prevent cracks by using proper substrate reinforcement, correct thinset coverage, movement joints, and staggered joints over seams.
If a tile cracks, remove it carefully, clean the cavity, check the substrate, apply fresh mortar, and reset a matching replacement.
Test and adjust surrounding tiles to avoid future stress points.
Stain and efflorescence issues with grout
Grout discoloration—whether from surface stains, deep-set dirt, or a white powdery bloom called efflorescence—can make a new tile job look aged and neglected, but you can usually fix and prevent it with the right approach.
Clean stains with pH-neutral cleaners or diluted bleach for organic spots; dissolve efflorescence with a mild acid rinse.
Seal grout, control moisture, and ventilate to prevent recurrence.
Best Practices and Pro Tips for Durable Results
Control temperature and humidity during installation to prevent adhesive and grout failures.
For large-format tiles, plan handling, back-buttering, and precise leveling before you set them.
Know when a job—unusual tile types, complex patterns, or challenging substrates—warrants a pro, and follow simple maintenance routines to keep your tile lasting longer.
Temperature and humidity considerations during installation
Because porcelain and its adhesives react to ambient conditions, you need to monitor temperature and humidity closely during installation to guarantee proper curing and long-term stability.
Keep temperatures within manufacturer specs—usually 50–90°F (10–32°C)—and relative humidity around 40–60%.
Avoid rapid swings, don’t work in direct sun or near heating vents, and allow extra cure time in cool or humid conditions for reliable bond strength.
Working with large-format porcelain tiles
When you move from standard tiles to large-format porcelain, your methods and attention to detail need to shift accordingly—these bigger panels amplify the effects of substrate flatness, adhesive coverage, and handling.
You’ll grout minimal joints, use a medium-bed mortar with back-buttering, check flatness with a long straightedge, handle panels with suction cups, and allow proper cure times to prevent lippage and cracking.
When to hire a pro complex scenarios and tile types
If your project involves unusual substrates, intricate layouts, high-value tiles, or any of the complex scenarios below, bring in a pro—you’re protecting your investment and saving time.
Hire a pro for substrate repairs, radiant-heat integration, steep slopes, irregular patterns, extreme cuts, or mixed materials.
Pros guarantee correct mortar, waterproofing, lippage control, and warranty-compliant installation, minimizing costly mistakes.
Maintenance tips to extend tile life
1 simple habit—regular sweeping or vacuuming—goes a long way toward keeping porcelain tile looking new, and you’ll prevent grit from scratching the surface or wearing down grout.
Clean spills quickly, use pH-neutral cleaners, avoid abrasive pads, and reseal grout annually.
Follow these tips to extend tile life:
- Sweep/vacuum daily
- Mop with mild cleaner
- Protect high-traffic areas
- Regrout or reseal as needed
Comparison: DIY vs Professional Installation
You can save a lot by doing straightforward porcelain tile work yourself, especially if you’re comfortable with cutting, setting, and grouting small areas. For complex layouts, subfloor repairs, or wet-room waterproofing, you’ll want a pro to avoid costly mistakes. Compare the typical pros and cons below to decide what’s right for your project.
| DIY: When it’s cost-effective | Pro: Tasks to hire out |
|---|---|
| Small rooms, simple layouts, and basic cuts | Structural floor repairs and leveling |
| You already own tools and have tiling experience | Complex patterns, large-format tiles, or mosaics |
| Low-cost labor and flexible scheduling | Waterproofing showers, steam rooms, and wet areas |
| You want DIY satisfaction and can manage time | Long warranties, code compliance, and guaranteed finish |
When DIY is cost-effective
When your space is straightforward and you’ve got some hands-on experience, installing porcelain tile yourself can save a sizable chunk of the budget.
Projects with simple layouts, minimal cuts, and no complicated substrate repairs are where DIY shines. You’ll save on labor, control scheduling, and learn useful skills.
Factor tool rental, material waste, and realistic time estimates before committing.
Tasks to always consider hiring a pro for
Although tackling simple tiling can be rewarding, some tasks are worth paying a pro for to avoid costly mistakes and safety risks.
Hire pros for structural work, waterproofing wet areas, complex layouts, radiant-heating systems, and large-format porcelain requiring precise cuts and leveling.
They’ll guarantee proper substrate prep, correct thinset selection, and long-term warranties, saving time, preventing damage, and preserving resale value.
Materials and Product Recommendations (Starter Kit)
To get started, you’ll want a polymer-modified thin-set rated for porcelain, a high-quality grout (sanded for wide joints, unsanded for narrow), and a penetrating sealer if your grout or tile requires it.
Include essential tools like a notched trowel, tile spacers, a wet saw or snap cutter, a grout float, and a quality mixing bucket and mixer.
Look for reputable brands (such as MAPEI, LATICRETE, and TEC), check product specs for porcelain compatibility and bond strength, and choose features like rapid set times or stain-resistant grout when they match your project.
Recommended thin-set, grout, sealers, and tools for porcelain
One reliable starter kit for porcelain includes a polymer-modified thin-set mortar, a sanded or unsanded grout matched to joint width, a penetrating sealer for unglazed tiles or porous grout, and a handful of quality tools—trowel, tile spacers, grout float, sponge, mixing bucket, and a tile cutter—so you’ve got everything to set, grout, and protect the installation.
- Thin-set mortar
- Grout (sanded/unsanded)
- Penetrating sealer
- Basic hand tools
Brands and features to look for
Choosing brands for your starter kit matters because reliable manufacturers back consistent performance and clearer product specs, so you’ll spend less time troubleshooting.
Pick thin-set and grout from reputable names with ANSI A118 certification, epoxy options for high-moisture areas, and polymer-modified mortars.
Look for clear open time, pot life, and coverage info.
Choose tools with ergonomic grips and durable stainless steel.
Project Timeline and Checklist (Start to Finish)
You’ll want a clear pre-project checklist and a simple day-by-day plan so the job stays on schedule and nothing gets missed.
Start by confirming materials, tools, and site prep, then follow a daily milestone plan that covers demolition through grouting and cleanup.
Keep the timeline realistic for drying and curing times to avoid rushed mistakes.
- Verify materials, tools, permits, and site conditions before you start
- Day 1–2: demo, subfloor inspection, and repairs
- Day 3–4: layout, cutting, and setting tiles
- Day 5–7: grout, seal, and final cleanup
Pre-project checklist
Start by mapping out the whole project from demolition to grout cure so you know what order tasks must happen and how long each will take; this checklist should include materials, tools, permits, substrate prep, drying times, and contingency days so you can avoid expensive delays.
Confirm measurements, order extra tile (10–15% overage), verify subfloor flatness, schedule inspections, gather safety gear, and set realistic lead times.
Day-by-day milestones for a typical room
With your checklist complete and materials on hand, set up a clear day-by-day plan so each phase flows into the next and you can spot scheduling bottlenecks.
Day 1: demo and prep subfloor.
Day 2: level and dry time.
Day 3: layout and cutting.
Day 4–5: thinset and tile setting.
Day 6: grout.
Day 7: seal and final cleanup; inspect.
Frequently Asked Questions
You’ve got practical questions about curing time, installing over existing tile, ideal grout width, whether sealing is needed, and preventing lippage with large-format pieces.
I’ll answer each one clearly so you can plan and avoid common mistakes.
Read on for concise, actionable guidance.
How long does porcelain tile installation take to cure before light use?
Curious how long you’ll need to wait before walking on newly installed porcelain tile?
Typically, grout and thinset set enough for light foot traffic after 24 to 48 hours.
For grout cure and full bond strength, wait 72 hours.
Avoid heavy furniture or rolling loads for at least seven days.
Always follow manufacturer instructions and local conditions like temperature and humidity.
Can porcelain tile be installed directly over existing tile?
Can you tile directly over existing porcelain? You can, but prep matters.
Clean thoroughly, guarantee the old tile is sound and well-bonded, and roughen the glaze or use a bonded membrane.
Use a suitable thinset rated for tile-over-tile and correct trowel size.
Keep floor height and changes in mind, and follow manufacturer instructions to secure a durable, stable installation.
What grout width is best for porcelain tile?
How wide should your grout lines be for porcelain tile? Aim for 1/16″ to 1/8″ for rectified tiles with tight joints; 1/8″ to 3/16″ works well for standard edges. Larger-format or uneven substrates may need 1/4″. Use smaller gaps for a seamless look, wider for movement tolerance. Match grout color to minimize visibility and guarantee proper joint filling.
Is sealing porcelain tile necessary?
You’ve chosen grout width to balance appearance and movement—now consider whether the tile itself needs sealing.
Porcelain is dense and typically glazed, so you usually don’t need to seal the tile surface.
However, seal grout and unglazed porcelain edges or cut faces to prevent staining and moisture.
Test a small area: if water beads, skip sealing; if it soaks in, apply a penetrating sealer.
How do I prevent tile lippage with large-format tiles?
Want flat, seamless joints with large-format tile? Use a true flat substrate—self-leveling compound if needed—plus a reputable large-tile mortar and full thin-set coverage with a large-notched trowel.
Employ a leveling system and consistent spacers, check tiles frequently with a straightedge, and correct any high spots before mortar sets.
Allow proper curing and grout with flexible joint materials.