What Do You Need to Fit Laminate Flooring? Tools and Materials Checklist
You’ll need a few key tools and materials to fit laminate flooring correctly: a tape measure, carpenter’s square, pencil, jigsaw or handsaw, utility knife, tapping block, pull bar, rubber mallet, spacer wedges and an installation kit. Grab underlay with a vapor barrier, the correct laminate planks, border strips, trims, adhesives and safety gear. Prep the subfloor, test for moisture and let planks acclimate. Keep joints staggered and expansion gaps consistent — more detailed tips follow if you want them.
Quick Answer What You Need to Fit Laminate Flooring
You’ll need a few basic tools and materials to fit laminate flooring: planks, underlay, spacers, a tapping block, pull bar, saw, tape measure, and a utility knife.
You’ll also want safety gear like gloves and eye protection and adhesive or trim pieces for finishing.
With those essentials on hand, you can plan the layout and start installing.
Short list of essential tools and materials
For a straightforward laminate floor installation, you need a few essential tools and materials: a good-quality laminate, underlay, spacers, a tapping block and pull bar, a saw (jigsaw or circular), measuring tape, pencil, utility knife, hammer, and a mallet.
Know what do I need to fit laminate flooring and gather these:
- Laminate boards
- Underlay
- Spacers
- Tapping block/pull bar
- Saw and measuring tools
Basic Understanding What Laminate Flooring Is and Why Proper Tools Matter
Laminate flooring is a layered product—typically a wear layer, decorative layer, and either HDF or MDF core—and you’ll choose between click-lock, glue-down, or floating systems based on those core differences.
Using the right saws, spacers, underlay, and installation tools guarantees clean cuts, stable joins, and a floor that performs as advertised.
If you skimp on tools or materials you can void warranties and compromise durability, so get what the manufacturer recommends.
What laminate flooring is (types and core differences)
Although it looks like hardwood, laminate flooring is a multi-layered product designed to mimic real wood or stone while offering greater durability and easier installation.
So you should know the basic types and core constructions before you start a project. You’ll encounter HDF, MDF and moisture-resistant cores, plus residential, commercial and water-resistant planks.
Choose cores based on traffic, moisture exposure and budget.
Why correct tools and materials affect outcome and warranty
Now that you know the different cores and types, you’ll see how the right tools and materials actually shape the finished floor and protect your warranty.
Using proper underlay, spacers, moisture barriers, and a quality saw prevents warping, gaps, and damage.
Manufacturers often void warranties for improper installation, so follow guidelines, use recommended products, and keep records to guarantee coverage and a durable result.
Essential Tools Must-Have Equipment for Installation
To get your laminate floor installed correctly, you’ll need the right cutting and measuring tools, installation and tapping tools, and layout and leveling gear.
Don’t forget safety equipment and protection, and consider whether power tools or manual alternatives suit your skill level and budget.
I’ll walk you through each category so you can choose the essential items for your project.
Cutting and measuring tools
Accurate cuts and precise measurements are what keep a laminate floor looking professional, so you’ll want the right cutting and measuring tools on hand before you begin.
You’ll measure, mark, and trim boards cleanly to fit edges, doorways, and fixtures without unnecessary waste.
- Tape measure
- Carpenter’s square
- Pencil and masking tape
- Jigsaw or handsaw
- Utility knife
Installation and tapping tools
When you’re ready to lock the planks together, a few specialized installation and tapping tools make the job faster and prevent damage to the tongue-and-groove edges.
You’ll use them to snug joints, finish tight rows, and protect edges while tapping. Carry a selection of sizes and a mallet to avoid marring.
- Tapping block
- Pull bar
- Rubber mallet
- Spacer wedges
- Installation kit
Layout and leveling tools
Lay out your planks and level the subfloor before you start cutting—getting your layout and leveling right saves time and prevents gaps, lippage, and uneven wear.
You’ll mark reference lines, check flatness, and adjust high or low spots so panels lock cleanly and sit flush.
- Tape measure
- Chalk line
- Spirit level or laser level
- Straightedge
- Floor leveling compound and trowel
Safety gear and protection
Once your layout is set and the subfloor’s flat, protect yourself and the work area before cutting and fitting planks.
Wear PPE, control dust, and guard flooring and trim. You’ll work cleaner and safer.
- Safety glasses
- Dust mask or respirator
- Ear protection
- Knee pads
- Drop cloths and tape
Power tools vs. manual alternatives
Although power tools speed the job, you don’t have to rely on them exclusively—manual tools can handle many tasks affordably and with less setup. You’ll choose based on time, budget, noise, and accuracy. Use power saws for long runs; use a handsaw and block for tight cuts. Consider ergonomics and safety when deciding.
| Power tool | Manual alternative |
|---|---|
| Mitre saw | Handsaw + mitre box |
| Jigsaw | Coping saw |
| Drill | Screwdriver |
| Floor nailer | Rubber mallet & spacers |
| Oscillating tool | Chisel |
Essential Materials Flooring and Consumables
You’ll need to choose laminate planks by size, AC rating, and finish to match durability and style.
Pick the right underlay and moisture barrier for your subfloor, then plan for junction strips, trims, and skirtings to finish edges.
Keep on hand any required adhesives, sealants, and fasteners so installation goes smoothly.
Laminate planks: selecting size, AC rating, and finish factors
Selecting the right laminate planks means balancing size, durability, and appearance to match your room’s use and style.
You’ll pick plank length and width for visual scale—longer, wider boards suit open spaces; narrow planks fit small rooms.
Choose an AC rating for traffic (AC3 for homes, AC4+ for busy areas).
Finish (matte, gloss, textured) affects look and scratch resistance.
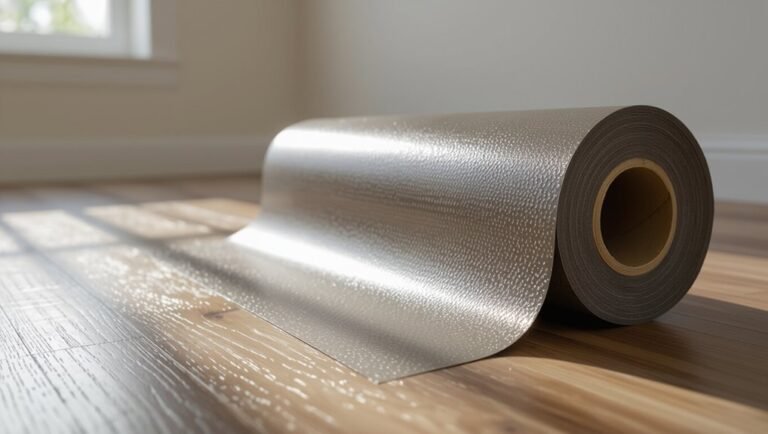
Underlay types and moisture barriers what to choose
Once you’ve picked planks that suit your room, think about what goes underneath them: the right underlay and moisture barrier protect the floor, improve comfort, and influence sound and thermal performance.
Choose based on subfloor, moisture risk, and insulation needs. Consider:
- Foam underlay for basic cushioning
- Cork for thermal and acoustic benefits
- Rubber for soundproofing
- Vapour barrier for concrete
- Combined underlay/barrier options
Transition strips, trims and skirtings
Changeover strips, trims and skirtings finish your installation and protect edges where laminate meets other surfaces, walls or thresholds.
So pick profiles that match the height, thickness and traffic of each junction. You’ll choose matching colours, durable materials and suitable fixing methods to guarantee neat joins and safe changes.
- Threshold/Reducer
- T-molding
- End cap
- Stair nosing
- Quarter round
Adhesives, sealants and fasteners (when required)
After you’ve picked and fitted the right strips and skirtings, you’ll need the adhesives, sealants and fasteners that hold everything in place and keep moisture, movement and wear from causing problems.
Use tacky adhesive for trims, flexible silicone or acrylic sealant for gaps and wet areas, and corrosion-resistant screws or finishing nails where recommended.
Choose products compatible with your laminate and subfloor.
Preparation Steps What to Do Before You Start
Before you cut or click anything together, inspect the room and subfloor for level, damage, and moisture, and let the planks acclimate per the manufacturer’s instructions.
Measure carefully and order enough material with a waste factor for cuts and mistakes.
Clear the space and plan the layout, choosing the board direction and stagger pattern before you start installing.
Room inspection: subfloor, moisture tests and acclimation steps
When you inspect the room, check the subfloor for level, cleanliness and damage, perform moisture tests, and let the laminate acclimate so your installation starts on solid footing.
You’ll verify flatness, remove debris, repair soft spots, test moisture with a meter or tape, and store boards horizontally at room conditions for 48–72 hours.
- Levelness check
- Cleanliness
- Damage repair
- Moisture testing
- Acclimation time
Measuring and ordering the right quantity (waste factor)
Start by measuring the room’s length and width and multiply to get the total square footage. Add a 5–10% waste factor for straight runs, 10–15% for irregular cuts. Round up to full boxes. Confirm plank coverage per box before ordering.
| Item | Example |
|---|---|
| Room area | 200 sq ft |
| Waste factor | 10% |
| Total needed | 220 sq ft |
| Boxes to order | 8 boxes |
Clearing the space and planning layout (direction and stagger)
After you’ve cleared the furniture and removed baseboards, sweep and vacuum the subfloor so you can plan plank direction and staggering with a clean surface.
Work from the longest wall toward natural light, laying full planks where visible. Stagger end joints at least 8–12 inches between rows for stability and appearance.
Mark starter lines, check doorways and connections, and dry-fit rows.
Step-by-Step Installation Overview
Now you’ll walk through the basic installation sequence so you know what to expect at each stage.
Start by preparing the subfloor and laying the underlay, then fit the first row while keeping proper expansion gaps and cut planks for edges and obstacles as needed.
Continue with subsequent rows using a tapping block, and finish by fitting connectors, thresholds, and skirting boards.
Step 1 Prepare subfloor and underlay
Clear and level subfloors make the rest of the installation go smoothly, so inspect and repair any damage before you lay the underlay.
You’ll clean, level high or low spots, and let concrete dry fully.
Roll out underlay, overlap or tape seams per manufacturer, and trim to fit around obstacles.
- Clean debris
- Fill cracks
- Sand high spots
- Moisture test
- Tape seams
Step 2 Laying the first row and maintaining expansion gaps
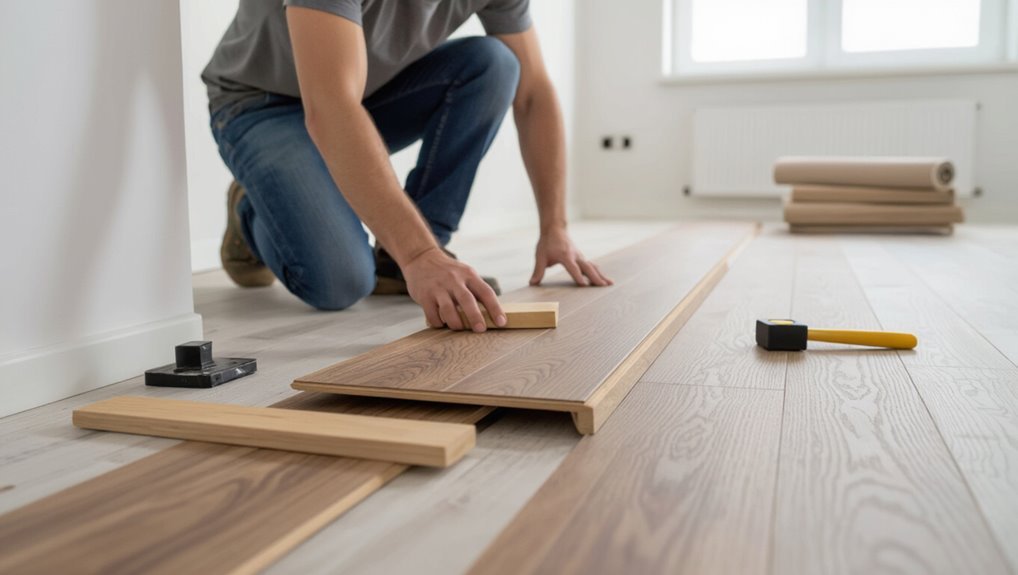
1. You’ll start along the longest straight wall, placing the tongue toward the wall and using spacers to keep a consistent 8–12 mm expansion gap.
Click or angle-lock each plank tightly, checking alignment as you go. Stagger end joints by at least 300–400 mm for stability.
Keep the first row perfectly straight; it sets the whole floor’s accuracy.
Step 3 Cutting planks for edges and obstacles
Measure and mark each plank carefully before cutting so you get tight fits at walls and around doorways or vents.
You’ll use a saw and spacer to trim edges, scribe around irregularities, and test-fit pieces. Cut slowly, check orientation, and keep scrap for templates.
- Tape measure
- Pencil and square
- Jigsaw or pull saw
- Spacers
- Safety goggles
Step 4 Installing subsequent rows and using tapping block
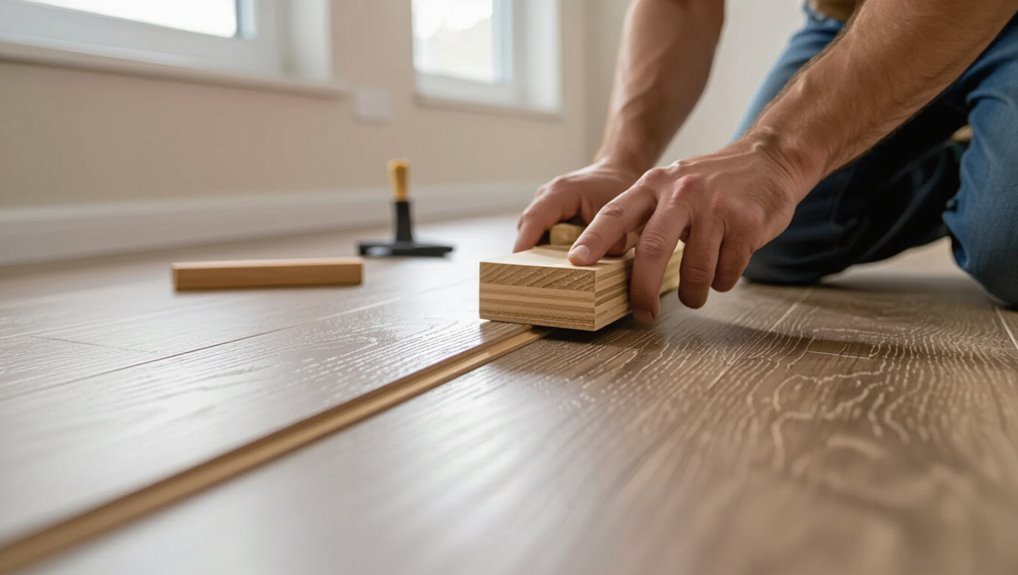
Start the next row by angling the plank’s long edge into the previous row’s tongue-and-groove, then lower it until it clicks.
Keep a consistent stagger and use spacers at the wall to maintain the expansion gap as you go.
Fit each plank end-to-end, tapping with a tapping block and mallet to close seams without damaging edges, checking alignment frequently and trimming last planks to fit.
Step 5 Fitting transitions, thresholds and skirting boards
With the field laid and edges trimmed, you’ll now move on to fitting the pieces that bridge your laminate to other floors and cover the room perimeter.
Measure openings, cut connectors and thresholds to fit, and attach skirting boards to conceal expansion gaps.
Use appropriate adhesives or screws, check alignment, and seal joins.
- connector strips
- thresholds
- skirting boards
- adhesive/sealant
- screws and fixings
Step 6 Final checks and cleaning
Once you’ve installed changes and skirtings, do a systematic final check and clean so the floor looks right and performs well.
Walk the room, checking joints, gaps, and expansion edges. Tighten trim and secure loose boards.
Remove dust and debris with a soft broom or vacuum, then wipe with a damp (not wet) microfiber mop.
Inspect for damage and note warranty details.
Common Problems and Mistakes to Avoid
When installing laminate, you’ll want to avoid common mistakes like poor subfloor prep and moisture-related failures that can ruin the floor.
Don’t use the wrong underlay or skip a vapor barrier, and always leave proper expansion gaps and use correct locking techniques.
Also make clean, proper cuts—poor cutting will damage planks and create fit problems.
Poor subfloor prep and moisture-related failures
Although it’s tempting to rush through the subfloor, failing to level, clean, and protect it from moisture is the most common reason laminate installations fail.
You must remove debris, repair dips or high spots, and guarantee the surface is dry and stable.
Ignore moisture and you’ll face warping, buckling, and mold.
Proper prep prevents costly repairs and preserves your floor’s warranty.
Incorrect underlay choice or missing vapor barrier
If you pick the wrong underlay or skip a vapor barrier, you’ll undermine the whole floor’s performance from day one.
Choose an underlay rated for your subfloor and traffic, and fit a vapor barrier over concrete or damp areas.
Wrong or missing layers cause warping, cupping, noise, and warranty voids.
Measure, overlap, and seal seams to protect the laminate.
Failing to allow expansion gaps or improper locking technique
1 simple mistake can wreck a flawless laminate install: skipping proper expansion gaps or forcing boards together with the wrong locking technique.
You’ll cause buckling, gaps, or damaged joints if you don’t leave recommended clearances at walls, thresholds, and fixed objects.
Use spacers, follow manufacturer gap specs, and lock boards using the correct angle and gentle tapping to avoid stress and misaligned seams.
Improper cutting techniques that damage planks
Once you’ve left the right expansion gaps and mastered the locking technique, improper cutting can still ruin your work. If you force blades, use dull tools, or cut against the grain, edges chip and joints fail.
Measure twice, use a sharp saw or laminate cutter, secure planks, and cut slowly. Clean, precise cuts preserve tongue-and-groove integrity and guarantee a tight, professional finish.
Tips, Best Practices and Efficiency Hacks
Keep your tools sharp, calibrated, and ready so you move faster and make cleaner cuts.
Plan your layout to reduce waste and hide seams, decide whether to rent specialty gear or buy it for the job, and pre-fit around doors, radiators, and uneven thresholds.
With a few setup tricks and smart sequencing you’ll cut install time and improve the finished look.
Tool maintenance and setup for faster work
Before you start cutting and fitting, tune and arrange your tools so they’ll work smoothly all day; a well-prepared setup cuts mistakes and downtime.
Sharpen blades, clean saw dust, oil moving parts, and check batteries.
Lay tools in task order, keep spare blades and masks handy, and set lighting.
Calibrate guides and test cuts to maintain speed and consistent, accurate joins.
Layout strategies to minimize waste and visible seams
With your tools tuned and laid out for fast, accurate cuts, plan the plank layout to cut waste and hide seams from the start.
Stagger end joints at least 8–12 inches, run long planks along focal lines, and dry-fit rows to avoid tiny end pieces.
Work from the most visible wall outward, measure twice, cut once, and reserve wider border planks for edges.
When to rent vs. buy specialty tools
If you’re tackling a single-room install or occasional repairs, renting specialty tools usually saves money and garage space; buy only when you’ll use a tool repeatedly or need its specific features for precision and speed.
Rent saws, floor nailers, and large-format cutters for one-offs; buy a quality jigsaw, pull bar, and tapping block if you’ll do multiple jobs to recoup cost.
Working around doors, radiators, and uneven thresholds
When you hit doors, radiators, and uneven thresholds, plan cuts and clearances ahead so installations stay tight and connections look professional; measure twice, mark once, and test-fit pieces before you glue or click them in place.
Use jamb saws to undercut door casings, template trims around pipes, and tapered reducers for thresholds.
Keep expansion gaps, use stabilizing screws where needed, and finish with matching profiles.
Comparison: DIY vs. Hiring a Professional
You can save money by doing laminate flooring yourself if you’ve got time and the right skills, but a pro can cut project time and reduce mistakes.
Consider the costs, the hours you’ll spend, and how comfortable you’re with measuring, underlayment, and changes.
Hire a professional for complex layouts, moisture-prone rooms, or tight deadlines to avoid costly rework.
Cost, time and skill level comparison
Although tackling laminate flooring yourself can save money, it usually takes more of your time and requires basic carpentry skills you might not have. You’ll spend hours learning, measuring, and fitting; pros finish faster with guaranteed results. Consider cost, time, and skill when choosing.
| Aspect | DIY | Professional |
|---|---|---|
| Cost | Lower | Higher |
| Time | Longer | Shorter |
Scenarios when professional installation is recommended
If your subfloor is uneven, your room has complex layouts (like many angles, built-ins, or changes in level), or moisture issues are present, hire a pro—these conditions need experience, special tools, and warranties that DIY work usually can’t match.
You should also consider professionals for large areas, staircases, pattern matching, or when you want a fast, guaranteed finish and minimal disruption to daily life.
Checklist Printable Tools and Materials List Before You Start
Before you begin, gather a clear checklist of tools and materials so the job starts smoothly and nothing slows you down.
Print or save a single-sheet list, confirm quantities, and stage items near the work area. Keep measurements, safety gear, and adhesive info handy so you won’t interrupt workflow.
- Tape measure
- Laminate planks
- Underlay
- Spacers and mallet
- Safety goggles
FAQ
You probably have a few quick questions before you start, like whether you can fit laminate over existing flooring or if you always need an underlay.
I’ll cover what tools you can skip on a budget, how much expansion gap to leave, and the best way to cut around door frames and vents.
If you want step-by-step answers or photos, tell me which question to start with.
Can I fit laminate flooring over existing flooring?
Wondering whether you can lay laminate over your existing floor? You can, provided the substrate is flat, dry, clean and securely fixed.
Remove loose tiles, lift any loose boards, and level dips or high spots. Check height clearance for doors and thresholds.
Avoid installing over damp-prone surfaces or cushioned/vinyl floors that flex; rigid, stable surfaces are best for a lasting result.
Do I need an underlay with every laminate?
Do you always need an underlay with laminate? Generally, yes — underlay improves sound, insulation, and helps even minor subfloor imperfections.
Some laminate comes with integrated underlay; in that case you can skip a separate layer. Always check manufacturer guidance and local building codes.
Use moisture barrier underlay on concrete or damp-prone areas to protect the flooring and warranty.
What tools can I skip if I’m on a budget?
On a tight budget, skip nonessential specialty tools and focus on basics that let you cut, fit, and protect the floor.
You can avoid a pneumatic nailer, fancy flooring stapler, and dedicated laminate router if you have a handsaw, jigsaw, or circular saw.
Forgo a power planer; use a sanding block for minor adjustments.
Rent occasional specialty tools to save money.
How much gap should I leave for expansion?
If you skipped some specialty tools to save money, you still need to leave proper expansion gaps—otherwise the floor can buckle as it expands and contracts.
Leave 8–12 mm (5/16–1/2 inch) around walls and fixed objects. In larger rooms, allow a slightly wider gap or follow manufacturer specs.
Use spacers during installation and cover gaps with trim or reducer profiles for a neat finish.
How do I cut laminate around door frames and vents?
Cutting laminate around door frames and vents takes a few simple tricks so your seams sit tight and look professional.
Measure and mark precisely, allowing the expansion gap. Use a jigsaw or coping saw for curves; a handsaw or pull saw for jamb returns.
For vents, trace the grille, cut slightly undersize, test-fit, then trim for a snug finish.
Sand edges and install trim.