
How to Waterproof a Bathroom Floor Before Tiling or Finishing
You should waterproof the bathroom floor before tiling to stop leaks, mold, and tile failures. Start by repairing and leveling the substrate, prime porous surfaces, then seal seams, corners, and drain areas. Use a compatible liquid membrane, sheet membrane, or cementitious product and follow manufacturer drying times. Test with a short ponding check, then install underlayment and tile. Keep warranties and local code in mind — continue for detailed steps, material choices, and cost guidance.
Quick Answer Should You Waterproof a Bathroom Floor Before Tiling or Finishing?
Yes — you should waterproof before tiling or finishing in most bathroom situations to protect against leaks and moisture damage.
It’s mandatory in wet areas like showers and around tubs, and strongly recommended for full bathroom floors; only some dry, low-risk spaces might skip it.
If you’re unsure, err on the side of waterproofing to avoid costly repairs later.
Short, Direct Recommendation
Always waterproof the bathroom floor before tiling or finishing — it’s a simple, cost-effective step that prevents costly water damage, mold, and grout failure down the line.
You should apply a proper membrane or liquid barrier, seal seams and drain areas, and follow manufacturer instructions.
Learn how to waterproof a bathroom floor now so you don’t face repairs, stains, or odors later.
When waterproofing is mandatory vs. optional
If your bathroom will see regular water exposure—like a shower, wet room, or floor-level tub—you should waterproof the floor; in low-moisture powder rooms or half-baths it can be optional if your substrate and installation meet local code and manufacturer specs.
Check local codes, tile and membrane manufacturer instructions, and vapor exposure.
When in doubt, waterproofing prevents damage, mold, and warranty disputes, so choose protection.
Basic Understanding What Is Bathroom Floor Waterproofing and Why It Matters
Waterproofing is a layer or system you apply to stop water from penetrating the floor, with the main goals of keeping moisture out, directing leaks to drains, and protecting finishes.
It shields the substructure and tiles from rot, mold, and structural damage, so you won’t face costly repairs or health risks later. Proper waterproofing prevents problems like staining, grout failure, warped joists, and hidden mold growth.
Definition and key objectives of waterproofing
Think of bathroom floor waterproofing as a protective layer you install to stop water from seeping into the subfloor and walls; it keeps moisture where it belongs and prevents rot, mold, and structural damage.
Your waterproofing’s key objectives are to create a continuous moisture barrier, seal joints and penetrations, accommodate movement, and provide a reliable substrate so tiles or finishes last without water-related failure.
How waterproofing protects structure, finishes, and health
A proper waterproofing layer stops water at the surface so it can’t reach your subfloor, framing, or adjacent walls, which prevents wood rot, drywall deterioration, and costly structural repairs.
It also preserves finishes—tiles, grout, and paint—by preventing staining, delamination, and mold growth.
Types of water damage prevented
When you seal the floor properly, you stop several common types of water damage before they start: surface staining and grout deterioration from everyday splashes, hidden subfloor rot caused by slow leaks or poor drainage, warped or swollen floorboards after prolonged moisture exposure, and mold growth that thrives in damp gaps and behind tiles.
You’ll also prevent adhesive failure, tile delamination, musty odors, and costly structural repairs.
Overview of Waterproofing Systems and Materials
You’ll choose between liquid-applied membranes like polyurethane or acrylic and sheet membranes such as rubberized, PVC, or bituminous options depending on your shower layout.
Consider cementitious coatings for direct tile application and drainage/underlayment systems like Schluter DITRA or decoupling mats when movement or moisture management matters.
Also know the difference between moisture barriers and vapor barriers so you pick the right protection for your subfloor and climate.
Liquid-applied membranes (polyurethane, acrylic)
Liquid-applied membranes like polyurethane and acrylic provide a seamless, flexible barrier you can paint or roll onto a bathroom floor, bonding directly to substrates and sealing joints, penetrations, and connections without the seams found in sheet membranes.
You’ll apply primer, spread two coats per manufacturer directions, reinforce corners with tape or fabric, allow proper cure, and test for continuity before tiling.
Sheet membranes (rubberized, PVC, bituminous)
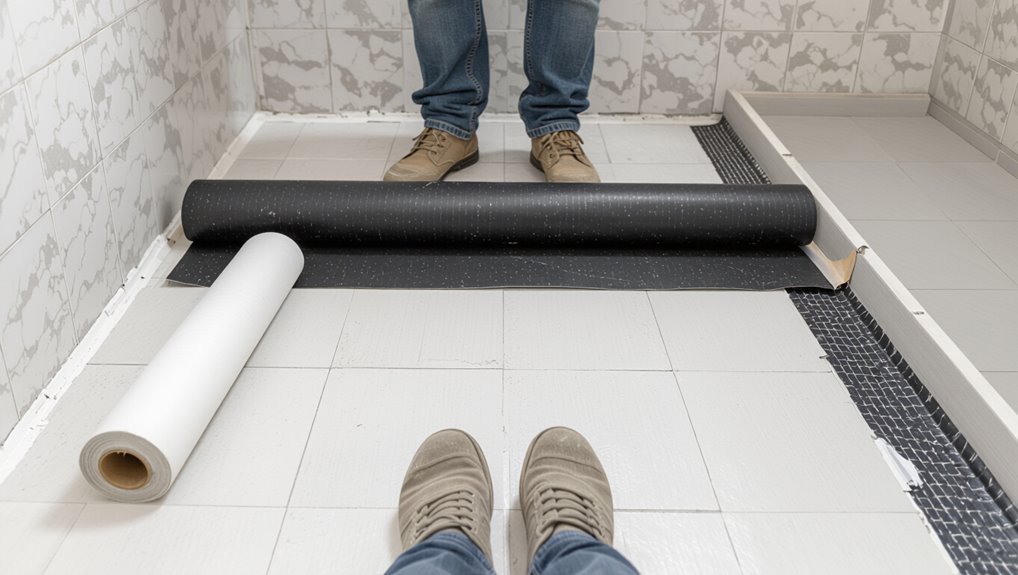
If you prefer a factory-made barrier instead of brushing on a liquid membrane, sheet systems offer durable, preformed protection in rubberized, PVC, or bituminous formats.
You’ll roll or bond sheets to substrate, sealing overlaps and corners with manufacturer tape or adhesive. They resist punctures and fully cover junctions, but need precise cutting, careful seam treatment, and proper substrate prep for reliable, long-lasting waterproofing.
Cementitious waterproofing products
When you need a simple, fast, and masonry-friendly option, cementitious waterproofing products are a go-to choice for bathroom floors.
You mix powder with water or additive, trowel or brush it onto concrete or cement board, and let it cure into a rigid, durable barrier.
They’re tile-compatible, low-maintenance, and ideal for wet areas—just follow manufacturer coverage, cure times, and joint treatment.
Drainage and underlayment systems (decoupling, Schluter, DITRA)
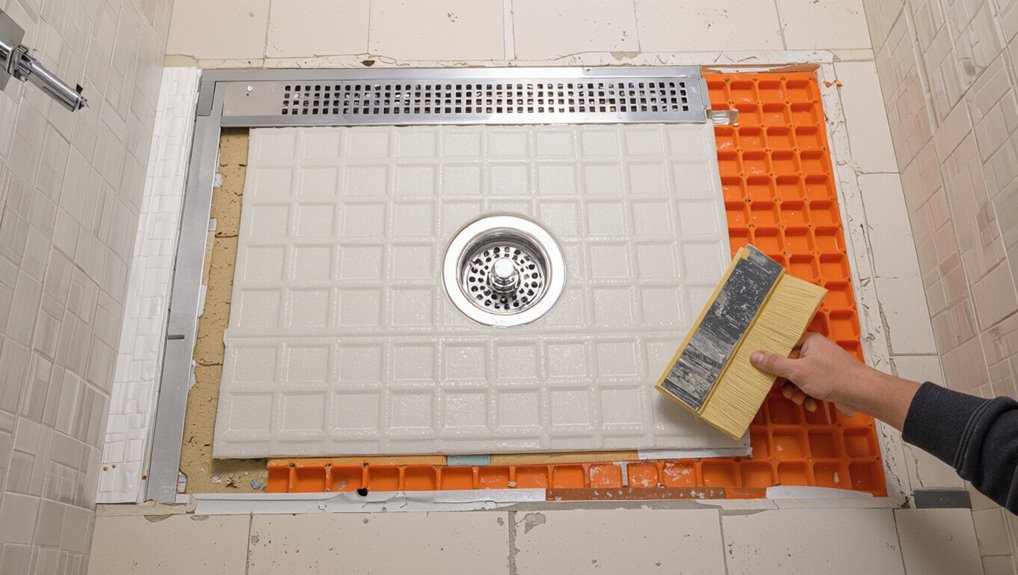
Because tile floors need a stable, waterproof base, drainage and underlayment systems like Schluter-DITRA and similar decoupling membranes give you a reliable way to protect the substrate and manage moisture.
They separate tile from substrate movement, channel water away, and provide a flat, bondable surface for thinset.
You’ll install membranes over sloped substrates, tie into drains, and use appropriate mortars and seams to guarantee proper drainage.
Moisture barriers vs. vapor barriers differences and use cases
Although the terms sound similar, moisture barriers and vapor barriers serve different jobs in a bathroom’s waterproofing assembly, and choosing the right one depends on where moisture originates and how you manage it. You’ll use moisture barriers to stop liquid intrusion; vapor barriers control vapor diffusion. Pick based on source, location, and materials.
| Barrier | Stops | Typical use |
|---|---|---|
| Moisture | Liquid | Shower pans |
| Vapor | Vapor | Exterior walls |
Quick Comparison Best Options by Bathroom Type and Floor Substrate
You’ll want different waterproofing strategies depending on whether you’re working on a small shower, a wet room, or a light-use bathroom, and on whether the substrate is concrete slab, plywood, or cement backer board. Below is a quick comparison to help you choose the most practical option for each combination. Pick the row that matches your room type and substrate to guide the next steps.
| Bathroom Type | Best Substrate Match |
|---|---|
| Small shower | Cement backer board |
| Wet room | Concrete slab |
| Light-use bathroom | Plywood |
Small shower/bathroom vs. wet room vs. light-use bathroom
When choosing a waterproofing approach, match the method to the room’s use and your floor substrate so you get lasting protection without overkill.
For a small shower/bathroom, use full waterproof membrane and sealed seams.
For a wet room, apply floor-to-wall tanking and slope to drain.
For a light-use bathroom, a bonded membrane or quality primer and grout sealant often suffices.
Concrete slab vs. plywood subfloor vs. cement backer board
Because the substrate determines both the waterproofing materials and the installation method, pick approaches that suit concrete slab, plywood subfloor, or cement backer board rather than treating them the same.
On concrete, use liquid membranes or sheet systems bonded to clean slab.
On plywood, install a decoupling membrane plus waterproofing and guarantee structural stiffness.
On backer board, seal joints and use thin liquid or sheet waterproofing over seams.
Step-by-Step: How to Waterproof a Bathroom Floor Before Tiling
Before you lay any tile, you’ll prepare the subfloor, check framing, and clear the space so the waterproofing can bond properly.
Next you’ll plan the layout, improve or install the right underlayment, and map where the membrane and flashing will go.
Finally you’ll apply the waterproofing membrane and seal all penetrations and perimeters with flashing to create a continuous barrier.
Preparation (Step 1)
Start by inspecting the substrate for cracks, rot, or any deflection and repair those issues before you proceed.
Verify the floor slopes correctly toward the drain so water won’t pool, and correct the pitch if needed.
Finally, clean the surface thoroughly, let it dry, and apply a suitable primer before waterproofing.
Inspect and repair substrate (cracks, rot, deflection)
When you inspect the bathroom substrate, focus on identifying cracks, rot, and any sagging or movement, since these issues will compromise waterproofing and tile adhesion if left unaddressed.
Remove damaged flooring, probe for soft spots, and expose joists. Replace rotten sections, sister or reinforce joists to eliminate deflection, and fill hairline cracks with appropriate patching compound before applying a waterproof membrane.
Check slope and drainage toward drain
Because water won’t tolerate flat floors, you need to verify the floor slopes properly toward the drain so showers and wet areas clear quickly and never pool.
Measure slope with a level or digital inclinometer; aim for 1/4″ per foot.
Fix low spots, build a mortar shower pan or adjust substrate, and guarantee the drain assembly sits flush so water funnels freely to the outlet.
Clean, prime and dry the surface
Before you apply any waterproofing products, clean the floor thoroughly, prime porous substrates, and verify everything’s bone dry so membranes and adhesives bond properly.
Remove dust, grease, old adhesives, and loose material with a stiff brush and vacuum.
Apply manufacturer-recommended primer to concrete or cement board, allow proper cure time, then recheck dryness before installing membranes or tiles to guarantee a reliable seal.
Layout and planning (Step 2)
Start by marking all changes, penetrations, and the drain location so you know exactly where seams and extra sealing will be required.
Then choose a waterproofing product rated for bathroom floors and calculate coverage so you buy enough for full and overlap coats.
With those plans on paper you’ll avoid surprises and guarantee continuous protection before you start applying materials.
Mark transitions, penetrations, and drain locations
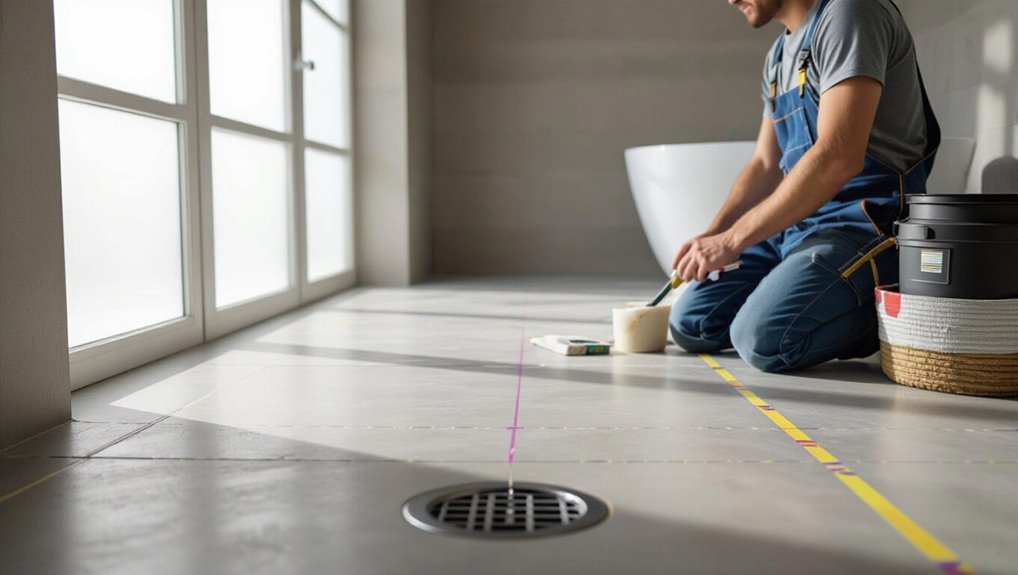
When you mark shifts, penetrations, and the drain location, you create a clear roadmap for your waterproofing membrane and avoid costly mistakes later.
Trace threshold lines, shower curb edges, pipe stubs, and fixtures with a pencil or chalk. Note drain center and elevation.
Dimension distances to walls and seams so membrane cuts, seals, and flashing fit precisely without guesswork during installation.
Choose appropriate product and calculate coverage
Choose a waterproofing system that matches your bathroom’s layout and traffic: liquid-applied membranes for seamless coverage, sheet membranes for speed and uniform thickness, or composite systems for heavy-use areas.
Pick products rated for wet areas, note cure times, and calculate square footage plus overlaps and fittings. Measure twice, add 10–15% waste, and confirm adhesive compatibility.
- Coverage per unit
- Overlap allowance
- Drain/flange needs
- Cure time
Install substrate or underlayment improvements (Step 3)
Before you waterproof, you’ll want to fix any rotten plywood or joists so the floor is solid.
Install cement backer board or an uncoupling membrane to give the tile a stable, water-resistant base.
Use the correct screw patterns and properly treat joints to prevent movement and leaks.
Replace/strengthen rotten plywood or joists
Inspect the subfloor and joists thoroughly and mark any plywood or framing that’s soft, crumbling, or sagging.
Remove damaged sections, cut back to sound wood, and sister new joists alongside weakened ones or replace ruined spans.
Fit exterior-grade plywood patches or full panels, screw and glue per manufacturer specs, and guarantee level, stiff support before proceeding with waterproofing or underlayment installation.
Install cement backer board or uncoupling membrane
Install a proper substrate next: lay cement backer board or an uncoupling membrane to create a stable, water-resistant base for your tile.
Choose backer board for rigidity or a membrane to prevent movement transfer.
Cut to fit, dry-fit panels, and bond per manufacturer instructions.
Leave recommended gaps at edges, seal seams later, and make certain the surface is flat, clean, and ready for waterproofing.
Ensure proper screw patterns and joints treatment
While your backer board or membrane provides the base, you’ve got to fasten and seal it correctly to keep water out and prevent tile movement.
Screw pattern: follow manufacturer spacing, stagger screws and avoid over‑driving.
Tape and thinset joints or use approved waterproof tape and sealant on seams.
Seal screw heads with waterproof caulk or patching compound to guarantee a continuous, bonded barrier.
Apply waterproofing membrane (Step 4)
Now you’ll apply the waterproofing membrane, starting with taping and sealing all seams and corners so water can’t find a way through.
Use either a liquid membrane applied in two even coats with specified drying times and coverage, or a sheet membrane bonded with the correct adhesive and overlapped per manufacturer instructions, making sure overlaps are firmly fixed.
Check coverage rates and cure times before tiling so each layer is fully dry and continuous.
Taping/sealing seams and corners
Taping and sealing seams and corners is where your waterproofing membrane truly earns its keep—these are the spots water will exploit first, so you’ll want a tight, continuous barrier.
Clean and dry joints, apply waterproof tape or fabric into corners, press firmly, smooth out wrinkles, then seal tape edges with compatible sealant or membrane.
Check for gaps and reinforce stressed areas.
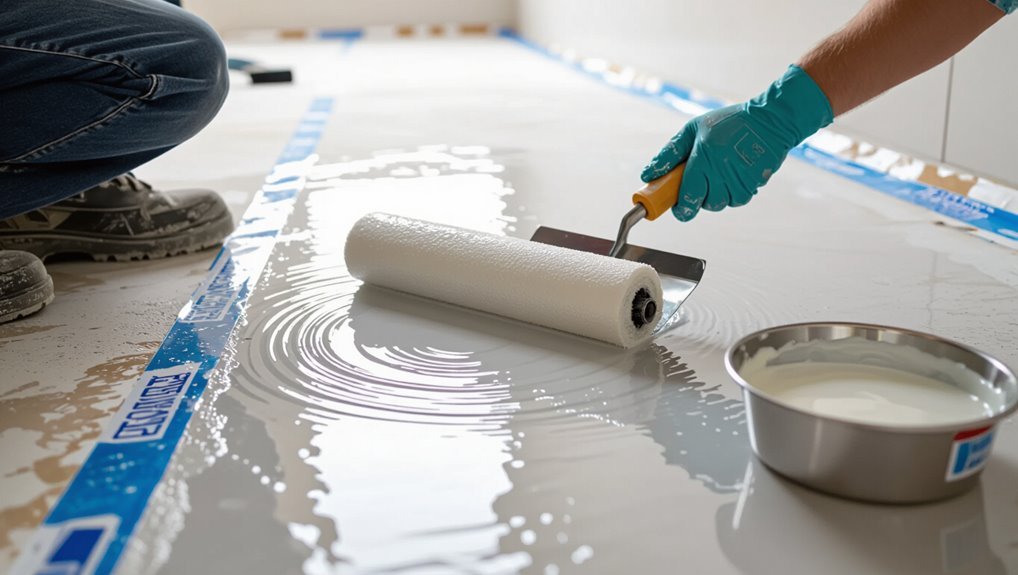
Applying liquid membrane coats, drying times, coverage
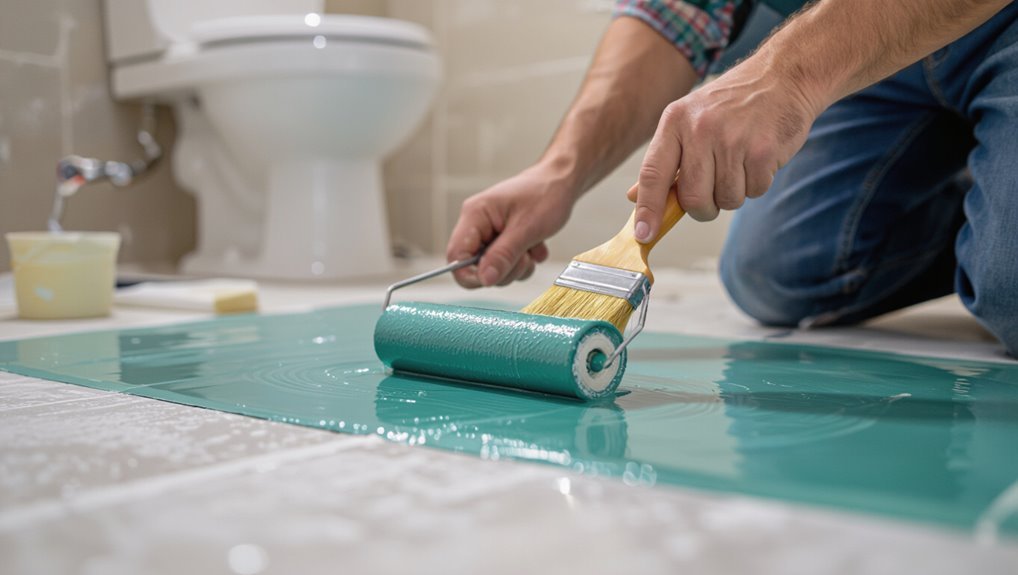
Start by stirring the liquid membrane thoroughly.
Then roll or brush a generous, even first coat onto the prepared floor, working from the far corner toward the exit so you don’t step on wet material.
Allow manufacturer-recommended drying time, usually 1–4 hours, before a second coat.
Apply a perpendicular second coat for full coverage, noting coverage rate per litre and temperature/humidity effects on cure.
Installing sheet membrane adhesives, overlaps, fixing
Lay the sheet membrane flat and smooth as you adhesive-bond it to the floor, working from the furthest corner toward the exit so you won’t trap air or walk on wet adhesive.
Use the manufacturer’s adhesive, roll firmly to eliminate bubbles, and overlap seams by the recommended width.
Fix edges with tape or sealant, trim excess, and allow curing before traffic or tiling.
Flashing around penetrations and perimeters (Step 5)
Now you’ll flash around all penetrations and perimeters to stop water at its most vulnerable points.
Focus on sealing drains, pipes, and the shower curb junctions with tight collars or preformed boots so nothing wicks underneath the membrane.
Make sure the membrane integrates cleanly with the drain system and any clamping rings or adapters to create a continuous, watertight seal.
Sealing drains, pipes, and shower curb junctions
Before you apply full-sheet membrane or liquid waterproofing, you’ll need to flash every penetration—drains, pipes, and the shower curb junction—so water can’t track underneath the membrane.
Clean surfaces, install preformed flashing or fabric-reinforced sealant, bed flange areas with thinset or mortar where required, and press membrane tight to fittings.
Tape seams, smooth wrinkles, and let cures follow manufacturer times before proceeding.
Integrating membrane with drain systems
Because the drain is the most likely place water will test your system, you’ll integrate the membrane tightly with the drain assembly so every joint is watertight.
Fit membrane over the clamping flange, trim neatly, then secure with the manufacturer’s ring or clamp.
Seal overlaps with compatible waterproofing tape or sealant, test drainage for leaks, and adjust fasteners to maintain continuous coverage.
Testing and cure time (Step 6)
Before you tile, you should run a flood (ponding) test to confirm the membrane holds water—fill the floor to a few inches and mark the level, then monitor for 24–48 hours for any drop.
While the test runs, do a visual inspection of seams, corners, penetrations, and drains for pinholes, missed coverage, or uncured areas.
Only proceed to tiling after the membrane passes the test and the manufacturer’s recommended cure time has fully elapsed.
Flood test / ponding test procedures and timing
Step 1: fill the waterproofed area and let it sit—this flood (or ponding) test checks for leaks and confirms the membrane cured properly.
Keep water at least 25 mm (1 inch) deep, barricade the space, and mark the level.
Wait 24–48 hours, then inspect surrounding rooms, drains, and joints.
If level drops, locate and repair leaks, then retest.
Visual inspection checklist before tiling
Now that your flood test has confirmed the membrane held, do a systematic visual inspection to catch any issues before you lay tile.
Check seams, corners, and junctions for pinholes, bubbles, or gaps.
Verify drain flange seal, slope toward drain, and full coverage up walls.
Confirm membrane cured per manufacturer, remove debris, and mark any repairs before tiling.
Tile installation over waterproofing (Step 7)
Now that your waterproofing is cured, you’ll choose adhesives and tile types that bond to the membrane—use manufacturer-recommended thinset or mastic for that system.
Follow grout and sealant recommendations to keep joints watertight and compatible with the waterproofing layer.
Finish with proper junction strips and expansion joints so tiles can move without breaking the seal.
Compatible adhesives and tile types
1 key decision before tiling is choosing adhesives and tile types that bond to your waterproofing system without compromising its integrity.
Use manufacturer-approved thin-set mortars or epoxy adhesives specified for your membrane. Porcelain, ceramic, and natural stone all work if adhesive compatibility is confirmed.
Avoid solvent-based glues or heavy uncoupling mats that aren’t rated for your waterproofing. Test adhesion where uncertain.
Grouting and sealant recommendations
Before you grout, make sure the waterproof membrane and tile adhesive have fully cured so you won’t trap moisture under the joints.
Use a grout rated for wet areas—epoxy or polymer-modified cement—and apply with a rubber float, packing joints firmly.
Wipe residue before it hardens.
After grout cures, seal porous grout with a compatible sealer and inspect edges for watertightness.
Transition strips and expansion joints
Changeover strips and expansion joints protect your tiled floor and waterproofing by accommodating movement where different materials meet or where large runs of tile end.
You’ll install metal or PVC junction strips at doorways and thresholds, and leave flexible expansion joints every 8–12 feet or where substrate changes.
Use silicone or movement-grade sealant, ensuring joints remain continuous through the waterproofing layer.
Common Mistakes and How to Avoid Them
Don’t skip substrate repairs or priming, because a weak base or poor adhesion defeats the whole system.
Check membrane overlaps and coverage, use compatible products, and tie the membrane into the drain while keeping a proper slope.
Finally, wait the full cure time before tiling—rushing this step causes failures down the line.
Skipping substrate repairs or priming
If you skip repairing damaged substrate or priming it, the waterproofing won’t bond properly and will fail sooner than you expect.
You must remove loose mortar, fix cracks, level hollows, and guarantee the surface is clean and dry.
Apply the manufacturer-recommended primer evenly; it promotes adhesion and seals porous areas.
Skipping these steps risks delamination and water damage beneath your tiles.
Incorrect membrane overlaps or insufficient coverage
When you overlap membranes incorrectly or leave gaps, water will find those weak points and seep beneath the system; that’s why precise overlap and full coverage matter.
Check manufacturer overlap specs, maintain consistent seam widths, and seal all joints with recommended tape or sealant.
Cover corners and connections thoroughly, extend membrane onto walls, and inspect for pinholes or missed areas before tiling.
Using incompatible products (adhesive vs. membrane)
Although it’s tempting to assume any tile adhesive will work over a waterproof membrane, mixing incompatible products can ruin the system: adhesives with solvents or incompatible chemistries can prevent proper bonding, break down membranes, or block their seals.
Always check manufacturer compatibility charts, use recommended adhesives or uncoupling systems, and test in a discreet area.
When uncertain, contact tech support.
Poor drain integration and inadequate slope
Because water always follows the path of least resistance, poor drain integration and inadequate slope are two of the fastest ways to defeat even a well-installed waterproofing system.
You must set a consistent slope (¼” per foot typical), tie membrane tightly into drain assemblies, and check connections.
Measure, mock up the drain flange, and test with water before tiling to prevent pooling and leaks.
Rushing cure times before tiling
If you rush cure times before tiling, you risk trapping moisture or disturbing a still-soft membrane, which can lead to tile bond failure, mold, or leaks down the line.
Wait the manufacturer’s full cure period, check ambient temperature and humidity, and avoid traffic.
Test adhesion if unsure.
Patience prevents costly repairs and preserves waterproofing integrity.
Best Practices and Pro Tips
Start by using a product selection checklist so you pick membranes, primers, and sealants that match your floor type and water exposure.
Schedule regular inspections and simple maintenance tasks to guarantee long-term performance, and factor those costs into your plan.
If the job looks complex, your timeline stretches, or you spot structural or persistent leak signs, hire a pro—those are clear red flags.
Product selection checklist
Choosing the right waterproofing products makes the difference between a short-term fix and a long-lasting floor system.
You’ll want compatible membrane type, substrate primer, appropriate sealants, and quality drain assemblies. Check VOCs, cure time, and warranty. Match products to tile and traffic.
- Compatible membrane and substrate
- Primer and adhesion properties
- Sealant type and joint flexibility
- Drain and flange compatibility
How to ensure long-term performance (maintenance, inspections)
Once you’ve picked compatible membranes, primers, sealants, and drains, you’ll need a practical maintenance and inspection routine to protect that investment and keep the system performing for years.
Check seals and grout quarterly, reseal grout annually, clear drains monthly, and watch for soft spots or odors.
Document inspections, fix small issues promptly, and schedule professional checks every few years for peace of mind.
Budgeting and time estimates for DIY vs. professional
How much should you expect to spend and how long will it take depends on whether you do the work yourself or hire pros:
A DIY waterproofing job can cut labor costs but usually adds time, requires tool purchases, and risks mistakes that may cost more later, while a professional gives speed, warranty coverage, and predictable scheduling at a higher upfront price.
Calculate materials, tools, and your hourly value; factor drying times and permits.
When to hire a pro red flags and complexity indicators
If your budget and schedule allow for professional help, it pays to know the clear signs that you should call a pro instead of tackling waterproofing yourself.
Hire a pro if you spot structural rot, uneven subfloor, previous leaks, complex drains or curbless showers, plumbing within the slab, or unclear local code requirements.
Also call one if you lack confidence or proper tools.
Cost, Tools, and Materials Checklist
Before you start, you’ll want a clear picture of costs by method and bathroom size so you can budget accurately.
Gather essential tools and PPE—gloves, knee pads, respirator, trowels, rollers—and list materials with quantities so nothing’s missed.
Use coverage calculators to convert square footage into the right amounts of membrane, primer, and sealant.
Estimated cost ranges by method and bathroom size
Because waterproofing methods and bathroom sizes vary widely, your costs can span a broad range — from a few hundred dollars for simple surface sealers in a small half-bath to several thousand for full-tile, membrane-backed systems in a large master bath. Estimate by method and size, plan for labor or DIY, and budget contingencies.
| Method | Typical cost |
|---|---|
| Surface sealer (half) | $100–$300 |
| Liquid membrane (full) | $200–$800 |
| Sheet membrane (medium) | $500–$1,500 |
| Full system (large) | $1,200–$4,000 |
Essential tools and PPE
Costs only tell part of the story; you’ll also need the right tools and protective gear to get the job done safely and effectively.
Gather essentials before you start so you work efficiently, avoid mistakes, and protect yourself from chemicals, dust, and sharp edges.
- Trowels, rollers, and seam rollers
- Waterproofing membrane and brush-on applicator
- Nitrile gloves and safety goggles
- Knee pads and a respirator
Materials quantities and coverage calculators
Calculate exactly what you need before you buy: measure the floor area, add allowances for shower curb, niches, and waste, and factor in overlap and product-specific spread rates so you don’t run short mid-job.
Use calculators or spreadsheets to tally membranes, thinset, primer, and sealant. Double-check manufacturer coverage figures and buy a small extra for mistakes.
- Waterproof membrane rolls
- Thinset mortar
- Primer/sealer
- Reinforcement tape
Comparison: DIY Waterproofing vs. Hiring a Professional
You can weigh DIY waterproofing against hiring a pro by comparing cost, time, and the skill required for a reliable job.
DIY can save money but risks mistakes; professionals cost more but bring experience, proper tools, and often warranties.
When considering a contractor, check references, licensing, and written guarantees so you know the work and warranty are verifiable.
Pros and cons of DIY
Although tackling bathroom waterproofing yourself can save money, it also demands time, skill, and the right tools, so weigh the trade-offs before committing.
You’ll gain control, flexibility, and lower costs if you follow instructions and accept a learning curve.
Risks include mistakes, warranty voids, and hidden damage.
Be honest about abilities, time, and willingness to research before starting the job.
Pros and cons of professional installation
When you hire a professional, you get seasoned expertise, reliable warranties, and faster completion—but that comes with higher upfront costs and less direct control over small decisions.
You’ll benefit from proper substrate prep, correct membrane installation, and code-compliant drains, reducing leak risk.
However, scheduling, contractor quality variance, and added labor expenses mean you’ll pay for peace of mind rather than just materials.
How to vet contractors and verify warranties
Because a bathroom waterproofing job hinges on proper technique and reliable coverage, vetting contractors and confirming warranty details should be your top priorities before hiring anyone.
Check licenses, insurance, and references; insist on written scope and materials.
Compare labor and product warranties, note exclusions and claim process, and get timelines.
Trust but verify.
- License and insurance
- Written scope
- Warranty terms
- References and photos
FAQ Common Questions About Waterproofing Bathroom Floors
You probably have specific questions like whether cement board alone protects the floor or if you can tile directly over a membrane.
You’ll also want to know how long to wait after a liquid membrane, whether waterproofing fixes mold from past water damage, and what warranties or certifications to look for.
Let’s answer these so you can pick the right materials and contractor.
Do I need to waterproof a bathroom floor if I use cement board?
Wondering if cement board alone keeps your bathroom floor waterproof?
Cement board resists moisture and provides a stable tile base, but it isn’t a waterproof barrier.
You should install a proper waterproof membrane or use waterproofing materials (liquid-applied or sheet membranes) over or under the cement board in wet areas.
That prevents moisture penetration into subfloor and framing, reducing mold and rot risk.
Can I tile directly over a waterproof membrane?
If you’ve installed a waterproof membrane over your subfloor or under your cement board, it’s natural to ask whether tile can go straight on top.
You can tile over many bonded membranes if the manufacturer permits and the surface is clean, dry, and appropriately textured.
Use a compatible thinset adhesive and follow warranty instructions; otherwise install uncoupling or cement backer board as directed.
How long should I wait before tiling after applying liquid membrane?
How long should you wait before tiling after applying a liquid membrane?
Wait until the membrane fully cures per manufacturer instructions—typically 24 to 48 hours for single coats, longer for multiple coats or cool, humid conditions.
Test tackiness; it must be dry, firm, and continuous.
Confirm any primer recommended is applied and curing times met before setting adhesive and tiles to guarantee proper bond and waterproof integrity.
Will waterproofing stop mold if there is existing water damage?
Can waterproofing by itself eliminate mold from existing water damage? No — waterproofing prevents future moisture but won’t remove mold or fix soaked materials.
You should locate and stop leaks, dry and replace affected drywall, subfloor, or insulation, and clean mold with appropriate cleaners or hire a remediation pro.
After repairs and drying, apply waterproofing to protect against recurrence.
What warranties or certifications should products/contractors have?
When you’re shopping for waterproofing products or hiring a contractor, look for clear warranties and industry certifications that guarantee performance and workmanship.
Verify product labels like ANSI A118.10, ASTM standards, or ICC evaluation reports.
Ask contractors for manufacturer-backed installation warranties, licensing, proof of insurance, and trade certifications (e.g., IICRC or local waterproofing trade groups).
Get terms in writing and confirm claim procedures.
