Do You Need Underlay With Laminate Flooring? Here’s the Truth
You should almost always use underlay with laminate flooring because it protects against moisture, evens minor subfloor imperfections, cushions impact, and reduces noise. It’s often required over concrete or in basements, and some manufacturers insist on it for warranty coverage. Choose foam, felt, cork, rubber, or peel-and-stick based on moisture control and sound needs, and follow proper laying and vapor-barrier techniques. Keep going to learn how to pick and install the right underlay for your project.
Quick Answer Do You Need Underlay With Laminate Flooring?
Yes—you usually need underlay with laminate to protect the floor, add comfort, and control moisture.
For below-grade basements use a moisture-barrier underlay, for soundproofing pick an acoustic underlay, and for radiant-heat systems choose a compatible, low-R-value underlay.
Follow the laminate maker’s recommendations to guarantee warranty compliance and best performance.
Short, actionable verdict for homeowners
You usually do need underlay with laminate flooring: it cushions, evens minor subfloor imperfections, reduces noise, and adds a moisture barrier if you pick the right type—so install underlay unless your laminate explicitly includes it or you’re laying over a perfectly flat, dry concrete slab with a built-in vapor barrier.
Verdict: buy compatible underlay, follow manufacturer instructions, and prioritize moisture protection and level subflooring.
One-line guidance for common scenarios (below-grade, soundproofing, radiant heat)
Need a quick rule for common cases?
Below-grade: always use a moisture-barrier underlay to block damp and protect laminate.
Soundproofing: choose dense acoustic underlay to reduce impact noise.
Radiant heat: use a thin, heat-compatible underlay rated for underfloor heating to maintain heat transfer and prevent expansion issues.
Follow manufacturer specs for compatibility and warranty coverage.
Basic Understanding What Is Underlay and Why It Matters
Underlay is a thin layer—usually foam, felt, or rubber—that you lay beneath laminate to protect and support the floor.
It acts as a moisture barrier, cushions impact, reduces sound, and adds some thermal insulation.
Because laminate is a floating, multi-layered board with a rigid core and thin wear layer, the right underlay helps the panels perform and last as planned.
Definition and common materials ()
Think of underlay as the unseen layer that cushions, levels, and insulates your laminate floor; it’s a thin sheet or roll placed between the subfloor and the flooring planks.
You’ll find common materials that suit different needs and budgets:
- Foam — affordable, lightweight.
- Felt — dense, durable.
- Cork — natural, resilient.
- Rubber — premium, long-lasting.
Functions of underlay: moisture barrier, cushioning, sound reduction, thermal insulation
Because your laminate sits above a subfloor that can be uneven, damp, noisy, or cold, a proper underlay performs four key jobs: it blocks moisture, cushions the planks, reduces impact and airborne sound, and adds thermal insulation.
You’ll prevent warp and squeaks, feel softer underfoot, cut noise transmission to rooms below, and keep floors warmer—making the installation last and feel better.
How laminate flooring is constructed and why underlay interacts with it
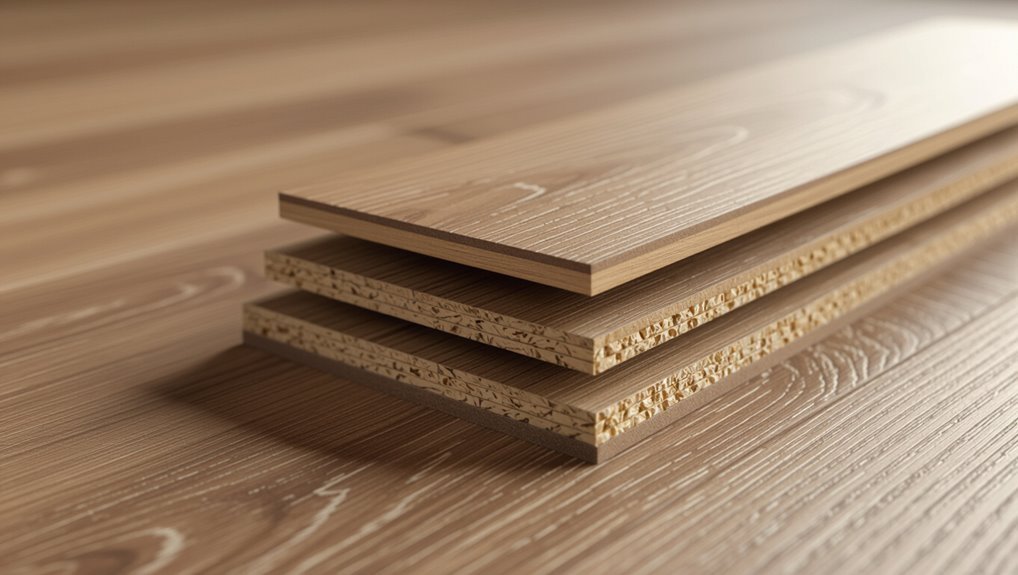
You’ve seen what a good underlay does; now look at how laminate itself is built so you can see why those functions matter.
Laminate has a wear layer, decorative layer, core (usually HDF), and backing. The rigid core needs flat, stable support; the backing balances moisture.
Underlay cushions, evens minor subfloor irregularities, blocks vapor, and reduces impact noise to protect the laminate.
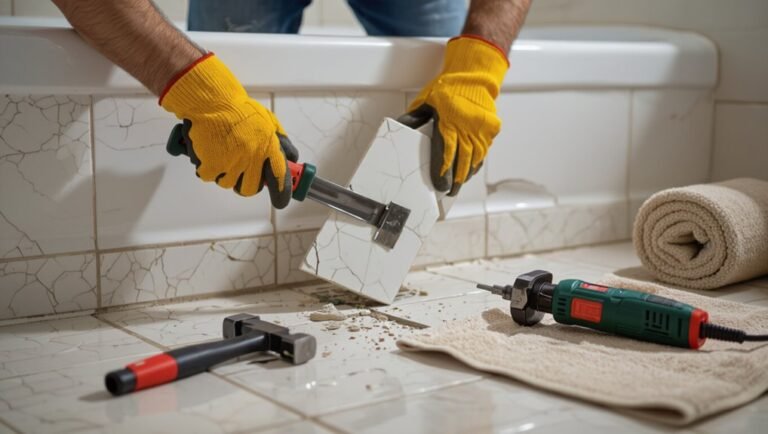
When Underlay Is Required vs Optional
You’ll need underlay in certain cases—like installing over a concrete slab, areas with moisture risk, or when your subfloor is uneven—to protect the laminate and control vapor.
In other situations, it can be optional, for example if there’s already an appropriate underlayment in place or you’re installing glued-down laminate.
Always check the manufacturer’s installation instructions and warranty requirements before skipping underlay.
Situations where underlay is essential (concrete slab, moisture risk, uneven subfloor)
When your subfloor is concrete, prone to moisture, or noticeably uneven, underlay isn’t optional — it’s essential to protect the laminate and guarantee a stable, long-lasting install.
You should always use a moisture barrier underlay on slabs, a cushioning underlay to hide minor irregularities, and denser underlay where movement or sound control matters.
Don’t skip it in these cases.
Situations where underlay can be optional (existing underlayment, glued-down laminate)
If your floor already has a proper underlayment or the laminate is being glued down, you can often skip an additional underlay; just confirm the existing layer provides moisture protection, cushioning, and flatness for the new product.
In other cases, you can omit underlay when installing over compatible, smooth surfaces or when the glue-down method secures stability and sound control without extra padding.
Manufacturer warranty and installation requirement considerations
Because manufacturers set specific installation requirements, skipping underlay can void your warranty unless the product explicitly allows it.
Check your flooring’s installation guide and warranty terms before you decide. If underlay is required, install the specified type and thickness to keep coverage valid.
When optional, document conditions and follow manufacturer-recommended alternatives to avoid disputes if issues arise later.
How to Choose the Right Underlay
First, assess your subfloor type—concrete, plywood, or OSB—to know what protection and moisture control you’ll need.
Next, identify performance needs like moisture barriers, sound rating, and thermal R-value, then match those needs to an underlay material (foam, rubber, cork, felt, or peel-and-stick).
Finally, check thickness and compressive strength specs and confirm the underlay is compatible with any radiant floor heating.
Step 1 Assess your subfloor type (concrete, plywood, OSB)
When choosing underlay, start by identifying what your subfloor is made of—concrete, plywood, or OSB—because each material affects moisture control, sound insulation, and cushioning needs differently.
You’ll inspect for dampness, flatness, and structural stiffness.
Choose compatible underlay based on that inspection to avoid problems later.
- Relief
- Confidence
- Security
- Pride
Step 2 Identify performance needs (moisture control, sound rating, thermal R-value)
Now that you know what your subfloor is made of and its condition, narrow down the underlay by the performance you need: moisture control, sound rating, and thermal R-value.
Decide if a vapor barrier is required for damp concrete, choose a sound rating that meets building or rental requirements, and pick an R-value that improves comfort without causing installation clearance issues.
Step 3 Match underlay material to needs (foam, rubber, cork, felt, peel-and-stick)
Once you’ve settled on the performance priorities, choose the underlay material that delivers them:
- foam for basic cushioning and cost-effectiveness,
- rubber for superior sound control and durability,
- cork for natural thermal and acoustic benefits,
- felt for heavy load distribution under floating floors, and
- peel-and-stick for built-in vapor barriers on concrete.
Pick based on room use, subfloor type, and budget—match function to material for best results.
Step 4 Check thickness and compressive strength specifications
After you pick the material, check its thickness and compressive strength to make sure it supports the floor’s performance goals.
Measure thickness against manufacturer limits—too thick can affect locking systems; too thin offers poor sound and thermal control.
Verify compressive strength for expected traffic and furniture loads.
Choose an underlay that balances cushioning with stability to prevent sagging and joint failure.
Step 5 Verify compatibility with radiant floor heating systems
How will your underlay behave with radiant heat? You’ll want an underlay labeled compatible with radiant systems and with low thermal resistance (R-value).
Check manufacturer specs for max surface temperature, moisture barriers, and adhesive recommendations. Improper underlay reduces heat transfer or causes overheating.
When in doubt, choose underlay specifically rated for electric or hydronic systems and follow both flooring and heating manufacturers’ installation guidelines.
Installation Overview and Step-by-Step Best Practices
Before you lay any planks, you’ll prep the subfloor by cleaning, leveling, and checking moisture so the underlay and laminate bond correctly.
When you roll out the underlay, overlap and tape vapor barriers properly and seal seams to prevent gaps, avoiding wrinkles or accidental double-layering.
Do a final check for flatness, secure tape, and continuous vapor protection before installing the laminate planks.
Pre-installation subfloor prep (cleaning, leveling, moisture testing)
Because a solid subfloor is the foundation of a long-lasting laminate installation, you’ll need to thoroughly clean, level, and test it for moisture before you lay any planks.
You’ll inspect, sweep, and vacuum debris, repair dips or high spots, and use a moisture meter to confirm safe levels.
Follow this checklist:
- Clean thoroughly
- Level surfaces
- Repair damage
- Test moisture
Laying underlay: seams, vapor barrier overlaps, and tape techniques
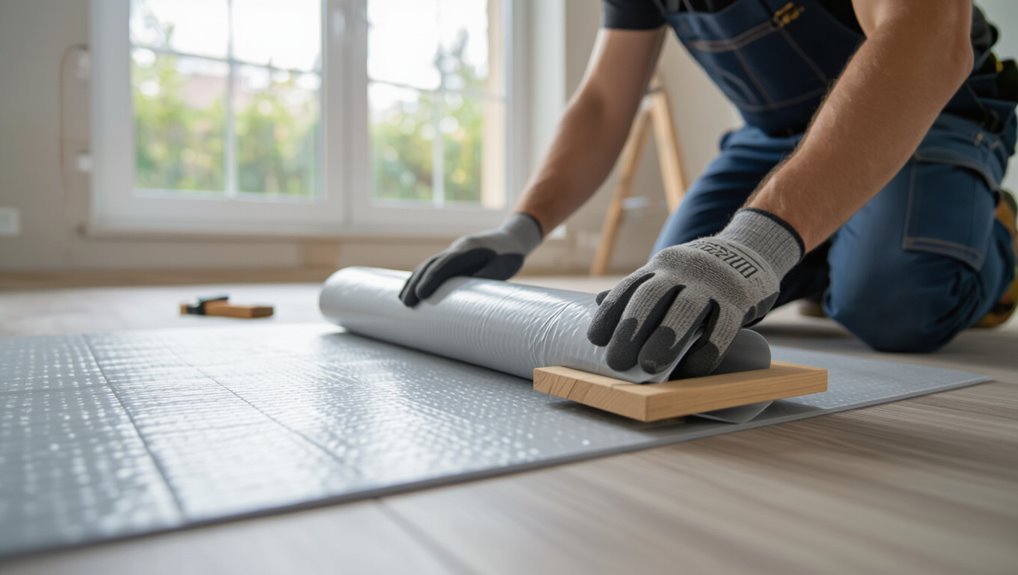
With the subfloor cleaned, leveled, and moisture-checked, you’re ready to lay the underlay and get the floor assembly airtight and even.
Roll or lay sheets parallel to the longest wall, butt seams tightly, and overlap vapor-barrier seams by 2–4 inches.
Use recommended waterproof tape to seal overlaps and perimeter edges. Trim neatly at walls and keep seams straight for a smooth laminate fit.
Common installation pitfalls to avoid (wrinkles, double-layering, improper taping)
When you lay underlayment, pay close attention to wrinkles, double-layering, and improper taping—those mistakes create uneven floors, trap moisture, and can void warranties.
Smooth wrinkles before you proceed, use a single continuous layer unless manufacturer allows otherwise, and tape seams correctly with recommended tape.
Inspect overlaps, avoid folding or creasing, and keep vapor barrier details consistent to prevent future issues.
Final checks before installing laminate planks
Before you click the first plank into place, run a final checklist to confirm subfloor flatness, underlayment integrity, and room conditions meet the manufacturer’s specs.
Check expansion gaps, door clearances, and plank orientation.
Verify moisture readings and adhesive or locking system compatibility.
Lay out starter rows to avoid awkward joints.
Keep tools, spacers, and trim nearby so installation proceeds smoothly and without delays.
Comparison of Popular Underlay Types
Now you’ll compare common underlays—foam, rubber, cork, and felt—looking at how they perform, how much they cost, and which gives the best sound and comfort.
You’ll also weigh moisture-barrier underlays against breathable options and explain when each is appropriate.
This comparison will help you pick the right underlay for your subfloor and climate.
Foam vs rubber vs cork vs felt performance and cost comparison
If you’re weighing underlay options, the most common choices—foam, rubber, cork, and felt—each balance cushioning, sound control, moisture resistance, and price differently, so pick the one that matches your floor’s needs and your budget. Choose foam for cost, rubber for sound, cork for durability, felt for affordability.
| Type | Performance | Cost |
|---|---|---|
| Foam | Basic cushioning | Low |
| Rubber | Excellent sound | High |
| Cork | Durable, natural | Medium |
| Felt | Good insulation | Low |
Moisture barrier underlays vs breathable underlays when to use each
Having picked the right material—foam, rubber, cork, or felt—you’ll next decide whether you need a moisture barrier or a breathable underlay.
Use moisture-barrier underlays over concrete or damp subfloors to block vapor and protect laminate.
Choose breathable underlays on wooden, well-ventilated subfloors to allow moisture escape and prevent trapped humidity.
Match underlay to subfloor and local humidity for best results.
Problems and Mistakes Homeowners Make (and How to Fix Them)
You might be making a few common underlay mistakes that shorten your floor’s life or void the warranty.
Skipping a vapor barrier on concrete, using underlay that’s too thick or soft, or ignoring manufacturer requirements can all cause moisture damage, instability, or denied claims.
The good news is there are targeted fixes—like adding a moisture mat, replacing problematic underlay sections, or using approved repair kits—that can often be done without ripping up the whole floor.
Mistake 1 Skipping vapor barrier over concrete and consequences
One common mistake homeowners make is skipping a vapor barrier over concrete before installing laminate; it may seem like an extra step, but moisture from the slab can warp planks, cause cupping, and ruin the floor’s locking system.
If you skip it, expect swelling, gaps, mold risk, and shortened lifespan.
Install a proper vapor barrier to protect your investment and preserve warranty coverage.
Mistake 2 Using too thick or too soft underlay causing instability
Pick an underlay that’s right for laminate thickness and subfloor type, because too thick or too soft underlay will make your floor feel spongy, flex at the joints, and stress the locking system.
Choose a firm, recommended-density underlay to maintain stability and alignment.
If you notice gaps, creaking, or uneven seams, replace the underlay with the correct spec before reinstalling boards.
Mistake 3 Not following manufacturer warranty requirements
If you skip the manufacturer’s installation and underlay requirements, you’ll likely void the warranty and lose recourse for defects or premature failures.
You should read and follow specs for underlay type, thickness, vapor barriers, and expansion gaps.
Keep installation records and receipts.
When you follow guidelines, you protect coverage and reduce dispute risk; ignoring them risks costly replacements you won’t be able to claim.
How to remediate existing issues without ripping up the floor
Following the manufacturer’s requirements protects your warranty, but you don’t always have to remove the entire floor to fix common issues.
You can replace individual planks, tighten or reattach loose thresholds, add underlay in problem areas after removing baseboards, and use moisture barriers where humidity caused cupping.
For scratches, sand and refinish compatible boards or use repair kits.
Test fixes in a small area first.
Tips and Best Practices for Longevity and Comfort
To keep your laminate lasting and feeling comfortable, focus on soundproofing upstairs or multi-family spaces with a quality acoustic underlay and proper seam sealing.
In cold climates or when using radiant heat, choose an underlay rated for thermal resistance and heat transfer to maintain warmth without harming the flooring.
Finally, protect both underlay and laminate with regular cleaning, moisture control, and prompt repairs to seams or damage.
Soundproofing tips for upstairs rooms and multi-family units
Want quieter upstairs rooms without tearing up the whole floor? Choose a quality acoustic underlay rated for impact and airborne noise, seal gaps at junctions and around pipes, and install perimeter foam to reduce flanking.
Add area rugs where traffic concentrates and use felt pads under furniture.
For multi-family units, follow local sound ratings and document products used to meet lease or code requirements.
Thermal comfort tips for cold climates and radiant heat integration
If you live in a cold climate or plan to run radiant heat, choose an underlay and installation approach that keeps warmth in while protecting the laminate—proper thermal insulation under the floor improves comfort, reduces energy use, and prevents temperature-related damage to the boards.
Use underlay rated for radiant systems, allow expansion gaps, follow manufacturer temperature limits, and add edge insulation to minimize heat loss and warping.
Maintenance recommendations to protect underlay and laminate
Because regular care preserves both the look and function of your floor, a few simple maintenance habits will protect the underlay and laminate for years.
Wipe spills immediately, use felt pads under furniture, and avoid dragging heavy items. Vacuum or sweep regularly to remove grit.
Keep indoor humidity between 35–55%. Inspect seams and thresholds periodically and replace damaged underlay or planks promptly to prevent moisture and wear.
Cost Considerations and ROI
You’ll usually pay anywhere from a few dollars to $50–$100 per room for underlay materials and basic installation, depending on quality and room size.
Choosing cheap underlay can cut upfront costs but may sacrifice noise control, comfort, and warranty protection compared with premium options.
In many cases a better underlay pays off over time through longer flooring life, reduced noise complaints, and small heating-cost savings.
Typical cost range for underlay materials and installation per room
Expect to spend roughly $30 to $150 per room for underlay materials and another $50 to $200 per room if you hire a professional to install it, depending on room size, underlay type, and local labor rates.
Factor in moisture barriers or soundproofing upgrades for specific needs.
Compare quotes, check warranties, and budget a little extra for trims or floor prep to avoid surprises.
Value trade-offs: cheap underlay vs premium underlay benefits
When weighing cheap underlay against premium options, think about more than upfront cost—you’re buying performance over the life of the floor.
Cheap underlay saves now but may compress, shift, or transfer imperfections, shortening laminate lifespan.
Premium underlay costs more but offers better cushioning, moisture protection, and stability, so you’ll avoid repairs and noisy floors.
Balance immediate budget with expected usage and traffic.
When underlay saves money long-term (warranty, noise reduction, energy savings)
Because underlay does more than cushion—it’s an investment in performance—you can recoup its cost through longer warranties, quieter rooms, and lower energy bills.
You’ll qualify for manufacturer guarantees, reduce sound transmission that improves resale appeal, and boost insulation to cut heating costs.
Choose the right underlay for your subfloor and climate to maximize lifespan, comfort, and long-term savings.
FAQ Common Questions About Underlay and Laminate Flooring
You probably have a few quick questions about underlay and laminate—like whether you need a vapor barrier, if you can skip underlay to save money, or whether it’ll make the floor feel spongy.
You’ll also want to know about special underlay for radiant heat and how long underlay lasts or if it can be replaced without ripping up the laminate.
I’ll answer each of these so you can pick the right option for your installation.
Do I need a vapor barrier under laminate flooring?
Wondering whether you need a vapor barrier under laminate flooring? You usually do on concrete slabs or in damp areas to block ground moisture that can warp or swell laminate.
Many underlays include a built‑in vapor layer; otherwise install a separate polyethylene barrier.
Over plywood or above-grade subfloors it’s often unnecessary, but check manufacturer guidelines and local humidity conditions before deciding.
Can I install laminate without underlay to save money?
Sure — but only sometimes.
You can skip underlay on perfectly flat, dry, and stable subfloors to cut costs, but you’ll lose moisture protection, sound reduction, and cushioning.
Savings may lead to clicks loosening, cold floors, or warranty voids.
If subfloor conditions aren’t ideal or manufacturer requires underlay, don’t skip it—installing proper underlay prevents problems and preserves performance.
Will underlay make my laminate feel spongy?
If your subfloor meets the conditions mentioned above, skipping underlay can save money—but many people worry it will feel spongy once they add one.
Underlay adds slight cushioning, but quality laminate and a firm underlay keep deflection minimal. Thin foam or cork won’t create a marshmallow feel; excessive thickness or poor subfloor support causes sponginess.
Choose compatible thickness and density.
Is special underlay required for radiant heating?
When you’re installing laminate over radiant heating, you do need an underlay that’s rated for use with radiant systems to guarantee proper heat transfer and prevent moisture or thermal damage.
Choose low-R-value, thin vapor-permeable underlay designed for heated floors.
Verify manufacturer compatibility with both your laminate and the heating system, follow installation temperature guidelines, and avoid insulating materials that reduce efficiency or trap heat.
How long does underlay last and can it be replaced without replacing laminate?
How long your underlay lasts depends on its material, installation quality, and exposure to moisture and traffic.
Typically, quality foam or cork lasts 20–30 years; cheap options fail sooner.
You can replace underlay without removing floating laminate if you lift planks carefully and retain locking profiles.
In glued or nailed floors you must remove and reinstall boards, so plan accordingly.
Conclusion Practical Decision Guide
Wrap up with a quick checklist you can use to decide if underlay is right for your floor and situation.
If your subfloor is uneven, you want sound or moisture control, or the laminate feels thin, you’ll usually want underlay.
Call a flooring professional when you’re unsure about subfloor issues, existing moisture problems, or warranty requirements.
Quick decision checklist for homeowners
Ready to make a clear call on underlay? Use this quick checklist to decide confidently:
- Is your subfloor uneven or concrete? Yes = underlay.
- Want quieter, warmer floors? Yes = underlay.
- Installing over existing flooring with moisture risk? Yes = moisture barrier underlay.
- Budget tight but priorities are comfort/durability? Invest in thin quality underlay.
Follow the checklist and choose with certainty.
When to consult a flooring professional

When should you call in a flooring professional?
Call a pro if subfloor issues, moisture problems, uneven surfaces, or complex room layouts exist.
Also consult one for warranty concerns, radiant heat systems, or if you’re unsure about underlay choices.
A pro prevents costly mistakes, guarantees proper installation, and gives tailored recommendations so your laminate performs and lasts as planned.