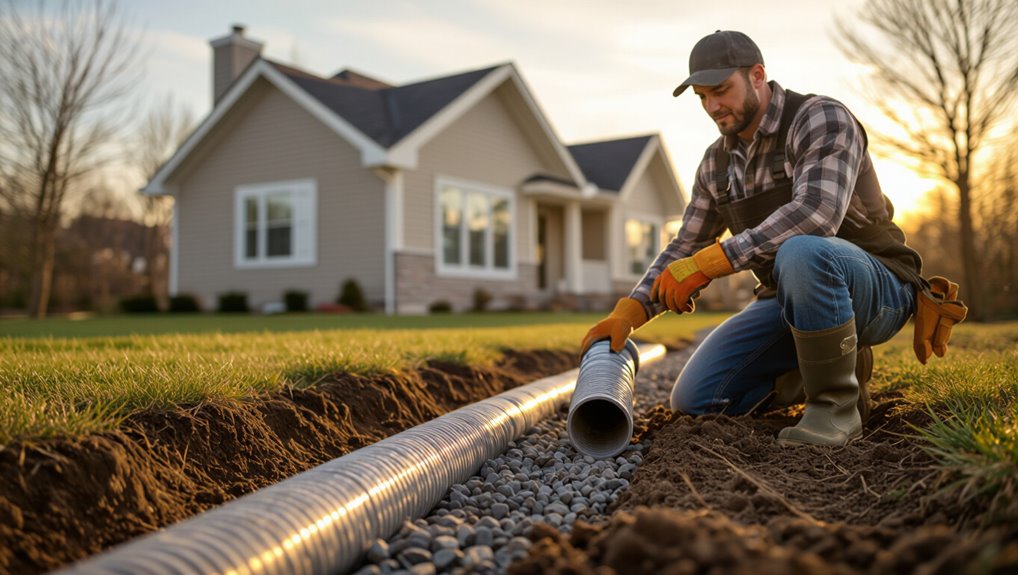
How to Install Drain Tile Around House for Effective Water Drainage
You’ll trench around the footing below the footing drain level, lay filter fabric and a bed of washed gravel, then place sloped perforated drain tile (minimum 1% fall) toward a daylight outlet, dry well, or sump with a discharge line; connect and seal couplers, backfill with more gravel, wrap the fabric to prevent clogging, and restore soil and grade away from the foundation. Follow codes, check utilities, and continue for step‑by‑step guidance.
Who This Guide Is For and What You’ll Learn
If you’re a DIY homeowner or a contractor tackling perimeter drainage, this guide gives clear, step-by-step instructions on planning and installing drain tile around a house.
You’ll learn who needs drain tile, key drain tile benefits, site assessment, tools, materials, safety, and practical installation tips.
You’ll get concise troubleshooting pointers and criteria for hiring pros when project complexity exceeds your skills.
Quick Overview: Drain Tile in a Minute
You’ve already seen who benefits from perimeter drainage and what you’ll learn; now get a one-minute snapshot of what drain tile is, why it works, and what installation looks like.
You’ll see common drain tile materials, trenching, gravel bedding, and perforated pipe placement.
Discover drain tile materials, trenching basics, gravel bedding, and correct placement of perforated pipe for reliable drainage.
Installation techniques focus on slope, filter fabric, and outlet connection.
You’ll grasp tasks, tools, and time needed to plan the job.
Why Perimeter Drain Tile Protects Your Foundation
You’ll see how perimeter drain tile stops soil from getting saturated by collecting excess groundwater before it soaks in.
That prevents buildup of hydrostatic pressure against your foundation walls.
Prevents Soil Saturation
Because waterlogged soil exerts constant pressure against your foundation, installing perimeter drain tile channels that moisture away and keeps the surrounding ground drier, reducing hydrostatic pressure and the risk of cracks or leaks.
You’ll see drainage benefits as the system lowers soil moisture, prevents saturation near footings, and directs runoff away. That protects structural stability and reduces mold risk in basements.
Reduces Hydrostatic Pressure
Keeping soil drier around your foundation not only reduces moisture but also lowers the hydrostatic pressure that pushes against basement walls and footings.
By installing perimeter drain tile, you’ll improve moisture control, prevent water buildup, and relieve lateral pressure on concrete.
That reduced hydrostatic pressure minimizes cracking risks and seepage, extending foundation life and lowering repair needs while keeping interior spaces drier.
Directs Water Away
Install perimeter drain tile to channel groundwater away from your foundation so it never pools against the walls or under the slab.
You’ll direct surface and subsurface flow into pipes that carry water to a safe discharge point.
These drainage techniques prevent saturation, reduce seepage, and maintain soil stability, giving reliable foundation protection and minimizing costly repairs over time.
Drain Tile vs. Surface Drains and Gutters
When you compare drain tile to surface drains and gutters, you’ll see drain tile excels at controlling subsurface water before it reaches your foundation.
Surface drains and gutters handle runoff and direct water away from the yard, but they won’t stop groundwater that seeps through soil.
You’ll want both systems working together so gutters manage roof runoff while drain tile protects the foundation from below.
Drain Tile Advantages
Longevity and reliability are what set drain tile apart from surface drains and gutters: it manages groundwater at the foundation level rather than just redirecting runoff, so you get consistent protection against basement seepage and hydrostatic pressure. You’ll see clear drain tile benefits in improved water management and lasting dryness.
| Secure | Calm | Confident |
|---|---|---|
| Relief | Safety | Pride |
| Dryness | Value | Peace |
Surface Drain Functions
Think of drain tile as a subsurface safety net while gutters and surface drains handle the visible runoff; both protect your foundation but work at different levels.
You’ll rely on surface drain installation to route puddles away and pair it with regular surface drain maintenance to prevent clogs.
Keep drains clear, check grates, and guarantee grading directs water into systems rather than toward your foundation.
Gutters Vs. Subsurface
Although both gutters and subsurface drain tile move water away from your house, they do it in very different ways and you should use them together for best protection.
You’ll rely on gutters for roof runoff and quick surface diversion, requiring regular gutter maintenance.
Subsurface drainage handles groundwater around foundations.
Use both: gutters reduce surface load while drain tile prevents basement seepage, giving extensive defense.
When to Install Perimeter Drainage
If your basement shows signs of dampness, water stains, or musty odors, install perimeter drainage as soon as possible to prevent worsening damage.
You should also plan it before major landscaping, grading, or exterior renovations so the system integrates properly with new elevations and hardscapes.
You’ll gain drainage system benefits by coordinating installation timing with projects.
Consider:
- Before grading changes
- Pre-hardscape work
- During foundation repairs
- Prior to landscaping
Signs You Need New or Upgraded Drain Tile
Not sure whether your drain tile needs replacing? Check for persistent basement dampness, new or worsening cracks, pooling water near foundations, or soggy landscaping after rain.
If older pipes crush or clog, or your sump runs constantly, it’s time to act.
Prioritize drain tile maintenance and consult installation tips to decide between repair, cleaning, or full replacement for reliable, long-term drainage.
How Soil Type and Water Table Affect Performance
You’ll want to match your drain tile plan to your soil’s permeability, since sandy soils drain quickly while clay holds water and clogs systems.
Check how high your water table sits because a shallow table can keep tiles submerged and reduce their effectiveness.
With those two factors in mind, you can choose pipe type, depth, and outlet location that’ll actually work.
Soil Permeability Impact
Because soil type and the depth of the water table control how quickly groundwater moves, they directly determine how well a drain tile system will perform.
You’ll assess soil texture to predict permeability and optimize drainage efficiency.
Consider these impacts:
- Sandy soils: fast percolation, quick relief
- Clay soils: slow flow, potential clogging
- Loam: balanced performance
- Compacted areas: reduced infiltration
Water Table Depth
Soil type sets the stage, but the depth of the water table determines how your drain tile actually performs.
You’ll assess water table fluctuations seasonally and after storms to set tile depth and slope.
In high water table areas you’ll place tile higher, add sump pumps, and improve groundwater management to prevent backup.
Proper planning keeps foundations dry and systems effective.
Check Local Code, Permits, and Setbacks
Before you dig, check local building codes, permit requirements, and setback rules so your drain tile project won’t run into legal or safety problems.
You should confirm local regulations and zoning laws, understand permit requirements, and respect setback regulations. Check with your municipality, utility maps, and homeowner association.
- Contact building department
- Review zoning laws
- Locate utilities
- Obtain permits
Planning the Drainage Route to the Low Point
You’ll first assess the property’s elevation to understand how water naturally flows.
Identify the existing low point where water collects so you can route the drain tile there.
Then plan the pipe slope carefully to maintain consistent downhill flow to that low spot.
Assess Property Elevation
When planning your drain tile, start by walking the perimeter and sighting the yard to find the natural downhill path—this lets you map the route water will follow to the low point and pin where the outlet must be.
Use elevation assessment for accurate drainage planning; note slope, high/low markers, soil type, and obstacles.
- measure fall
- mark stakes
- sketch grades
- note obstructions
Locate Existing Low Point
Now that you’ve mapped the yard’s grades and noted obstacles, locate the existing low point where surface water naturally collects or exits your property.
Walk the yard after rain, mark pooled areas and visible channels, and perform a quick drainage assessment to confirm patterns.
Trace water flow to the outlet—storm drain, ditch, or street—and note access, obstructions, and required permissions for routing drain tile.
Plan Pipe Slope
Before you dig, calculate a consistent downhill slope so water flows freely from foundation to the low point without pooling or washing out the trench.
You’ll perform slope calculation, mark grades, and set stakes to guarantee drainage efficiency.
Check these steps:
- Measure rise/run for target slope
- Use laser level or line level
- Maintain minimum 1% grade
- Recheck after backfill
Choosing an Outlet: Storm Sewer, Dry Well, or Daylight
Which outlet makes the most sense for your house? Consider outlet options like storm sewer tie‑in, dry well, or daylighted discharge.
You’ll weigh local code, property grade, soil absorption, and cost while prioritizing drainage effectiveness. Tie into storm sewer when allowed; choose a dry well for isolated absorption; use daylight if you can safely run water downhill without harming neighbors or foundations.
Calculating Slope and Fall for Reliable Flow
If you want reliable flow, calculate the fall so water always moves away from the foundation at a steady grade; aim for a minimum of 1% slope (1 foot drop per 100 feet) for perforated drain tile and increase to 2% where debris or heavy flow might clog the line.
You’ll perform slope calculation to guarantee flow efficiency. Consider:
- Use a level or laser
- Measure run and drop
- Check for sags
- Adjust grades as needed
Calculate Pipe, Gravel, and Labor Needs
First, measure the trench length around your foundation so you know how much pipe and gravel you’ll need.
Then calculate pipe runs and the cubic yards of gravel based on trench width and depth.
Finally, estimate labor hours by factoring trenching, bedding, laying pipe, backfilling, and cleanup so you can plan time or hire help.
Determine Trench Length
To figure out how much trench you’ll need, walk the perimeter of the house and mark where water collects, downspouts discharge, and basement walls show dampness. Measure those runs to calculate pipe length, gravel volume, and labor time.
Consider trench depth and trench width when planning.
- Note soil obstacles
- Include corners and downspouts
- Allow access points
- Estimate crew hours
Calculate Pipe And Gravel
Start by tallying the total linear feet of pipe you marked around the foundation. Then add extra for turns, drop sections, and cleanout access so you don’t come up short.
Calculate pipe sizing based on flow and slope, typically 4-inch perforated tubing.
For gravel selection, plan a 2–4 inch bedding and 6–12 inch surround.
Sum pipe, gravel volume, and materials for ordering.
Estimate Labor Hours
Estimate labor by breaking the job into tasks—trenching, pipe laying, gravel placement, backfill, and cleanouts—and assigning hours to each so you know who and how long you’ll need.
This lets you forecast labor cost and the project timeline accurately. Estimate per-task hours, add contingency, and multiply by crew size.
- Trenching
- Pipe laying
- Gravel placement
- Backfill and cleanouts
Types of Drain Tile: Perforated, Corrugated, PVC
There are three common drain-tile options you’ll encounter: perforated pipe, corrugated pipe, and PVC; each has different costs, durability, and installation needs.
You’ll find perforated pipes let water in along a trench, often paired with gravel.
Corrugated systems are lighter, cheaper, and flexible for curves.
PVC is rigid, durable, and cleaner to join, but usually costs more upfront.
Picking Pipe Size and Wall Thickness
Most installations use 4-inch or 6-inch drain pipe, so choose the smallest diameter that will handle peak flow and fit easily in your trench.
Consider pipe material and wall thickness to balance durability and cost considerations.
Focus on installation techniques that maximize drainage efficiency and simplify maintenance tips.
Environmental impact matters too.
- Durability vs. price
- Flow capacity
- Ease of install
- Long-term upkeep
Why Filter Fabric Matters and Which Type to Use
Because fine soil and silt can quickly clog pipe and gravel, you should wrap your drain tile in a proper filter fabric to keep the drainage path open; doing so extends service life and reduces maintenance. You’ll pick among filter fabric types (woven, nonwoven, specialty) based on permeability and durability. Installation benefits include reduced clogging, easier upkeep, and longer system life.
| Woven | Nonwoven | Specialty |
|---|---|---|
| Durable | High permeability | Reinforced |
| Reusable | Good for silts | Heavy-duty |
| Cost-effective | Flexible | Long-life |
Choosing Washed Gravel Size and Quantity
Pick washed gravel that balances drainage, stability, and cost—typically 3/4-inch crushed stone works well for standard perimeter drain tile because it resists compaction, allows water to flow freely, and keeps soil from migrating into the pipe.
You’ll consider gravel types and gravel drainage capacity, estimating quantity by trench volume and compaction allowance.
- Calculate trench cubic feet
- Allow 10% extra for compaction
- Use uniform 3/4″ stone
- Buy from reputable supplier
When to Use a Sump Pit and Which to Pick
If your basement collects water faster than your perimeter drain can carry it away, you’ll need a sump pit to give that excess a controlled place to go.
Choose based on capacity, shape, and pump compatibility; compare pedestal vs. submersible sump pit types.
Plan sump pit installation where drains converge, guarantee proper depth and discharge routing, and include a reliable float switch and check valve.
Tools You’ll Need for Trenching and Pipe Work
Before you start digging, gather the essential hand tools like shovels, a trenching shovel, a tape measure, and a pick.
Decide whether you’ll rent a trencher or use a mini-excavator based on trench length and soil conditions.
Have pipe fitting supplies ready—PVC or corrugated pipe, couplers, glue, and sealant—so you can assemble the system without delays.
Essential Hand Tools
When you’re digging and laying drain tile, having the right hand tools makes the job faster and keeps your work neat and safe.
Bring measuring tape, a digging shovel or gravel shovel, a drain level, trench rake, safety gloves, pipe cutter and utility knife.
Use landscape fabric and drainage stakes to secure, protect, and align the system.
- Measuring tape
- Pipe cutter
- Trench rake
- Utility knife
Trenching Equipment Options
You’ll need the right trenching equipment to move soil efficiently and lay pipe consistently—choices range from simple hand tools to rented walk-behind trenchers and mini-excavators depending on trench depth, soil type, and how much ground you’re covering. Choose equipment types by soil conditions, balance trenching techniques, trenching safety, project efficiency, and excavation costs.
| Type | Best use |
|---|---|
| Hand tools | Small, shallow |
| Mini-excavator | Deep, rocky |
Pipe Fitting Supplies
After trenching is underway and your pipe route is cleared, gather the fittings and tools that’ll make installation accurate and fast.
You’ll need supplies matched to pipe types and proper installation techniques to avoid leaks and rework.
- PVC couplers and elbows
- Correct sealant and primer
- Pipe cutter and deburring tool
- Shims, clamps, and grade level stakes
Safety Gear and Precautions Around Foundations
Before you dig, suit up with PPE and check the site for hazards: wear a hard hat, steel-toe boots, gloves, eye protection, and a dust mask or respirator for airborne particles, and bring hearing protection for power tools.
Use appropriate safety equipment, shore trenches, and maintain safe distances from foundation walls to protect foundation stability.
Monitor footing, work with a partner, and keep first-aid nearby.
Locate and Avoid Underground Utilities Before Digging
Because striking a buried utility can shut down services or injure someone, locate and mark all underground lines before you dig.
Because hitting a buried utility can cause outages or harm, always locate and mark underground lines before digging.
Use utility mapping services and call 811 for precise info. Prioritize digging safety and inspect site maps.
Follow these steps:
- Contact local one-call center
- Request utility mapping records
- Visually confirm markings
- Use safe hand-digging near marked lines
Marking and Measuring Your Trench Line Accurately
Start by laying out a clear line where the trench will run, marking the edge of the excavation and the pipe centerline so you’ll maintain consistent depth and slope.
Use string lines, batter boards, spray paint, and stakes for precise trench layout. Measure intervals, record elevations with a line level or laser, and apply simple marking techniques to guarantee straight runs and uniform gradient before digging.
Trenching Methods: Hand vs. Mini-Excavator
You can dig your trench by hand for tight spots and lower cost, but it’s slower and more physically demanding.
A mini-excavator speeds the job and guarantees consistent depth, though it costs more and needs room to operate.
We’ll compare when each method makes sense so you can pick the right tool for your site.
Hand Trenching Pros & Cons
When weighing trenching methods for your drain tile project, hand trenching offers simple control and low equipment cost but demands more time and physical effort than using a mini-excavator.
You’ll weigh hand trenching benefits against hand trenching challenges and decide based on access, budget, and stamina.
- Precise around landscaping
- Low rental cost
- Slower progress
- Physically taxing
Mini-Excavator Advantages
If hand trenching gives you control near plants but wears you out, a mini-excavator speeds the work and handles tougher soil with far less labor. You’ll appreciate mini excavator efficiency and faster excavation speed for long runs, precise depth, and reduced back strain.
| Power | Precision | Speed |
|---|---|---|
| Compact | Adjustable | Rapid |
| Stable | Consistent | Efficient |
How Deep and Wide to Dig Your Drain Tile Trench
Dig a trench deep enough to move water away from your foundation and wide enough to install the pipe, gravel, and fabric without compacting the backfill.
Use proper trench dimensions and efficient digging techniques to guarantee slope and clearance.
Dig the trench to proper dimensions and use efficient techniques to ensure correct slope and clearances.
Consider:
- Depth: below footing drain level
- Width: allow gravel plus pipe
- Slope: 1% minimum
- Access: for pipe placement and inspection
Protecting the Foundation and Footing During Excavation
After you’ve set trench depth and slope, take steps to shield the foundation and footing from collapse, water, and vibration damage during excavation.
Use shoring, temporary bracing, and gentle equipment to limit disturbance. Divert surface runoff, install temporary drains, and monitor for movement.
Follow proper excavation techniques, keep soils stable, and prioritize foundation protection to prevent undermining and costly repairs.
Prepping the Trench Bed for Consistent Pipe Bedding
Before laying pipe, prepare a smooth, level trench bed that gives the tile continuous, uniform support; remove large rocks and roots, loosen compacted zones, and bring the bottom to the designed slope using hand tools or a small plate tamper so the bedding material will settle evenly beneath the pipe.
You’ll focus on trench preparation and bedding consistency:
- Remove debris and sharp stones
- Check and correct grade
- Compact selectively, not overdo
- Keep bed uniform before pipe placement
Laying Filter Fabric Correctly to Prevent Clogging
Make sure the filter fabric overlaps the seams by at least 12 inches and runs the length of the trench so water flows through the fabric instead of around it.
Position the fabric with the woven side facing the soil and the nonwoven side toward the pipe if the manufacturer specifies orientation.
Secure the fabric with stakes or staples every few feet and tape seams so it won’t shift during backfill.
Proper Overlap And Orientation
When you lay filter fabric, orient and overlap the sheets so water flows freely into the pipe while keeping soil out; place each new piece upstream of the next (overlapping by at least 6–12 inches) so runoff moves across the fabric seams instead of forcing soil through them.
Use proper drainage techniques and effective installation methods:
- overlap downhill to shed water
- stagger seams for strength
- keep overlaps straight
- inspect seams before backfill
Securing Fabric Against Movement
Those overlaps and staggered seams won’t help much if wind, backfill, or foot traffic shifts the fabric and opens gaps where soil can intrude.
You’ll anchor edges with staples or sod pins, secure overlaps with landscape tape, and maintain consistent fabric tension management so the cloth stays taut.
Use anchoring intervals and inspect after backfill.
These fabric installation techniques prevent clogging and keep drains working.
Placing Gravel Bedding and Checking Slope Before Pipe
Start by spreading a 2–3 inch layer of washed gravel along the trench bottom so the pipe rests on a firm, even bed; this cushion prevents point loads and helps maintain slope.
Start with a 2–3 inch layer of washed gravel so the pipe rests on a firm, even bed.
You’ll check slope calculations and choose gravel types suited to drainage.
Then:
- Tamp gravel evenly
- Verify 1%–2% grade with a level
- Remove high spots
- Add more gravel as needed
Proper Placement and Connection of Perforated Drain Tile
Set your perforated drain tile at the correct depth and slope so water runs away from the foundation without pooling.
You’ll connect it to downspouts with adapters or catch basins to keep roof runoff out of the trench.
Make tight, sealed joints with couplers and glue or rubber seals so the system stays watertight.
Tile Depth And Slope
Place the perforated drain tile at a depth that keeps the pipe below the foundation footing’s level of saturation—typically 6 to 12 inches below the footing or at the footing base—so water running along the soil profile reaches the pipe before it can infiltrate your basement wall; maintain a consistent slope of about 1/8 to 1/4 inch per foot toward the outlet to guarantee gravity moves water away without relying on pumps.
- Confirm slope with string level
- Use clean gravel for bedding
- Protect pipe with geotextile fabric
- Inspect joints for leaks
For tile installation, you’ll monitor slope and bedding to ascertain drainage effectiveness.
Connection To Downspouts
When you tie downspouts into your perforated drain tile system, position the connection so water from the roof is diverted onto the gravel bedding just upslope of the pipe rather than directly over a joint; this prevents concentrated flow from washing out bedding and guarantees the runoff enters the trench evenly.
Use a rigid adapter or solid pipe to make durable downspout connections that route roof runoff into the drainage system.
Joining And Sealing Joints
After routing roof runoff onto the gravel bedding, you’ll turn your attention to joining and sealing the perforated drain tile so every connection stays watertight and aligned.
You’ll check joint integrity, choose sealant options, and guarantee proper overlap. Follow these steps:
- Clean and dry pipe ends
- Use gasketed couplers or solvent weld
- Apply exterior-rated sealant
- Test for leaks before backfilling
Gluing or Coupling PVC Runs and Making Watertight Joints
Cut the PVC cleanly, chamfer the edges, and dry-fit each section to verify alignment before you glue or couple them.
Use proper pipe adhesion techniques—apply primer, then solvent cement for permanent bonds.
For removable runs, use mechanical couplings or rubber-sleeve adapters.
Inspect and test joints, wipe excess cement, and consider additional joint sealing options like silicone or butyl tape where movement or minor leaks might occur.
Integrating Sump Basins and Pumps Into the System
1 clear decision you’ll make is whether to route your drain tile to a sump basin or to a daylight outlet.
If you choose a sump, you’ll need to size and position it to handle peak inflow, allow easy pump access, and tie in the incoming drain-tile lines so water funnels efficiently into the basin.
Consider:
- sump basin integration location
- sump pump selection criteria
- battery backup options
- float switch placement
Tying Into Storm Drains or Municipal Systems Safely
If you decide not to rely on a sump—or want to supplement it—you may route drain tile into a municipal storm system, but you’ll need to follow local codes, obtain any permits, and confirm the outlet can accept the additional flow.
Coordinate with authorities, tie your drainage system to approved inlets, avoid illegal connections, install backflow prevention if required, and document compliance for proper stormwater management.
Backfilling: Gravel Cover, Fabric Wrap, and Soil Replacement
After you lay the drain tile and check the slope, cover the pipe with 2–4 inches of clean, coarse gravel to protect it from crushing and to promote rapid water flow.
Then wrap that gravel-pack in a permeable geotextile to keep fine soil from clogging the voids before you replace the excavated soil to grade.
You’ll then:
- Choose proper gravel selection for permeability.
- Guarantee fabric installation overlaps.
- Compact soil in lifts for soil compaction.
- Grade for erosion control and drainage maintenance.
Restoring Landscaping and Hardscapes After Installation
With the soil compacted and the surface graded, you’ll turn your attention to restoring the yard and any hardscape affected by excavation.
After compacting and grading, begin restoring the yard and any hardscape disturbed by the excavation.
For landscape restoration, replant turf, shrubs, and topsoil, matching original grades and irrigation.
For hardscape repair, reset pavers, edging, and walkways, compacting base materials and sealing joints.
Finish with mulch and spot watering to settle plants and prevent erosion.
Testing the System: Water Flow and Clog Checks
Now that the drain tile’s in, you’ll run a steady stream of water through the line to confirm flow.
Watch outlet points and cleanouts while the water’s moving to spot any slow spots or backups.
If you see pooling or sluggish flow, clear the clog with a snake or flush until the line runs freely.
Run Water Through Line
Turn on a steady stream of water and watch how it moves through the drain tile to verify flow and spot any clogs.
You’ll assess water flow and drainage efficiency by observing speed, sound, and exit points.
Check these quickly:
- Note flow rate visually
- Listen for gurgles or stalls
- Inspect discharge area
- Time water clearing to confirm performance
Inspect For Clogs
Grab a garden hose and walk the length of the drain tile while you test for clogs; you’ll look for slow spots, gurgling sounds, or backups that indicate blockages. Use simple inspection techniques: flush sections, probe with a snake, and note flow rates for clog detection.
| Location | Observation |
|---|---|
| Corner A | Clear |
| Corner B | Slow |
| Downspout | Gurgle |
| Outlet | Backup |
Seasonal Maintenance Tasks for Drain Tile
In spring and fall you should inspect and maintain your drain tile to prevent clogs, freeze damage, and water intrusion; a quick seasonal routine keeps the system working and avoids costly repairs.
Follow a simple maintenance schedule and perform seasonal inspections to catch issues early.
Stick to a simple maintenance routine and seasonal checks to catch problems before they grow.
- Clear debris from gutters and downspouts
- Check outlet discharge points
- Verify slope and soil drainage
- Test sump and backup systems
How to Clear Blockages and Inspect Pipe Condition
Start by locating and removing debris from access points and cleanouts so water can flow freely.
Then inspect the pipe for cracks, crushed sections, or root intrusion that could cause recurring blockages.
If you find damage, repair or replace the affected section to prevent further problems.
Locate And Remove Debris
Walk the trench and scan the exposed pipe for obvious obstructions like roots, silt piles, or collapsed sections before you begin clearing; you’ll save time and avoid worsening hidden damage by knowing what you’re up against.
Identify debris types and plan debris removal. Then clear gently with appropriate tools and dispose offsite.
- Roots and vegetation
- Sediment and silt
- Construction waste
- Small collapses and gravel
Inspect Pipe For Damage
Now you’ll inspect the exposed drain tile closely for damage and blockages so you can decide the right repair method.
You’ll run a camera or rod through the pipe, clear roots and sediment, and note collapsed sections.
Record pipe integrity findings and perform a damage assessment.
Replace crushed or heavily cracked runs; patch minor holes.
Recheck flow to confirm repairs restored proper drainage.
Common Mistakes That Cause Drain Tile Failure
When drain tile fails, it’s usually because of avoidable mistakes made during planning or installation; common errors like poor grading, inadequate pipe bedding, clogged filter fabric, or incorrect outlet placement cut short the system’s effectiveness.
You should avoid these pitfalls during drain tile installation and prioritize drainage system maintenance.
- Poor site grading
- Improper pipe bedding
- Skipped filter fabric
- Wrong outlet positioning
Cost-Saving Strategies Without Sacrificing Durability
You can save money by using recycled materials like clean crushed concrete for backfill and reclaimed gravel for drainage layers, as long as you confirm they’re free of contaminants.
Focus on labor efficiency by planning trenching and material staging to cut crew hours without rushing critical steps. Those moves keep costs down while maintaining a durable drain tile system.
Use Recycled Materials
A smart way to cut costs on drain tile is to use recycled materials that still meet performance needs; you’ll get reliable drainage without paying full price for new components.
You can source reclaimed pipe and gravel, and choose eco friendly options that perform.
Consider:
- Reclaimed PVC pipe
- Crushed concrete for bedding
- Salvaged perforated pipe
- Recycled fabric filter
Prioritize Labor Efficiency
Plan tasks to minimize crew hours and keep costs down without cutting corners on durability.
You’ll schedule work in logical stages, assign skilled teams, and use labor saving techniques like modular assemblies and pre-cut pipes.
Choose efficient materials that speed installation—lightweight pipe, snap-fit fittings—and train crews on best practices so you save time and money while maintaining a long-lasting drain tile system.
When to Hire a Pro: Red Flags for DIY Limits
If your yard shows signs of chronic water intrusion, or the project’s scope exceeds your experience, it’s time to call a pro.
You’ll avoid DIY challenges and large cost implications when professionals do complex grading or utility work.
Look for these red flags:
- unclear grading or hidden utilities
- persistent basement seepage
- lack of proper permits
- risk of critical mistakes without Professional assessments
DIY vs. Contractor-Installed: Tradeoffs to Consider
When weighing drain tile options, you’ll want to balance cost, skill level, and long-term reliability so you don’t trade short-term savings for bigger problems later.
You’ll weigh DIY challenges like permits, excavation, and material choices against contractor benefits: faster installation timelines, expertise for complex project scope, and warranty-backed work.
Compare cost comparisons, labor considerations, and long-term maintenance needs before deciding.
How to Get Accurate Quotes and What to Ask Contractors
How do you get quotes that actually reflect the scope of work and let you compare bids side-by-side?
Ask clear questions, request written estimates, and verify contractor credentials and references. Confirm the project timeline and materials.
Ask clear questions, get written estimates, and verify credentials, references, timelines, and materials before hiring.
Use this checklist to compare bids:
- Detailed scope and line-item pricing
- Materials and drain tile specs
- Start/end dates and milestones
- References and proof of past work
Warranties, Permits, and Insurance Considerations
Because drain tile installation affects your home’s structure and long-term costs, you should pay close attention to warranties, permits, and insurance before work begins.
Verify warranty coverage details, document exclusions, and get written guarantees.
Confirm the permit process with local authorities and make sure contractors meet insurance requirements.
Clarify liability concerns, request certificates of insurance, and include warranty terms in your contract to protect yourself.
Low-Impact and Eco-Friendly Perimeter Drainage Options
If you want a perimeter drainage system that protects your foundation without harming the yard or nearby ecosystems, consider low-impact, eco-friendly options that prioritize stormwater management and soil health.
You’ll use sustainable materials and green landscaping to reduce runoff and support biodiversity.
Consider:
- French drains with recycled aggregate
- Rain gardens at downspouts
- Permeable walkways
- Native-plant swales
Combining Exterior Drain Tile With Interior Waterproofing
While low-impact exterior solutions like recycled-aggregate French drains and rain gardens keep water away from your yard, combining exterior drain tile with interior waterproofing gives you a layered defense against moisture intrusion.
You’ll get drain tile benefits plus targeted interior waterproofing techniques—sump pumps, sealed joints, and vapor barriers—that manage both groundwater and condensation.
Coordinate contracts, inspect seams, and maintain drainage for long-term protection.
Troubleshooting Persistent Water Near Foundation Corners
When you keep finding water pooling at foundation corners, focus first on the obvious causes—blocked gutters, downspouts discharging too close to the wall, uneven grading, or clogged corner drains—because those problems are often the easiest to fix and will tell you whether you need more extensive work.
When water pools at foundation corners, start with the obvious: gutters, downspouts, grading, and clogged corner drains.
Check foundation drainage, soil erosion, landscape impacts, and apply drainage solutions.
- Inspect gutters and downspouts
- Regrade low spots
- Clear corner drains
- Review installation techniques and maintenance tips for DIY troubleshooting
Choosing Materials for Freeze-Thaw Climates
Because freeze-thaw cycles put extra stress on drainage systems, you’ll want materials that resist cracking, heaving, and frost damage—think frost-rated perforated pipe, coarse washed gravel, and geotextile fabric that stays permeable in cold, wet conditions.
Choose frost resistant materials, add rigid insulation under slabs or beside pipe runs, and slope bedding to prevent ice lensing. Use durable fittings and UV-stable covers.
How to Monitor Your Drain Tile Over Time
How often should you check your drain tile? You should schedule routine drain tile maintenance and seasonal inspections to catch clogs or shifts early.
Inspect visually, listen for changes, and log findings.
- Check after heavy rain
- Inspect in spring and fall
- Clear surface debris monthly
- Note flow changes and odors
Act promptly on issues to prevent foundation problems.
Where to Find Local Codes, Tool Rental, and Product Specs
Before you dig in, check local building codes, rental options, and product specifications so your drain tile install meets requirements and uses the right tools and materials.
Contact your municipal building department for local building codes and compliance requirements.
Visit big-box stores for product specifications and manufacturer websites for datasheets.
Compare rental options at hardware stores or tool centers, and document permits before work begins.
Frequently Asked Questions
Can Animal Burrows or Roots Damage Drain Tile Over Time?
Yes — you’ll see animal impact and root intrusion gradually damage drain tile; burrows can collapse bedding and roots can infiltrate joints or perforations, so you’ll need barriers, regular inspections, and prompt repairs to prevent failure.
Can I Install Drain Tile on a Sloped or Tiered Lot Without Regrading?
Yes — you can. Picture water finding its downhill path like a ribbon; you’ll adapt drain tile materials to each run, mind slope considerations, use stepped trenches, catch basins, and daylight outlets so you won’t need full regrading.
Will Drain Tile Installation Affect My Property’s Resale Value?
Yes — improving drainage benefits usually boosts resale value by preventing water damage and basement issues, and buyers will appreciate documented repairs; just keep permits, warranties, and quality installation records to maximize buyer confidence and marketability.
Can Solar or Geothermal Systems Conflict With Drain Tile Placement?
Yes — and like two dancers sharing a stage, they can clash; you’ll need to coordinate solar panel positioning and geothermal system integration with drain tile routing, avoiding footing conflicts and preserving access for maintenance and inspections.
How Do Tree Removal or Planting Plans Impact Long-Term Drainage?
Tree removal or planting plans impact long-term drainage by altering tree growth and root patterns; you’ll change soil absorption, potentially clogging or exposing drain tile, so plan placements and species to protect drainage and encourage proper infiltration.
Conclusion
Think of drain tile as a moat you build around your home’s castle. By guiding water away, it turns storms into harmless visitors instead of invaders—soil settles, paint stays bright, and basements breathe. You’ve learned where and when to dig, what materials to choose, and how to keep the moat flowing. Maintain it like tending a garden: check, clear, and repair, and your foundation will stand strong through every season.