How to Install Linoleum Flooring on Concrete the Right Way
You can install linoleum directly over clean, dry, level concrete if you test for moisture, repair cracks, and smooth the surface first. Acclimate sheets or tiles 48–72 hours, plan seams to minimize visibility, and use the manufacturer-recommended adhesive with the correct trowel notch. Roll seams and allow proper cure time (24–72 hours) before heavy use. Follow good cleaning and moisture-control practices, and keep going for detailed prep, adhesive choices, and troubleshooting tips.
Quick Answer Can You Install Linoleum on Concrete and How Long Does It Take?
Yes — you can install linoleum directly over concrete as long as the slab is clean, level, and dry.
Expect a straightforward DIY job to take a weekend for a small room, while larger areas or extra prep (like patching cracks or applying a moisture barrier) can add a day or more.
I’ll outline the key prep steps and realistic time estimates next.
Short summary of feasibility and estimated time
If your concrete floor is clean, dry, and level, you can install linoleum directly over it with the right underlayment and adhesive; the job usually takes a weekend for a single room — roughly 4–10 hours for prep and installation, plus drying time for any adhesive.
Follow these steps for how to install linoleum flooring on concrete:
- Inspect and repair cracks.
- Clean and dry thoroughly.
- Lay underlayment.
- Apply adhesive and set sheet.
Basics What Is Linoleum and Why Choose It for Concrete Floors?
Linoleum is a natural sheet or tile flooring made from linseed oil, cork dust, wood flour and pigments, and it comes in resilient, durable grades suited for different rooms.
You’ll weigh its benefits for concrete—like longevity, breathability and ease of adhesion—against drawbacks such as sensitivity to moisture and the need for a smooth, level subfloor.
Before you start, gather the right tools and materials (adhesive, seam sealer, trowel, roller, underlayment and moisture testing kit) so the installation goes smoothly.
What linoleum is (materials, durability, types)
Think of linoleum as a resilient, eco-friendly sheet or tile flooring made from natural materials—primarily linseed oil, cork or wood flour, resins, and a jute backing—that’s designed to stand up to heavy use on concrete surfaces.
You’ll find smooth, marbled, and patterned surfaces; thickness and wear layers affect longevity. Properly maintained, linoleum resists dents, scratches, and moisture when sealed correctly.
Advantages and disadvantages for concrete subfloors
Because concrete is common in basements and commercial spaces, choosing linoleum for those floors makes sense: it bonds well to smooth, level concrete, handles heavy foot traffic, and provides a warm, cushioned surface that’s more comfortable underfoot than bare slab.
You’ll enjoy durability, low maintenance, and good moisture resistance, but watch for surface imperfections, high moisture levels, and potential adhesive or subfloor prep needs.
Tools and materials overview
Before you start, gather the right tools and materials so the job goes smoothly: you’ll need flooring-grade linoleum rolls or tiles sized for your space, a moisture-rated adhesive formulated for concrete, a long-handled trowel with the correct notch, a heavy-duty utility knife, a measuring tape and chalk line, a straightedge or J-roller for pressing seams, and safety gear like knee pads and gloves.
- Linoleum and adhesive
- Cutting and measuring tools
- Rollers and straightedges
- Safety and prep supplies
Assessing Your Concrete Subfloor Before Installation
Before you lay linoleum, inspect the concrete for moisture, vapor issues, levelness, cracks, and surface contaminants.
You’ll want to run a moisture test (calcium chloride or relative humidity) when the slab’s history or visible signs suggest excess moisture.
Based on those results and the floor’s flatness, decide whether to use glue-down, floating, or loose-lay installation.
Inspecting for moisture and vapor issues
If your concrete subfloor holds moisture, your new linoleum won’t last, so you need to test and address vapor issues before you lay anything down.
Check relative humidity with a probe or do a simple calcium chloride test.
Identify high readings, locate water sources, and let concrete dry or install an appropriate vapor barrier or moisture mitigation system before proceeding with adhesive or flooring.
Checking levelness, cracks, and surface contaminants
When the slab’s moisture is under control, check that the concrete is flat, free of major cracks, and clear of oils, paint, or loose debris so your linoleum will adhere and lie smooth;
use a straightedge to find high or low spots, mark and fill cracks with a suitable patch, grind away contaminants, and sweep and vacuum thoroughly so the adhesive bonds uniformly and the sheet lays without telegraphing.
When to use a moisture test (calcium chloride, RH)
How do you know whether a moisture test is necessary? You should test when concrete is new (under 28 days), shows efflorescence, or previous moisture issues existed.
Use calcium chloride for surface vapor emission and in-situ relative humidity (RH) probes for internal moisture.
Follow manufacturer limits for linoleum and adhesive.
Repeat tests after repairs or humidity changes to guarantee a safe installation environment.
Deciding between glue-down, floating, or loose-lay linoleum
Before you choose glue-down, floating, or loose-lay linoleum, evaluate the condition of your concrete subfloor so you can match the installation method to its moisture, flatness, and surface strength.
If moisture is high or surface weak, avoid direct glue-down. Use floating for minor irregularities and easy removal.
Choose loose-lay for stable, flat, low-moisture slabs and quick installation.
Preparation Steps Getting Concrete Ready
Before you lay linoleum, you’ll need to thoroughly clean and degrease the concrete so adhesives bond properly.
Patch cracks and holes, level low spots, and choose a moisture mitigation method—sealant, vapor barrier, or damp-proofing—if the slab shows dampness.
Finish by priming and applying a smoothing compound to create a flat, stable surface for the flooring.
Cleaning and degreasing the surface
Scrub the concrete thoroughly to remove dirt, grease, and oil that can prevent good adhesion; use a stiff brush and a degreaser formulated for concrete, working in small sections and rinsing well so contaminants don’t spread.
After rinsing, let the slab dry completely, then vacuum or wipe away residue.
Repeat degreasing for stubborn stains until the surface is visibly clean and dry.
Repairing cracks, holes, and leveling low spots
Once the slab is clean and dry, you’ll need to address any cracks, holes, or low spots so the linoleum can lay flat and bond properly.
Open cracks with a chisel, remove debris, then fill with concrete patch or epoxy repair compound.
For low areas, apply a polymer-modified self-leveling compound per instructions.
Sand cured patches smooth and vacuum before adhesive or underlayment.
Moisture mitigation options (sealants, vapor barriers, damp-proofing)
When concrete sits damp, you’ll need to stop moisture before laying linoleum to prevent adhesive failure and mold.
Choose between surface sealers, sheet vapor barriers, or liquid-applied damp-proofing based on slab condition and local moisture levels. Test moisture first.
Use breathable surface sealers for mild dampness, durable sheet membranes for high vapor, or a liquid damp-proof coating for irregular surfaces—follow manufacturer cure times and overlap details.
Priming and applying smoothing compound
Prime the slab and skim any irregularities so your linoleum lays flat and the adhesive bonds consistently.
Clean thoroughly, let the surface dry, then apply a concrete primer to improve adhesion.
Mix a self-leveling smoothing compound per instructions, pour and spread to fill low spots, and use a gauge rake or trowel for evenness.
Allow full cure before installing flooring.
Step-by-Step Installation Guide
Start by acclimating your linoleum and planning the layout so seams fall in low-traffic areas.
Cut and dry-fit sheets or tiles, then apply the correct adhesive with the recommended trowel size and open time.
Set the flooring, roll seams, and finish by welding or sealing them for a watertight result.
Step 1 Acclimating linoleum and planning layout
1. You’ll acclimate linoleum by unrolling or stacking sheets in the installation room for 48–72 hours so materials match temperature and humidity.
Measure the space, note doorways, vents and high-traffic zones, then plan seam locations to minimize visible joins and waste.
Sketch layout, allowing extra at edges for trimming, and mark reference lines to guide precise placement during installation.
Step 2 Cutting and dry-fitting sheets or tiles
Lay out your linoleum sheets or tiles and measure each run carefully before cutting, since precise fits at walls, doorways, and fixtures save time and material later; mark cuts with a straightedge, snap chalk lines, and cut with a utility knife or fine-tooth saw.
Dry-fit pieces, trim as needed for seams and around obstacles, and guarantee patterns align before proceeding to adhesive.
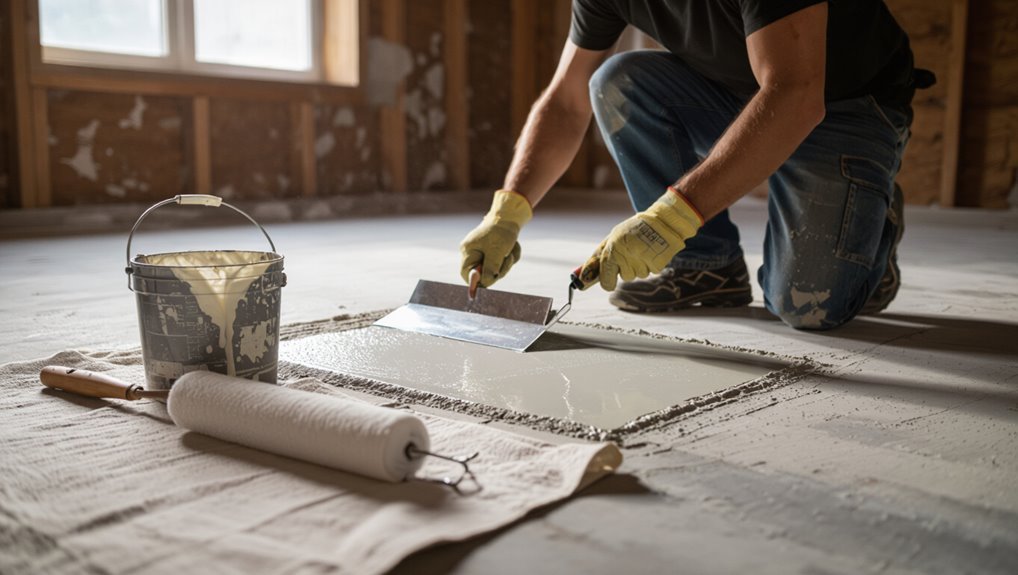
Step 3 Applying adhesive (type, trowel size, open time)
With your pieces dry-fitted and pattern seams checked, you’re ready to apply adhesive.
Choose a recommended pressure-sensitive or acrylic adhesive for concrete; check manufacturer specs.
Use the trowel notch size they specify—commonly 1/16″ x 1/32″ U-notch for sheets, larger for tiles.
Maintain the adhesive’s open time and work in manageable sections so it remains tacky but not skin‑formed.
Step 4 Setting the linoleum and rolling seams
Start by positioning each sheet or tile over its adhesive bed so seams line up precisely and any pattern repeats match.
Press material into place, smoothing from center outward to expel air. Use a 100–150 lb roller, making two passes perpendicular to each other.
Trim excess at edges, clean adhesive squeeze-out promptly, and check seams for tight contact before proceeding.
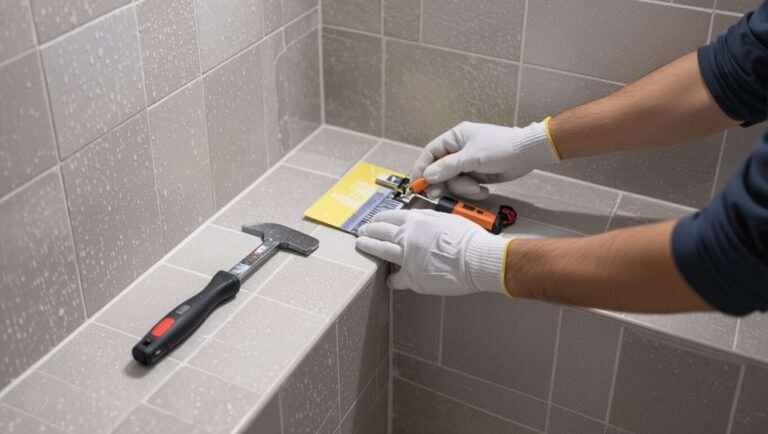
Step 5 Welding or sealing seams for a watertight finish
Weld or seal the seams carefully to create a watertight finish that protects the floor from moisture and dirt.
Use a hot air welder or solvent seam sealer depending on your linoleum type. Run the weld rod slowly, keep consistent heat, and trim the bead flush once cooled.
Clean residue and inspect joints for gaps, repairing any imperfections before traffic or moisture exposure.
Step 6 Trimming edges, installing transition strips and baseboards
Trim the excess linoleum flush to the walls and doorways, then fit threshold strips and reinstall baseboards to finish the job.
Use a straightedge and sharp utility knife for clean cuts, leaving a 1/8″ gap under baseboards for expansion.
Dry-fit metal or vinyl joining strips, secure them per manufacturer’s instructions, then reinstall or caulk baseboards for a neat, professional appearance.
Step 7 Curing time and initial care
Although the adhesive may feel dry to the touch, you’ll need to let the floor cure fully before heavy use; follow the adhesive manufacturer’s recommended wait time (usually 24–72 hours).
Keep foot traffic light, and avoid moving furniture or rolling casters across the surface during this period.
After curing, slowly reintroduce furniture with felt pads, clean with a damp mop and pH-neutral cleaner, and monitor seams for any lifting.
Alternative Methods and Comparisons
Now that you’ve seen the basic installation, let’s compare glue-down, loose-lay, and floating linoleum so you can pick the best fit for your room and skill level.
You’ll also weigh sheets versus tiles and consider vinyl alternatives for cost, durability, and ease of replacement.
I’ll highlight the main pros and cons so you can decide quickly and confidently.
Glue-down vs. loose-lay vs. floating linoleum pros and cons
When choosing between glue-down, loose-lay, and floating linoleum, consider how much prep, permanence, and DIY skill you want—glue-down offers the most secure, long-lasting bond but needs careful subfloor prep; loose-lay is quicker and repair-friendly for smaller rooms; and floating systems give easier installation and underfloor access at the cost of slightly more movement and seams.
| Choice | Feeling |
|---|---|
| Glue-down | Confident |
| Loose-lay | Relieved |
| Floating | Flexible |
| Your pick | Satisfied |
Linoleum sheets vs. linoleum tiles vs. vinyl alternatives
If you’ve weighed glue-down, loose-lay, and floating systems, the next decision is material: linoleum sheets, linoleum tiles, or vinyl alternatives—each has different costs, durability, and installation quirks.
Sheets give seamless coverage and fewer seams but need precise cutting and adhesive.
Tiles simplify repairs and layout but show grout lines.
Vinyl is cheaper, easier to install, and less eco-friendly; choose by budget and lifespan.
Common Problems During and After Installation and How to Fix Them
You’ll likely run into issues like bubbles, ridges, or wrinkles from poor acclimation or improper rolling, and you’ll want to know how to smooth and re-secure those areas.
If edges lift or adhesive fails, you’ll need to clean, reapply the right glue, and clamp or weight the seams until they set.
Moisture can cause adhesive breakdown or discoloration, so test and remediate dampness first, and repair surface damage or stains with approved cleaners and patching as needed.
Bubbles, ridges, and wrinkling causes and remediation
Although properly laid linoleum can look seamless, bubbles, ridges, and wrinkles often show up from a few predictable causes—poor acclimation, trapped moisture, inadequate adhesive coverage, or movement in the subfloor.
You should smooth small bubbles by rolling toward edges, pierce and press out air for larger ones, allow proper acclimation, fix moisture sources, and re-roll with a weighted roller.
Adhesive failure and edge lifting fixes
When adhesive fails and edges lift, linoleum can curl, catch dirt, and shorten the floor’s life, so you need to diagnose the cause quickly and act decisively.
Check for improper adhesive, cold seams, or insufficient trowel coverage.
Reclean surfaces, roughen edges, apply recommended adhesive, press and roll seams, and weight edges until cured.
Trim ragged edges and re-seal junctions for durability.
Moisture-related failures and remediation steps
If moisture gets into or under linoleum—whether from a damp subfloor, high humidity, or a plumbing leak—you’ll see cupping, adhesive failure, staining, or mold growth.
So act quickly to find and fix the source before repairing the flooring.
Dry the area, use a moisture meter to confirm levels, repair leaks, improve ventilation, replace compromised underlayment, and only reinstall when concrete meets manufacturer moisture specs.
Discoloration and surface damage repair options
Address discoloration and surface damage promptly to prevent small stains or scuffs from becoming permanent problems.
Clean with a pH-neutral cleaner, then spot-treat stains using manufacturer-recommended compounds.
For minor scratches, buff and apply a linoleum-safe polish.
Replace sections if burns or deep gouges occur.
Test repair methods in an inconspicuous area first, and always follow safety and warranty guidelines.
Best Practices and Pro Tips for a Durable Installation
To make your linoleum last, you’ll want simple moisture-control steps and a routine maintenance plan that stops problems before they start.
Use the right tools and materials—quality adhesive, a good seam roller, and a sharp utility knife—whether you’re a pro or a DIYer.
Finally, follow long-term care: clean with recommended products, refinish when needed, and protect high-traffic areas to preserve the floor.
Preventive tips for moisture control and maintenance
Because linoleum reacts to moisture, you’ll want to control humidity and water exposure from the start to keep your floor durable and stable.
Use a vapor barrier underlay, seal perimeter joints, and slope nearby surfaces away from the slab.
Wipe spills promptly, use mats at entrances, maintain indoor humidity between 30–50%, and inspect seams periodically to catch moisture issues before they cause damage.
Tool and material recommendations for professionals and DIYers
Controlling moisture and maintaining seams sets the stage for installation, but having the right tools and materials will make the difference between a short-lived job and a durable, professional result.
You’ll need a moisture meter, floor scraper, primer/underlayment, trowel-sized adhesive, seam roller, straightedge, utility knife, heat gun for seams, and quality connection strips.
Invest in proper PPE and flooring adhesive recommended for concrete.
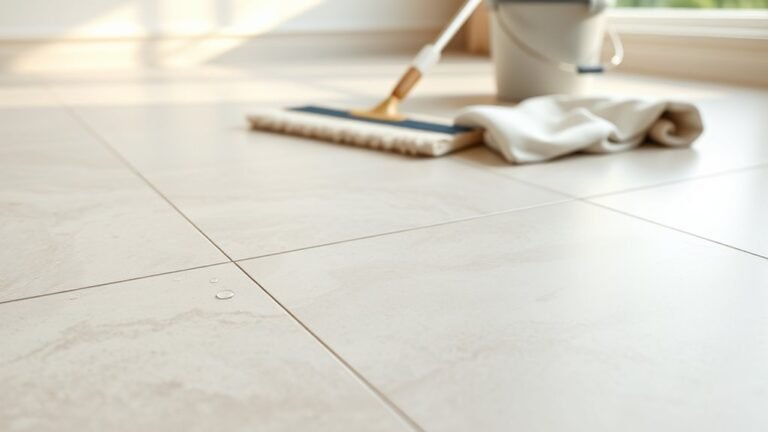
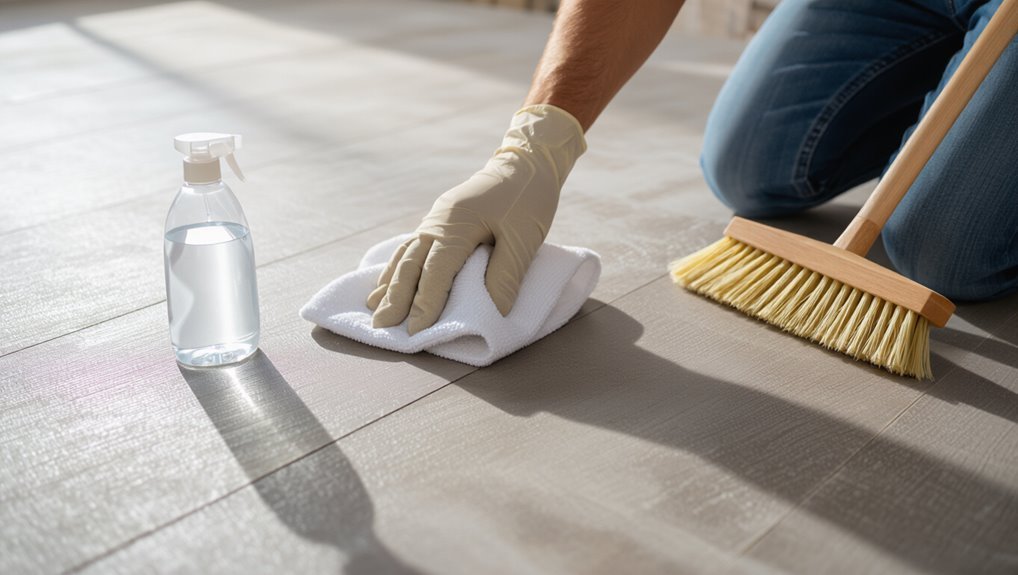
Long-term care: cleaning, refinishing, and protecting linoleum
1 simple routine will keep your linoleum looking new: clean gently, protect proactively, and refinish only when wear shows.
You should sweep or vacuum weekly, mop with pH-neutral cleaner, and blot spills immediately.
Use felt pads, rugs in high-traffic zones, and avoid harsh chemicals.
When scuffs or dullness appear, lightly abrade and apply a compatible finish or sealant per manufacturer instructions.
Cost, Time, and When to Hire a Pro
You’ll want a quick breakdown of material and labor costs so you can budget the job accurately.
Plan on time estimates for prep, installation, and finishing so there’s no surprises.
If your subfloor is uneven, the room is large or oddly shaped, or you lack tools/experience, you should hire a pro.
Estimated material and labor costs breakdown
Estimating linoleum costs comes down to three things: materials, labor, and whether you hire a pro—each affects your budget and schedule in different ways. You’ll pay per square foot for sheet or tile, plus adhesive and underlayment; labor varies by region and prep. Compare DIY vs pro before deciding.
| Item | Typical Cost | Notes |
|---|---|---|
| Linoleum | $1–$6/ft² | quality varies |
| Adhesive | $0.50–$1/ft² | |
| Labor | $2–$6/ft² | prep adds cost |
Signs the job should be done by a professional
If your subfloor is uneven, the room is large or oddly shaped, or you lack time and experience, hire a pro—these factors quickly drive up labor, extend the schedule, and increase the risk of costly mistakes.
Call a pro when moisture, major repairs, complex patterns, or strict warranties are involved. They’ll guarantee proper prep, adhesive selection, and a durable, warranty-compliant installation on schedule.
Step-by-Step Checklist for Installing Linoleum on Concrete
Before you start, check your concrete for moisture, cracks, and a level surface, and make sure you’ve got the right tools and materials.
On installation day, follow a clear sequence: acclimate and cut the linoleum, apply adhesive, and roll seams and edges.
Afterward, inspect seams, trim any excess, and follow curing and maintenance steps to protect your new floor.
Pre-installation checklist
Start by gathering everything you’ll need and verifying the concrete subfloor is ready: clean, dry, level, and free of cracks, oil, or loose debris.
Check moisture with a meter, confirm temperature and humidity, inspect for unevenness, and plan material layout.
Prepare:
- Moisture test and patching supplies
- Primer and adhesive
- Linoleum and underlayment
- Cutting tools and safety gear
Installation day checklist
1. On installation day, follow this concise sequence to stay efficient and safe.
- Clear room, remove debris, dry surface.
- Roll out linoleum, align pattern, trim excess.
- Apply adhesive per manufacturer, press and smooth seams.
- Weight seams, install threshold strips, clean tools and workspace.
Stick to timing and ventilation; don’t rush adhesive curing.
Post-installation checklist
Once the adhesive’s set and the seams are weighted, take a systematic walk-through to confirm the job’s sound: inspect seams and edges for gaps, remove temporary weights and any protective films, trim or fit junction pieces, and clean the surface with the manufacturer-recommended cleaner so you don’t damage the new floor.
Check thresholds, reattach baseboards, verify flatness, and note curing time before heavy use.
Frequently Asked Questions (FAQ)
You probably have practical questions before you start—like whether linoleum can go over old vinyl or sticky residue and how to tell if your concrete is too damp.
You’ll also want to know the best adhesive for concrete, whether linoleum works in basements or over radiant heat, and how long to wait before moving furniture back.
Read on for clear, actionable answers to each of these common concerns.
Can you install linoleum directly on old vinyl or adhesive residue?
If old vinyl or adhesive residue is present, you generally shouldn’t lay linoleum over it—you’ll want to remove the vinyl and scrape off adhesives first so the new floor can bond to a clean, flat surface.
Patch gouges, grind high spots, and use a solvent or adhesive remover for stubborn glue.
Prime and level concrete before installing linoleum to guarantee proper adhesion and a smooth finish.
How do I know if my concrete is too wet for linoleum?
How wet is too wet for linoleum?
You’ll want concrete with moisture below manufacturer limits—typically under 3 pounds per 1,000 sq ft/24 hours (ASTM) or less than 4% relative humidity (depending on test).
Use a calcium chloride or in-situ RH test to confirm.
If readings exceed limits, don’t install; dry, cure, or use a vapor barrier before proceeding.
What is the best adhesive for concrete and linoleum?
Which adhesive works best depends on the linoleum type and your concrete’s condition.
For sheet linoleum, use a pressure-sensitive acrylic or vinyl adhesive rated for resilient flooring.
For linoleum tiles, use a dispersion or modified acrylic adhesive.
Always choose products labeled for concrete, follow manufacturer trowel size and open time, and test a small area to confirm bond and compatibility before full installation.
Can I install linoleum in basements or over radiant heating?
Wondering whether linoleum can go in a basement or over radiant heating?
Yes—you can install linoleum in basements if moisture is controlled: use a vapor barrier, test concrete for dampness, and choose a moisture-tolerant adhesive.
Over radiant heating, use a compatible linoleum and follow manufacturer temperature limits, ramp heat slowly, and guarantee the subfloor and adhesive tolerate thermal movement to prevent buckling or adhesive failure.
How long before I can move furniture back onto the floor?
Once your linoleum is down and any adhesives or sealers have had time to cure, you can start thinking about moving furniture back in—just not immediately.
Wait at least 24–48 hours for standard adhesive; pressure-sensitive or solvent-based adhesives may need 72 hours.
Test a small area first, then replace lightweight items first, use felt pads under legs, and avoid dragging heavy pieces for a week.