How to Install Lifeproof Flooring: Tips for a Perfect Click-Lock Fit
You can get a perfect click-lock fit with Lifeproof flooring by prepping the subfloor, acclimating planks 48+ hours, and laying a straight starter line. Use spacers for expansion gaps, stagger end seams 6–8 inches, and click each plank together with a tapping block and mallet for tight seams. Check level and moisture, trim for doorways, and keep extra planks for repairs. Follow these basics and you’ll avoid common issues — keep going to learn step-by-step tips and tricks.
How to Install Lifeproof Flooring: Quick Answer and Overview
Yes—you can install Lifeproof click-lock flooring yourself with basic tools and careful prep.
This guide shows when DIY is appropriate, walks you through each step from acclimation to cutting and clicking boards together, and flags common pitfalls.
It’s written for handy homeowners and first-time installers who want clear, practical instructions.
Direct Answer Can you install Lifeproof click-lock flooring yourself?
Although you don’t need professional help for most installs, Lifeproof click‑lock flooring is designed so a competent DIYer can lay it yourself with basic tools and careful prep.
You’ll follow how to install lifeproof flooring by measuring, acclimating planks, underlayment, staggering seams, tapping joints, and trimming edges.
With patience and attention to layout and moisture control, you can complete a clean, durable floor.
What this guide covers and who it’s for
Now that you know Lifeproof click-lock flooring is a doable DIY project with the right prep, here’s what this guide covers and who it’s for:
It walks you step-by-step through planning, measuring and acclimating planks, choosing and installing underlayment, laying and tapping joints, trimming edges, handling thresholds and changes, and finishing touches.
You’ll get clear steps, tool lists, common fixes, and tips for confident installation.
Understanding Lifeproof Flooring Basics
Lifeproof flooring is a multi-layered, waterproof click-lock plank made from vinyl over a rigid core, and you’ll lock pieces together without glue or nails.
You’ll appreciate its scratch resistance and easy installation, though it can have limitations like less warmth underfoot and sensitivity to extreme temperature shifts at seams.
Consider room suitability and moisture — it’s great for kitchens and basements with proper subfloor prep, but check manufacturer guidelines for full wet-area use.
What is Lifeproof flooring? (materials, construction, click-lock system)
Think of Lifeproof flooring as a layered, waterproof plank designed for easy DIY installation: it combines a durable wear layer, realistic printed vinyl or wood-look surface, a rigid core (often SPC or WPC), and an attached underlayment, all held together by a click-lock system you snap into place.
You’ll handle lightweight, dimensionally stable boards that resist moisture, denting, and everyday wear while locking tightly without glue.
Benefits and limitations of Lifeproof click-lock planks
Although click-lock planks snap together quickly, they offer a mix of clear advantages and a few trade-offs you should weigh before installing them.
You’ll enjoy fast, glue-free installation, easy plank replacement, and stable floating floors that reduce noise.
However, seams can show if subfloor isn’t perfect, clicks may loosen over time, and repair options differ from glued or nailed systems.
Room suitability and moisture considerations
Those installation pros and trade-offs affect where you should lay the planks: click-lock floors work great in many living areas but you’ll need to match the product to each room’s moisture and traffic conditions.
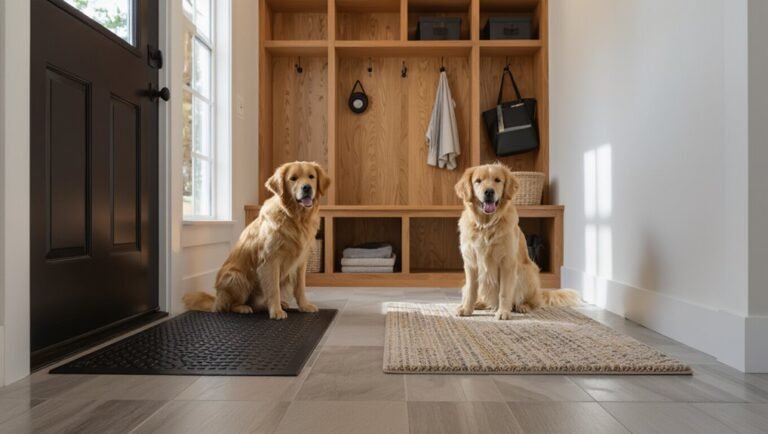
Choose waterproof or water-resistant Lifeproof for kitchens, bathrooms, basements, and entryways.
Maintain subfloor dryness, use proper underlayment, allow expansion gaps, and address spills quickly to prevent warping or mold.
Tools, Materials, and Preparation
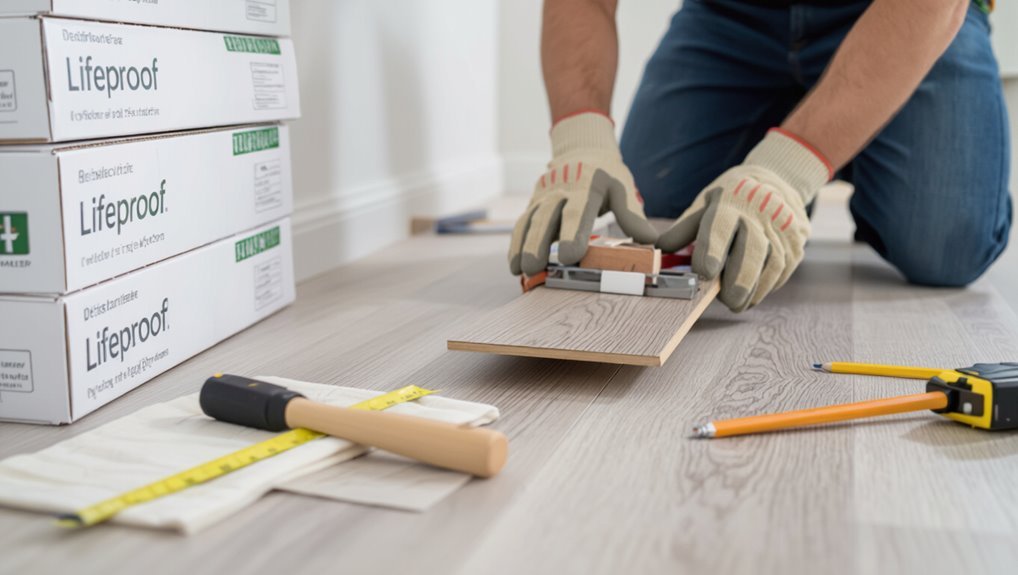
Before you start, gather the required tools and any optional extras—saws, tapping block, spacers, underlayment, connecting pieces, and trim—so you won’t stop mid-job.
Measure the room carefully and calculate materials with a waste factor to know how much flooring and accessories to buy.
Finally, inspect the subfloor for level, cleanliness, and moisture so you can address issues before installing.
Required tools and optional extras
When you’re ready to lay your Lifeproof flooring, gather the right tools and a few optional extras to keep the job smooth and fast: a tape measure, utility knife, T-square or straight edge, spacers, rubber mallet, pull bar, tapping block, jigsaw or circular saw for cuts, and underlayment where required; optional but helpful items include a flooring roller, knee pads, pry bar, and a chalk line.
- Inspect and measure accurately.
- Keep tools organized.
- Use protective gear.
- Test cuts and fit before final installation.
Materials and accessories to buy (underlayment, transition pieces, trim)
You’ve got your tools ready and measurements checked, so next pick up the materials and trim that’ll finish the job and keep the floor performing.
Buy Lifeproof-approved underlayment (moisture barrier or sound-reducing as needed), matching transition strips, reducer and stair nosing, quarter round or shoe molding, and adhesive or trim screws.
Keep extra planks for repairs and color match.
Measuring the room and calculating material needs (waste factor)
Start by measuring each room’s length and width with a tape measure and jotting those numbers down. If walls aren’t square, take several measurements at different points and use the largest.
Multiply length by width for area, add 5–10% for waste on straight runs, 10–15% for irregular layouts or diagonal installs.
Round up to whole boxes and buy an extra carton for repairs.
Subfloor inspection checklist (level, cleanliness, moisture testing)
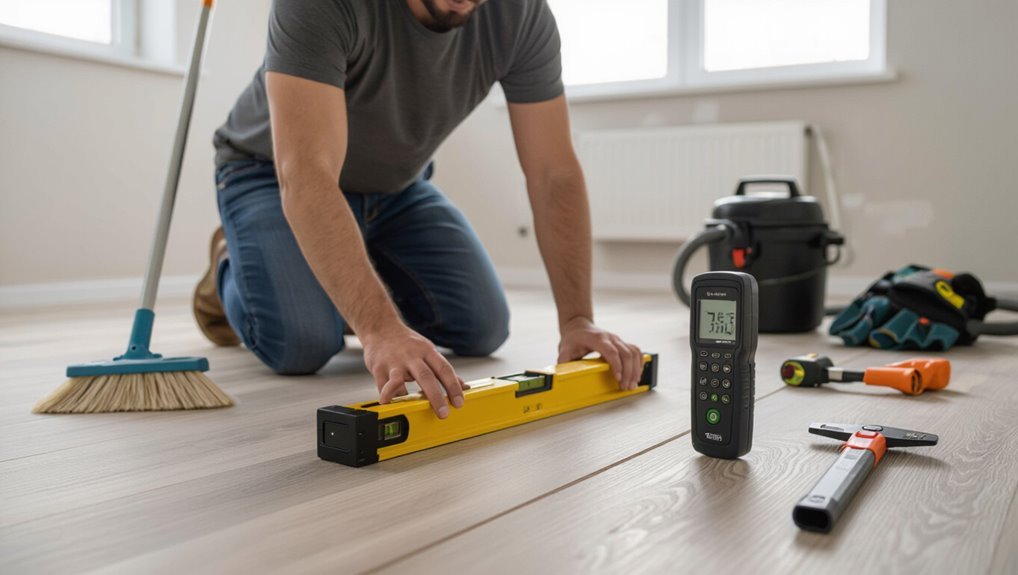
After measuring and buying your flooring, inspect the subfloor thoroughly before laying anything down. You’ll confirm level, clean surfaces, and acceptable moisture to prevent gaps or failure.
Follow this checklist:
- Check levelness with a straightedge; shim or skim where needed.
- Remove debris, old adhesives, and dust.
- Test moisture with a meter or tape method.
- Repair cracks and secure loose boards.
Step-by-Step Installation
Now you’ll move through the installation in clear steps, starting with acclimating the planks so they adjust to the room’s temperature and humidity.
Next you’ll prepare the subfloor, lay underlayment, and snap a straight reference line before placing the first row.
Finally, you’ll use the click-lock technique, stagger seams for strength, and measure and cut end pieces for a clean fit.
Step 1 Acclimating the planks
Before you lay any planks, let them acclimate in the room for at least 48 hours so the material settles to the local temperature and humidity; this prevents gaps, buckling, and uneven seams once installed.
Open cartons, spread planks flat, and keep them off cold floors. Maintain normal HVAC settings during acclimation and check for visible warping or defects before you begin installation.
Step 2 Preparing the subfloor and installing underlayment
1. You’ll clear, clean, and level the subfloor: remove debris, fix dips or high spots, and guarantee it’s dry.
Roll out a compatible underlayment, overlapping seams per manufacturer instructions, and tape them. Trim around vents and doorways so planks sit flat.
Leave expansion gaps at walls, supported by spacers, to prevent buckling as temperature and humidity change.
Step 3 Laying the first row and establishing straight reference lines
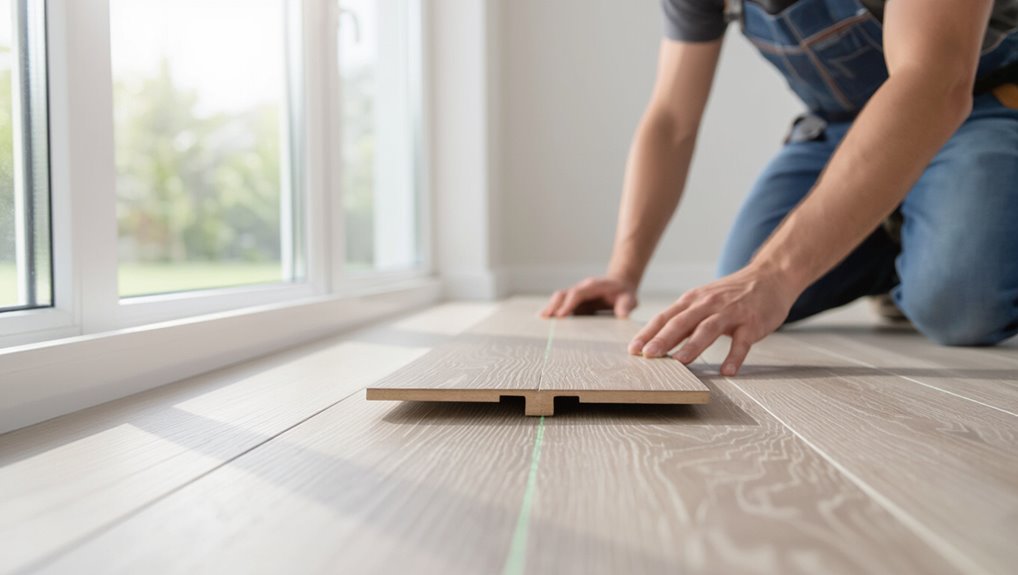
Start by snapping a straight reference line across the room to guide your first row. Then lay your starter planks with the tongue facing the wall and spacers in place to maintain the required expansion gap.
Trim end pieces to fit, stagger seams at least 8–12 inches, check alignment frequently, and use a tapping block only when joining is complete to avoid damaging edges.
Step 4 Click-lock joining technique and best practices
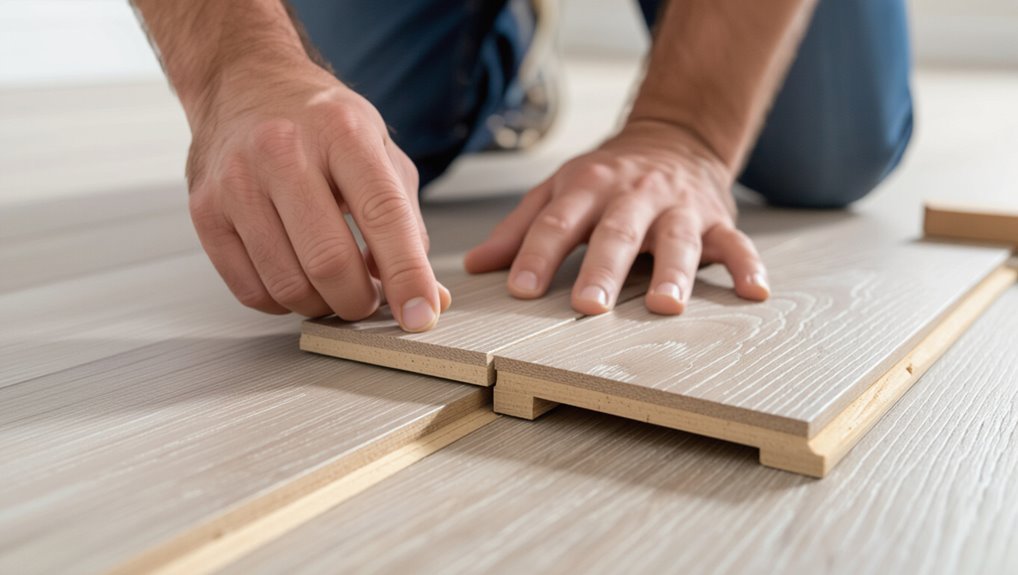
Now you’ll join the planks using the click‑lock system: angle the tongue of the new plank into the groove of the installed plank at about 20–30 degrees, then press down until you hear or feel the click that locks them together.
Work along the row, keeping seams tight, tapping gently with a mallet and block when needed, and checking alignment frequently to prevent gaps.
Step 5 Staggering seams and cutting end pieces
Because staggered seams add strength and a natural look, you’ll want to plan the layout so end joints are at least 6–8 inches apart between adjacent rows.
Alternate plank lengths, measure and mark cuts precisely, and use a pull bar for tight end joints.
When cutting last pieces, allow expansion gap, test-fit before final clicks, and trim doorsills if needed for clearance.
Step 6 Working around doorways, cabinets, and fixtures
6 key areas—doorways, cabinets, and fixtures—require careful measuring and cutting so your Lifeproof planks fit snugly without binding; you’ll mark, test-fit, and trim as needed while maintaining the required expansion gaps and ensuring connections line up for a seamless finish.
Use templates for odd shapes, undercut door jambs, scribe to cabinets, and cut around pipes; keep offcuts to confirm fit before final clicks.
Step 7 Installing transitions, thresholds, and baseboards
Finish the job by installing connectors, thresholds, and baseboards to secure the edges, cover expansion gaps, and create a polished look.
Fit junctures at doorways and room changes, using appropriate profiles and adhesive or screws per manufacturer instructions.
Snap or nail baseboards, leaving the expansion gap intact beneath them.
Caulk or seal joints where needed, and trim thresholds for a tight, safe edge.
Step 8 Final inspection and cleanup
Anyone can wrap up the job cleanly by doing a systematic final inspection and cleanup to guarantee the floor looks right and performs as planned.
Walk the room, check joints, seams, and connections for gaps or height issues. Remove spacers, trim excess underlayment, vacuum debris, and wipe with a manufacturer-approved cleaner.
Reinstall threshold pieces and inspect baseboards for tight, even fit.
Common Problems During Installation and How to Fix Them
You’ll likely run into a few common issues—gaps between planks, uneven seams or buckling, damaged or miscut pieces, and problems at doorways or over uneven subfloors.
Learn how to identify the cause of each issue so you can apply the right fix, whether it’s adjusting spacing, replacing a plank, or leveling the substrate.
I’ll walk you through quick diagnostic steps and practical repair or replacement options for each problem.
Gaps between planks causes and remedies
If your planks are showing gaps, it’s usually due to improper acclimation, uneven subfloor, or incorrect tapping during installation; identifying the root cause lets you choose the right fix.
Check humidity and acclimate boards longer, level and patch low spots, and refasten loose planks.
Use proper tapping block technique to close joints, avoid overforcing, and replace damaged locking edges when gaps persist.
Uneven seams or buckling diagnosis and solutions
Several common issues can cause uneven seams or buckling in Lifeproof flooring, and diagnosing them quickly helps you choose the right fix.
Check for inadequate acclimation, subfloor irregularities, trapped moisture, or tight perimeter spacing.
Correct by acclimating planks longer, leveling or repairing the subfloor, improving moisture control, and ensuring correct expansion gaps.
Re-lay affected rows if buckling persists.
Damaged planks or miscuts repair and replacement options
Repairing or replacing damaged or miscut Lifeproof planks is straightforward if you act promptly and follow the right steps.
Remove the affected plank by releasing adjacent pieces, cut out the damaged section or full plank, then measure and trim a replacement for a snug click-lock fit.
Use a tapping block and pull bar to reseat joints; seal edges if near moisture-prone areas.
Issues at doorways and uneven subfloors
When you run into doorways or uneven subfloors, small misalignments can turn into big headaches during installation, but most issues are fixable with the right prep and a few simple tools.
Measure openings, trim planks for door clearances, and use threshold strips where levels differ.
For dips or high spots, level or shim the subfloor before clicking planks together to prevent gaps and locking failures.
Best Practices and Professional Tips for a Perfect Fit
Get your alignment right from the start and use a tapping block and mallet properly to lock seams without damaging the planks.
Watch moisture levels, leave the recommended expansion gaps, and acclimate the flooring so it settles correctly.
Work efficiently with a clear plan and the right tools, and call a professional if you hit uneven subfloors, complex cuts, or persistent fit issues.
Alignment, tapping block, and mallet techniques
1 simple trick to achieve tight, even seams is to focus on proper alignment before you tap a plank into place.
You’ll hold planks flush, check joint gaps, then use a tapping block to protect edges. Tap gently with a mallet, increasing force only as needed.
Work along the row, rechecking alignment often to prevent misfits and locking damage.
Moisture control and expansion gap recommendations
Alignment and careful tapping help lock planks tightly, but moisture and room movement will still dictate how much breathing room you leave at the edges.
Test subfloor moisture; follow manufacturer limits. Leave a consistent 1/4″–1/2″ gap around walls, larger for wide or sunny rooms.
Use spacers, stagger end joints, and install proper junction pieces to maintain gaps and allow seasonal expansion.
Efficiency tips to speed installation without mistakes
While you’ll still want to work methodically, a few prep steps and smart workflow choices will let you lay Lifeproof flooring faster and with fewer mistakes:
- Pre-sort planks by shade and defect to avoid pauses.
- Trim and label starter rows to maintain rhythm.
- Use a tapping block and pull bar for quick, secure locks.
- Keep tools, spacers, and scrap stacks within arm’s reach.
When to call a professional
Speed and smart workflow matter, but some situations are better handled by a pro.
Call a professional if subfloor damage, severe unevenness, moisture issues, or complex cuts around stairs and built-ins exist.
Hire help when you lack tools, time, or confidence.
Pros guarantee proper acclimation, vapor barriers, and tight seams, preventing costly callbacks and preserving your warranty and the floor’s longevity.
Comparison and Product Considerations
When choosing Lifeproof click-lock versus other click-lock LVT or laminate, you’ll want to compare durability, locking strength, and ease of installation.
Factor in cost differences between doing it yourself and hiring a pro, including time and tools.
Also check how each installation method affects warranty coverage so you don’t void protection by a DIY mistake.
Lifeproof click-lock vs other click-lock LVT/laminate options
If you’re deciding between Lifeproof’s click-lock planks and other click-lock LVT or laminate options, focus on construction, warranty, and locking system compatibility to guide your choice. You’ll compare wear layer, core type, water resistance, warranty length, and locking profile to match performance and installation ease.
| Feature | Consideration |
|---|---|
| Wear layer | Durability |
| Core type | Rigid vs foam |
| Water resistance | Wet areas |
| Warranty | Coverage length |
| Lock profile | Compatibility |
Cost considerations: DIY vs professional installation
Having compared construction, warranties, and locking profiles, you’ll now weigh installation costs to decide whether to DIY or hire a pro.
DIY saves labor but demands time, tools, and precise prep; mistakes can be costly.
Hiring a pro adds upfront expense but speeds installation, guarantees fit, and reduces waste.
Compare quotes, tool rental, and your skill level before choosing.
Warranty implications based on installation method
Because installation method affects warranty coverage, you should check the fine print before you start cutting planks.
If you install yourself, note any DIY exclusions, required prep, or approved adhesives; mistakes can void coverage.
Hiring an authorized installer often preserves warranty benefits and claim support.
Keep receipts, photos, and manufacturer guidelines so you can prove compliance if a defect claim arises.
Maintenance After Installation
Now that your Lifeproof flooring is down, you’ll want a simple cleaning routine and the right products to keep it looking new.
Use felt pads, rugs, and proper furniture movers to prevent scratches and dents.
For moisture-prone areas, keep spills wiped promptly and check seams and underlayment periodically to avoid long-term damage.
Cleaning routines and recommended products
Keep dirt and grit from wearing down your LifeProof flooring by sweeping or vacuuming with a soft-brush attachment at least twice a week and spot-cleaning spills as they happen.
Use a damp microfiber mop with a manufacturer-approved cleaner or a mild pH-neutral floor solution. Avoid abrasive pads, waxes, or oil-based products.
Test new cleaners in an inconspicuous area first.
Preventing scratches and dents
Along with regular cleaning, you’ll want to take steps that specifically guard against scratches and dents.
Use felt pads under furniture, install floor protectors on heavy items, and lift rather than drag things.
Place durable rugs in high-traffic zones and entryways.
Trim pet nails regularly and avoid shoes with cleats or sharp heels to keep your Lifeproof surface looking new.
Long-term care for moisture-prone areas
When you live in moisture-prone areas like bathrooms, basements, or entryways, staying proactive with maintenance prevents water damage and preserves your LifeProof flooring’s warranty.
Wipe spills immediately, use absorbent mats at entrances, maintain proper ventilation, and check seams periodically.
Replace failing caulk or seals, dry wet spots fast, and avoid steam cleaners.
Regular inspections catch issues before they escalate.
Mistakes to Avoid
Don’t skip acclimation or moisture testing, because trapped moisture or wrong temperatures will ruin the planks.
Prep the subfloor properly, cut and stagger seams accurately, and mind expansion gaps and shifts so the floor can move and look right.
Avoiding those common mistakes will save you time, money, and headaches.
Skipping acclimation or moisture testing
If you skip acclimating your LifeProof planks or skip moisture testing the subfloor, you’re inviting cupping, warping, and premature failure.
Always let boxes breathe in the room where they’ll be installed for 48–72 hours and use a reliable moisture meter on concrete or wood.
Ignoring these steps voids warranties and leads to costly repairs, so don’t rush this stage.
Improper subfloor preparation
1 critical step is getting your subfloor right — skip it and the best planks won’t perform.
You’ll need a clean, dry, flat surface; remove debris, nails, and adhesive. Fix dips or high spots, sand rough areas, and replace water-damaged sections.
Don’t ignore moisture barriers on concrete—improper prep leads to gaps, squeaks, and premature failure of your Lifeproof click-lock flooring.
Incorrect cutting or poor seam staggering
Cut accurately and stagger seams properly to prevent weak joints and an obvious, tiled look that undermines the floor’s durability and appearance.
Measure twice, cut once, and use a straightedge saw to guarantee clean edges that lock tightly.
Offset end joints at least 12 inches between adjacent rows, avoid repeating patterns, and inspect each plank before installation to maintain strength and a natural appearance.
Overlooking expansion gaps and transitions
Once your seams are tight and staggered correctly, don’t forget to leave room for the floor to expand and meet other surfaces.
If you skip expansion gaps or improperly install connectors, boards can buckle or pop.
Follow manufacturer gap guidelines, use spacers, and install transition strips at doorways, thresholds, and different flooring levels so the installation moves with temperature and humidity changes.
FAQ Common Questions About Installing Lifeproof Flooring
You’ve probably got a few practical questions before you start, like whether Lifeproof can go over tile or concrete and how much expansion gap you need.
You’ll also want to know if installation is okay in bathrooms or basements, how to repair a damaged plank, and how long a standard room usually takes.
I’ll answer each clearly so you can plan the job with confidence.
Can Lifeproof be installed over tile or concrete?
Wondering whether you can install Lifeproof over existing tile or concrete? Yes—you can, provided the substrate is flat, clean, dry, and structurally sound.
For tile, grout lines must be leveled or filled; for concrete, repair cracks and guarantee moisture levels meet manufacturer specs.
Use appropriate underlayment if recommended, and follow Lifeproof’s installation guidelines to guarantee a stable, long-lasting click-lock floor.
How much expansion gap do I need?
How much space should you leave around the room? Leave a 1/4-inch gap for smaller rooms and up to 1/2 inch for larger installations or areas over 30 feet in length.
Maintain consistent gaps at walls, doorways and fixed objects. Use spacers during installation, then cover gaps with trim or reducers.
Check manufacturer guidelines for specific width recommendations.
Can I install in bathrooms or basements?
Yes—you can install Lifeproof flooring in most bathrooms and basements, but you’ll need to follow moisture-control and subfloor-prep steps to guarantee long-term performance.
You should verify subfloors are dry, flat, and clean, use a moisture barrier where recommended, allow acclimation, and avoid direct, prolonged water exposure.
Proper sealing at thresholds and vents helps prevent moisture migration and warping.
How do I repair a damaged plank?
Bathrooms and basements can still see accidents or wear, so if a Lifeproof plank gets damaged you don’t have to replace the whole floor.
Remove surrounding trim, release and lift affected plank using proper tools, then slide a replacement into place.
If glued or stubborn, cut out the damaged piece and fit a new one, ensuring seams align and expansion gaps remain intact.
How long does installation typically take for a standard room?
Wondering how long it’ll take to install Lifeproof flooring in a standard room?
For a typical 12×12 room, expect 4–6 hours for a DIYer with basic tools and prep done. Professionals often finish in 2–4 hours.
Allow extra time for removing old flooring, acclimation, door trims, and changes—these steps can add a few hours or a separate day.