How to Install Laminate Wood Flooring From Start to Finish
You can install laminate wood flooring yourself by prepping a flat, dry subfloor, acclimating planks 48–72 hours, and laying a suitable underlayment with a vapor barrier. Start along a straight wall using spacers, click‑lock the first row with tongues facing the wall, stagger end joints 8–12 inches, and use a tapping block and pull bar for tight seams. Leave proper expansion gaps, reinstall trim, and control humidity for longevity—keep going for step‑by‑step tips and troubleshooting.
Quick Answer Can You Install Laminate Wood Flooring Yourself?
Yes—you can usually install laminate yourself: it’s a click-lock floating floor that involves prepping the subfloor, laying underlayment, and snapping planks together, which for a typical room takes a weekend and modest tool costs.
It’s affordable and moderately easy if you’re comfortable with measuring, cutting, and following a layout.
Hire a pro if your subfloor needs major repair, the room has complex angles or built-ins, or you want a guaranteed warranty and faster finish.
Short summary of process, time, cost, and difficulty
You can often install laminate flooring yourself if you’re reasonably handy: the process mainly involves prepping the subfloor, laying underlayment, snapping planks together with a floating-lock system, and trimming edges and joints.
Expect 1–3 days for a typical room, $2–6 per sq ft (materials) plus tools, and moderate difficulty—follow how to install laminate wood flooring instructions carefully to avoid mistakes.
When to hire a pro vs. DIY
If you’re handy and the room is straightforward—flat subfloor, simple layout, few doorways—you can probably install laminate yourself and save money.
Choose DIY when you have time, basic tools, and patience for prep and trimming.
Hire a pro if subfloors need repair, layouts are complex, moisture is an issue, or you want a flawless finish quickly.
Consider warranties and resale value.
Basic Understanding What Is Laminate Flooring and Why Choose It?
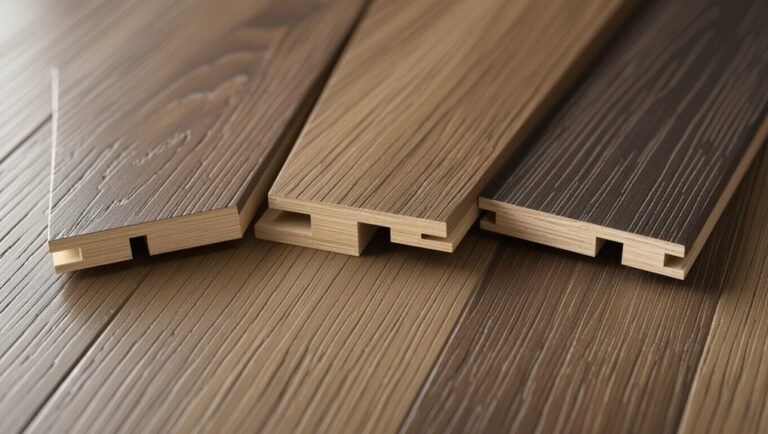
Laminate flooring is made of stacked layers—usually a fiberboard core, a printed design layer that mimics wood, and a tough wear layer—so you’ll get the look of hardwood at a lower cost.
You’ll weigh pros and cons versus hardwood, vinyl, and engineered wood: laminate is generally more scratch- and fade-resistant than hardwood, less water-resistant than vinyl, and often cheaper than engineered wood.
Expect good durability in high-traffic areas, moderate water resistance (better with scored or lock-sealed edges), and common use in living areas, hallways, and basements with proper underlayment.
Definition and construction of laminate planks
Think of laminate planks as a layered composite that gives you the look of real wood or stone without the cost or maintenance. They’re made of a high-density fiberboard core, a decorative printed image layer, a protective wear layer on top, and often a backing layer for stability.
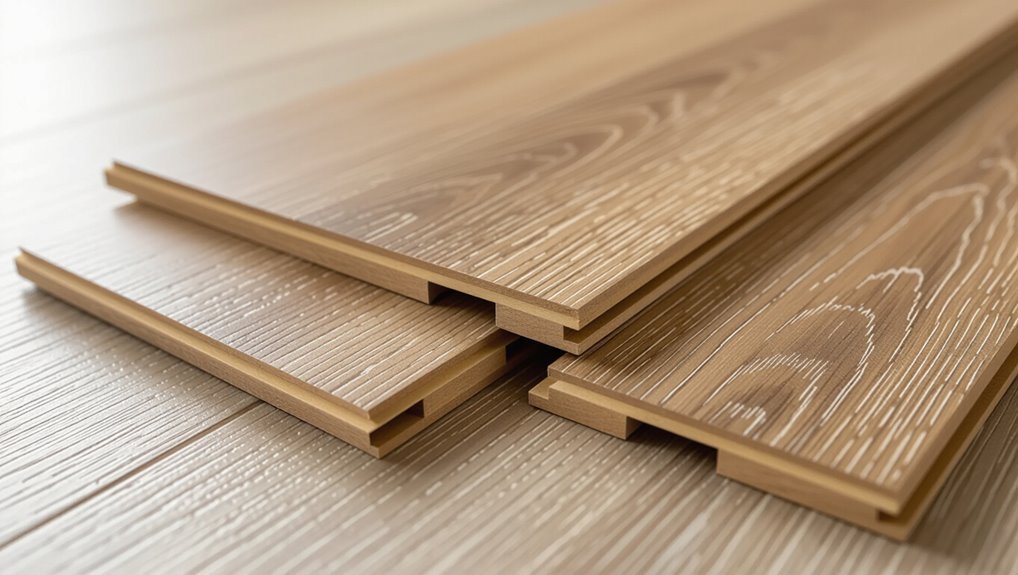
You’ll also find various thicknesses, edge profiles, and click-lock or glued joints that affect durability and installation.
Pros and cons compared with hardwood, vinyl, and engineered wood
A quick comparison helps you see why homeowners choose laminate: it usually costs less than hardwood and engineered wood, resists scratches better than many vinyl options, and installs faster thanks to click-lock joints. You get style, value, and ease, but you may sacrifice resale appeal and ultimate refinishing.
| Emotion | Benefit | Trade-off |
|---|---|---|
| Relief | Affordable | Lower prestige |
| Confidence | Scratch resistance | Limited refinishing |
Common uses and performance expectations (durability, water resistance, traffic)
When you pick laminate for a busy area, expect durable surface wear, decent water resistance depending on the product, and good performance under everyday foot traffic.
You’ll use it in living rooms, hallways, kitchens (with water-rated planks), and basements with proper underlayment.
Avoid prolonged standing water; choose higher AC ratings for commercial or high-traffic zones to guarantee longevity and scratch resistance.
Tools, Materials, and Preparation
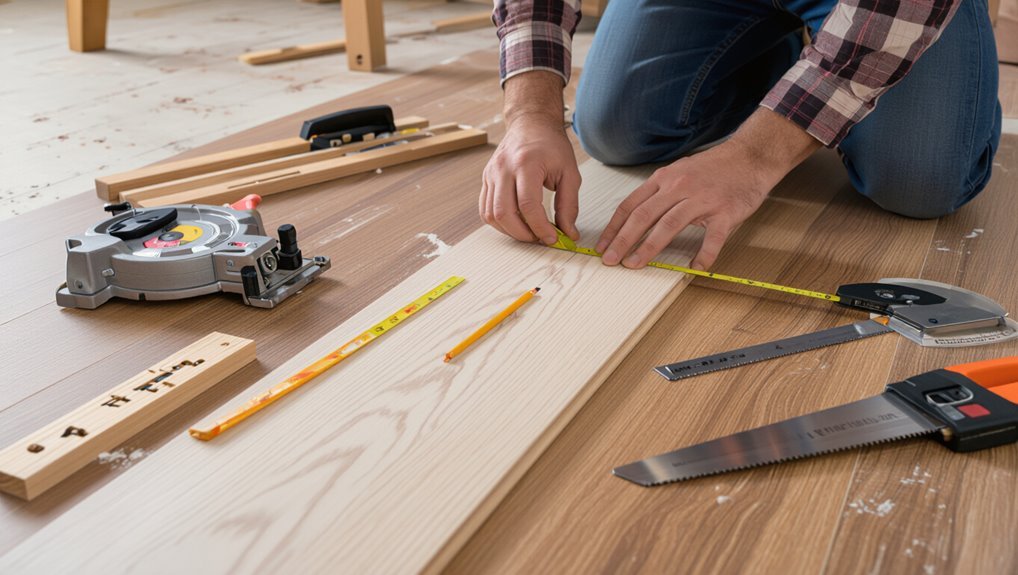
Before you start, gather the essential tools—tapping block, pull bar, spacers, saw, tape measure—and consider optional items like a flooring jack, underlay, and spacers with wedges to speed the job.
Pick planks by type, thickness, AC rating, bevel and color, and calculate square footage plus a 5–10% waste allowance before ordering.
Finally, confirm your subfloor meets flatness and moisture specs and run a moisture test (meter or tape method) so the new floor performs well.
Essential tools list
Although you might be tempted to rush in, gathering the right tools and materials first will save time and prevent costly mistakes; you’ll need a measuring tape, chalk line, utility knife, tapping block, pull bar, spacers, tapping mallet or hammer with a soft face, saw (miter, jigsaw, or circular with laminate blade), pry bar, level, and underlayment plus adhesive or connecting strips as required.
You’ll also want clear workspace, good lighting, and steady hands.
- Planks lined up for a straight seam
- A clean subfloor ready for underlayment
- Precise cuts beside a doorway
Optional tools and helpful accessories
You’ve already gathered the basics, but a handful of optional tools and accessories can speed the job and improve the finished look.
Consider extras that save time, protect edges, and guarantee tight seams.
- Rubber mallet and tapping block for snug joins
- Pull bar and wedges for last-row fit
- Felt pads and transition strips to finish edges neatly
Material selection: plank types, thickness, AC rating, bevels, colors
Choosing the right laminate involves balancing looks, durability, and budget, so pick planks that match your room’s traffic and style.
Choose plank types (standard, herringbone, wide), 7–12mm thickness for stability, and AC rating for wear (AC3–AC5 for homes).
Decide bevels (micro, V) for seam appearance and stain/finish colors to complement lighting and décor.
How to calculate square footage and order extra (waste allowance)
With your plank type and finish picked, next figure out how much flooring to buy so you don’t run short.
Measure each room’s length × width, add closet areas, and total square footage.
Add a waste allowance—typically 8–10% for straight runs, 10–15% for diagonal or complex layouts.
Round up to the nearest carton and order from the same production batch.
Subfloor requirements and moisture testing methods

Before you start laying planks, confirm your subfloor is flat, clean, structurally sound, and within the manufacturer’s thickness and material requirements—typically a minimum of 3/4″ tongue-and-groove plywood or equivalent.
Check flatness with a 6′ straightedge; max deviation 3/16″.
Test moisture: use a moisture meter and perform a calcium chloride or in-situ RH test for concrete.
Repair or dry as needed.
Pre-Installation Checklist
Before you start laying planks, make sure the laminate has acclimated in the room for at least 48–72 hours so it adjusts to temperature and humidity.
Remove trim, doors, and baseboards, then inspect and repair the subfloor—level low spots, secure loose boards, and fill concrete cracks.
Finally, choose and roll out the correct underlayment and any required vapor barrier for your subfloor and climate.
Acclimating laminate planks how and how long
Because laminate expands and contracts with moisture and temperature, you should acclimate the planks to the installation room so they settle into the same conditions they’ll live in.
Leave unopened boxes in the room for 48–72 hours on elevated sticks or pallets, away from direct sunlight and heat sources.
Maintain normal humidity (30–50%) and temperature (60–80°F) during acclimation.
Preparing the room removing trim, doors, and baseboards
Clear the room so you can work efficiently: remove furniture, rugs, and any wall hangings.
Then take off baseboards, quarter round, and door thresholds using a pry bar and pull bar to avoid damaging the drywall or trim.
Label removed trim and hardware, store screws and hinges in bags, remove or plan for door height adjustment.
Vacuum and sweep thoroughly before laying underlayment.
Inspecting and repairing subfloor (leveling, loose boards, concrete cracks)
With the room cleared and trim removed, inspect the subfloor thoroughly to catch issues that will affect laminate performance.
Walk the floor, look for soft spots, squeaks, loose boards, gaps, and uneven areas.
Screw or nail down loose boards, plane high spots, fill low spots with leveling compound, and repair concrete cracks with appropriate filler.
Make certain the surface is flat, clean, and dry.
Installing underlayment types and vapor barriers

Before you lay a single plank, choose the right underlayment and vapor barrier for your subfloor and climate—these thin layers control moisture, reduce sound, and add cushioning, so picking the wrong type can shorten your floor’s life.
Match foam, cork, or felt to floor use; add a polyethylene vapor barrier over concrete; overlap and tape seams; trim edges, and follow manufacturer specs.
Step-by-Step Installation Process
Start by planning your layout and choosing the wall you’ll work from so rows run straight and seams fall in logical places.
You’ll install the first row with spacers and a staggered pattern, then click subsequent rows together using the locking mechanism.
Finish by cutting planks for ends, doorways, vents and pipes, and fitting around irregular shapes with the right tools and techniques.
Step 1 Planning layout and determining starting wall
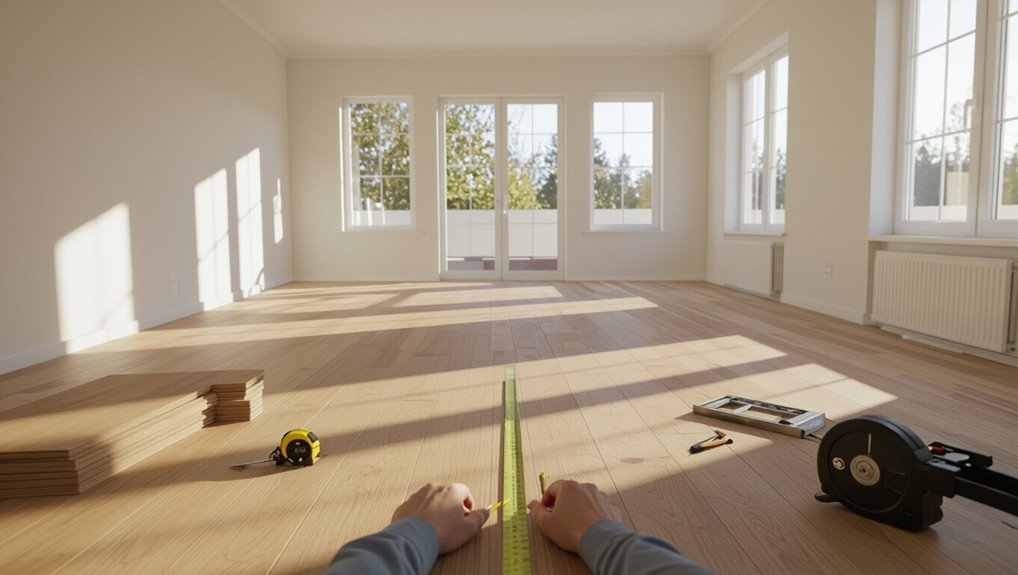
Planning the layout is the essential first step, because where you begin determines seam alignment, changes, and how noticeable cut pieces will be.
Measure room dimensions, note doorways, vents, and high-traffic zones. Choose a starting wall that minimizes narrow end rows and showcases the room’s sightlines.
Sketch plank runs, account for shifts, and calculate waste so you’ll buy enough material.
Step 2 Installing the first row (spacing, stagger, spacers)
1. You’ll lay the first row with tongues facing the wall, keeping a consistent expansion gap using spacers.
Start from a straight reference line, trim the last board to fit. Stagger end joints at least 8–12 inches from adjacent rows to avoid a uniform seam.
Check alignment as you go; maintain tight seams and remove spacers only after several rows are secure.
Step 3 Connecting subsequent rows (locking mechanism tips)
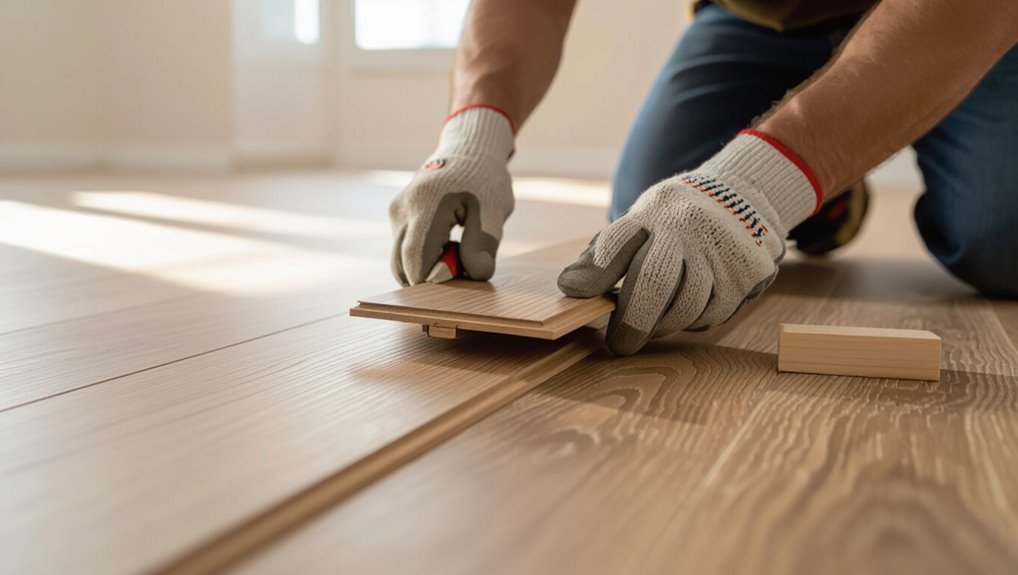
Once you’ve got the first row locked in and spaced correctly, angle the tongue of the next board into the groove of the installed row and drop it down until it clicks, working along the length so each joint closes tightly.
Use a tapping block and mallet for stubborn seams and a pull bar to finish rows where the gap is tight against the wall.
Continue staggering seams, checking alignment, and maintaining expansion gaps.
Step 4 Cutting planks for ends, doorways, and obstacles (tools & techniques)
Measure and cut each plank carefully to fit at room edges, doorways, and around pipes or vents, using the right tool for the cut— a miter or circular saw for straight rip cuts, a jigsaw for irregular shapes, and a handsaw or pull saw for final trimming near walls.
Mark cut lines, cut with the patterned side up, deburr edges, dry-fit pieces, and label rows for reinstall.
Step 5 Fitting around vents, pipes, and irregular shapes
After you’ve cut and dry-fit the edge and doorway pieces, turn your attention to vents, pipes, and other irregular shapes you’ll encounter across the field.
Measure and transfer openings to planks, mark cut lines, and use a jigsaw or hole saw for pipe collars.
Test-fit each piece, leaving the required expansion gap.
Secure and reinstall vent grilles, trimming as needed for a neat finish.
Step 6 Installing the final row and ensuring expansion gap
Because the final row often needs custom cutting to fit snugly, you’ll want to plan each plank’s layout before you start trimming.
Measure carefully, subtracting the required expansion gap (usually 1/4″ to 1/2″).
Use a pull bar and mallet to lock pieces in place.
Trim planks lengthwise with a saw, test fit, and maintain consistent gap along walls for proper movement.
Step 7 Reinstalling trim, baseboards, and transitions

Once the flooring’s locked and the expansion gaps are checked, you’ll reinstall trim, baseboards, and junction pieces to finish the room and conceal gaps.
Remove old nails, cut trim to fit, and nail or glue baseboards to walls—not the floor.
Install connector strips at doorways and between surfaces, allowing movement.
Caulk seams, touch up paint, and check alignment for a clean, professional look.
Step 8 Post-installation checks and initial cleaning
When the trim’s back in place and the floor’s locked, take a systematic walk-through to verify expansion gaps, seam alignment, and fastener security so any issues can be fixed before furniture goes back in;
then do a light initial cleaning to remove dust and adhesive residue without saturating the panels.
Check changes, door clearances, and undercut edges.
Vacuum, dry-mop, and spot-clean with a damp cloth.
Troubleshooting Common Installation Problems
If you run into gaps between planks, cupping, buckling, shifting, noisy or hollow spots, or uneven seams at junctions and doorways, you’ll want to identify the root cause before fixing it.
Check moisture levels, underlayment, installation gaps, and locking joints to determine whether you need to re-seat boards, add or replace underlayment, trim or acclimate planks, or adjust expansion space.
I’ll guide you through quick diagnostics and practical remedies for each issue.
Gaps between planks and how to fix them
Gaps between laminate planks are a common frustration, but you can usually fix them without ripping up the floor—first identify whether they’re caused by improper locking, moisture changes, or subfloor issues.
Then choose the appropriate repair like reseating the joints, adding weight and tapping them closed, replacing damaged boards, or addressing humidity and subfloor flatness.
If seams persist, check for debris, trim swollen edges, and use proper tapping blocks.
Cupping, buckling, or shifting causes and remedies
Those same factors that cause gaps—moisture swings, uneven subfloors, or poor locking—can also make planks cup, buckle, or shift.
You should check humidity levels, acclimate boards, and level the subfloor.
Replace warped pieces, guarantee proper expansion gaps, and re-lock or refasten affected rows.
For severe buckling, remove and reinstall sections after correcting moisture or flatness issues.
Noisy or hollow spots diagnosis and correction
A hollow or squeaky spot under laminate usually means the plank isn’t fully supported or its joints aren’t seated, and you can often find and fix the problem without pulling up the whole floor.
Tap and walk to locate noise, then remove adjacent molding, lift the affected plank, add thin adhesive, shims, or floor-leveling compound beneath, reseat joints, and reinstall molding.
Uneven seams at transitions and doorways
When seams at doorways or between rooms don’t line up, you’ll notice uneven gaps, raised edges, or misaligned plank ends that catch your foot or the threshold strip.
Fix by removing affected rows, realigning starter pieces, and trimming plank ends for a clean fit. Use proper connecting molding, guarantee consistent expansion gaps, and secure underlayment.
Check subfloor flatness before reinstalling.
Common Mistakes to Avoid
Don’t skip acclimating the planks or testing for moisture — that’s a fast way to get warping or buckling later.
Make sure the subfloor is flat, dry, and covered with the correct underlayment, plan a proper stagger pattern and waste allowance, and always leave the recommended expansion gaps.
Missing any of these steps will cost you time and money to fix.
Skipping acclimation or moisture testing
If you skip acclimating your laminate or testing subfloor moisture, you’re inviting warping, gapping, and costly repairs down the line.
Don’t assume conditions are stable—bring boards into the room for 48–72 hours and use a moisture meter on concrete or wood.
Address excessive moisture with mitigation or delay installation. Taking these steps prevents failure and preserves your warranty.
Improper subfloor prep or wrong underlayment
Acclimating and moisture-testing are only part of the job; you also need a properly prepared subfloor and the right underlayment to keep your laminate stable.
If your subfloor isn’t level, clean, and dry, boards will flex and click.
Choose underlayment suited to moisture levels and sound control, install it seam-sealed where required, and replace damaged subflooring before you lay any planks.
Incorrect stagger pattern and waste planning
When you ignore proper stagger patterns and waste planning, your floor can look amateurish and leave you short on material mid-job.
You should plan plank offsets to avoid repeating end joints and calculate extra boards for cuts, mistakes, and pattern matching.
Measure rooms, account for doorways and closets, and buy 5–10% overage so you won’t stall or create weak, obvious seams.
Failing to leave expansion gaps
Because laminate expands and contracts with temperature and humidity, you need to leave consistent expansion gaps around the room’s perimeter and at doorways; skipping them will cause buckling, warped seams, or popped planks as the floor shifts.
Use spacers per manufacturer specs, keep gaps at thresholds and against fixed objects, and cover with appropriate trim so the floor can move without damage or visible gaps.
Best Practices and Pro Tips for Durable Results
Plan your board layout with proper staggering ratios and patterns so seams stay strong, and control indoor humidity to prevent warping or gaps.
Know when a glue-down method is better than floating—especially in high-traffic or moisture-prone areas—and use adhesives according to manufacturer specs.
Match connections, thresholds, and room flow to keep movement predictable and the finished look seamless.
Recommended installation patterns and staggering ratios
Looking to keep seams tight and floors stable? You’ll want a running bond with staggered end joints, avoiding alignment every row.
Use consistent offset ratios—30–50% for strength, 15–25% for visual variety—and keep starter rows straight.
- Visualize brick-like staggered seams across a sunny living room
- Imagine 50% offset in a long hallway
- Picture short planks near doorways
Climate control and maintenance to prevent damage
After you’ve staggered seams for stability, control of humidity and regular upkeep will keep that layout looking tight and lasting longer.
Keep indoor humidity between 30–50% and temperature stable to prevent cupping or gaps.
Use felt pads, mats at entries, and clean spills immediately.
Sweep or vacuum debris, mop with recommended cleaner, and inspect seams periodically to catch issues before they worsen.
When to use adhesives or glue-down methods
When you need a firmer, flatter installation—like over a concrete slab, in high-traffic rooms, or with thinner click-lock boards—using adhesive or a full glue-down method gives better long-term stability and sound control than a floating floor.
Use glue when subfloor unevenness, moisture concerns, or permanent installation is expected. Choose manufacturer-approved adhesives, follow open time, and guarantee proper trowel size for full contact.
Matching transitions, thresholds, and room flow
If you’ve chosen a glue-down or adhesive approach for stability, you’ll also need to plan how the floor meets doorways, adjoining rooms, and level changes to keep that performance consistent.
Match junction profiles to thickness and movement needs, secure thresholds to substrate, allow expansion gaps where required, and choose color and material that guide traffic visually.
Test fit before final bonding.
Cost, Time Estimates, and Project Planning
You’ll want to sketch a budget that covers materials and tools—from budget to mid-range to premium—so you’re not surprised by costs.
Estimate project time based on room size and crew size (a solo DIYer will take much longer than a two-person team).
Check permits, HOA rules, and local building codes up front to avoid delays or rework.
Typical material and tool costs (budget, mid-range, premium)
Expect to budget differently depending on the grade of laminate: budget options keep material costs down but may need more prep and replacement sooner, mid-range balances durability and appearance, and premium planks give the best wear, texture, and warranties at a higher price. Compare costs and tools quickly:
| Item | Typical Cost |
|---|---|
| Budget materials | $1–$2/ft² |
| Mid-range | $2–$4/ft² |
| Premium | $4–$8+/ft² |
Time estimates by room size and crew size
When planning laminate installation, factor in room size and crew size because they directly change how long the job takes and what you’ll pay.
A single installer can handle a small bedroom in a few hours, while a two- or three-person crew will finish the same space faster and tackle complex layouts or multiple rooms in a day.
Expect: small room 3–6 hours (1–2 people); medium 6–12 hours; large or open plans 1–3 days.
Permits, HOA rules, and building code considerations
Because local rules can affect both cost and schedule, check permits, HOA guidelines, and building codes before you start—doing so prevents costly delays and fines.
Contact your city permit office and review HOA covenants for finish, color, and noise restrictions.
Confirm subfloor, moisture, and fire-rated assembly requirements in code.
Get approvals in writing, factor permit fees and inspection windows into your timeline.
Care, Maintenance, and Warranty Considerations
Once your laminate is down, you’ll want simple daily cleaning and quick stain-removal methods to keep it looking new.
Follow a few long-term maintenance habits—like protecting high-traffic areas and controlling moisture—to extend the floor’s lifespan.
Also check your manufacturer’s warranty so you know what’s covered and what actions (like using the wrong cleaners or improper installation) could void it.
Daily cleaning and stain removal tips
While regular sweeping and quick spot-cleaning keep your laminate looking new, it’s essential you avoid excess water and harsh cleaners that can warp the surface or void your warranty; use a dry mop or slightly damp microfiber and a manufacturer-approved cleaner for tough stains.
Blot spills immediately, lift dried messes gently with a plastic scraper, and test stain removers on inconspicuous areas first.
Long-term maintenance to extend lifespan
Keeping up with daily cleaning lays the groundwork for long-term care, but extending your laminate’s lifespan also means following a few scheduled maintenance steps and honoring the manufacturer’s warranty rules.
Inspect seams and joints periodically, tighten loose molding, replace damaged underlayment, refinish thresholds, use felt pads on furniture, control humidity, and address spills quickly.
Schedule professional inspections if you spot warping or persistent wear.
Understanding manufacturer warranties and what voids them
Because your warranty sets the rules for repairs and replacements, you should read it carefully and follow its care instructions exactly; failing to do so can void coverage.
Check coverage limits, installation requirements, moisture thresholds, and approved cleaners.
Keep proof of purchase and installation records.
Avoid unauthorized repairs, improper underlay, or excessive moisture.
Contact the manufacturer before making claims to preserve your rights.
FAQ Common Questions About Installing Laminate Flooring
You’ll find answers to common concerns about installing laminate, like whether you can lay it over existing floors or use it in kitchens and basements.
We’ll cover lifespan and repair options, installing on stairs or uneven rooms, and how to shift between different floor heights.
If you have a specific situation, mention it and we’ll address the best solution.
Can laminate be installed over existing flooring?
If your existing floor is flat, dry, and in good condition, you can usually install laminate right over it—saving time and labor.
You’ll need to remove trim, repair any loose or damaged areas, and guarantee the surface is clean and level.
Use an appropriate underlayment for cushioning and moisture control, and follow manufacturer guidelines for expansion gaps and changeover pieces.
Is laminate flooring waterproof enough for kitchens and basements?
Curious whether laminate holds up in kitchens and basements? You’ll find both water-resistant and waterproof laminate options.
Water-resistant handles spills short-term; waterproof planks with sealed edges and appropriate underlayment tolerate more moisture and occasional standing water.
In kitchens, they work well with quick cleanup.
In basements, guarantee moisture barriers, proper acclimation, and correct installation to prevent warping and mold.
How long does laminate installation last and can planks be repaired?
Though longevity depends on product quality and care, most laminate floors last 15–25 years under normal residential use.
You can extend life by avoiding moisture, using area rugs, and replacing underlayment when needed.
Individual planks can be repaired or replaced if snapped or scratched—lift adjoining boards, swap the damaged plank, then reseat joints.
Minor surface damage can be filled or refinished with repair kits.
Can you install laminate on stairs or uneven rooms?
While laminate isn’t typically designed as a stair tread material, you can install it on stairs and in rooms with uneven floors if you take the right precautions and use the proper products.
Use stair nosing, glue or pneumatic fastening per manufacturer, and guarantee each riser/tread is solid and level.
For uneven subfloors, shim, level or add a plywood underlayment before laying laminate.
What is the best way to transition between rooms with different floor heights?
If you’re moving from a room with uneven floors or installing laminate on stairs, you’ll also need to handle any height differences between adjoining rooms.
Use connector strips—reducers, T-molding, or threshold bars—matched to your laminate thickness. Measure gap and choose metal or wood profiles, secure per manufacturer instructions, and allow expansion space.
For large differences, add a plywood ramp or subfloor shim.