How to Cut Ceramic Tile Without Cracking or Chipping It
You can cut ceramic tile cleanly by picking the right tool, securing the tile, and taking your time. Wear safety gear, mark the line, and support the tile to prevent stress points. For straight cuts use a manual cutter or wet saw; for curves use nippers or a diamond wheel. Score evenly, feed the tile slowly, and keep blades cool with water to avoid chipping. Finish edges with a rubbing stone, and keep going to learn more tips and tricks.
How to Cut Ceramic Tile Without Cracking or Chipping It
When you need a clean edge without cracks or chips, choosing the right tool and technique matters most.
Start with a sharp scoring wheel or a wet tile saw and steady hands, and always support the cut line to prevent stress.
Take your time on cuts and finish edges with a rubbing stone or diamond pad for a smooth result.
Best Way to Cut Ceramic Tile Cleanly
Cut tile cleanly by choosing the right tool and technique for the job—wet saws and score-and-snap cutters give smooth edges, while a diamond blade or carbide bit helps with precision cuts and holes.
When you ask how do you cut ceramic tile, follow this emotional checklist:
- Feel confident using proper guides.
- Stay calm controlling speed and pressure.
- Celebrate flawless, chip-free edges.
Understanding Ceramic Tile and Cutting Challenges
You’ll first want to know what ceramic tile is made of—clay body, glaze, and how porcelain differs from standard ceramic—because density and glaze affect how the tile cuts.
Cracking or chipping usually happens from wrong tools, too much pressure, or cutting across a hard glaze or an unsupported edge.
Match the job to the right tool—wet saw, manual cutter, nippers, glass cutter, or angle grinder—to avoid damage and get clean cuts.
What Is Ceramic Tile? Materials, Glaze, and Porcelain vs Ceramic
Ceramic tile combines a clay body with minerals and a glassy glaze, and knowing what each layer does will make cutting—and choosing—the right tile much easier.
You’ll note red or white bodies: red-fired clay is softer, white is finer.
Glaze thickness affects finish and chip resistance.
Porcelain is denser, less porous, and tougher to cut than standard ceramic, so pick tools accordingly.
Why Tiles Crack or Chip During Cutting Common Causes
Knowing the tile’s body and glaze helps, but even with the right choice you’ll still face cracking or chipping if cutting technique, tooling, or handling are off.
You’ll worry when cuts aren’t supported, when blades overheat, or when pressure’s uneven.
Common causes include:
- Insufficient support leading to snap points.
- Overheating causing glaze fracture.
- Uneven pressure and sudden force.
Tools Overview: When to Use Wet Saw, Tile Cutter, Nippers, Glass Cutter, Angle Grinder
When tackling tile cuts, pick the right tool for the job: a wet saw for straight or intricate cuts in thick, porcelain-like tiles; a manual tile cutter for quick straight scores on softer, glazed tiles; nippers for small curved notches; a glass cutter for precise score-and-snap cuts on thin, non-porcelain tiles; and an angle grinder for irregular shapes, plunge cuts, or removing old grout.
| Tool | Best Use |
|---|---|
| Wet saw | Porcelain, intricate |
| Tile cutter | Straight scores |
| Nippers | Notches, curves |
| Grinder/Glass cutter | Irregular/plunge cuts |
Choosing the Right Tool for Your Cut Type
When you’re cutting tile, pick the tool that matches the cut: score-and-snap or a wet saw for straight cuts, a grinder or hole saw for curves and notches.
For small adjustments or lippage-sensitive work, hand nippers and a tile file can be gentler than power tools.
I’ll explain when each option is fastest, cleanest, or safest for your project.
Straight Cuts Best Tools and When to Use Them
Pick the right tool and a straight cut becomes fast, clean, and predictable.
Use a manual score-and-snap cutter for glazed ceramic up to medium thickness—it’s precise, cheap, and leaves minimal chipping.
For thicker or porcelain-like tile, use a wet tile saw with a continuous-rim blade for smooth edges.
Clamp tiles, measure twice, and feed steadily for consistent results.
Curved Cuts and Notches Best Tools and Techniques
Curved cuts and notches demand different tools and techniques than straight cuts, so match your method to the shape and tile type:
Use a wet tile saw with a plunge or scroll blade for smooth arcs on porcelain, a carbide-grit wheel on a rotary tool for small radii, and a diamond-hole saw for rounded openings.
Score then snap only for very shallow curves.
Small Cuts and Lippage-Sensitive Work Hand Tools vs Power Tools
Small, precise cuts and lippage-sensitive jobs demand a different mindset than bulk ripping—you’ll want the tool that gives you control, minimal vibration, and the cleanest edge for tight grout lines. Choose manual nippers or score-and-snap for tiny tweaks; use a wet saw with a continuous-rim blade for near-seam finishes.
| Tool | Best use |
|---|---|
| Tile nippers | Small nibble cuts |
| Score-and-snap | Straight micro cuts |
| Wet saw | Lippage-sensitive edges |
| Grinder | Adjustments, smoothing |
Preparation Before Cutting
Before you make any cuts, put on safety glasses, gloves, and a dust mask and set up a clear, stable workspace.
Measure and mark each tile carefully with a pencil or scoring tool so your cuts are exact.
Clamp or support the tile firmly and score along the line to reduce stress and prevent chipping.
Safety Gear and Workspace Setup
You’ll need the right safety gear and a well-organized workspace before you cut ceramic tile:
- Wear goggles, dust mask, gloves — protect yourself and stay confident.
- Clamp a stable work surface, clear clutter — focus without panic.
- Set up good lighting and ventilation — breathe easy, see every line.
Keep tools handy and cords out of the way to avoid accidents.
Measuring and Marking Tiles Accurately
With your safety gear on and workspace secured, start by measuring the open area and each tile you’ll cut so your layout lines up perfectly at edges and corners.
Use a reliable tape measure and square, mark cut lines with a pencil or wax marker, note grout gaps, double-check measurements, and transfer dimensions to tiles precisely.
Re-measure before any cut.
Clamping, Support, and Scoring Techniques to Minimize Stress
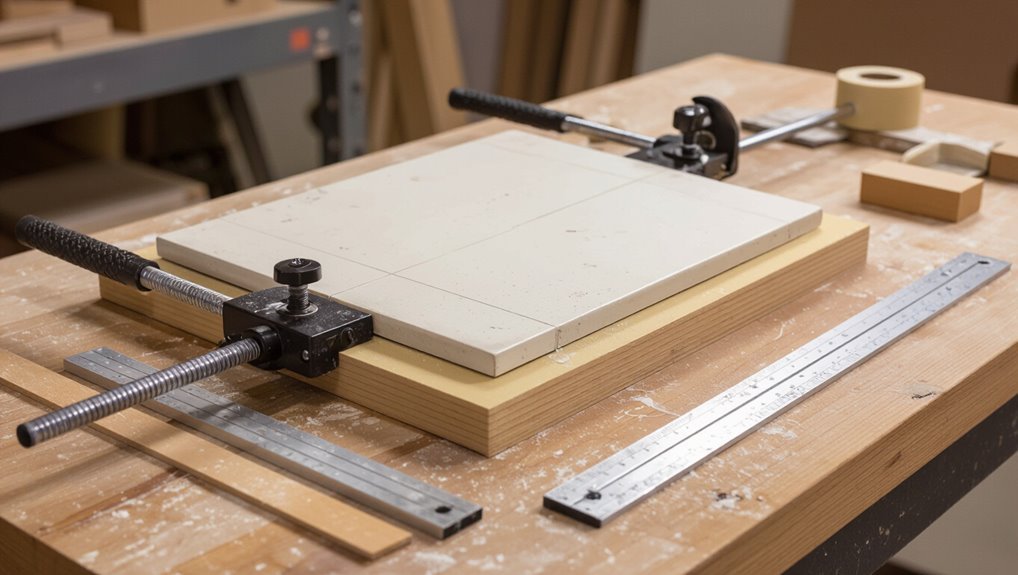
Although delicate, ceramic tiles cut cleanly when you support and secure them properly; clamp the tile or its workpiece firmly, back it with sacrificial wood or rubber padding to distribute pressure, and score consistently along the marked line to guide the break and reduce cracking.
You should position supports close to the cut, avoid over-tightening clamps, use a straightedge, and make a single confident scoring pass.
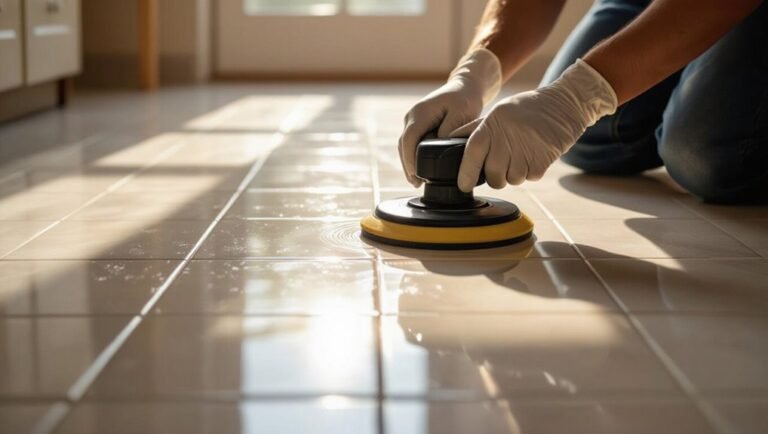
Step-by-Step: Cutting Ceramic Tile Without Chipping (Wet Saw Method)
Start by choosing the right diamond blade and prepping your wet saw so everything’s stable and clean.
Set the water flow, blade speed, and fence, then mark the tile and position it securely for the cut.
Feed the tile steadily with light pressure to keep the blade cool.
Finish the edge with a rubbing stone or file, and inspect the cut for chips or irregularities.
Step 1 Select Blade and Prepare the Wet Saw
Choose the right blade and set up your wet saw before you cut to prevent chipping and get clean edges.
Pick a continuous-rim or fine-grit diamond blade for glazed ceramic. Mount it securely, check for wobble, and confirm the arbor nut is tight.
Clean the table, align the fence, and wear eye, ear, and hand protection.
Inspect the water reservoir and plug in safely.
Step 2 Set Water Flow, Blade Speed, and Fence/Guide
Now you’ll dial in the water flow, blade speed, and fence so the blade cuts cool and steady—minimize chipping by keeping a thin, constant water sheet on the rim, running the blade at the manufacturer’s recommended RPM for tile, and locking the fence square to your cut line.
Adjust water to coat the blade without flooding, set speed per spec, snug the fence, and test spin.
Step 3 Mark the Tile and Position It for the Cut
Measure and mark the cut line clearly with a pencil or non-permanent marker, then align the tile on the saw so that the mark sits directly under the blade’s path.
Support the tile against the fence, clamp or hold it steady, and check for square.
Position any notches or pattern edges outward.
Recheck alignment from both angles before powering the saw.
Step 4 Make the Cut: Feed Rate, Pressure, and Cooling Best Practices
Start the saw, align the marked line under the blade, and feed the tile steadily—too fast will chip, too slow can overheat the blade.
Maintain light, even pressure; let the blade do the work. Keep the water flow steady to cool and flush debris.
Pause if you see overheating or binding, then resume with controlled, consistent feed until the cut’s complete.
Step 5 Finishing Edges and Inspecting the Cut
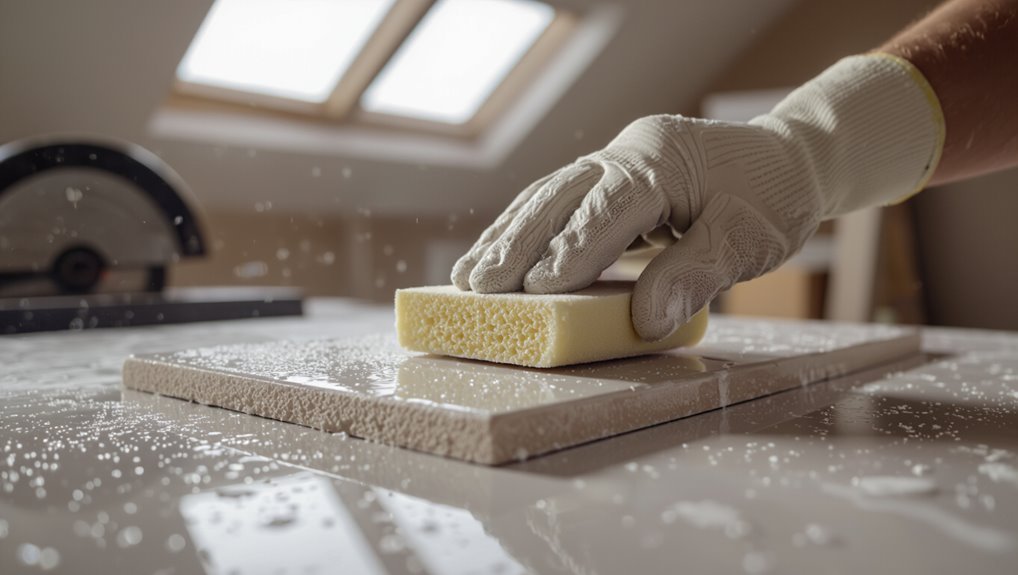
Run your fingers lightly along the cut and look for rough spots, then smooth any burrs with a rubbing stone or fine-grit diamond pad while keeping the tile wet to reduce dust and prevent overheating.
Check the edge for straightness and fit against adjoining tiles.
Remove glaze chips with light passes, dry the tile, inspect for hairline cracks, and discard or repair imperfect pieces.
Step-by-Step: Cutting Ceramic Tile Without Chipping (Manual Score-and-Snap)
When you don’t have a wet saw, you can still get clean cuts with a manual score-and-snap method by choosing the right scoring tool and following a few precise steps.
Score firmly in a single pass, support the tile close to the scoreline, and apply even, controlled pressure to snap without stressing the tile.
Finish the edge with a rubbing stone or fine sandpaper to remove any burrs and guarantee a smooth fit.
Step 1 Choose the Right Scoring Tool
Picking the right scoring tool makes the rest of the manual score-and-snap process much easier and prevents chips and jagged edges.
Choose a carbide-tipped wheel for porcelain and hard ceramics, and a standard carbide or diamond-tipped wheel for softer ceramic.
Prefer a solid, well-aligned hand scorer or adjustable tile cutter with stable bearings.
Inspect the wheel for nicks before cutting.
Step 2 Proper Scoring Technique and Single-Pass Rule
Now place the tile on a stable surface, align your scoring wheel with the cut line, and set your body so you can roll the wheel in a single, confident pass.
Keep steady pressure, maintain wheel contact, and move at a consistent speed. Don’t hesitate or retrace; one clean, uninterrupted score creates a reliable fracture line and minimizes chipping risk along the edge.
Step 3 Snapping Without Stress: Support Points and Controlled Pressure
1. Position the tile so the scored line rests directly over two supports with equal spacing; you’ll want the score centered between them.
Hold the tile firmly but don’t grip the scored edge.
Apply steady, even downward pressure at the center with both thumbs or a controlled press tool until the tile snaps cleanly.
Release gradually to avoid sudden shocks that cause cracks.
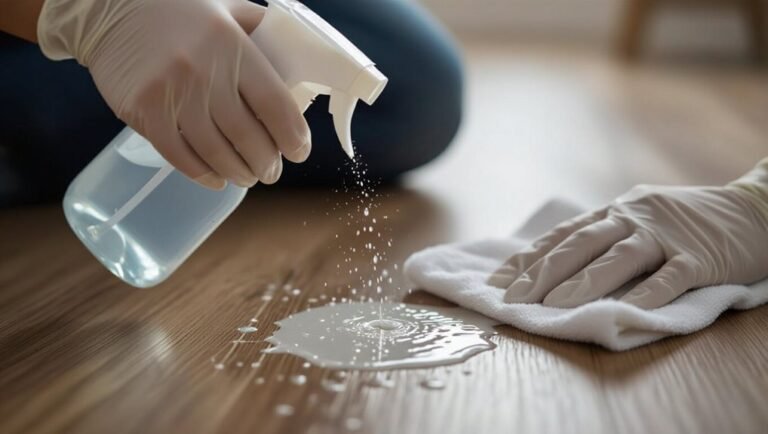
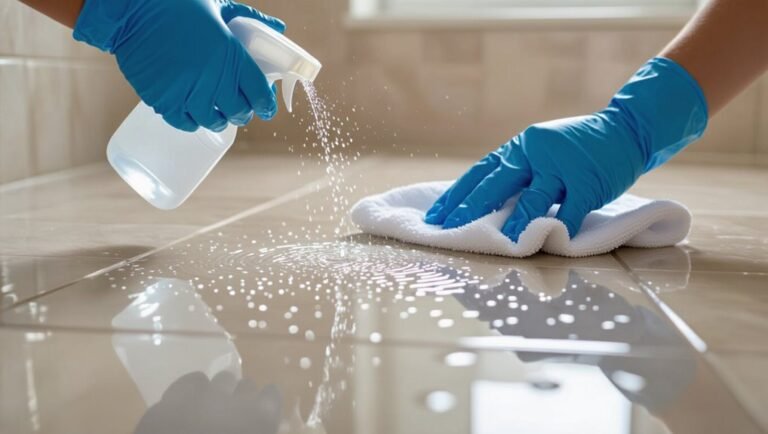
Step 4 Smoothing the Cut Edge with a Rubbing Stone or Sandpaper
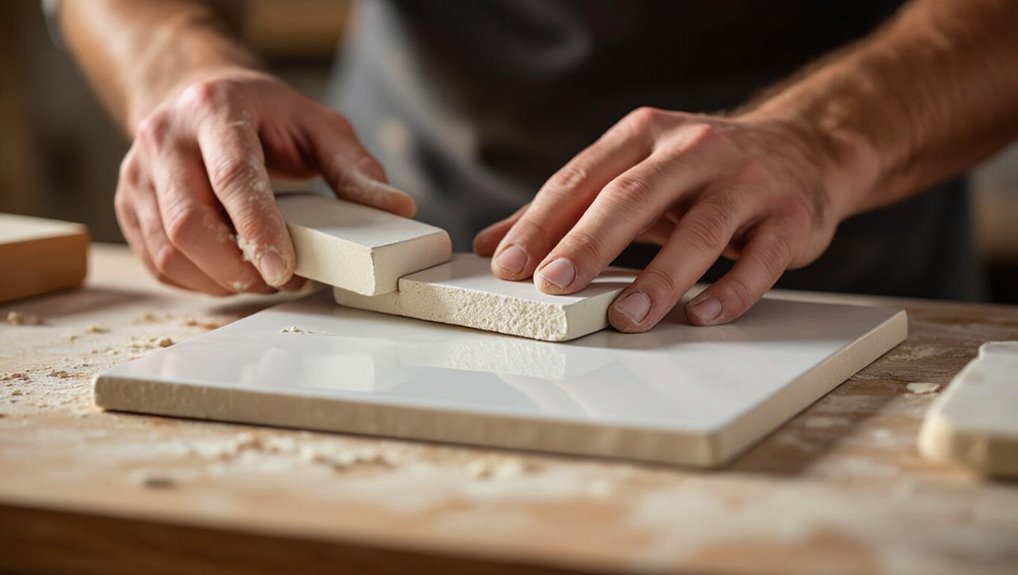
Smooth the fresh edge with a rubbing stone or fine-grit sandpaper to remove burrs and prevent cuts or glaze chipping.
Hold the tile firmly and work along the edge with light, even strokes. Check frequently, wiping dust away.
For glazed edges, use finer grit (220–400). Finish until the edge feels smooth and safe, then clean thoroughly before installation.
Step-by-Step: Cutting Irregular Shapes and Holes
When you need holes for pipes or fixtures, start by marking and drilling pilot holes with the right diamond or carbide bits to prevent cracking.
For internal cutouts and curves, you’ll use a grinder with a diamond blade or tile nippers, working slowly and checking fit as you go.
For complex shapes, make a cardboard or plywood template and try a mock-up on a spare tile before cutting the finished piece.
Drilling Holes for Pipes and Fixtures Bits, Pilot Holes, and Technique
Drilling holes for pipes and fixtures asks for the right bits, a small pilot hole, and steady technique to keep your tile from cracking.
Use a carbide or diamond-tipped bit, clamp the tile, and mark the center.
Drill slowly with water cooling, start with a tiny pilot bit, then progress to the final diameter.
Back off pressure near breakthrough to prevent chipping.
Making Internal Cutouts and Curves with a Grinder or Nippers
Cutting internal cutouts and curves in ceramic tile calls for the right tool and a steady, patient hand: use an angle grinder with a diamond blade for smooth arcs and nippers for small, irregular bites, and plan your sequence so you remove material gradually.
Mark the cut, drill starter holes for internal cuts, score along the line, grind slowly with light passes, and finish edges with a rubbing stone.
Templates and Mock-Ups for Complex Shapes
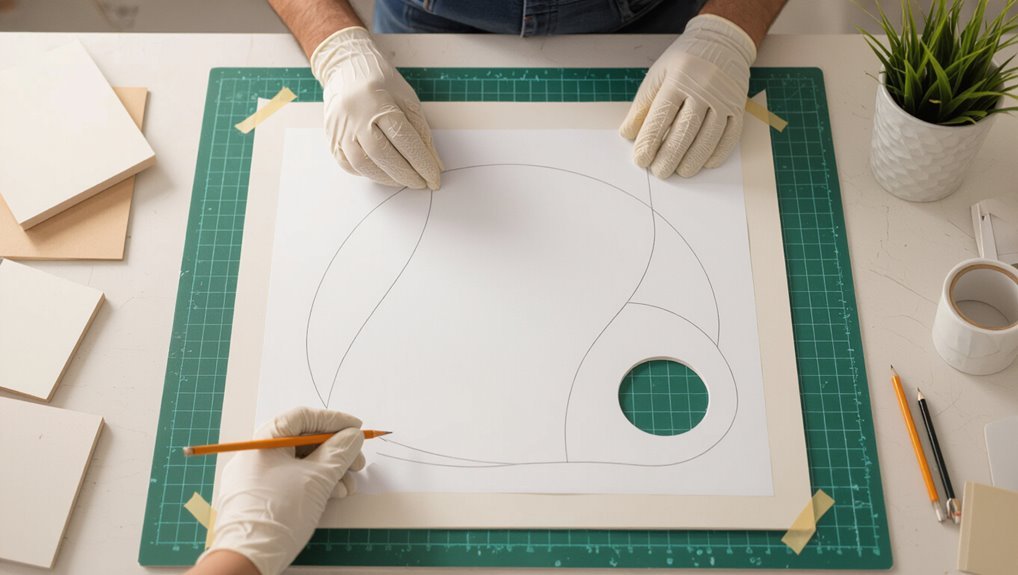
One good template can save you hours and a lot of ruined tile: make a full-size mock-up of the shape or hole on cardboard or thin plywood, test-fit it against the installation, then transfer the outline precisely to the tile before you touch the blade.
Use masking tape to hold the template, mark reference points and centerlines, refine edges with a file, then cut slowly.
Common Mistakes That Cause Chipping or Cracking
When you get chipping or cracking, it’s usually from using the wrong blade or tool or from rushing the cut and applying uneven pressure.
You’ll also see breaks if the tile isn’t properly supported or clamped, or if you ignore the tile’s orientation and glaze direction.
Fixing these common mistakes starts with the right gear, steady technique, and proper support.
Using the Wrong Blade or Tool
Choose the right blade or tool and you’ll avoid most chips and cracks; pick the wrong one and even careful hands won’t save the tile.
Use a blade rated for ceramic—diamond or continuous-rim wet blades—keep it sharp, and match the cutter to the tile thickness.
Don’t try abrasive cutting discs or dull blades; they tear glaze and cause fractures.
Rushing the Cut or Applying Uneven Pressure
If you rush the cut or push unevenly, you’ll almost always end up with chips or hairline cracks; steady, consistent pressure is what keeps the blade tracking cleanly through the glaze and body of the tile.
Move at a controlled pace, let the tool do the work, and avoid jerky starts or stops. Smooth, even motion produces clean edges and reduces stress fractures.
Insufficient Support or Incorrect Clamping
Because tile needs a stable base, failing to support it properly or clamping it wrong lets the cut vibrate and the edges chip or crack.
You should rest the tile on a flat, padded surface, support both sides of the scored line, and use soft-faced clamps or tape to hold it.
Reduce movement, avoid over-tightening, and check alignment before cutting.
Ignoring Tile Orientation and Glaze Direction
When you ignore tile orientation and which side has the glaze, you’re increasing the chance that the cut will chip or the glazed face will crack.
You should mark the glazed side, align the score toward the unglazed back, and cut with the glaze facing up when recommended.
Consider these consequences:
- Heartbreak over ruined tiles.
- Wasted time and money.
- Frustration and lost confidence.
Prevention, Troubleshooting, and Best Practices
To prevent chips and cuts that crack, choose and maintain the right blade—dress or replace it when it dulls.
Feed the tile at a steady, moderate rate with multiple shallow passes and use water or air to keep the cut cool.
If you hit a nick, I’ll show quick repair techniques and ways to salvage partially cut tiles.
Blade Selection and Maintenance (Dressing, Replacing)
Choosing and caring for the right blade keeps cuts clean and speeds your work, so pick a diamond blade matched to ceramic tile (continuous rim for glazing, segmented or turbo for thicker or harder tiles) and inspect it regularly for wear, glazing, or uneven teeth.
Dress a glazed blade with a dressing stone or a sacrificial concrete block to expose fresh grit, and replace any blade that shows cracks, missing segments, excessive wobble, or diminished performance.
Dress blades gently, avoid overheating, store them dry, and rotate or replace blades when cutting quality drops to prevent chipping and unsafe operation.
Optimal Feed Rates, Multiple Passes, and Cooling Strategies
One good rule is to match feed rate, pass depth, and cooling so your blade slices cleanly without overheating or binding.
Cut slowly with steady pressure; let the diamond edge do the work. Use multiple shallow passes for thick or hard glaze.
Keep water flow steady or pause to cool between passes. Inspect cuts and adjust speed if burning or chipping appears.
How to Repair Minor Chips and Salvage Cut Tiles
Catch minor chips quickly and you can usually fix them without replacing the tile. Use epoxy or color-matched filler to rebuild edges, sand gently, then seal.
If cuts cracked, stabilize with thinset and backerboard.
- Act fast — protect appearance.
- Repair carefully — avoid overfilling.
- Accept limits — replace if structural.
You’ll save tiles and stay proud of the finish.
Tool Comparison and Cost vs Precision Tradeoffs
When choosing a tool, you’ll weigh wet saws, manual cutters, and grinders for their speed, accuracy, and cost.
For large or porcelain jobs a wet saw gives the cleanest cuts, while manual cutters work fine for smaller ceramic tiles and grinders handle curves or adjustments.
Match the tool to your project size and tile type to avoid paying for precision you don’t need or settling for tools that won’t do the job.
Wet Saw vs Manual Cutter vs Grinder Pros and Cons
Although each cutting method can handle tile, choosing between a wet saw, a manual cutter, and an angle grinder changes how fast, clean, and precise your cuts will be—and how much you’ll spend. You’ll favor a wet saw for precision, a manual cutter for quick straight cuts, and a grinder for curved or notches; each balances speed, cost, and finish.
| Tool | Speed | Finish |
|---|---|---|
| Wet saw | Medium | Smooth |
| Manual cutter | Fast | Clean |
| Grinder | Variable | Rough |
Recommended Tools by Project Size and Tile Type
For small DIY jobs with basic ceramic or glazed wall tile, you’ll usually get by with a manual cutter and a handheld grinder for odd cuts. For larger floors or porcelain, a wet saw saves time and reduces breakage.
Choose by scale, budget, and precision:
- Manual cutter — cheap, satisfying.
- Grinder — versatile, nerve‑wracking.
- Wet saw — costly, calming accuracy.
Quick Checklist Before You Cut
Before you start cutting, check your workspace, tools, and personal protective gear so nothing surprises you mid-cut.
Make sure the tile is measured and marked, the cutter or blade is securely mounted, and your respirator, eye protection, and gloves are on.
Confirm that clamps, water supply (if wet cutting), and a clear escape path for cut pieces are in place.
Pre-Cut Safety and Setup Checklist
1. You’re ready—pause. Check safety gear, secure workspace, and confirm measurements before any blade touches tile.
- Wear goggles, gloves, dust mask.
- Clamp tile to a stable surface; use non-slip mat.
- Inspect blade; test cut on scrap.
These steps protect you and your project, reducing chips, cracks, and frustration.
Proceed only when everything’s set.
Frequently Asked Questions
You probably have a few specific questions before you start cutting, like whether a regular circular saw will do or if you need a diamond blade.
You’ll also want to know how to protect glaze on delicate tiles, cut openings for outlets and switches, and when to choose wet versus dry cutting.
I’ll answer each of these clearly so you can pick the right tools and techniques.
Can I cut ceramic tile with a regular circular saw?
Wondering if a regular circular saw will cut ceramic tile? You can, but only with the right blade and setup.
Fit a continuous-rim or diamond blade rated for wet cutting, clamp the tile, and run slowly to avoid overheating.
Use water for cooling and dust control, steady support, and proper safety gear. Without these, you’ll risk cracking, chipping, or ruining the blade.
How do I prevent glaze from chipping on delicate tiles?
If you’ve been cutting tiles with a wet-rated diamond or continuous-rim blade, take the same care to protect delicate glazes: support the tile firmly, score first if possible, and keep cuts slow and cool to minimize vibration and chipping.
Use a sacrificial backing board, clamp edges, run water consistently, and finish with fine-grit sanding or a touch-up ceramic pen for any tiny nick.
Is a diamond blade necessary for ceramic tile?
Need a diamond blade to cut ceramic tile? Not always. For thin, glazed ceramic, a carbide-tipped scoring wheel or snap cutter can work cleanly.
But for porcelain, large tiles, or wet saw jobs, diamond blades give smoother cuts, less chipping, and longer life.
Choose a continuous rim or fine-grit blade for delicate finishes, and match blade type to tile hardness and cutting method.
How do I cut tiles for electrical outlets and switches?
When you’re tiling around electrical outlets and switches, plan and measure carefully so cuts fit snugly and keep wiring safe; mark the tile precisely, account for the box depth and cover plate, and cut using the appropriate tool (tile nippers, a carbide nibbling tool, or a wet saw with a diamond blade) to get clean, straight notches or openings.
Double-check fit, smooth edges with a file, and test placement before installing.
How do I choose between wet cutting and dry cutting?
Because each method has different risks, speeds, and finishes, you’ll want to match the cut type to your tile, workspace, and comfort level:
Wet cutting controls dust, cools the blade, and reduces chipping—choose it for porcelain, dense tiles, or indoor work.
Dry cutting is portable and faster but creates dust and heat; use it for small jobs, softer tiles, or where water isn’t practical.