How to Clean Rubber Gym Floors Safely and Effectively
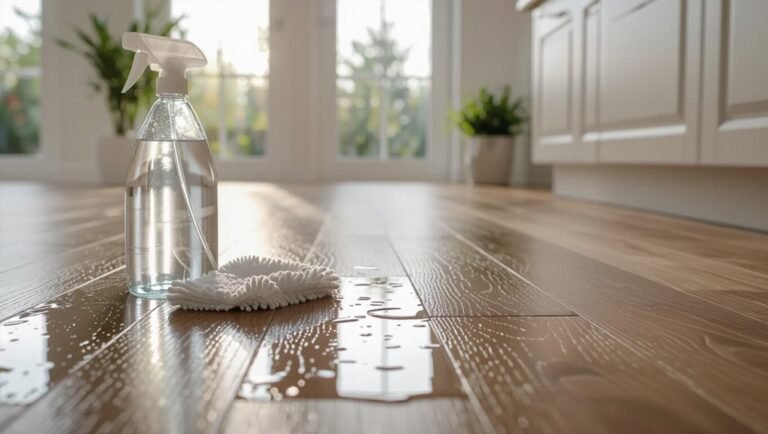
You can keep rubber gym floors safe and lasting by using pH‑neutral cleaners, soft mops or brushes, and minimal water; sweep or vacuum daily, spot‑clean spills immediately, and damp‑mop weekly with the manufacturer’s diluted solution. For deeper cleaning use a low‑RPM scrubber or manual brush, rinse lightly, and dry quickly with fans to avoid mold or adhesive damage. Wear gloves and slip‑resistant shoes, test products first, and follow warranty guidelines — more practical steps and schedules follow.
Can You Clean Rubber Gym Floors Safely and Effectively?
Yes—you can clean rubber gym floors safely and effectively with the right products and methods.
Use a pH-neutral cleaner, soft mop, and avoid harsh solvents or abrasive tools.
A routine cleaning takes about 15–30 minutes for a typical room, with deeper cleaning needing an hour or more.
Short, direct recommendation and time estimate
If you stick to mild cleaners, soft mops, and regular maintenance, you can clean rubber gym floors safely and effectively without special training; a quick daily sweep and a 10–20 minute wet mop session once or twice a week usually keeps them in good shape.
To answer how do you clean rubber gym floors: spot-clean spills promptly, dilute pH-neutral cleaner, mop gently, rinse, and dry.
Basic Understanding What Are Rubber Gym Floors and Why Care?
Rubber gym floors come in rolled sheets, interlocking tiles, or poured rubber, and each type needs different handling.
You’ll see sweat, chalk, oils, scuffs, and bacterial buildup that shorten the floor’s life if left unchecked. Using the wrong cleaners, scrubbing too hard, or leaving moisture behind can permanently damage rubber, so you’ll want the right care from the start.
Types of rubber gym flooring (rolled, interlocking tiles, poured rubber)
Floors come in three main rubber styles—rolled sheets, interlocking tiles, and poured-in-place—and each suits different spaces and needs.
You’ll pick based on budget, installation, and use. Consider:
- Rolled: seamless, good for large areas.
- Interlocking: DIY-friendly, replaceable.
- Poured: custom, durable.
- Thickness: affects shock absorption.
- Maintenance: varies by material.
Common contaminants and wear patterns (sweat, chalk, oils, scuffs, bacteria)
You’ll encounter a handful of common contaminants—sweat, chalk, oils, scuffs, and microbes—that drive most wear and maintenance issues on gym rubber surfaces.
You’ll see sweat and oils darken or stain, chalk creates abrasive residue, scuffs abrade textures, and microbes cause odors and hygiene risks.
Spot-cleaning, routine sweeping, and targeted disinfection help prevent buildup and slow visible wear.
Why improper cleaning damages rubber (chemicals, abrasion, moisture)
Spot-cleaning and routine care will keep grime at bay, but using the wrong cleaners or techniques can do more harm than good.
You risk chemical degradation from bleach, ammonia, or harsh solvents that break down rubber polymers. Excessive scrubbing creates abrasion and dulls surfaces. Overwetting traps moisture, fosters mold, and weakens adhesives.
Use pH-neutral cleaners, soft tools, and controlled drying.
Safety and Preparation Before Cleaning
Before you start cleaning, make sure you’ve got the right PPE—gloves, eye protection, and non-slip shoes—and a checklist of tools like vacuums, mops, scrubbers, and pH-neutral cleaners.
Test any cleaner on a small, inconspicuous patch and wait the recommended time to check for discoloration or damage.
Close or restrict access to the gym while you clean to keep people safe and let the floor dry fully.
Required personal protective equipment (PPE)
1 key step before you start cleaning rubber gym floors is putting on the right PPE to protect yourself from chemicals, slips, and airborne dust.
Wear chemical-resistant gloves, slip-resistant closed-toe shoes, and safety goggles.
If you’ll be using concentrated cleaners or working in dusty areas, add a respirator or mask and protective clothing.
Replace damaged PPE and inspect fit before starting.
Tools and supplies checklist (mops, scrubbers, vacuums, pH-neutral cleaners)
Gathering the right tools and supplies makes the job faster and prevents damage to the rubber surface.
You’ll want reliable, gentle equipment and cleaners suited for rubber.
Essential items include:
- Microfiber mop with wringer
- Soft-bristle scrub brush or floor machine pad
- Commercial wet/dry vacuum
- pH-neutral floor cleaner
- Replacement mop heads and clean buckets for rinsing
How to test a cleaner on a small area (spot test procedure)
With your tools and cleaner ready, you’ll want to confirm the solution won’t harm the rubber by testing it on a small, out-of-the-way spot first.
Dampen a microfiber cloth, apply cleaner, wait 10 minutes, then blot and inspect for fading, swelling, or residue.
If unchanged, proceed; if you see damage, rinse immediately and choose a milder, pH-neutral product.
When to close or restrict access to the gym
Because cleaning can create slip and trip hazards, you should close or restrict access whenever the floor will be wet, when you’re using equipment that leaves residues, or during deep-cleaning cycles that take sections out of service.
Post clear signage, block entrances, and notify staff and members in advance.
Schedule cleaning during low-traffic hours and reopen only after surfaces are fully dry and safe.
Quick Daily Maintenance (Routine Tasks)
Keep your rubber gym floors in top shape with a few quick daily tasks: sweep or vacuum to remove grit, spot-clean fresh sweat and spills with a mild cleaner, and deodorize high-traffic areas as needed.
Use a soft-bristle brush or vacuum with a hard-floor setting to avoid scuffing, and blot spills immediately to prevent staining.
For odor control, try a diluted enzymatic spray or a pH-neutral deodorizer that’s safe for rubber.
Daily sweeping and vacuuming best practices
If you want your rubber gym floor to stay safe and last longer, sweep or vacuum it every day to remove grit, sweat and debris before they grind into the surface.
Use a soft-bristle broom or vacuum with a rubber-floor setting, work in overlapping passes, empty collection bins daily, and focus on high-traffic zones.
Don’t use beater bars or harsh brushes.
Spot-cleaning fresh sweat and spills
Blot fresh sweat and spills as soon as you notice them to prevent staining and odor buildup.
Use a clean microfiber cloth or paper towels, pressing—don’t rub—to lift moisture.
Apply a mild dish soap solution sparingly for sticky residue, then rinse with a damp cloth.
Dry the area thoroughly.
Repeat if needed, and avoid harsh chemicals or abrasive scrubbing that can damage the rubber.
Quick deodorizing methods and products
After you’ve treated fresh spots, tackle lingering odors with quick deodorizing steps you can do daily.
Sweep or vacuum, then mist a diluted enzymatic spray or a 50/50 vinegar-water solution lightly—don’t saturate. Let air circulate and dry.
For heavier areas, sprinkle baking soda, wait 15–30 minutes, then vacuum. Use products labeled safe for rubber and follow manufacturer directions.
Deep Cleaning Step-by-Step
Before you start deep cleaning, clear the area and move equipment so you can work unimpeded.
Sweep or HEPA-vacuum loose debris, then mix a pH-neutral cleaner to the proper ratio and let it sit the recommended contact time.
Use soft brushes or the correct pad for manual scrubbing, and follow machine-guidelines for RPM, pad type, and water use when scrubbing larger areas.
Step 1 Pre-clean: clear area and remove equipment
Start by clearing the workout area so you can access the whole floor surface—move dumbbells, benches, mats, and any portable equipment to a nearby room or against the wall.
Then prepare for cleaning by organizing items and checking for damage:
- Remove loose items and trash
- Stack mats neatly
- Unplug machines
- Label small gear
- Inspect the floor for tears or seams
Step 2 Dry debris removal: sweeping and HEPA vacuuming
With the area cleared and equipment moved, you’ll tackle dry debris next by sweeping and HEPA vacuuming to remove dust, chalk, hair, and grit that can abrade the rubber.
Use soft-bristle push brooms and a slow, overlapping pattern, then HEPA-vacuum edges and seams.
Empty filters regularly, inspect for stuck particles, and repeat until the surface looks uniformly clean and free of loose debris.
Step 3 Diluting and applying pH-neutral cleaner (ratios and contact times)
Solution: mix a pH‑neutral cleaner at the manufacturer’s recommended ratio and apply it evenly so the rubber soaks just long enough to loosen soil without over‑wetting seams.
Use measured buckets or a calibrated sprayer, note dwell time (usually 5–10 minutes), and work in small sections.
Rinse or extract promptly to remove residue and prevent slickness or discoloration.
Step 4 Manual scrubbing techniques by floor type (soft brush, pad selection)
Grab the right tool and match it to the rubber type: use a soft-bristle brush or a low‑speed rotary with a soft pad for vulcanized or cushioned rubber, a medium‑soft brush or a white/green scrubbing pad for gym tiles, and avoid hard nylon or abrasive pads on bonded rubber to prevent texturing or tearing.
Work in overlapping strokes, moderate pressure, and rinse frequently to lift soil without damage.
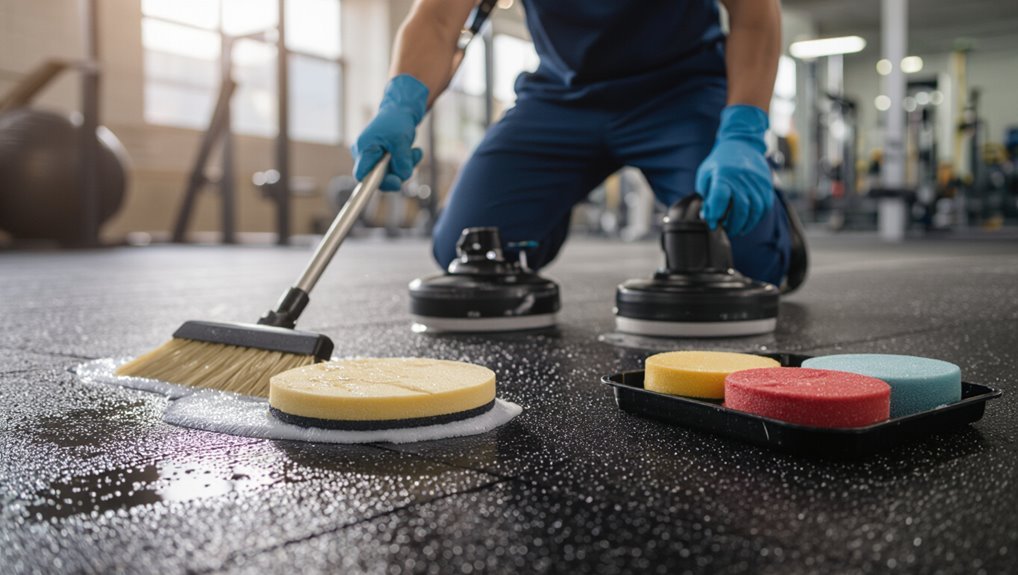
Step 5 Machine scrubbing guidelines (RPM, pad type, water use)
Step 5 moves you from hands-on scrubbing to machine cleaning—set RPM, pad type, and water flow to match the rubber and soil level so you get deep cleaning without damage.
Use low RPM (175–300) for soft or textured rubber, higher (300–600) for dense floors.
Choose non-abrasive pads, control water to avoid pooling, and make slow, overlapping passes for even agitation.
Step 6 Rinsing and squeegee extraction procedures
1. After scrubbing, rinse thoroughly with clean water to lift residual detergent and loosened grime.
Use a floor squeegee to push rinse water toward drains, working in overlapping passes.
For large areas, run a wet-vac or extraction machine along the squeegee channels, keeping suction low to moderate to avoid delamination.
Repeat until water runs clear.
Step 7 Drying and moisture control to prevent mold or delamination
After rinsing, dry the floor promptly and thoroughly to prevent moisture from seeping into seams or under the rubber and causing mold or delamination.
Use a wet/dry vacuum, squeegees, and clean microfiber mops to remove standing water.
Increase ventilation with fans and dehumidifiers, monitor moisture with a meter, and avoid reopening the area until readings show the floor is fully dry and stable.
Specialized Cleaning Scenarios and Solutions
You’ll encounter stains, odors, and physical damage that need different fixes—oil and ink often need targeted solvents, rust and adhesive may require mechanical removal, and scuffs or gouges call for temporary patching or professional repair.
Learn when enzymatic cleaners are better for organic smells and bacteria versus when disinfectants are required for sanitizing.
Also follow careful techniques for cleaning painted or logo areas so you don’t strip or fade the design.
Removing stubborn stains: oil, ink, rust, adhesive (step tactics)
Stains like oil, ink, rust, and adhesive each demand a specific tactic, so identify the material first and tackle it with the matching cleaner and tool—this cuts trial-and-error and prevents damage to the rubber.
- Oil: absorb, degreaser, soft brush.
- Ink: isopropyl wipe, blot, repeat.
- Rust: mild acid paste, rinse thoroughly.
- Adhesive: commercial remover, plastic scraper.
- Test first on an inconspicuous spot.
Dealing with odor and bacterial build-up (enzymatic cleaners vs disinfectants)
Once you’ve removed surface blemishes, tackle lingering odors and bacterial buildup with products chosen for their action, not just their scent.
Use enzymatic cleaners for organic odors—they break down sweat and urine at the source.
For infection control, apply EPA-registered disinfectants per label contact times.
Rinse or neutralize residues to prevent slippery floors and preserve rubber integrity.
Repairing scuffs, gouges, and seam issues (temporary fixes and when to replace)
Minor scuffs, deeper gouges, and loose seams each need different fixes, so assess the damage before you start.
For scuffs, scrub with a mild cleaner and a soft brush.
Fill small gouges with a rubber floor patch or two-part epoxy.
Re-glue loose seams with recommended adhesive and clamps.
Replace tiles or sheets when damage compromises safety or water resistance.
Cleaning painted or logo areas without damage
If your rubber floor has painted designs or logos, treat those areas gently to avoid lifting paint or dulling the graphics.
Use a soft microfiber mop or cloth, mild pH-neutral cleaner diluted per directions, and blot rather than scrub.
Test any product in an inconspicuous spot first.
Avoid harsh chemicals, abrasive pads, steam cleaners, and prolonged wetting to preserve color and adhesion.
Comparison of Cleaners and Tools
When choosing products and equipment, you’ll weigh pH-neutral cleaners, alkaline options, and solvents for stain and grease removal.
You’ll also compare manual tools, single-disc machines, and automatic scrubbers for coverage, control, and floor impact.
Finally, match recommended products and materials to your specific rubber floor type to protect finish and longevity.
pH-neutral cleaners vs alkaline cleaners vs solvents
Because different spills and traffic levels call for different chemistry, choosing between pH-neutral cleaners, alkaline cleaners, and solvents matters for both cleaning power and floor longevity. You’ll use pH-neutral for routine cleaning, alkaline for heavy soils, and solvents sparingly for stubborn spots—always test first.
| Type | Best for | Caution |
|---|---|---|
| pH-neutral | Daily cleaning | Safe, gentle |
| Alkaline | Grease, heavy soil | Can dull finish |
| Solvents | Spot removal | Use minimal, ventilate |
Manual tools vs single-disc machines vs automatic scrubbers
Although each tool can get rubber gym floors clean, choosing between manual tools, single-disc machines, and automatic scrubbers comes down to scale, budget, and desired labor intensity. You’ll pick manual for spot cleaning and low cost, single-disc for moderate jobs and burnishing, or automatic scrubbers for large areas and efficiency.
| Tool | Best use | Labor |
|---|---|---|
| Manual | Small/spot | Low |
| Single-disc | Medium | Moderate |
| Scrubber | Large | Low |
Recommended products and materials by floor type
Pick cleaners and tools based on your rubber floor type—interlocking tiles, poured rubber, or recycled crumb—so you get effective cleaning without damage.
Choose pH-neutral cleaners, soft brushes, and low-speed machines for delicate surfaces. Match stronger degreasers with sealed poured rubber only.
Consider traction mats for high-wear areas.
- pH-neutral cleaner
- Soft-bristle broom
- Microfiber mop
- Low-speed single-disc
- Sealed-floor degreaser
Common Mistakes That Damage Rubber Floors
Don’t use harsh chemicals, over-wet the surface, or scrape with metal or abrasive pads, because those habits can permanently damage your rubber floor.
Excess water and poor drying promote mold and adhesive failure, while abrasive tools and wrong cleaners strip the finish or gouge the material.
Always follow the manufacturer’s guidelines to avoid costly mistakes.
Harmful chemicals and why to avoid them
When you clean rubber gym floors with harsh solvents, bleach, or ammonia-based cleaners, you’ll strip protective coatings, cause discoloration, and accelerate material breakdown.
These products can also leave residue that attracts dirt and makes the surface slippery. Avoid petroleum solvents, strong acids, and solvent-based degreasers.
Use pH-neutral cleaners formulated for rubber, test a small area first, and follow manufacturer guidance to preserve appearance and longevity.
Over-wetting and poor drying consequences
Because rubber absorbs and holds moisture, over-wetting during cleaning and slow drying can cause swelling, delamination, mold growth, and a weakened bond to the subfloor.
You should use minimal water, wring mop heads thoroughly, and speed drying with fans or dehumidifiers.
Inspect seams after cleaning, avoid puddles, and address damp spots immediately to prevent structural damage and persistent odors.
Using abrasive pads or metal tools
1 simple mistake can ruin a rubber gym floor: using abrasive pads or metal tools that scrape the surface.
Don’t grab wire brushes, scouring pads, or metal scrapers—they gouge, dull, and remove protective coatings.
Instead, use soft-bristled brushes or non-abrasive pads and plastic scrapers for stubborn spots.
Treat the floor gently to preserve texture, traction, and lifespan.
Ignoring manufacturer guidelines
If you skip the manufacturer’s care instructions, you’re gambling with your floor’s warranty and longevity.
Follow recommended cleaners, dilution ratios, and cleaning frequency to avoid discoloration, breakdown, or voided warranties.
Don’t improvise with harsh chemicals, sealers, or high-temperature steam.
When in doubt, contact the manufacturer for approved products and methods—doing so preserves performance and saves repair or replacement costs.
Preventive Maintenance and Best Practices
You should set a routine maintenance schedule—daily spot cleaning, weekly mopping, monthly inspections, and annual deep care—to keep rubber floors in top shape.
Use protective measures like entrance mats, clear shoe policies, and equipment pads, and adjust frequency during high-traffic seasons or events.
Call professionals for restorative cleaning when stains, odor, or wear exceed what regular maintenance can handle.
Routine maintenance schedule (daily, weekly, monthly, annual)
Because regular care keeps rubber gym floors safe and long-lasting, set a clear routine that breaks tasks into daily, weekly, monthly, and annual actions.
Daily: sweep or vacuum, spot-clean spills.
Weekly: damp-mop with pH-neutral cleaner, inspect seams.
Monthly: deep-clean with low-speed scrubber, check for wear.
Annual: professional inspection, reseal or repair damaged areas as needed.
Protective measures: mats, shoe policies, equipment pads
Alongside a regular cleaning schedule, take steps that reduce wear before it starts by using protective mats, enforcing shoe policies, and fitting equipment with pads.
Use durable entrance mats to trap grit, place rubber or foam under heavy machines, ban spiked or outdoor shoes, and require clean indoor-only footwear.
Inspect pads regularly and replace worn pieces to prevent concentrated damage and simplify cleaning.
Seasonal and heavy-use adjustments
When seasons change or your facility sees spikes in traffic, adjust maintenance routines to prevent accelerated wear and hygiene issues.
Increase sweeping and damp-mopping frequency, switch to wet-cleaning after heavy events, and use neutral pH cleaners to avoid surface damage.
Inspect seams and high-traffic zones weekly, rotate mats and equipment, and document findings to tailor cleaning cadence and supplies seasonally.
When to call professionals for restorative cleaning
If your increased maintenance efforts—more frequent sweeping, wet-cleaning after events, and weekly seam inspections—still leave stains, lingering odors, deep embedded dirt, or signs of physical breakdown, it’s time to bring in professionals for restorative cleaning.
You should call them when DIY methods fail, odors persist, seams delaminate, heavy abrasion or chemical damage appears, or you need restoration-grade equipment and sealing to extend floor life.
Cost, Time, and Environmental Considerations
You’ll want to plan for time and labor — expect routine cleaning for a typical gym area to take 30–90 minutes per session depending on size and equipment.
Weigh DIY costs (cleaners, tools, your labor) against professional service rates, which vary by region and frequency.
Also choose eco-friendly products and proper wastewater handling to minimize environmental impact and potential disposal fees.
Estimated time and labor for typical gym areas
For a typical mid-sized gym (3,000–5,000 sq ft), plan on 1–2 hours of focused floor cleaning each day—about 2–3 staff-hours if you rotate employees or split tasks.
Inspect high-traffic zones daily, spot-clean equipment areas, and deep-clean rubber sections 1–2 times weekly.
Allocate extra time after events or heavy sweat periods; adjust staffing for rush mornings and weekends.
Cost ranges for DIY vs professional services
After estimating time and staffing needs, weigh the costs of handling rubber-floor care yourself versus hiring pros. You’ll spend less on supplies DIY—$50–$300 for cleaners and machines—but pay more in labor. Pros cost $0.50–$3.00/ft² including equipment and disposal. Choose based on budget, frequency, and downtime tolerance.
| Option | Typical Cost |
|---|---|
| DIY | $50–$300 |
| Pro | $0.50–$3/ft² |
Eco-friendly products and waste-water handling
While choosing eco-friendly cleaners and handling wastewater might take a bit more planning, you’ll cut long-term environmental impact and often reduce regulatory hassle. Biodegradable, low-VOC detergents typically cost a little more upfront but can lower disposal fees and liability.
You should pick concentrated formulas, measure accurately, and use filtration or retention systems so runoff meets local discharge rules, saving time and fines.
FAQ Common Questions About Cleaning Rubber Gym Floors
You’ll want clear answers to common concerns like whether bleach or strong disinfectants are safe, how often to deep clean versus spot clean, and whether steam cleaning can harm the rubber.
We’ll also cover how to remove and prevent odors and what cleaning practices might void your warranty.
Read on for practical, warranty-safe guidance.
Can I use bleach or disinfectants on rubber floors?
If you’re wondering whether bleach or harsh disinfectants are safe for rubber gym floors, the short answer is: usually no—at least not undiluted or used frequently.
They can discolor, degrade, and make surfaces brittle.
Instead, dilute mild neutral pH cleaners, use EPA-approved sanitizers safe for rubber, test a small area first, rinse thoroughly, and ventilate.
Follow manufacturer guidelines.
How often should I deep clean versus spot clean?
How often you deep clean versus spot clean depends on foot traffic, activity type, and visible soil.
High-traffic commercial gyms usually need a weekly deep clean plus daily spot cleaning, while low-traffic home or private studio floors can get by with a monthly deep clean and as-needed spot treatment.
Inspect daily, mop or vac as needed, and escalate to deep cleaning when dirt, odor, or wear become noticeable.
Will steam cleaning damage rubber flooring?
When deciding between spot treatments and deeper methods, you might wonder whether steam cleaning can safely remove grime without harming your rubber floor.
Steam can soften adhesives and lift finishes if temperature or pressure’s too high. Use low-heat, low-pressure steam, test a hidden area first, and avoid prolonged exposure.
For heavy buildup, opt for manufacturer-approved cleaning or mechanical extraction instead.
How do I remove and prevent unpleasant odors?
Because rubber traps sweat and bacteria, you’ll want to tackle odors quickly by cleaning, drying, and deodorizing regularly.
Sweep and mop with a pH-neutral cleaner, rinse thoroughly, and dry with fans.
Use enzyme-based deodorizers or diluted vinegar for persistent smells.
Keep ventilation strong, clean mats often, and address spills immediately to prevent bacteria buildup and recurring odors.
What warranty issues arise from improper cleaning?
Those odor-control steps also protect your warranty: manufacturers often void coverage if you use harsh chemicals, abrasive tools, or let moisture and bacteria sit on the surface.
If you ignore recommended cleaners, leave standing water, or scrub improperly, you could lose repair or replacement rights.
Always follow care guidelines, keep records of maintenance, and use approved products to preserve warranty protection and avoid costly disputes.
Quick Checklist Before and After Cleaning
Before you start scrubbing, run through a quick checklist to make sure the job goes smoothly and safely:
- Clear equipment and debris so nothing blocks cleaning.
- Test cleaner on a small patch to avoid damage.
- Wear gloves and non-slip shoes for protection.
- Ventilate the area to speed drying and remove fumes.
- Inspect for damage after cleaning and report any issues promptly.