How to Remove Ceramic Tile From a Wall Without Cracking the Board
You can remove ceramic wall tile without cracking the backer board if you work methodically and use the right tools. Score the grout, pry a corner gently with a thin putty knife or oscillating tool, then lift tiles in small sections with a pry bar and suction cup. Keep tools low-angle to avoid gouging, soften stubborn thinset, and patch any shallow voids with thinset. Wear PPE and protect the area; keep going and you’ll find detailed steps, tips, and troubleshooting ahead.
Quick Answer Can You Remove Wall Ceramic Tile Without Cracking the Backer Board?
Yes — you can often remove wall ceramic tile without cracking the backer board by working slowly and using the right tools and technique.
Expect the job to take several hours for a small area and longer for larger sections, and have a pry bar, hammer, chisel, utility knife, and safety gear on hand.
It’s a moderate-skill task: careful, patient homeowners can do it, but pros are worth hiring if the board must stay intact or the tile is stubborn.
Short summary of safest approach
You can often remove wall ceramic tile without cracking the backer board by working slowly, using the right tools, and following a careful sequence—start by scoring grout, pry a loose tile at a corner with a thin putty knife or pry bar, and tap gently behind the tile to break the adhesive bond rather than forcing the whole sheet off at once.
To answer how do I remove ceramic tile from a wall, proceed methodically.
Time, tools, and skill level needed
Although it’s possible to remove wall ceramic tile without cracking the backer board, it takes patience, the right tools, and some basic DIY skill to do it reliably.
Expect several hours for a small wall, longer for larger areas.
You’ll need protective gear, a utility knife, hammer, chisel or oscillating tool, pry bar, and steady hands.
Start slowly; practice on a scrap.
Basic Understanding What You’re Removing and Why It Matters
Before you start prying tiles off, you need to know what you’re actually dealing with: different tiles and adhesives bond differently and demand different tools.
Check the backer board—cement board, drywall, or greenboard—because each reacts to impact and moisture in its own way and may or may not survive removal.
Preserving the backer can save you time, money, and structural work, so factor that into how aggressively you remove the tile.
Types of wall tile and adhesives
When you’re planning tile removal, it’s important to know what kind of wall tile and adhesive you’re up against because material and glue types dictate the tools, effort, and repair needed afterward.
You’ll encounter varied tiles and glues that affect prying, scraping, and cleanup. Consider these common combos:
- Ceramic with thinset: strong bond, needs chisels or power tools
- Porcelain with mastic: very tough, may require grinders
- Glass or mosaic with epoxy: delicate tiles, solvent and careful removal
Types of backer board (cement board, drywall, greenboard) and how they react
The tile and adhesive you remove will only tell part of the story; what’s behind them—cement board, drywall, or greenboard—shapes how much work and repair you’ll face.
Cement board resists moisture and holds screws but chips if hammered.
Drywall tears easily and sogs, needing full patching.
Greenboard tolerates humidity better than drywall but still swells when soaked; repair needs vary accordingly.
Common reasons to preserve the backer board (structural, cost, time)
If the backer board’s sound and dry, you’ll often want to keep it because it saves time, money, and structural hassle.
You avoid ripping out studs, reframing, or replacing moisture barriers. Preserving it reduces labor, disposal fees, and downtime. It also maintains a stable substrate for new tile or finish.
Inspect for mold or delamination first; compromised boards still need removal.
Safety, Preparation, and Tools
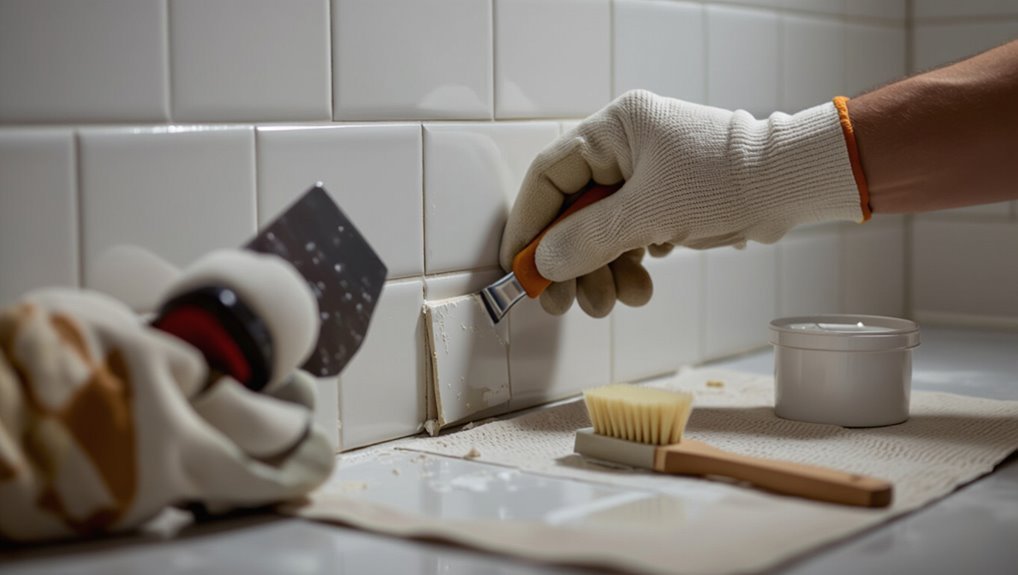
Before you start, make sure you’ve got the right PPE—gloves, eye protection, a dust mask or respirator, and sturdy footwear.
Gather the removal tools (scrapers, hammer, rotary tool) separately from any items you’ll use to preserve the backer board (putty knives, thin scrapers, smaller chisels) so you don’t damage what you want to keep.
Prep the workspace by clearing the area, protecting floors and fixtures, and setting up dust containment to keep debris where it belongs.
Personal protective equipment (PPE) checklist
Safety gear keeps you from getting hurt while you demo tile, so don’t skimp on it: wear impact-resistant goggles, a NIOSH-rated N95 or P100 respirator for dust, heavy-duty gloves, long sleeves, knee pads, and sturdy closed-toe shoes or work boots.
Pick well-fitting, certified items and inspect them each job.
- Goggles, respirator, gloves
- Knee pads, long sleeves
- Sturdy boots, inspection routine
Tools for tile removal vs. tools for backer board preservation
When you’re choosing tools, remember there’s a big difference between gear that rips tile off a wall fast and tools that help you preserve the underlying backer board; the former are aggressive and forgiving, the latter are precise and gentle.
You’ll pick demolition tools for speed and hand tools for care. Choose based on tile condition and board value.
- Oscillating cutter for careful grout removal
- Hammer and chisel for controlled lifting
- Putty knife and scraper for final cleanup
Workspace preparation and containment
Set up a clear, well-lit work zone and contain dust and debris before you touch a single tile: put down heavy-duty drop cloths, tape plastic sheeting over doorways and vents, and seal off adjacent rooms to keep dust from spreading.
Wear eye, ear, and respiratory protection, keep a broom and shop-vac handy, position a sturdy work light, and organize tools for safe, efficient access.
Step-by-Step Tile Removal Method (Preserve the Backer Board)
Start by testing a small area so you can see how the tile and thinset are attached to the backer board.
Score and remove grout, then loosen tile edges with a thin tool (putty knife or oscillating scraper) before prying tiles off in controlled sections using pry bars and suction cups.
Finish by removing remaining adhesive with wetting, softeners, careful scraping, or light sanding without gouging the board.
Step 1 Assess the installation and test a small area
Before you pull a single tile, take a close look at how the wall was put together and try a small test removal so you know what you’re dealing with.
Check adhesion, substrate type, and tile edge condition. Probe gently with a flat tool in one corner to assess bond strength before committing to full removal.
- Adhesion quality
- Substrate material
- Tile edge stability
Step 2 Score grout lines and remove grout carefully
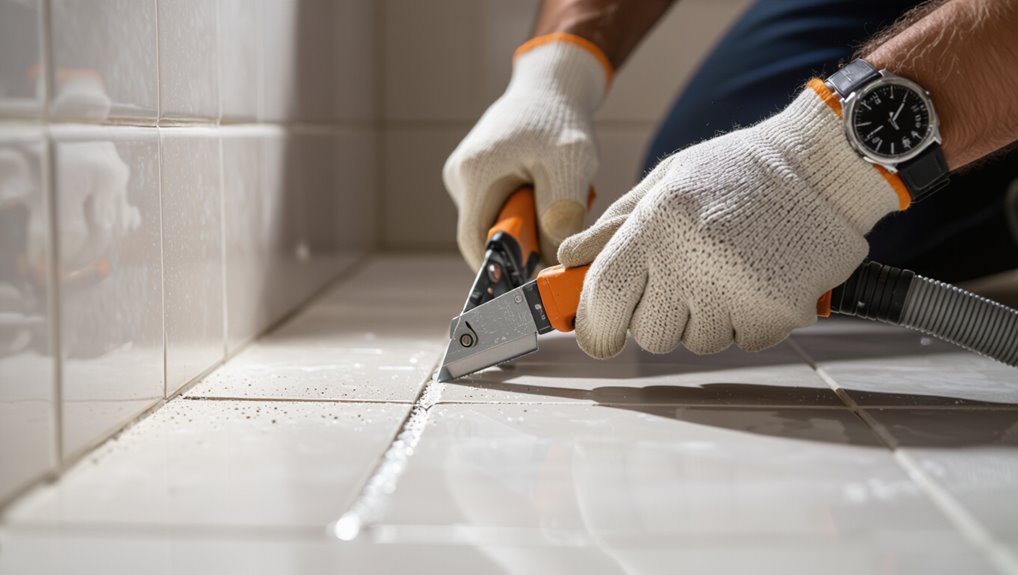
Score the grout lines and remove the grout carefully so you can free tiles without damaging the backer board beneath.
Use a grout saw or rotary bit, working shallow and steady. Clean dust as you go to see progress and avoid slips.
- Work along joints, not tile faces
- Keep tools angled away from board
- Wear eye and dust protection
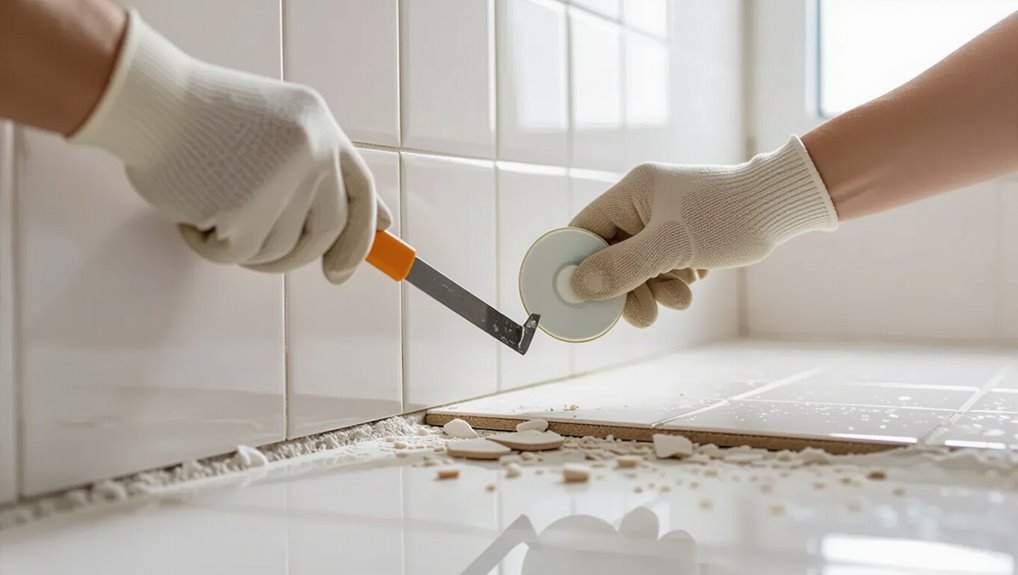
Step 3 Loosen tile edges with thin tools (putty knife, oscillating tool with scraper)

With the grout removed you can get at the tile edges; use a thin, stiff tool like a putty knife or an oscillating tool fitted with a rigid scraper to work along the loosened joints.
Slide the blade gently under the edge, tapping if needed, and pry just enough to break the adhesive bond.
Move slowly, repeating along each joint to free tiles without stressing the backer board.
Step 4 Remove tiles in controlled sections using pry bars and suction cups
Start prying tiles out in small, manageable sections so you can control leverage and limit damage to the backer board.
Use a flat pry bar near an edge and a small trim bar for tight spots. Grip tiles with a suction cup to lift fractured pieces cleanly.
Work slowly, alternating bars and suction to ease tiles free without levering against the board.
Step 5 Remove remaining adhesive/thinset without gouging the board (wetting, softeners, scrapers, sanding)
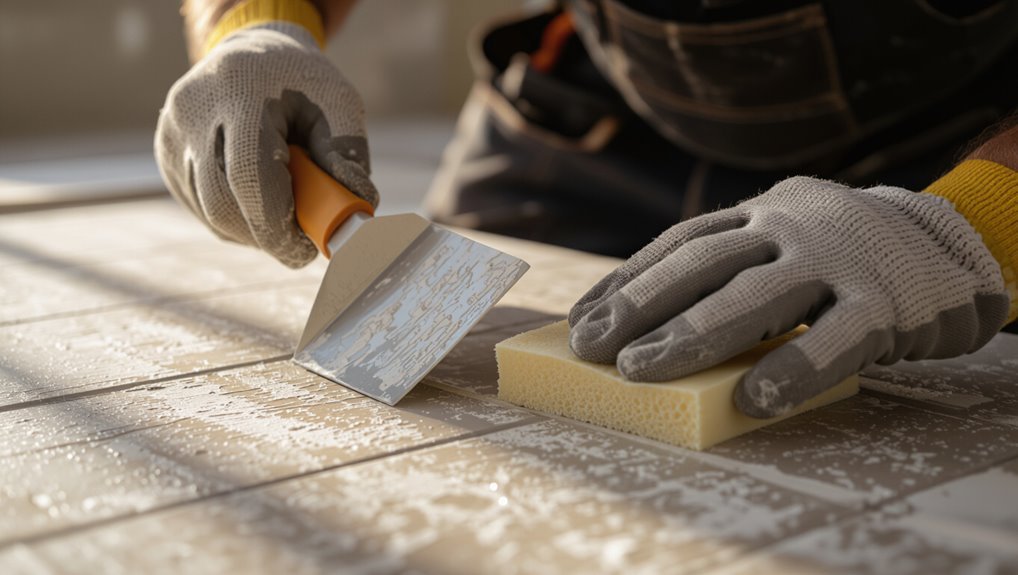
Loosen and remove the remaining thinset carefully so you don’t gouge the backer board.
Wet stubborn areas, apply a commercial thinset softener or diluted vinegar, let it penetrate, then scrape gently with a flat plastic or low-angle metal scraper.
Use a sanding block or oscillating tool with a fine-grit pad only for tiny high spots.
Clean dust and residue thoroughly before proceeding.
Step 6 Inspect and repair minor backer board damage (patching thinset voids, screw checks)
Inspect the backer board closely for small gouges, thinset voids, or loose screw heads before you move on—catching issues now prevents bigger problems later.
Patch thinset voids with thinset or patching compound, tighten or replace loose screws, and sand or skim minor gouges. Use compatible materials so the board stays flat and strong.
- Patch voids
- Check screws
- Sand/skim minor gouges
Alternative Methods and When to Use Them
You’ll weigh power tools against manual ones by balancing speed and control—power tools move faster but can damage the backer board, while manual tools give finesse.
For stubborn sections you can remove only the affected board panels instead of stripping the whole wall, saving time and materials.
If the backer board is water-damaged, crumbling, or warped, plan for full replacement to guarantee a solid substrate.
Power tools vs. manual tools pros and cons
While power tools can speed up tile removal and cut through adhesive, they also create more dust, noise, and risk of damaging the wall; manual tools give you greater control and less mess but take longer and demand more physical effort. You’ll choose based on time, skill, and tolerance for mess.
| Speed | Control | Mess |
|---|---|---|
| Fast | Less | High |
| Slow | More | Low |
Partial board removal strategy for stubborn areas
If power tools are making too much mess or manual methods aren’t shifting stubborn tile and adhesive, consider removing only the wallboard behind those trouble spots instead of stripping the entire wall.
Cut a neat access panel around the affected tiles, remove damaged backer, clean remaining adhesive, and reinstall a new patch. This limits disruption, saves time, and preserves intact board elsewhere.
When complete backer board replacement is recommended
When water damage, widespread loose tiles, or mold has compromised more than isolated sections, replace the entire backer board rather than patching—doing so prevents hidden problems from resurfacing and gives you a stable, uniform substrate for new tile.
You’ll also replace framing that’s weakened, guarantee continuous waterproofing, and avoid mismatched thicknesses or fastening issues.
Full replacement saves time and future repairs.
Common Problems and How to Avoid Them
When you remove ceramic tile, watch for common problems like cement board cracking or delaminating and learn what causes them so you can prevent further damage.
Take steps to spot and protect drywall and studs before they get gouged, and use proper technique to minimize tile breakage.
Plan debris control and cleanup to keep the work area safe and make the job easier.
Cracking or delamination of cement board causes and prevention
Crackling or delamination in cement board usually points to movement, moisture, or improper installation, and you’ll want to address the root cause before retiling.
Inspect seams, fasteners, and waterproofing; fix deficiencies. Prevent recurrence by ensuring a stable substrate and correct materials.
- Check and tighten or replace loose fasteners
- Repair or add membrane waterproofing
- Use proper joint tape and thinset spacing
Damaging drywall or studs signs and prevention
If you spot soft spots, bulging, mold stains, or nails popping out, don’t ignore them—these are clear signs drywall or studs have been compromised and they’ll only get worse if you proceed with tile removal or reinstallation.
Stop, inspect framing, and probe with a screwdriver.
Replace rotted studs, cut out wet drywall, treat mold, and reinforce with blocking.
Use moisture meters and proper ventilation.
Tile breakage and debris control
Expect some breakage and plenty of dust when you start prying tile off a wall, but you can minimize both by using the right tools and a controlled technique.
Score grout lines, tap with a chisel and hammer, remove whole tiles when possible, and work slowly.
Wear eye, lung, and hand protection, lay drop cloths, and vacuum frequently to contain debris and shards.
Best Practices and Professional Tips
Plan your removal to keep repair work minimal by scoring grout first and working from an edge so you don’t damage the wall.
Protect plumbing, electrical fixtures, and nearby finishes with covers and drop cloths before you start chiseling.
If the tile sits over hidden pipes, electrics, or the job feels bigger than you expected, call a pro.
How to minimize repair work after tile removal
1 smart strategy will cut hours of repair work: remove tiles in large, intact sections and preserve the backing whenever possible. You’ll reduce patching, sanding, and re-taping when substrate stays intact. Work slowly, score grout, and use pry tools near seams.
- Support edges before lifting
- Keep removed sections labeled
- Clean adhesive residue promptly
Protecting plumbing, electrical, and adjacent finishes
Because plumbing, electrical, and nearby finishes are easy to nick or overload during tile removal, take proactive steps to protect them before you begin.
Shut off water and power, cap or isolate exposed pipes and wires, and mark hidden lines.
Cover fixtures and surrounding trim with rigid shields and heavy-duty tape.
Work slowly near penetrations to avoid shocks, leaks, or cosmetic damage.
When to call a professional
If the job involves structural changes, extensive plumbing or electrical work, or loads of stubborn mortar, call a pro—trying to handle those risks yourself can lead to costly mistakes, safety hazards, or code violations.
You should also hire a pro when you lack proper tools, face heavy tile adhesive, discover mold or damaged backing, or need permits.
Pros save time and prevent surprises.
Tools and Materials Checklist for the Job
Before you start, gather the right tools and materials so the job goes smoothly: safety gear (glasses, gloves, mask), a pry bar and hammer, a multi-tool or oscillating tool with a grout-removal blade, chisels, a putty knife or scraper, drop cloths, a bucket and sponge, and replacement backing or patching supplies for any damaged substrate.
Before you start, gather safety gear, pry bar, oscillating tool, chisels, scraper, drop cloths, sponge, and patch supplies.
You’ll also want quality adhesive remover and fine sandpaper.
- Sturdy pry bar
- Oscillating tool + blades
- Patch kit
Estimated Time and Cost Comparison
If you tackle the job yourself, you’ll need to budget more time for prep, cleanup, and learning curves, plus costs for tools, disposal, and any repairs.
Hiring a pro will usually get the job done faster but raises labor and scheduling costs.
Compare estimated hours and line-item expenses for both options before you decide.
DIY timeline and cost factors
A realistic DIY timeline and cost estimate helps you plan the project and avoid surprises. For a single small wall, you can expect anywhere from a half-day to two full days of work and roughly $50–$300 in supplies.
While larger or more complex jobs can take several days and cost $200–$1,000 or more depending on tools, disposal, and whether you need replacement backerboard or new tile.
You’ll factor skill level, tool rental, safety gear, cleanup time, and unexpected repairs into your schedule and budget.
Professional removal timeline and cost factors
When you hire a pro, they’ll usually finish removing ceramic tile from a single small wall in a few hours to a full day. They’ll bring tools, protect surfaces, and clean up, so you’ll pay for labor, disposal, and scope. Expect higher rates for adhesive removal or delicate boards.
| Job Size | Time | Typical Cost |
|---|---|---|
| Small | 0.5–8 hrs | $100–$300 |
| Medium | 1–2 days | $300–$700 |
| Large | 2+ days | $700+ |
FAQ
You’ll probably have a few practical questions before you start—like whether you can pull tiles out without raking grout first, or if removing them will void warranties or harm moisture barriers.
You’ll also want to know how to inspect the backer board for salvageability, the safest way to remove thinset without damaging cement board, and whether tiles can be reused after careful removal.
Read on for concise answers and quick checks you can do yourself.
Can I remove tile without removing grout first?
Curious if you can pry tiles off the wall without digging out the grout first? You can in some cases, but grout often bonds tiles tightly.
Skipping grout removal raises risk of tile breakage and extra force that can damage the backerboard.
Score grout joints first; remove loosened grout with a grout rake or oscillating tool to reduce stress and preserve the substrate.
Will removing tile void my warranty or affect moisture barriers?
Removing grout first helps protect the substrate, but you should also consider warranties and moisture barriers before prying tiles off a wall.
Check product warranties—manufacturer terms may void coverage if you alter installed systems.
If a membrane or waterproofing layer is present, work carefully to avoid tearing it.
Document conditions with photos, and consult the installer or manufacturer before proceeding to avoid unexpected liability.
How do I tell if the backer board is salvageable?
How can you tell if the backer board is worth keeping? Check for intact edges, minimal crumbling, and solid screw holding.
Tap for a consistent, firm sound—no hollow spots. Look for mold, soft spots, or deep gouges; those mean replacement.
Confirm waterproofing membrane remains adhered. If the board stays flat, screws secure, and damage is cosmetic, you can usually salvage it.
What’s the easiest way to remove thinset without damaging cement board?
Start by softening the thinset so you don’t force the issue and risk gouging the cement board: dampen the mortar with a wet sponge or spray, let it sit 10–15 minutes, then use a plastic or rubber scraper to lift softened residue.
For stubborn spots, apply a thinset remover gel per instructions and gently pry with a carbide scraper held flat to avoid chipping the board.
Can tiles be reused after careful removal?
If you’ve softened and scraped the thinset carefully, you’ll have a much better shot at saving tiles during removal.
You can often reuse intact tiles if you lift them with minimal edge chipping, clean off old mortar, and store them flat.
Check for hairline cracks, glazed-surface damage, or warping—reject any compromised pieces.
Reused tiles work best for backsplashes or patchwork, not high-stress floors.