Can Mold Grow on Concrete Floors? Warning Signs and Prevention Tips
Yes — mold can grow on concrete floors when moisture, dust, and poor ventilation let spores take hold. You’ll usually notice dark stains, fuzzy patches, musty odors, or worsening respiratory symptoms. Check for damp spots with a moisture meter, inspect cracks and efflorescence, and clean regularly to remove organic debris. Control humidity, seal cracks, and use dehumidifiers or exhaust fans to prevent recurrence. Keep acting fast to limit spread, and the next section explains practical inspection and remediation steps.
Can Mold Grow on Concrete Floors? Quick Answer
Yes—mold can grow on concrete floors when moisture, organic matter (like dirt or dust), and poor ventilation are present, though bare concrete is less hospitable than porous materials.
You’re at higher risk in basements, garages, or after leaks and floods, and some molds can pose health and structural concerns if allowed to spread.
Act quickly to dry, clean, and fix moisture sources to prevent a small problem from becoming costly.
Direct summary of risks and likelihood
Although concrete itself doesn’t feed mold, you can still get significant mold growth on concrete floors when moisture, organic debris, and time come together.
You should know that can mold grow on concrete floor depends on dampness, poor ventilation, and contaminants.
Risk is higher in basements, around leaks, or with flooding.
Reduce likelihood by controlling humidity, drying quickly, and removing debris.
One-sentence takeaway and urgency indicator
If your concrete floor stays damp and catches dirt or organic matter, mold can grow on it quickly, so act fast to dry and clean affected areas.
You should treat any visible growth or musty smell as urgent: stop moisture sources, dry thoroughly, scrub with appropriate cleaners, and inspect nearby materials.
Left unchecked, mold spreads and can harm health and structural finishes—address it today.
How Mold Develops on Concrete Basic Understanding
Concrete’s mix of cement, sand, and aggregate makes it porous, so you’ll often have tiny voids that trap moisture.
When water soaks into those pores or condenses on the surface, it creates the damp conditions mold needs to start growing.
Common species you’ll find on concrete include Aspergillus, Penicillium, and Cladosporium, which thrive on the organic dust and dampness rather than the concrete itself.
What concrete is made of and its porosity
Think of concrete as a sponge made of cement, water, sand, and aggregates; its microscopic pores and capillaries trap moisture, and when organic matter or humidity gets in, mold can take hold.
You’ll find cured concrete is inherently porous, varying by mix and finish; more porosity means higher moisture retention, creating spots where mold spores can survive and colonize.
How moisture interacts with concrete surfaces
When water reaches a concrete surface, it doesn’t just sit there — it soaks into a network of pores and capillaries that hold moisture long after the surface looks dry.
Those retained damp spots give mold the continuous humidity it needs to germinate and grow. You’ll find trapped moisture wicking from below, pooling in cold spots, and creating microclimates that let spores thrive unnoticed.
Common mold species found on concrete
Moisture trapped in and beneath concrete creates the steady humidity that lets specific mold species take hold, and knowing which ones you’re likely to encounter helps you spot and address them sooner.
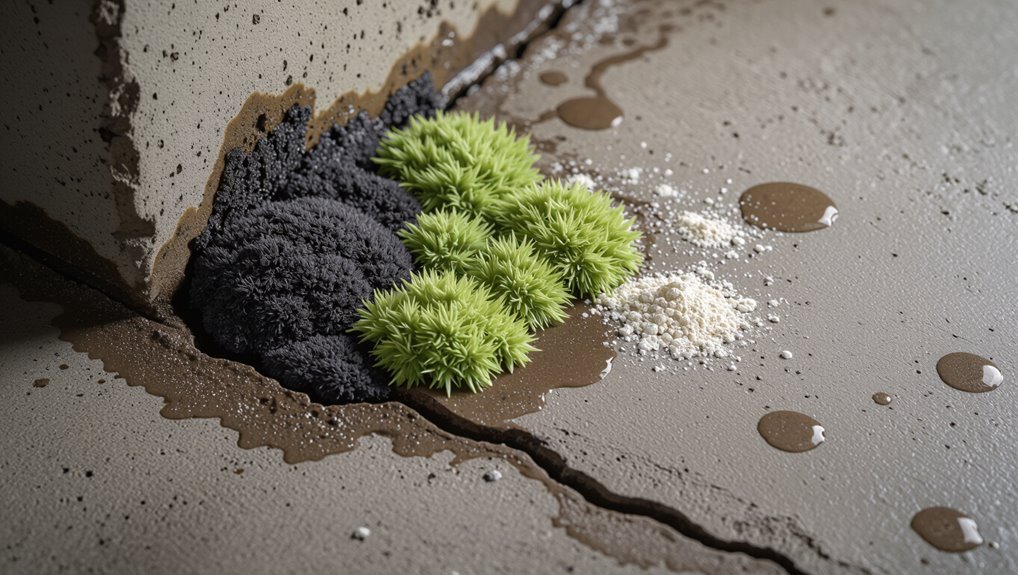
You’ll commonly see black mold (Stachybotrys/Chaetomium), green or white Aspergillus and Penicillium, and Cladosporium. Each varies in appearance and health risk, so identify and remediate promptly.
Common Causes and Risk Factors for Mold on Concrete Floors
You’ll usually find mold on concrete where moisture and organic matter meet, so check for high indoor humidity, poor ventilation, and any water intrusion from basement seepage, floods, or plumbing leaks.
Condensation from thermal bridging, aging concrete with cracks, and failing surface coatings make it easier for spores to settle, especially when dust and other organic debris are present.
Identifying these risk factors helps you prioritize repairs and cleaning to prevent growth.
Indoor humidity and poor ventilation
Although concrete itself doesn’t hold humidity, high indoor humidity and poor ventilation let damp air condense on cooler floors and feed mold growth.
So you’ll often find spores taking hold in basements, garages, and ground-level rooms. You should monitor humidity, use dehumidifiers, and run exhaust fans.
Keep air moving, dry wet areas promptly, and inspect for hidden dampness to prevent mold colonization.
Water intrusion sources (basement seepage, floods, plumbing leaks)
When water gets into your building—whether from basement seepage, flooding, or hidden plumbing leaks—it soaks into concrete and creates the damp conditions mold needs to take hold.
You should inspect foundations, grade, gutters, and sump pumps after storms, fix pipe leaks promptly, and dry soaked slabs within 24–48 hours.
Prevent recurring intrusion to stop mold before it starts.
Condensation and thermal bridging
If warm, humid indoor air hits a cold concrete floor or an uninsulated steel beam, moisture will condense on the surface and feed mold growth.
You’ll see damp spots, musty odors, or recurrent mildew where thermal bridges create cold surfaces.
Reduce indoor humidity, insulate floors and beams, and improve airflow so condensation can’t persist and encourage mold on concrete.
Organic debris, dust, and surface contaminants that feed mold
Because concrete itself doesn’t feed mold, organic debris, dust, and surface contaminants become the primary food sources that let mold establish on floors, cracks, and joints.
You’ll find dirt, leaves, pet dander, spilled food, and residues from adhesives or paints nourish spores.
Regular sweeping, vacuuming with HEPA filters, and prompt cleaning of spills remove nutrients and greatly reduce mold risk on concrete surfaces.
Aging concrete, cracks, and surface coatings failure
As concrete ages, it develops hairline cracks, spalls, and worn coatings that let moisture and spores penetrate the slab. Those defects become prime sites for mold growth.
You should inspect and repair promptly, seal surfaces, and control humidity to prevent colonization.
- Inspect for cracks and spalling
- Patch and reseal coatings
- Fix leaks and drainage
- Monitor indoor humidity
Warning Signs of Mold on Concrete Floors
You’ll often spot mold on concrete as discoloration, dark spots, or fuzzy patches that stand out from the floor.
You’ll also notice musty, damp odors and sometimes physical symptoms like coughing or headaches if exposure is ongoing.
Check for structural clues too—efflorescence, spalling, or paint failure can signal moisture problems that invite mold.
Visible signs: discoloration, spots, and fuzzy growth
When moisture lingers, your concrete floor often gives clear visual cues: discoloration, dark spots, and fuzzy or powdery growths that don’t brush away easily.
Check corners, seams, and areas under rugs or appliances for irregular patches, staining, or filamentous textures.
Note color changes from black and green to white powdery residues; take photos, mark locations, and address moisture sources promptly.
Odors: musty or damp smells
Alongside visible stains, musty or damp smells are a clear sign mold may be growing on your concrete floor.
If you notice persistent, cellar-like odors especially after rain or leaks, don’t ignore them. Those smells signal trapped moisture feeding mold beneath coatings or in cracks.
Investigate promptly, dry the area, fix water sources, and clean affected spots to prevent further growth.
Health symptoms linked to mold exposure
1 clear sign that mold on concrete can affect you is a sudden increase in respiratory irritation—think coughing, wheezing, or persistent throat clearing—especially after spending time near the affected area.
You may also notice worsening allergies, sinus congestion, itchy eyes, or skin rashes.
If symptoms improve away from the site, address moisture and clean or remove contaminated concrete to reduce exposure.
Structural signs: efflorescence, spalling, and paint failure
Noticing respiratory or allergy symptoms after being near a damp concrete floor is a strong cue to check the slab itself for physical signs of trouble.
Look for white, powdery efflorescence indicating moisture movement, flaking or spalling where surface layers crumble, and peeling, blistering, or chalky paint.
These signs mean persistent moisture that can support mold and needs prompt repair and waterproofing.
How to Inspect and Test Concrete for Mold (Step-by-Step)
Start by doing a careful visual inspection using a checklist for stains, discoloration, peeling, and musty odors.
Then use moisture mapping and simple DIY tests (like a moisture meter and plastic-sheet test) to pinpoint damp areas, and know when to call a pro for formal mold testing.
Finally, learn how to read typical test results and decide the right remediation or monitoring steps.
Step 1: Visual inspection checklist
Before you collect samples, do a systematic visual walkthrough of the concrete surfaces—inspect walls, floors, edges, seams, and any nearby porous materials for discoloration, fuzzy growth, water stains, efflorescence, or paint bubbling.
Note odor hotspots, map visible spread, photograph suspected areas, and mark locations for follow-up testing or remediation.
Wear gloves and a mask while documenting findings.
Step 2: Moisture mapping and simple DIY tests
Now that you’ve documented where mold-like staining and odors occur, it’s time to map moisture — the driver behind most concrete mold problems — and run a few simple DIY checks to confirm high-humidity spots.
Use a handheld moisture meter on multiple grid points, tape a plastic sheet to the slab for 24–48 hours to check vapor, and sniff for musty smells near walls and drains.
Step 3: When to use professional mold testing
Wondering whether to call in a pro? If you find widespread discoloration, persistent musty odors, health symptoms, or DIY tests show high moisture without clear source, hire certified mold inspectors.
They’ll use air, surface, and bulk sampling plus moisture meters to pinpoint hidden growth and sources.
Call professionals when contamination seems extensive, recurrent, or impacts occupants’ health.
Step 4: Interpreting test results and next steps
If a professional tester or your DIY kit has returned results, you’ll need to understand what they actually mean and decide on next steps.
Interpret spore types, concentrations, and outdoor baselines; prioritize species like Stachybotrys. Then act: clean, remediate, or call pros.
Consider moisture source fixes and follow-up testing.
- Identify species and levels
- Compare to outdoor baseline
- Fix moisture sources
- Choose remediation method
Safe Mold Removal Methods for Concrete Floors
For small mold spots you can clean concrete yourself using detergent, vinegar, hydrogen peroxide, or other bleach alternatives and follow safe procedures like ventilating and wearing gloves.
If you’re considering stronger biocides, fungicides, or institutional cleaners, learn proper dilution, application, and disposal to avoid harm.
For stubborn growth use mechanical methods such as scrubbing or grinding and encapsulation, but call a professional remediation team when mold covers large areas, has penetrated deeply, or when health risks are present.
Small-area DIY cleaning: products and procedures (bleach alternatives, detergent, vinegar, hydrogen peroxide)
When you’re dealing with a small patch of mold on concrete, you don’t need harsh commercial products to get it clean—simple alternatives like detergent, vinegar, or hydrogen peroxide can be effective when used correctly.
Ventilate, wear gloves and an N95, scrub with a stiff brush and soapy water, rinse, then apply 3% hydrogen peroxide or white vinegar.
Let sit 10–15 minutes, scrub and dry thoroughly.
Using biocides, fungicides, and institutional cleaners safely
Although stronger biocides and institutional fungicides can speed up mold removal on concrete, you should treat them with caution and follow label instructions precisely.
Wear PPE—gloves, eye protection, and an N95 or respirator—ventilate the area, and avoid mixing chemicals.
Test a small area first, use recommended dwell times, and dispose of waste per local regulations to protect health and the environment.
Mechanical removal: scrubbing, grinding, and encapsulation
Start by choosing the right mechanical approach for the job—scrubbing for surface growth, grinding for deep-seated colonies, and encapsulation when removal would damage the concrete or isn’t feasible.
Wear proper PPE, contain dust with HEPA vacuums, and work in small sections.
After scrubbing or grinding, clean residues thoroughly and apply an appropriate encapsulant per manufacturer instructions to seal remaining spores.
When to call a professional remediation team
Because mold that’s spread deep into cracks, covered large areas, or comes with water damage poses health and structural risks, call a professional remediation team if the infestation exceeds about 10 square feet, if people in the building have compromised immune systems or respiratory issues, or if you detect persistent musty odors after DIY attempts.
- extensive visible growth
- recurring leaks or flooding
- HVAC contamination concerns
- allergy or illness symptoms
Prevention Strategies and Best Practices
To prevent mold on concrete floors, you’ll want to control moisture with dehumidifiers, proper grading, and good drainage.
Seal and waterproof floors and joints, improve ventilation and HVAC airflow, and keep up routine cleaning, debris control, and inspections.
Also choose mold-resistant floor coverings and adhesives to reduce future problems.
Controlling moisture: dehumidifiers, grading, and drainage
When you control moisture around and beneath concrete floors, you cut off the conditions mold needs to grow.
Use dehumidifiers to keep indoor relative humidity below 60%, especially in basements.
Confirm exterior grading slopes away from the foundation and keep gutters clear.
Install proper drainage — French drains or channel drains — to divert groundwater.
Monitor humidity and inspect for leaks regularly.
Sealing and waterproofing concrete floors and joints
Controlling moisture is the first line of defense, but sealing and waterproofing concrete floors and joints gives you a durable barrier against the water vapor and leaks that cause mold.
Use penetrating sealers on slabs, flexible polyurethane or silicone caulk for joints, and epoxy coatings in high-moisture areas.
Prep surfaces, follow manufacturer cure times, and inspect seals annually to maintain protection.
Ventilation improvements and HVAC considerations
Although sealing stops many sources of moisture, improving ventilation and tuning your HVAC are essential to keep concrete floors dry and prevent mold growth.
Increase airflow with exhaust fans, vents, and passive intake to reduce humidity.
Set HVAC to remove moisture — use dehumidification and balanced ventilation, guarantee ductwork isn’t leaking, and schedule professional tune-ups to maintain consistent indoor humidity below 60%.
Routine maintenance: cleaning, debris control, and inspections
Regularly sweep and mop concrete floors, clear debris from drains and expansion joints, and inspect surfaces for stains, efflorescence, or soft spots so you can catch moisture issues early and stop mold before it starts.
Wipe spills promptly, use pH-neutral cleaners, remove organic matter, and keep gutters and downspouts functioning.
Log inspections, address damage immediately, and schedule deeper cleanings seasonally to prevent buildup.
Choosing floor coverings and adhesives that resist mold
After you’ve kept up with cleaning and inspections, pick floor coverings and adhesives that won’t trap moisture or feed mold.
Choose vapor-permeable materials like sealed concrete, porcelain tile, or mold-resistant vinyl. Use low-VOC, waterproof adhesives and mold-inhibiting primers.
Install with proper seams and drainage, and avoid organic underlayments. Regularly check seals and replace compromised products to prevent mold growth.
Common Mistakes That Make Mold Problems Worse
Don’t rely on bleach or quick cosmetic fixes—you’ll often scrub or seal mold in place and make it worse.
Don’t paint or seal over active growth, ignore humidity sources, or use DIY tricks that can damage concrete and trap moisture.
Address root causes and use proper remediation so the problem doesn’t come back.
Over-reliance on bleach and improper cleaning
When you reach for bleach thinking it’ll solve mold on concrete, you’re often making things worse: bleach can remove surface staining but won’t penetrate porous concrete to kill root mold.
Its strong fumes and corrosive nature can damage sealants, nearby materials, and your health if used improperly.
Instead, don’t overuse harsh cleaners; test products, use appropriate cleaners or biocides, scrub, dry thoroughly, and ventilate.
Painting or sealing over active mold without remediation
Although a fresh coat of paint or sealant might seem like a quick fix, painting or sealing over active mold just traps spores and moisture beneath the surface, letting the problem grow and return under the new finish.
Don’t cover it up—stop, remove and dry the mold properly first. Otherwise you’ll hide health risks and force more costly, extensive remediation later.
Ignoring humidity sources and cosmetic fixes only
If you only fix visible stains or slap on a dehumidifier without locating their source, mold will keep coming back—because surface treatments don’t stop the underlying moisture that feeds growth.
You need to track leaks, condensation, groundwater, and ventilation issues.
Don’t rely on cosmetic fixes; address leaks, improve airflow, and correct grade or drainage so humidity sources are eliminated and mold can’t return.
DIY fixes that damage concrete or trap moisture
Because quick DIY fixes feel satisfying, you might be tempted to paint over stains, seal cracks with the wrong products, or pour concrete sealers without checking moisture levels—but those moves often make mold worse.
You’ll trap moisture, hide active growth, or create vapor barriers that force dampness into the slab.
Use breathable repairs, test moisture first, and consult pros for structural or persistent issues.
Cost Considerations and When Professional Help Is Needed
You’ll want to know typical costs for inspection, testing, and remediation so you can budget and compare quotes.
Be aware that factors like the mold extent, moisture source, contamination type, and accessibility can drive prices up.
Ask potential contractors about their certification, scope of work, containment methods, timeline, and warranty before hiring.
Typical costs for inspection, testing, and remediation
A few key cost ranges can help you plan: a basic visual inspection typically runs $100–$300, while moisture and air testing often cost $200–$600.
Lab analysis per sample may be $25–$100.
Small remediation projects can be $500–$2,000; larger professional cleanups commonly range $2,000–$10,000.
Get written estimates and verify contractor credentials before hiring.
Factors that increase remediation complexity and price
When mold spreads beyond a small patch or sits in hidden pockets, remediation gets more involved and pricier.
Factors like extent of contamination, type of mold, moisture source, and whether structural materials are affected all drive complexity.
You’ll pay more when contamination is extensive, toxic molds are suspected, moisture requires structural repairs, inaccessible areas need demolition, or HVAC and flooring systems are contaminated and require specialized cleaning.
Questions to ask a mold remediation contractor
Curious how to spot a reputable mold remediation contractor and whether the cost is justified? Ask about licensing, insurance, references, scope, testing, timeline, and total cost. Get written estimates and warranties. Consider professional help for widespread or hidden mold, water damage, or health risks.
| Question | Why it matters |
|---|---|
| Licensing/Insurance | Protects you |
| Cost/Scope | Avoid surprises |
Case Examples and Real-World Scenarios
You’ll see different mold patterns depending on the situation — like musty walls from hydrostatic pressure in a basement that need exterior drainage and a sump, or black streaks under cars in a garage that call for targeted ventilation and sealants.
In finished basements with carpet over concrete, you’ll need to remove wet carpet, treat or kill the mold, and address the moisture source before restoring the floor.
These real cases show how diagnosis guides a specific, practical remediation plan.
Basement with hydrostatic pressure: symptoms and solution
If your basement shows damp spots, peeling paint, or bowed walls, hydrostatic pressure may be forcing groundwater through cracks and joints in the slab and foundation.
This pressure-driven intrusion often produces recurring wet floors, efflorescence, and musty odors that standard dehumidifying won’t fix.
You should consult a professional to install interior drains, a sump pump, exterior drainage repairs, and foundation sealing to stop intrusion.
Garage floor with condensation under cars: targeted fixes
When a cold car sits on a warm, damp garage floor, condensation often forms beneath it and leaves dark, greasy-looking patches that don’t come up with simple mopping.
These spots usually mean moisture is condensing on the vehicle’s metal and dripping onto the concrete, or warm slab humidity is meeting cool surfaces.
You can raise ventilation, use a dehumidifier, park on a drip pan, seal concrete, and address vehicle leaks promptly.
Finished basement with carpet over concrete: remediation and restoration
Because carpet traps moisture against concrete and hides mold until it’s well established, you’ll want a clear plan for remediation and restoration before pulling up flooring.
In the examples below we’ll show how homeowners and contractors handled wet pad, stained carpet, and stubborn mold growth so you can see practical steps, estimated costs, and outcomes for drying, disinfecting, and replacing materials.
You’ll learn inspection, containment, HEPA vacuuming, antimicrobial treatment, drying with dehumidifiers, pad and carpet replacement, and moisture-proofing options, plus typical cost ranges and timeframes so you can decide when to DIY or hire pros.
FAQs About Mold on Concrete Floors
You probably have quick questions like whether mold only grows on the surface of concrete or can penetrate it, and how long it takes to appear after water exposure.
You’ll want to know if mold on concrete is dangerous, whether painting or sealing stops it permanently, and what you can do to prevent it in a humid climate.
Let’s answer these FAQs plainly so you can take the right next steps.
Can mold grow inside concrete or only on the surface?
Wondering whether mold can get inside concrete or only sit on the surface?
It mainly grows on the surface or in pores where moisture and organic residues collect. Concrete is porous, so mold can penetrate micro-pores but won’t digest the cement itself.
If moisture stays, mold can persist below the visible layer, making thorough drying and sealing essential to prevent recurrence.
Is mold on concrete dangerous to my health?
How risky is mold on concrete to your health? You’re mainly exposed via spores and fragments; mild symptoms include sneezing, coughing, and eye irritation.
If you have allergies, asthma, or a weakened immune system, reactions can be worse. Prolonged exposure may aggravate respiratory issues.
Remove visible mold promptly, improve ventilation, and dry damp areas to reduce health risks.
Will painting or sealing my concrete stop mold permanently?
Will sealing or painting concrete permanently stop mold? No—coatings reduce moisture entry and make cleaning easier, but they don’t guarantee permanence.
If moisture vapor, leaks, or organic debris remain, mold can recur under or on top of coatings.
Maintain dryness, fix leaks, clean before painting, and use mold-resistant products to minimize risk, then monitor regularly for any return.
How long does it take for mold to appear after water exposure?
After a spill or leak, mold can begin showing visible signs on concrete within 24 to 48 hours under warm, humid conditions.
You’ll often notice discoloration, musty smells, or fuzzy growth quickly if moisture persists.
Cooler, drier spaces slow growth, but trapped water, porous surfaces, or organic debris speeds it up.
Promptly dry and clean the area to limit development.
Can I prevent mold if I live in a humid climate?
If you’ve seen mold appear quickly after a spill, you’re probably wondering whether humid climates make prevention hopeless — they don’t.
You can reduce risk by controlling indoor humidity (ideally below 60%), using dehumidifiers, improving ventilation, sealing concrete with a breathable waterproof sealer, fixing leaks promptly, and keeping floors dry.
Regular cleaning with mold-inhibiting cleaners helps too.
Quick Action Checklist: What to Do If You Find Mold on Concrete
If you spot mold on your concrete, first protect yourself and contain the area by wearing gloves and a mask and limiting traffic.
Then take short-term steps like drying the floor, improving ventilation, and cleaning small spots to stop spread.
Finally, plan for long-term remediation and prevention—address moisture sources, consider professional removal for large infestations, and monitor regularly.
Immediate safety steps and containment
1 clear step you should take immediately is to stop using the area and limit access — keep people and pets out until you’ve assessed the situation and put on basic protective gear (gloves, N95 respirator, and eye protection).
Seal off the room with plastic sheeting, close vents, and turn off fans.
Note visible mold extent, photograph it, and call a professional if growth is extensive or indoor air quality is affected.
Short-term fixes to reduce spread
Once you’ve stopped traffic into the area and put on basic protective gear, act quickly to limit mold spread: close doors, keep HVAC off, and cover vents with tape and plastic to prevent spores from circulating.
Remove loose debris, blot wet spots with disposable towels, and place contaminated materials in sealed bags.
Run a dehumidifier outside the room and open windows briefly if outdoor air is dry.
Long-term remediation and prevention plan
Because short-term steps only stop immediate spread, you’ll need a clear long-term remediation and prevention plan to fully fix mold on concrete and keep it from returning.
Create a schedule and follow these steps:
- Inspect and document moisture sources regularly.
- Repair leaks, improve grading and drainage.
- Install dehumidifiers and maintain ventilation.
- Use professional remediation for large or persistent infestations.