Can You Stain Laminate Flooring? Honest Answers and Better Alternatives
You can’t reliably stain laminate the way you do hardwood because its sealed, printed surface won’t absorb stain and attempts usually leave blotches, damage, or void your warranty. Instead, you can change color with specialty tintable coatings, gel-stain simulators, floor paint, or bonding primers and polyurethane refreshes—test a small area first and prep surfaces well. For a true wood look, consider replacing with engineered or real wood, and keep reading to learn practical steps and pros/cons.
Can You Stain Laminate Flooring? Quick Direct Answer
Short answer: you usually can’t stain laminate the way you’d real wood because the top wear layer is a sealed, printed surface that won’t absorb stain.
You can sometimes change the look with surface treatments or specialized products on low-gloss, lightly worn laminates, but results are limited and not truly permanent.
If the planks are damaged or have a thick, real-wood veneer, refinishing or replacing is the better option.
Short verdict: Is staining laminate possible or recommended?
Can you stain laminate flooring? You technically can’t stain its sealed, printed surface like real wood, so results are poor and short-lived.
You shouldn’t expect reliable color absorption or longevity. Instead, consider safer alternatives—specialized paints, overlays, or replacing planks—for a durable change.
If you try staining, be prepared for uneven finish and likely failure; it’s generally not recommended.
When staining might be attempted vs when it’s not feasible
You’ve seen why staining laminate usually won’t work, but there are a few narrow situations where you might try and others where you should skip it entirely.
You might attempt staining on very thin wear layers after testing a hidden scrap and accepting short lifespan.
Don’t try if the surface is factory-sealed, melamine-coated, or heavily embossed; results will fail and void warranties.
Understanding Laminate Flooring: Materials and Surface Construction
You’ll want to know that laminate flooring is built from a core board, a printed image layer that gives the look of wood, and a clear wear layer on top.
The thickness and composition of that wear layer determine whether you can refinish, sand, or only surface-treat the floor.
Different laminates also use varied surface treatments—embossed, textured, or high-gloss—which affect appearance and what products or methods will work.
What laminate flooring is made of (core, image layer, wear layer)

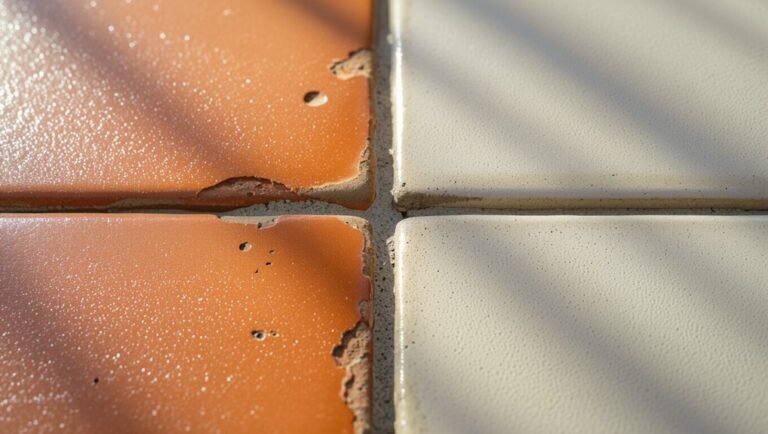
Laminate flooring is a layered product built for durability and visual appeal: at its heart is a dense fiberboard core that gives the plank stability and impact resistance, a high-resolution photographic image layer that replicates wood, stone, or tile, and a tough transparent wear layer that protects the design from scratches, stains, and daily wear.
You’ll rely on the core for strength, the image for look, and the wear layer for surface protection.
How the wear layer affects refinishing options
Because the wear layer sits on top of the decorative image, it largely determines whether you can refinish or must replace a damaged laminate plank.
Thin or heavily embossed wear layers don’t accept sanding or recoating, while thicker, smoother wear layers may tolerate light resurfacing or specialized re-coating products.
You should inspect thickness and texture, test a small area, and choose manufacturer-approved methods to avoid voiding warranties.
Types of laminate with different surface treatments
Knowing whether a wear layer can be refinished helps you decide how to handle damage, but it’s also important to recognize the variety of surface treatments manufacturers use.
You’ll find textured AC-rated wear layers, aluminum oxide coatings for scratch resistance, UV-cured finishes, and embossed-in-register surfaces that mimic grain.
Each treatment affects durability and whether repairs or replacement are practical, so choose based on use and budget.
Why Staining Laminate Is Different from Staining Wood
You’ll notice wood soaks up stain through its porous fibers, but laminate’s sealed melamine layer prevents that absorption.
Many people assume they can treat laminate like real wood, which leads to failed results or uneven color.
Before you try anything, understand the realistic risks and limits of staining laminate so you don’t damage the surface.
How wood absorbs stain vs how laminate reacts
Wood soaks up stain like a sponge, while laminate hardly drinks at all — and that difference changes everything.
When you apply stain to wood, pigments penetrate pores and fibers, altering tone and grain.
Laminate’s sealed melamine layer resists absorption, so stain beads or wipes away, leaving surface color unchanged.
You’ll need surface alteration or replacement, not traditional staining, to change laminate’s look.
Common misconceptions about staining laminate
Because laminate behaves so differently from real wood, a few persistent myths keep circling among DIYers and pros alike.
You might hear that sanding and staining will work like on hardwood, or that any stain soaks in.
In reality, laminate’s sealed surface prevents absorption, and coatings adhere differently.
Accepting that lets you choose proper alternatives instead of wasting time on false fixes.
Risks and limitations of attempting to stain laminate
Although it might seem tempting to treat laminate like hardwood, attempting to stain it brings serious limits and risks you’ll want to know up front.
Laminate’s sealed melamine surface won’t absorb stain, so results are uneven or fail. You risk surface damage, voiding warranties, and wasted time and money.
Sanding ruins the wear layer; discoloration and peeling are common.
Choose alternatives instead.
Honest Alternatives to Staining Laminate (Primary Solutions)
If you want a new look without trying to stain laminate like wood, you can choose recoloring products—specialized paints, gel-stain simulators, or tintable coatings—that sit on the surface.
You’ll also consider floor paint or solid-color coatings (easy coverage but they hide grain and may wear differently), overlay/refresh kits and polyurethane-compatible coatings for added durability, or a full replacement with engineered or real hardwood if you need true staining flexibility.
Each option has trade-offs in appearance, longevity, and cost, so you’ll want to match the solution to your priorities.
Recoloring with specialized products (paint, gel stain simulators, tintable coatings)
When you can’t strip or stain laminate the traditional way, specialized products let you change its look without replacing the floor.
You can use gel-stain simulators, tintable clear coats, or specialty paints designed for slick surfaces. They bond to the wear layer, mimic grain or alter tone, and require proper prep and compatible sealers.
Test a small area first.
Using floor paint or solid-color coatings: pros and cons
Because laminate won’t accept traditional stains, painting it with floor-grade or solid-color coatings gives you a straightforward way to change the look without replacing the planks.
You can get uniform color, hide wear, and choose durable, slip-resistant finishes.
Downsides: prep matters, adhesion can fail on low-VOC or glossy laminates, and you’ll lose wood-grain texture and resale appeal.
Overlay/refresh products (refinishing kits, polyurethane-compatible coatings)
Painting gives you bold color and hides damage, but overlay or refresh products aim to preserve more of the laminate’s original look while improving wear and surface performance.
You can apply thin bonding primers, polyurethane-compatible refresh coats, or full refinishing kits to restore sheen and protect against scratches without replacing planks.
- Bonding primers
- Polyurethane refresh coats
- Refinish kits
Full replacement with engineered hardwood or real wood for staining flexibility
If you want true staining flexibility and long-term value, replace the laminate with engineered hardwood or solid wood planks that accept stains and finishes the way real timber does.
You’ll get authentic grain, repairable surfaces, and multiple refinishes over time. Installation costs and downtime are higher, but you gain lasting aesthetics, resale value, and the ability to customize color or refresh the floor repeatedly.
Step-by-Step: How to Recolor Laminate Safely (When You Choose an Alternative)
Before you start, you’ll assess your laminate type and test a small hidden area to confirm compatibility.
Then you’ll clean and prep the floor, decide whether sanding is safe, and apply a primer or adhesion promoter if needed.
Finally, you’ll choose the right paint or coating, tools, and techniques, and follow recommended drying times for a durable finish.
Step 1 Assess your laminate type and test a small area
Because laminate comes in several constructions and coatings, you’ll want to identify your exact type before you start work.
Inspect wear layer, edge profile, and manufacturer codes. Then pick an inconspicuous corner and try your chosen recoloring method. Note adhesion, color match, and texture change.
- Check wear layer and finish.
- Read manufacturer label or contact support.
- Test a hidden spot.
Step 2 Clean and prepare the floor (recommended products and techniques)
Since proper cleaning sets the stage for any successful recolor, you’ll want to remove dirt, grease, and residue that could block adhesion or show through the new finish.
Vacuum thoroughly, mop with a pH-neutral laminate cleaner, and wipe stubborn spots with isopropyl alcohol.
Dry completely. Use tack cloths before applying primers or paints, and guarantee good ventilation while you work.
Step 3 Sanding considerations and when NOT to sand laminate
With the floor cleaned and dry, decide whether sanding is appropriate for your laminate—often it’s not.
If your planks have a factory wear layer or printed surface, sanding can expose core material, ruin texture, and void warranties.
Only sand lightly to scuff glossy surfaces for adhesion; never attempt aggressive sanding or flattening.
When in doubt, skip sanding and use compatible primers or coatings instead.
Step 4 Applying primers or adhesion promoters for laminate
Start by choosing an appropriate primer or adhesion promoter designed for non‑porous surfaces—this step guarantees whatever coating you apply will stick to laminate rather than peel off.
Clean and degrease thoroughly, then apply thin, even coats per manufacturer directions.
Allow full cure between coats, sand lightly if instructed, and spot‑test adhesion before proceeding to the final coating stage.
Step 5 Applying paint/coating: tools, techniques, drying times
Gather the right tools and work in thin, controlled layers to get a durable, even finish on laminate.
Use a high-quality synthetic brush or foam roller and low-nap microfiber for smooth coats.
Apply two thin coats, allowing manufacturer-recommended flash time—typically 30–60 minutes between coats—and 24–48 hours curing before light use.
Sand lightly with 400-grit between coats if needed for adhesion.
Step 6 Sealing and maintenance after recoloring
Once your paint or coating has fully dried between coats, you’ll move on to sealing and upkeep to lock in durability and appearance.
Apply a clear, water-based polyurethane or acrylic sealer recommended for laminate, using thin coats and light sanding between layers. Let each coat cure fully.
Clean gently with pH-neutral cleaners, use felt pads, and address scratches promptly to preserve the finish.
Comparison: Staining vs Recoloring vs Replacing Laminate
When deciding whether to stain, recolor, or replace your laminate floor, weigh durability, cost, and the look you want; each option suits different needs and constraints. You’ll choose staining rarely, recoloring for surface refresh, replacing for lasting change. Compare options quickly:
| Option | Best for |
|---|---|
| Staining | Rare aesthetic tweaks |
| Recoloring | Temporary refresh |
| Replacing | Permanent transformation |
Cost, Time, and Durability Considerations
You’ll want to weigh typical costs — recoloring products and kits usually run much lower than full replacement, but prices vary by brand and coverage.
Consider durability: recoloring and stains can refresh appearance but won’t match the wear resistance of new planks, while replacement offers the longest-lasting solution.
Also think about time and disruption—DIY recoloring is quickest and cheapest, professional services or full replacement take longer and cost more.
Typical cost ranges for recoloring products vs replacement
Although recoloring products cost a fraction of full replacement, the trade-offs in longevity and prep time matter—expect DIY recoloring kits and stains to run roughly $25–$200 for a room-sized kit, while professional recoloring or reglazing typically costs $200–$800 depending on room size and product.
Full replacement of laminate floors commonly starts around $2–$6 per square foot for low-end materials and labor can push total replacement to $4–$12+ per square foot.
You’ll pay less upfront for recoloring, but replacement involves higher material and labor costs and potential disposal fees.
Durability and wear expectations for each option
Because recoloring and reglazing only change the surface layer, expect noticeably different durability and wear patterns compared with full replacement: your recolored finish will resist scratches and wear less than a new laminate or plank with factory wear layer.
Touch-ups hide cosmetic flaws but won’t restore structural damage or long-term abrasion resistance, so plan for more frequent refreshes or eventual replacement.
Time and disruption for DIY vs professional approaches
When weighing DIY recoloring or reglazing against hiring a pro, consider the tradeoffs in time, disruption, and long-term value:
DIY saves upfront money but demands hours for prep, curing, and possible rework, disrupting living spaces.
Pros finish faster with proper equipment, warranties, and minimal downtime, costing more upfront yet reducing the risk of mistakes and future repairs.
Common Mistakes and How to Avoid Them
Don’t try to treat laminate like solid wood by using traditional stains—you’ll be disappointed.
Always test adhesion and use the right primer before committing to a full floor.
Avoid over-sanding the wear layer and never mix harsh cleaners with incompatible sealers if you want the finish to last.
Mistake 1 Attempting traditional stain on laminate
1 big misconception homeowners make is trying to apply traditional wood stain to laminate flooring; it won’t penetrate the surface and usually leaves blotches, streaks, or a sticky finish.
You’ll waste time and materials and risk uneven color. Instead, choose products formulated for non-porous surfaces or consider replacement options.
Test any approach on a scrap piece before committing.
Mistake 2 Skipping adhesion tests or primers
Although it might seem like an unnecessary extra step, skipping adhesion tests or primers is a common shortcut that often leads to peeling, flaking, or patchy results on laminate floors.
You should always test a small, inconspicuous area and use a primer designed for non-porous surfaces. That step confirms compatibility, improves paint bonding, and prevents wasted time and money on a failed finish.
Mistake 3 Over-sanding or damaging the wear layer
One common error is over-sanding laminate and wearing through the thin protective layer, which leaves the core exposed and ruins the planks’ durability and appearance.
You should never sand like real hardwood; most laminates have no refinishable surface. Instead, inspect edges, repair chips with filler, and consider surface coatings designed for laminates.
When in doubt, consult the manufacturer before altering the wear layer.
Mistake 4 Using wrong cleaners or incompatible sealers
After you’ve fixed chips and avoided sanding through the wear layer, the next big risk is using the wrong cleaners or sealers.
You’ll strip protective coatings or cause clouding if you use abrasive cleaners, bleach, or oil-based sealers. Stick to manufacturer-recommended pH-neutral cleaners and never apply DIY sealers.
Test any product in an inconspicuous spot first to avoid irreversible damage.
Best Practices and Maintenance After Recoloring
After recoloring your laminate, you’ll want a simple cleaning regimen using manufacturer-approved, pH-neutral cleaners and microfiber mops to protect the finish.
Use area rugs, felt pads under furniture, and limit heavy foot traffic to prevent scratches and premature wear.
If you notice localized fading or chips, address them with touch-up kits, and consider full replacement when large areas show irreversible damage.
Cleaning regimen and recommended products
Because recolored laminate has a fresh finish that needs gentle care, you’ll follow a straightforward cleaning regimen to protect the stain and sealant while keeping the floor looking even and vibrant.
Sweep or vacuum daily with a soft-brush tool, damp-mop weekly using pH-neutral laminate cleaner, and blot spills immediately.
Avoid abrasive cleaners, oil soaps, or steam mops; test any new product on a hidden spot first.
Preventing scratches and wear (rugs, pads, traffic management)
While your recolored laminate still looks fresh, take proactive steps to prevent scratches and uneven wear by using area rugs in high-traffic zones, felt pads under furniture legs, and a rotation plan for heavy items; these simple habits preserve the stain and sealant and keep color consistent across the floor.
Sweep regularly, use nonabrasive mops, avoid dragging furniture, and enforce shoe rules to minimize damage.
When to consider touch-ups or full replacement
Keeping up those protective habits will prolong your recolor, but you’ll still need to know when to touch up or replace planks to keep the floor looking uniform.
Touch up small chips, edge wear, or fading with manufacturer-matched products and thin coats.
Replace planks if wear is widespread, if core swelling or delamination appears, or if color mismatch persists after repairs.
Real-World Scenarios and Case Examples
Think about three common situations to guide your approach: a low-budget DIY refresh for a rental, a high-traffic living room that needs a durable recolor, and when you should opt to replace with real wood to get a historic look.
You’ll weigh cost, longevity, and finish quality for each case. Use these examples to decide whether staining laminate is the right move or if replacement makes more sense.
Scenario A Low-budget DIY refresh for rental property
If you’re trying to freshen up a rental on a tight budget, staining laminate can give floors a cleaner, updated look without replacing them.
You’ll want a water-based stain-like paint, light sanding with fine grit, and a breathable sealer.
Test a small area, use thin coats, and keep tenants informed.
Expect cosmetic improvement, not structural change or long-term durability.
Scenario B High-traffic living room needing durable recolor
Moving from a low-cost rental refresh to a high-traffic living room, you’ll need a more robust approach when recoloring laminate.
Don’t attempt staining — the wear layer won’t hold pigment. Instead, sand lightly if edge profiles allow, use a durable primer designed for laminates, then apply high-quality floor paint or a commercial overlay.
Finish with a strong polyurethane or epoxy sealer for longevity.
Scenario C Historic look desired when to replace with wood
1 clear sign it’s time to replace laminate with real wood is when you want an authentic historic look that laminate can’t convincingly reproduce.
You’ll notice texture, patina, and nail‑board details missing. If period accuracy matters for restoration or resale, choose reclaimed or wide‑plank hardwood.
It takes skilled installation and finishing, but delivers genuine depth, aging potential, and long‑term value you can’t fake.
Frequently Asked Questions (FAQ)
You’re probably wondering whether wood stain works on laminate or if paint will just peel off — short answer: standard stains soak into real wood, not laminate, and paint adhesion varies by product and prep.
You’ll also want to know how long recoloring coatings last, whether refinishing kits can mimic real wood, and if replacing the flooring is worth it for a stained-wood look.
I’ll answer each of these FAQs plainly so you can pick the best route for your floors.
Can I use wood stain on laminate?
Can you use wood stain on laminate? No — laminate’s sealed photographic surface won’t absorb stain, so it won’t change color like real wood.
If you try, you’ll likely get uneven results that sit on top and rub off.
Instead, sandless alternatives like specialized floor paints, dye coatings, or replacing planks produce reliable, durable color changes without wasting time or money.
Will paint peel off laminate floors?
Will paint peel off laminate floors? Yes — paint can peel from laminate if you skip proper prep or use incompatible products.
Laminate’s smooth, sealed surface resists adhesion, so paint may lift with traffic, moisture, or poor primer.
To minimize peeling, scuff the surface, clean thoroughly, apply a primer made for slick substrates, then use a durable topcoat and allow full cure.
How long do recoloring coatings last on laminate?
How long do recoloring coatings last on laminate? Typically 3–7 years depending on traffic, product quality, and prep.
You’ll get longer life with commercial-grade recolorants, proper cleaning, and low-abrasion traffic.
Heavy use, pets, and moisture shorten lifespan. Touch-ups extend appearance but won’t restore worn wear layers.
Plan on reapplication when finish dulls, chips, or shows visible wear.
Can refinishing kits make laminate look like real wood?
If you’re hoping a refinishing kit will turn laminate into something indistinguishable from real wood, temper expectations: kits can greatly improve appearance but can’t recreate genuine wood grain or depth because laminate lacks a real wood layer to absorb stains and finishes the way solid or engineered wood does.
You’ll get improved color uniformity and surface protection, but texture and natural variation will remain artificial.
Is it worth replacing laminate if I want a stained wood look?
Wondering whether you should replace your laminate to get a stained wood look?
If the laminate is damaged, cheap, or you want authentic grain and stain depth, replacing with real hardwood or engineered wood is worth it.
If the laminate’s in good shape and budget limits you, consider high-quality vinyl plank or wood-look alternatives that mimic stained wood without full replacement.