
Can You Install Tile on Top of Tile? What You Must Know First
You can often install new tile over existing tile if the old surface is solid, level, and well bonded, but you shouldn’t do it when tiles are loose, cracked, or create unacceptable height changes. You’ll need to clean and prep the surface, choose the right thinset or primer for the tile types, and confirm structural flatness and local code allowances. Costs are lower than full removal, yet warranties can be voided—keep going to learn the steps and checks you’ll want to follow.
Can You Install Tile on Top of Tile? Quick Answer
You can often install new tile over existing tile if the old surface is sound, level, and well-bonded, so it’s a quick way to save time and money.
Don’t do it if the existing tile is loose, uneven, or on a floor with height or door-clearance issues—those need removal.
Check substrate condition and local building codes before you proceed.
Short, Direct Recommendation
Yes—you can often install tile over existing tile, but only when the old floor is firmly bonded, level, and free of cracks or loose tiles.
If you’re confident the substrate meets those conditions, clean and prime the surface, use a proper thin-set for tile-over-tile, and follow manufacturer guidelines.
Otherwise, remove old tile first to avoid failures.
Consider load and door clearances.
When it’s usually acceptable vs. when it’s not
If the existing tile is sound, level, and well-bonded, you can usually lay new tile over it; but when those conditions aren’t met, removal is the safer choice.
You can retile over intact floor or wall tile to save time, provided height, drainage, and substrate permit.
Remove tile if it’s loose, cracked, uneven, water-damaged, or if plumbing/thresholds require a flush surface.
Basic Understanding What It Means to Tile Over Tile
When you tile over tile, you’re choosing an overlay method that skips full removal and changes prep, adhesive, and weight considerations compared with ripping everything out.
You’ll need to assess the existing substrate — whether it’s ceramic, porcelain, or natural stone — because bondability and stability vary.
Many homeowners pick this route to save time, reduce dust and demo costs, and keep underlying substrates intact when they’re sound.
How tile-over-tile installation differs from full removal
Though both approaches result in a finished tiled surface, tiling over existing tile and doing a full removal are fundamentally different in scope, prep, and risk.
If you tile over, you save time, waste, and often cost, but you must guarantee flatness, strong adhesion, and acceptable thickness.
Removing tile lets you inspect and repair the substrate, but it’s laborious, messy, and may reveal hidden problems.
Types of existing tile substrates (ceramic, porcelain, natural stone)
Tiles come in different materials—ceramic, porcelain, and natural stone—and each changes how you’ll approach a tile-over-tile job.
Ceramic is porous and often accepts thinset well if intact.
Porcelain is dense and may need mechanical bonding or special primers.
Natural stone varies widely; some absorb adhesives, others secrete oils or salts, so you’d test absorption and stability before tiling over it.
Common reasons homeowners choose to tile over tile
Because ripping out existing tile adds time, cost, and dust, many homeowners choose to tile over tile to speed up remodeling and cut expenses.
You’ll also avoid demolition mess, preserve subfloor integrity, and shorten project timelines when conditions allow.
Consider these common motivations:
- Lower labor and disposal costs
- Faster project completion
- Less disruption to your home and schedule
Benefits and Drawbacks of Tiling Over Existing Tile
Tiling over existing tile can save you time, cut labor costs, and reduce the mess from demolition.
But you’ll need to watch for added floor height, potential adhesion and warranty problems, and whether the substrate can handle the extra load.
In some cases—like uneven or damaged tile, tight door clearances, or strict warranty requirements—the drawbacks will outweigh the savings.
Benefits (time, cost, less demolition)
Saving time is the biggest immediate advantage when you lay new tile over existing flooring — you skip ripping up old tile, hauling debris, and waiting for subfloor repairs, so your project moves from start to finish much faster.
You’ll also save money and reduce disruption, making the job cleaner and quicker.
- Lower labor and disposal costs
- Reduced demolition mess
- Faster project completion
Drawbacks and risks (height, adhesion, warranty issues, load)
While the shortcut can look appealing, laying new tile over old brings several real risks you should weigh:
- Increased floor height can create changes in elevation, trip hazards, and cabinet/range fit issues.
- Poor adhesion over glazed or contaminated tile can cause delamination and cracking.
- Manufacturers may void warranties, and added weight can overstress subfloors or joists, risking structural damage.
Situations where drawbacks outweigh benefits
If you’re dealing with uneven substrate, significant height changes, or suspect the old tile is poorly bonded, the risks usually outweigh the convenience of covering it up.
You’ll want to remove existing tile when waterproofing is compromised, multiple layers would exceed door thresholds, or structural loads concern you.
In those cases, demolition and proper preparation prevent failures, costly repairs, and voided warranties.
Key Requirements and Conditions for Success
Before you start, make sure the existing floor is structurally sound, level, and free of any loose or hollow tiles.
You’ll also need to match the new tile type to the old one (porcelain, ceramic, or stone) and choose thinset, adhesives, and grout rated for that combination.
Finally, check local building codes and the new tile manufacturer’s warranty requirements so your installation won’t void coverage or fail inspection.
Structural and substrate requirements (sound, level, no loose tiles)
Because the success of installing tile over existing tile depends on a stable base, you need a substrate that’s sound, level, and free of loose tiles or movement.
Inspect for cracks, flexing, or hollow spots; remove and repair any unstable tiles.
Verify floor flatness within manufacturer tolerances, reinforce joists or add a decoupling membrane where needed, and guarantee the surface is clean and firmly bonded.
Tile type compatibility (porcelain vs. ceramic vs. stone)
Several common tile types—porcelain, ceramic, and natural stone—have different absorption rates, thicknesses, and bonding needs.
You’ll need to match your setting materials and techniques to the specific tile you’re installing over existing tile.
Porcelain’s low porosity and rigidity may need stronger mechanical keying.
Ceramic is more forgiving, and stone demands sealing and careful movement accommodation to prevent cracking or staining.
Thinset, adhesives, and grout considerations
When you’re installing tile over existing tile, choosing the right thinset, adhesive, and grout is critical to creating a durable bond and a stable surface; each product must match the existing substrate, the new tile’s porosity and weight, and the expected movement or moisture conditions.
Use a polymer-modified thinset for better adhesion, pick grout suited to joint width and staining risk, and follow manufacturers’ curing times.
Local building code and manufacturer warranty considerations
If you want your tile-over-tile job to pass inspection and keep its warranty, you’ll need to meet both local building codes and the tile manufacturer’s installation requirements before you begin.
Check code for substrate, height, and moisture rules. Review warranty terms: allowed substrates, approved adhesives, and installer qualifications.
Get permits, document compliance, and keep receipts to avoid voiding coverage.
Step-by-Step Guide: How to Install Tile on Top of Tile
Before you start, inspect the existing tile and substrate carefully to make sure it’s sound and repair any cracks or loose tiles.
You’ll clean, degrease, and then sand or profile the surface so new thinset can bond.
Finally, level as needed and pick the correct adhesive—modified or unmodified—based on your materials and the manufacturer’s instructions.
Step 1 Inspect and evaluate existing tile and substrate
Although it might seem straightforward, you need to thoroughly inspect the existing tile and substrate to know whether you can tile over it safely.
Check for loose, cracked, or hollow tiles and damaged grout lines. Verify substrate type and levelness; confirm no moisture damage or deflection.
- Tap for hollow spots
- Measure flatness and slope
- Look for water stains or soft spots
Step 2 Clean and prepare the surface (degrease, remove contaminants)
Start by removing dirt, grease, and any loose residue so your new adhesive can bond properly to the old tile.
You’ll clean with a degreaser, rinse thoroughly, and let it dry completely.
Check for soap scum or wax and eliminate contaminants before tiling.
- Use a pH-neutral cleanser or degreaser
- Rinse with clean water and dry
- Remove oil, wax, and mildew
Step 3 Sanding, scuffing, or profiling the existing tile for adhesion
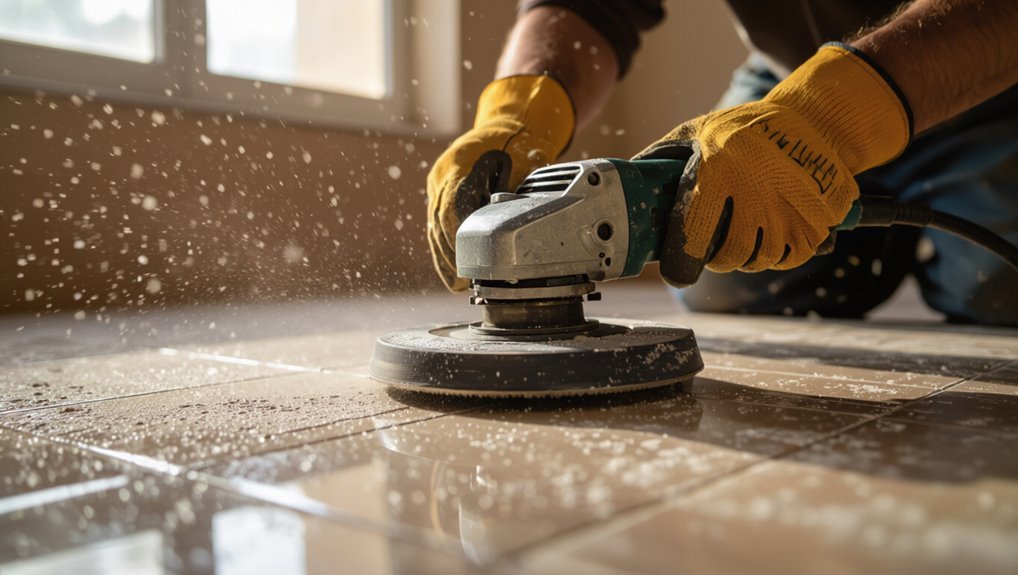
Now that the surface is clean and dry, you’ll need to roughen the existing tile so new adhesive can grip.
Use these quick methods to profile tile and improve bonding without removing the old layer.
- Sand glazed tiles with a diamond pad or coarse sandpaper.
- Scuff ceramic with a rotary tool or sanding disc.
- Use a chemical etcher for porcelain when mechanical profiling isn’t feasible.
Step 4 Repairing cracks, loose tiles, and leveling the floor
Before laying new tile, fix any loose pieces, fill cracks, and level low spots so the finished floor stays stable and looks professional.
You’ll remove loose tiles, clean cavities, and use appropriate patching to create a firm substrate. Check flatness with a straightedge, feather underlayment into dips, and let repairs cure fully before proceeding.
- Remove and re-secure loose tiles
- Fill cracks and voids
- Level low spots
Step 5 Choosing the right adhesive and thinset (modified vs. unmodified)
Because the existing tile surface affects bond strength, you’ll need to pick an adhesive and thinset that’s formulated for tile-over-tile installations and compatible with your new tile type.
In most cases, a polymer-modified thinset engineered for improved adhesion to non-porous substrates is the right choice, while unmodified thinset is usually reserved for specific membranes or manufacturer-required installations.
- Use polymer-modified thinset for porcelain or glazed tile over tile.
- Check manufacturer instructions and floor movement ratings.
- Guarantee proper mixing, open time, and substrate preparation for a reliable bond.
Step 6 Laying out new tile and accounting for height/transition issues
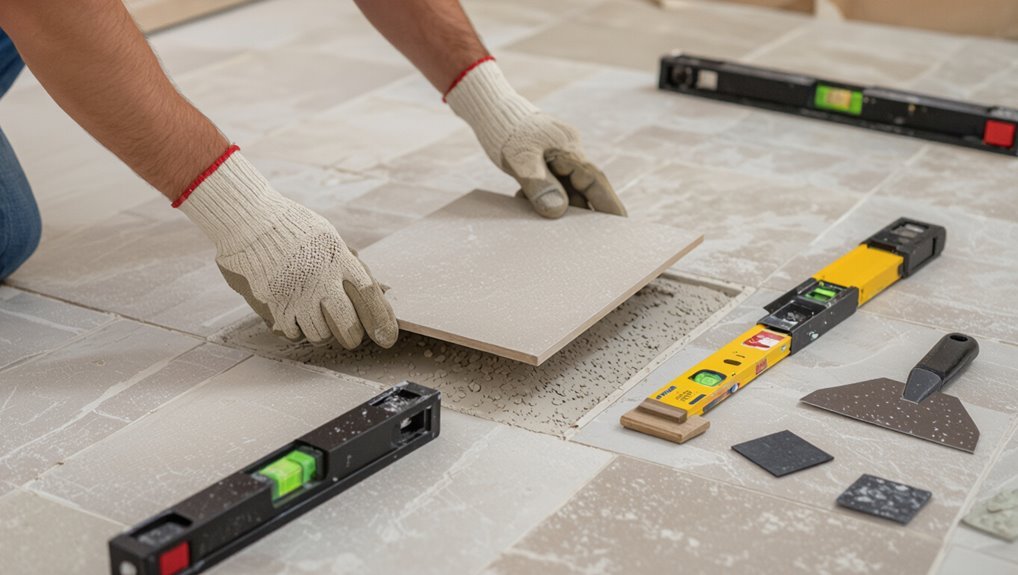
With your adhesive chosen and the substrate prepped, you’ll lay out the new tile so it sits flat, aligns with room sightlines, and meets door and floor-level changes.
Measure from focal points, dry-lay rows, and mark cut lines. Account for added thickness at thresholds and under doors; plan junction strips or ramps.
- Dry-lay and adjust
- Check door clearances
- Choose junction profile
Step 7 Installing tile, grout, and sealing (curing times and tips)
Start by spreading thinset evenly and setting each tile firmly into place, using spacers to keep consistent joints and a rubber mallet to seat tiles without breaking the bond beneath.
Let thinset cure per manufacturer, usually 24–48 hours. Grout, then seal after grout cures—wait full cure times for traffic.
Tips:
- Work in small sections, wiping haze promptly
- Use epoxy or urethane grout for durability
- Seal porous tile and grout twice
Tools, Materials, and Estimated Costs
You’ll need a clear checklist of essential tools and materials—trowels, thinset, spacers, a wet saw or tile cutter, and a quality primer—along with optional items like a grinder, leveling system, and better-quality thinset for improved results.
I’ll also compare typical costs so you can see how tile-over-tile usually stacks up against full removal and re-tiling. That way you can decide what tools to buy or rent and which approach fits your budget.
Essential tools and materials checklist
Before you lift the first tile, gather a compact kit of tools and materials so the job goes smoothly:
You’ll need tile adhesive rated for over-tile applications, a quality notched trowel, grout, spacers, a cement backerboard if required, a tile cutter, level, and safety gear.
Keep costs estimated per item to avoid surprises.
- Adhesive, trowel, grout
- Tile cutter, level, spacers
- Backerboard, safety gear, tape measure
Optional tools for better results
Once you’ve gathered the basics, consider adding a few optional tools that’ll speed the work and improve the finish without breaking the budget.
You’ll get cleaner cuts, faster adhesion, and neater grout lines with modest extras. Prioritize according to scope and reuse potential to keep costs sensible.
- Wet tile saw (compact)
- Leveling system and wedges
- Premium polymer-modified thinset
Typical cost comparison: tile-over-tile vs. full removal and re-tile
For a straightforward 100–200 sq ft room, tiling over existing tile typically cuts labor and disposal costs dramatically compared with full removal and re-tile: you’ll mostly pay for thinset, new tile, grout, and a few specialty tools rather than demo labor, dumpster fees, and subfloor repairs. Compare estimates:
| Option | Typical cost range | Notes |
|---|---|---|
| Tile-over-tile | $800–$2,000 | Lower labor, faster |
| Full removal | $2,000–$6,000 | Demo, disposal, repairs |
| Materials only | $300–$1,200 | Tile, thinset, grout |
Common Mistakes and Problems to Avoid
Don’t install new tile over loose or damaged old tiles—you’ll end up with delamination and cracks.
Make sure you use the correct adhesive and properly profile the surface, or the bond will fail. Pay attention to height shifts and thresholds so doors and movement joints work correctly.
Also account for substrate deflection and structural movement to prevent future tile breakage.
Installing over loose or damaged tile
If you try to install new tile over loose or damaged tile, you’ll invite adhesion failures, uneven surfaces, and premature cracking.
You should remove unstable tiles and repair substrate before proceeding. Loose pieces, hollow spots, or crumbling grout will compromise bonding and alignment.
Skipping demolition shortens initial work but leads to callbacks, water intrusion, and costly repairs down the line.
Using the wrong adhesive or skipping surface profiling
When you choose the wrong adhesive or skip proper surface profiling, your new tile may never bond correctly and problems will show up fast.
You’ll face hollow spots, loose tiles, and grout cracking. Always remove contaminants, roughen glossy surfaces, and use a compatible thinset or adhesive rated for tile-over-tile.
Follow manufacturer instructions and test adhesion before finishing to avoid costly rework.
Ignoring height transitions and threshold issues
Because you’re stacking tile layers, you’ll quickly run into height mismatches at doorways, cabinets, and thresholds unless you plan for them up front.
Measure changes, pick compatible thresholds or reducers, and trim doors if needed.
Account for appliances and cabinet clearances. Neglecting this causes trip hazards, poor seals, and unsightly gaps.
Plan profiles and order change pieces before installing the new tile.
Failing to account for substrate deflection or structural movement
You handled height changes and thresholds, but the floor itself can still move under you. If you ignore substrate deflection or structural movement, tiles crack and grout fails.
Check joist span, stiffen or add plywood, and allow movement joints. Use flexible adhesives and decoupling membranes where needed to protect the new tile from hidden shifts.
- Inspect framing stiffness
- Add underlayment or braces
- Include movement joints
Best Practices and Professional Tips
Decide whether the project is within your skillset or needs a pro—large areas, tricky waterproofing in bathrooms, or matching existing joints are good reasons to call one.
Pay special attention to moisture details: you’ll need proper waterproofing over existing tile and should consider uncoupling membranes where movement or mismatched substrates are likely.
Finally, plan expansion joints and a maintenance routine now so the new installation lasts and performs well.
When to hire a pro vs. DIY
If the layout is simple and you’re comfortable with cutting and leveling tile, you can probably handle the project yourself; hire a pro when complex patterns, uneven substrates, waterproofing needs, or time constraints exceed your skills.
Choose DIY for small, flat areas, modest budget, and patience to learn.
Call a pro for large rooms, structural issues, precise grout lines, or when warranty and resale value matter.
Moisture and bathroom-specific considerations (waterproofing over tile)
When bathrooms stay wet, moisture can work its way through grout and old tile to damage the substrate and framing below.
So waterproofing over existing tile needs deliberate planning and the right materials. You’ll inspect for leaks, repair damaged substrate, and choose a compatible liquid membrane or waterproof board.
Seal seams, connections, and penetrations thoroughly before tiling to prevent mold and rot.
Matching expansion joints and using uncoupling membranes
Because tile assemblies and building structures move at different rates, you’ll need to match expansion joints and consider uncoupling membranes to keep cracks from telegraphing through to your new tile.
Identify existing movement joints and extend them through the new installation.
Use a certified uncoupling membrane over stable, clean substrate to isolate stresses, follow manufacturer layout, and bond with recommended thinset for lasting performance.
Long-term maintenance recommendations
As you finish the installation, plan a simple maintenance routine to protect your tile and grout over the long term:
Sweep or vacuum regularly, mop with pH-neutral cleaner, and avoid abrasive tools.
Reseal grout annually or as recommended, inspect joints and membranes for cracks, and address stains promptly.
Schedule professional inspections every few years to guarantee adhesion and spot repairs before issues escalate.
Comparison: Tile-Over-Tile vs. Tile Removal and Re-Do
You’ll want to weigh durability and expected lifespan when choosing between tiling over existing tile or stripping it down and redoing the substrate.
Consider time, cost, and disruption: tile-over is faster and cheaper short-term, but full removal often prevents hidden problems and gives longer-lasting results.
If the old tile is loose, cracked, or on a compromised substrate, removal is usually the smarter option.
Durability and lifespan comparison
When you compare tile-over-tile to removing and redoing the floor, the biggest differences show up in long-term durability and how well the substrate can support the installation. You’ll find redoing usually yields longer life and fewer failures if the substrate is compromised. Tile-over-tile can last if existing tile is sound, but it raises risk of delamination over decades.
| Option | Expected lifespan |
|---|---|
| Tile-over-tile | Moderate |
| Removal and re-do | Longer |
Time, cost, and disruption comparison
If you’re weighing tile-over-tile against removing and redoing the floor, time, cost, and household disruption are usually the deciding factors: tile-over-tile often finishes faster and cheaper with less mess, while full removal takes longer, costs more, and creates more noise and dust but gives you a cleaner substrate and fewer long-term worries.
| Option | Time | Disruption |
|---|---|---|
| Tile-over-tile | Short | Low |
| Removal & re-do | Long | High |
When removal is the better option (case scenarios)
Having looked at time, cost, and disruption, now let’s look at the situations where removing old tile and redoing the floor makes more sense.
You should remove tiles if the substrate is damaged, tiles are loose or cracked, multiple layers already exist, or height changes will interfere with doors or thresholds.
Also remove when matching patterns, waterproofing, or long-term warranty matters.
Real-World Scenarios and Case Examples
You’ll see a clear example of a successful kitchen tile-over-tile renovation, including prep steps and outcomes.
You’ll also learn common bathroom pitfalls and practical salvage strategies when problems show up.
Finally, you’ll get key considerations for installing tile over tile with underfloor heating to keep performance and longevity intact.
Successful tile-over-tile kitchen renovation (summary)
When you’re renovating a kitchen and want to save time and demolition costs, tiling directly over existing tile can be a smart choice—provided the old surface is solid, level, and clean.
You’ll assess adhesion, repair cracks, and use proper thinset and uncoupling membranes.
With correct prep, new porcelain or ceramic tiles achieve durable, modern results without full tear-out, saving time and money.
Bathroom installation pitfalls and salvage strategies (summary)
Because bathrooms face constant moisture, tiling over existing tile in that space demands extra care to avoid leaks, mold, and adhesion failures.
Inspect substrate, grout, and plumbing; remove loose or hollow tiles; guarantee proper waterproofing at wet zones.
If adhesive fails, rip back to substrate, repair or replace backer, and reinstall with appropriate thinset and waterproof membrane to salvage the installation.
Flooring with underfloor heating considerations
If you’re adding tile over existing floor tile and plan to run underfloor heating, prioritize compatibility, thinset thickness, and thermal transfer so the system heats efficiently without stressing the tiles or adhesive.
Test adhesive bond, confirm tile and membrane ratings for temperature, and keep thinset layer minimal for conductivity.
Use uncoupling membranes rated for heat and follow manufacturer spacing, insulation, and thermostat recommendations.
FAQ
You’ll have practical questions like whether porcelain can go over ceramic, how much the floor height will change, and if warranties stay valid.
You’ll also want to know about wet-area installs and whether showers are safe for tile-over-tile.
Finally, you’ll need guidance on how long to wait before walking on the new surface.
Can I tile over ceramic tile with porcelain tile?
Curious whether you can lay porcelain over existing ceramic tile? You can, if the ceramic is sound, well-bonded, clean, and flat.
Roughen glazed surfaces or use a bonding primer, and choose a polymer-modified thinset rated for porcelain over tile.
Check moisture and deflection limits, and follow manufacturer instructions.
When in doubt, consult a pro to avoid failures.
How much taller will the floor be if I tile over tile?
Wondering how much height you’ll add by tiling over existing tile? Expect roughly 1/8″ to 3/8″ for thinset and grout plus your new tile thickness.
Typical porcelain or ceramic ranges 3/16″–3/8″, so total often equals about 3/8″–3/4″.
Large-format or thick tiles add more.
Factor changes at doorways, thresholds, and appliance clearances when planning.
Will tiling over tile void my new tile’s warranty?
If you install new tile over existing tile, you could jeopardize the manufacturer’s warranty because many makers require a proper substrate and approved installation methods—conditions that are harder to confirm when tiling over old tile.
Check the warranty terms: manufacturers often void coverage for nonstandard installs.
Get written confirmation from the maker or installer before proceeding, and document surface prep to support any future claims.
Can I tile over tile in a shower or wet room?
Tiling over existing tile in a shower or wet room is possible, but it raises extra concerns compared with dry areas—especially since warranties may already be at risk when you don’t follow manufacturer-approved methods.
You must guarantee the substrate is sound, remove loose or soft tile, waterproof correctly, use appropriate thinset and tile rated for wet areas, and follow local codes to prevent leaks and mold.
How long should I wait before walking on newly installed tile-over-tile?
How long you should wait before walking on tile-over-tile depends on the thinset and setting method you used: for a standard cement-based thinset, wait at least 24 hours for initial cure and 48–72 hours for full strength.
For rapid-set mortars you can often walk on it in 2–4 hours, while epoxy or resin-based adhesives may require longer manufacturer-specified cure times.
After that, avoid heavy loads for several days.
Conclusion Decision Checklist and Next Steps
Use this quick checklist to decide if tiling over tile fits your situation: check the old tile’s condition, height concerns, and whether the substrate and layout meet standards.
If everything looks good, start prepping; if you’re unsure or find problems, inspect more closely or consult a pro.
That way you’ll know whether to proceed, get help, or stop and repair first.
Quick decision checklist to determine if tiling over tile is right for you
Ready to make a final call? Use this quick checklist to decide if tiling over tile fits your project:
- Assess substrate stability: is existing tile firmly bonded with no major cracks?
- Check height and door clearances: will added tile create clearance or trip hazards?
- Evaluate moisture and use: is the area dry enough and suited for an additional layer?
Recommended next steps (inspect, consult pro, or start prep)
Once you’ve ticked off the checklist, decide whether to inspect, call a pro, or begin prep based on confidence and scope—if the tiles are sound, clearances work, and moisture isn’t an issue, you can likely prep and proceed;
if anything’s uncertain (loose tiles, substrate damage, tricky changes, or plumbing/electrical concerns), schedule a professional inspection before you commit.
Choose one path and act.
- Inspect for stability and moisture.
- Call a pro for structural or tricky work.
- Start prep: clean, prime, and plan layout.

