How to Cut Laminate Flooring Without a Saw: 5 Surprisingly Easy Methods
You can cut laminate flooring without a saw using five easy methods: score-and-snap with a utility knife, a fine-tooth handsaw or pull saw, tin/aviation snips for notches, heavy-duty tile nippers for small sections, or a chisel for precise corner cuts. Measure, mark, support the plank, score deeply, and snap or trim slowly to avoid chipping. Wear eye protection and gloves, seal cut edges, and keep tools sharp — continue for step-by-step techniques and pro tips.
How to Cut Laminate Flooring Without a Saw and Overview
You can cut laminate without a saw using five easy methods: score-and-snap, utility knife, handsaw, chisel, and tile nippers.
You’ll need saw-free options for small tweaks, tight spaces, or when power tools aren’t allowed.
Always wear eye protection, gloves, and a dust mask, and work on a stable surface to stay safe.
Direct answer: 5 easy saw-free methods summarized
Cutting laminate without a saw is entirely doable with the right tricks—here are five simple, saw-free methods you can use depending on the cut you need and the tools you have on hand.
You’ll learn how to cut laminate flooring without a saw using practical options:
- Snap score method
- Utility knife slices
- Jigsaw alternative (manual)
When and why you might need to cut without a saw
If those saw-free tricks aren’t just convenient but necessary, here’s when you’ll want them: tight spaces where a power saw won’t fit, small trim or end cuts that don’t justify hauling out noisy equipment, jobs in apartments with noise limits, or quick repairs and touch-ups where speed matters more than perfection.
You’ll also use saw-free methods when tools aren’t available, budget is tight, or dust control matters.
Safety overview and necessary protective gear
Because working without a saw changes the risks, take a moment to prepare with the right safety gear before you start.
You’ll protect yourself from sharp edges, flying chips, and dust.
Follow these essentials:
- Safety glasses and dust mask for eye and lung protection.
- Cut-resistant gloves to handle boards safely.
- Knee pads and sturdy shoes for comfort and stability.
Basic Understanding Laminate Flooring Types and Cut Requirements
Laminate planks come in different constructions—click-lock, glued, and engineered layers—and each affects where you’ll need end cuts, notches for pipes, or long rip cuts.
You can substitute tools like a manual pull saw, scoring knife, or jamb saw for many end and notch cuts, but they’re limited on long rips and thick wear layers.
Before you start, assess each cut’s complexity so you’ll know which ones are safe to do without a powered saw.
Common laminate plank constructions and where cuts are needed (end cuts, notches, long rip cuts)
There are three common plank constructions you’ll encounter—direct-press (HDF with a printed décor), laminate over composite core, and engineered click-together—that each affect how and where you’ll make end cuts, notches, and long rip cuts.
You’ll cut ends for length, notch for door jambs and vents, and rip long strips for edge runs; denser cores resist chipping, while layered cores can delaminate if cut improperly.
Tools you can substitute for a saw: limitations and suitable cut types
If you don’t have a saw, you can often get away with a few handheld tools—utility knife, scoring knife, circular cutter, or a sharp jigsaw—for certain cuts, but each has limits depending on plank construction and cut type.
You’ll choose by cut precision, depth, and speed.
Use:
- Utility knife for thin laminates and end cuts.
- Scoring cutter for clean snaps.
- Jigsaw for small notches and curves.
Assessing complexity: which cuts are safe with non-powered methods
After choosing between a utility knife, scoring cutter, or jigsaw, you’ll need to judge which cuts you can safely do without power.
Straight rip cuts, short end trims, and simple doorways are fine with scoring and snapping or hand saws.
Complex curves, long angled cuts, and tight notches require a powered saw for accuracy and clean edges—avoid forcing non-powered methods.
Method 1 Score-and-Snap with Utility Knife (Best for short straight cuts)
You’ll only need a utility knife, straightedge, measuring tape, pencil, and a scrap block to protect edges for the score-and-snap method.
I’ll walk you through preparing the plank, scoring along the line, snapping cleanly, and finishing the edge, plus which plank orientations this works best for and common mistakes to avoid.
You’ll also get a quick rundown of pros and cons so you can decide when this fast, low-cost technique is the right choice.
Tools and materials needed
For the score-and-snap method you’ll need a sharp utility knife, a straightedge or carpenter’s square, a measuring tape, and knee pads or a soft surface to protect the plank while you work.
Gather these essentials and keep blades fresh.
- Replacement utility blades
- Masking tape (to prevent chipping)
- Pencil and scrap wood for support
Step-by-step: Preparing, scoring, snapping, finishing
When you’re ready to cut a plank, set it flat on a protected surface with the finished side down and the edge you’ll cut supported by scrap wood so the blade won’t tear the laminate.
Measure and mark the cut line, score deeply with a utility knife along a straightedge, snap downward using pressure on the supported side, then sand or file the edge and seal if needed.
Best use cases and plank orientations
After scoring and snapping a few planks, you’ll notice this method shines on short, straight cuts where control matters more than speed.
Use it for end cuts near walls, door jambs, and narrow filler strips. Orient planks face-up when scoring for cleaner lines, and score along the length for precise snaps.
It’s ideal for tight spaces and final trimming tasks.
Pros, cons, and common mistakes

Although score-and-snap is simple and cheap, it gives you clean, controlled end cuts without special tools; you just score the face, snap, and trim the tongue if needed.
You’ll like the speed and low cost, but watch for splintering and uneven snaps.
Common mistakes and tips:
- Use a sharp blade and multiple shallow passes.
- Clamp or support plank to prevent tear-out.
- Measure twice, cut once; avoid angled cuts.
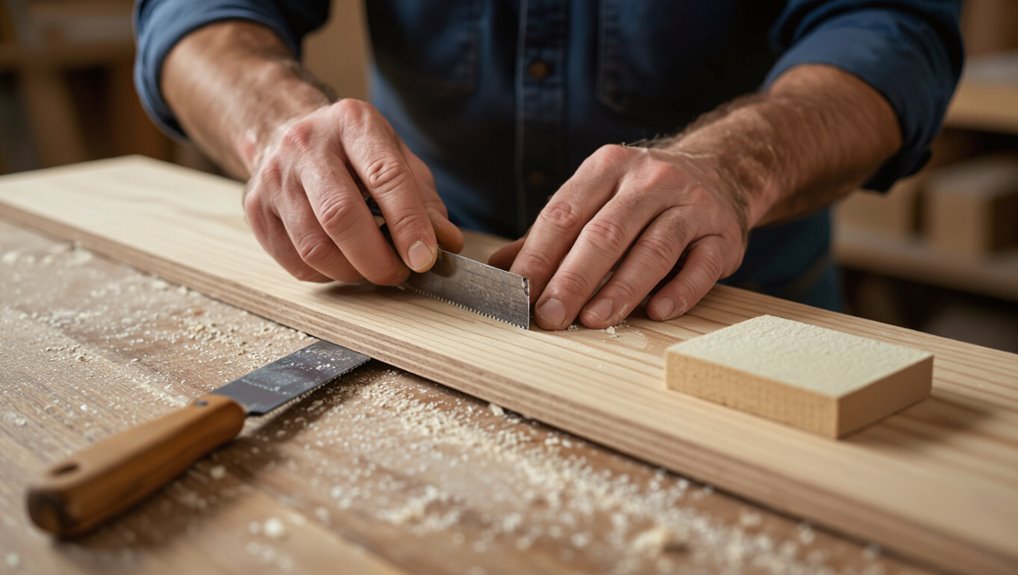
Method 2 Using a Manual Pull Saw or Handsaw Alternative (No power tools)
If you don’t have power tools, a fine-tooth pull saw or a crosscut handsaw with 10–14 tpi will give the cleanest cuts on laminate.
I’ll walk you through blade selection, a steady score-and-saw technique for crisp edges, when a handsaw is the smarter choice versus other methods, and quick finishing tips to hide any roughness.
Read on and you’ll know the pros and cons so you can pick the right approach for your cut.
Recommended manual saw types and blade selection
When you’re working without power tools, choosing the right manual saw and blade makes the job cleaner and faster; a pull saw or fine-toothed handsaw with a 10–14 TPI (teeth per inch) and a triple-chip or carbide-tipped blade edge will give you the smoothest cuts on laminate without chipping the melamine surface.
- Pull saw: fast, clean pull stroke.
- Fine-toothed handsaw: affordable, precise.
- Japanese-style dozuki: excellent for thin, delicate finishes.
Step-by-step cutting technique for clean edges
Having picked the right manual saw and blade, you’re ready to cut for clean, chip-free edges; start by marking the cut line on the laminate’s melamine face and backing.
Then flip the plank and score that line lightly with a utility knife to prevent tear-out.
Clamp the plank over a gap, saw slowly with steady strokes, support the offcut, and sand the edge smooth.
When to choose a handsaw vs. other methods
Because you’re working without power tools, pick a manual pull saw when precision, portability, and low noise matter more than speed.
Choose it for short, straight cuts, on-site adjustments, or tight spaces where a larger tool won’t fit.
Opt for alternatives—snap method, scoring knife, or jamb saw—if speed, minimal dust, or repeated identical cuts take priority.
Pros, cons, and finishing tips
Expect a balance of control and effort: a manual pull saw gives you precise, low-noise cuts and great portability, but it’s slower and more physically tiring than power tools and can produce ragged edges if you rush.
You’ll appreciate affordability and control; drawbacks are speed and fatigue.
Finish by sanding rough edges, sealing cut ends with laminate sealant, and testing fits before installing.
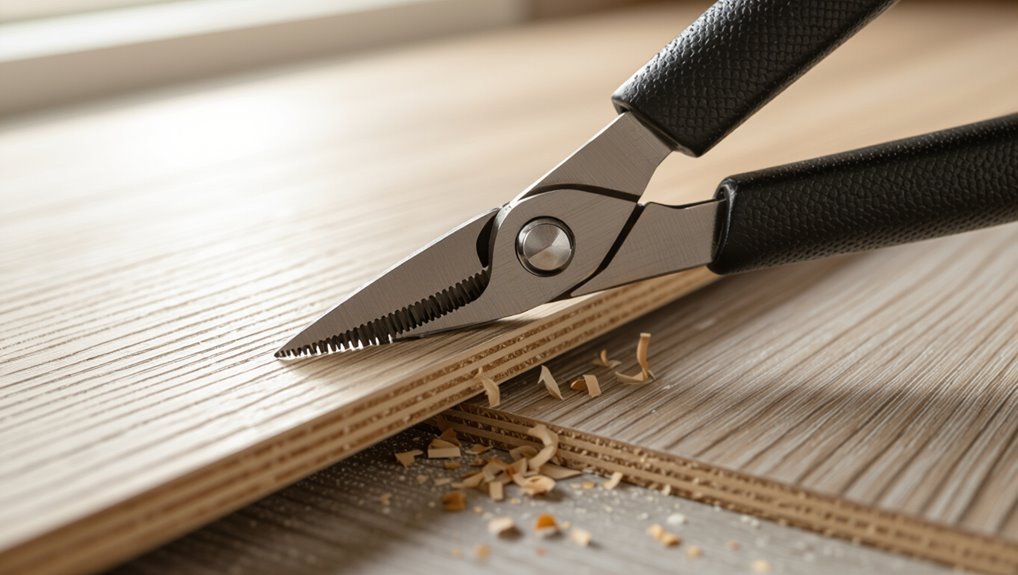
Method 3 Tin Snips or Aviation Snips for Narrow Cuts and Notches
For tight notches and small trim work you’ll want aviation snips or sharp tin snips made for cutting metal—choose left- or right-cut snips to follow your cut line and score the finish first to avoid chipping.
Protect the plank surface with masking tape or a scrap piece of cardboard under the cut, then make shallow passes to form grooves, remove the waste, and tidy the edge with fine sandpaper.
I’ll point out the pros, cons, and where snips fall short so you can decide when this method’s right for the job.
Which snips work and how to protect the plank surface
Tin snips—or aviation snips for tighter curves—are a great choice when you need narrow cuts or small notches in laminate planks because they give you control without splintering the groove.
Choose sharp, compound-action snips for smoother edges. Protect the plank surface with low-tack painter’s tape where blades contact.
Work slowly, support the plank beneath the cut, and inspect edges for burrs before locking joints.
Step-by-step for notches, grooves, and small cuts
Start by marking the cut on the plank with a pencil and a square. Then apply a strip of low-tack painter’s tape over the line to protect the surface and keep the laminate from chipping.
Clamp the plank to a stable surface. Score the tape along the mark with a utility knife.
Use tin snips to nibble away small sections, working slowly and checking fit frequently until the notch or groove fits.
Pros, cons, and limitations
Although they look simple, aviation snips give you precise control for tight notches and short edge cuts, and they’re cheap and easy to use without power tools.
You’ll get clean small cuts fast, need minimal setup, and avoid dust.
But they struggle with long straight cuts, thick or reinforced laminate, and can fatigue your hand.
Use them for detail work, not full plank ripping.
Method 4 Jigsaw-Free Rip Using a Straightedge and Heavy Duty Shears or Tile Nippers
For long, narrow rips where you don’t want to bring out a saw, you can use a straightedge with heavy-duty shears or tile nippers to clamp, score, and shear the plank in controlled increments.
Clamp the straightedge, score the wear layer, then make small, steady cuts with the shears or nibble away with nippers to keep the edge clean and avoid splintering.
This method’s simple tooling is handy for tight jobs, but it’s slower, can stress the plank edge, and isn’t recommended for very thick or patterned boards.
Tools suitable for long narrow rips without a saw
When you need to rip long, narrow laminate strips without a saw, pick tools that give straight, controlled cuts and reduce chipping—heavy-duty tin snips or laminate shears and tile nippers fit the bill.
Use long-reach snips for continuous straight rips, compound-action shears for reduced hand fatigue, and small tile nippers for trimming tight curves or stubborn bits.
Wear eye protection.
Step-by-step: clamping, scoring, and incremental shearing
If you’ve picked heavy-duty snips or tile nippers for those long, narrow rips, the next step is to clamp a straightedge, score the laminate, and shear incrementally to keep the cut straight and chip-free.
Mark your line, secure the straightedge, score firmly along it with a utility knife, then nibble away small sections with the snips, working from the scored side and checking alignment frequently.
Best practice for edge integrity and preventing splintering
Although this method skips power tools, you’ll want to prioritize clean edges by scoring deeply, supporting the laminate, and making controlled, small shears rather than big bites.
Work from the back face to avoid top splintering, clamp a sacrificial straightedge under the cut, keep shears sharp, and finish with a light sanding or file.
Move slowly and steady for crisp results.
Pros, cons, and when to avoid
Because you can work without power tools and keep noise and dust to a minimum, this jigsaw-free rip with a straightedge and heavy-duty shears or tile nippers is great for quick, small jobs and awkward pieces where precision matters more than speed.
You’ll get clean control and low setup, but it’s slow, tiring, and unsuitable for long rips, thick or textured planks—avoid for large areas.
Method 5 Use of Rasp, File, and Sanding for Fine Adjustments and Curves
Sometimes filing or sanding is enough instead of cutting, especially for tight fits, small notches, or smoothing curves.
You’ll learn step-by-step how to shape interior cutouts and round edges using a rasp, file, and progressively finer sandpaper.
We’ll also cover the pros, cons, and how much extra time these fine adjustments typically add.
When filing/sanding is sufficient instead of cutting
When you’re fitting laminate around door jambs, pipes, or tight curves, filing and sanding often give a cleaner, quicker result than pulling out a saw; they’re ideal for trimming small amounts or smoothing cut edges.
Use a rasp or coarse file to remove material gradually, then switch to finer sandpaper for a snug fit and neat finish.
Check frequently to avoid over-removal.
Step-by-step shaping and smoothing interior cutouts or rounded edges
If your laminate cutouts need subtle shaping or a rounded finish, reach for a rasp, file, and progressive grits of sandpaper—these tools let you remove small amounts precisely and avoid splintering.
Mark the curve, rasp away bulk with controlled strokes, switch to a medium file for refining, then sand from 120 to 220 grit for smooth edges.
Clean dust and test fit.
Pros, cons, and time considerations
Though this approach takes more hands-on time than a power tool, using a rasp, file, and sandpaper gives you precise control for small adjustments and delicate curves.
Pros: low cost, quiet, minimal dust, great finish control.
Cons: slow, labor-intensive, limited for large cuts.
Time: plan extra time for shaping and sanding; small corrections take minutes, complex curves take considerably longer.
Comparison of the 5 Methods Which to Use When
Now that you’ve seen each cutting method, you’ll get a quick comparison of speed, accuracy, finish quality, tool cost, and best use cases to help you pick the right one.
You’ll also follow a simple decision flow that matches cut types and the tools you have on hand. Use the table and flowchart to choose fast straight cuts, precise miters, or fine curve work without guessing.
Quick comparison table of speed, accuracy, finish quality, tool cost, and best use cases
Choose the right cutting method by weighing five quick factors—speed, accuracy, finish quality, tool cost, and best use cases—so you get the result you need without wasting time or money. Use the table to match needs quickly and pick the method that fits your skill and budget.
| Method | Strength | Best use |
|---|---|---|
| Utility knife | Finish | Small trims |
| Handsaw | Accuracy | Straight long cuts |
| Jigsaw | Speed | Curves |
| Tile cutter | Clean edge | Plugs |
| Scoring tool | Cheap | Repeat cuts |
Decision flow: choosing the best method based on cut type and available tools
When you know the cut type and what tools you have on hand, pick the method that matches both quickly and confidently; assess accuracy needed, edge finish, and tool availability.
Use this quick decision flow:
- Straight long cuts + speed: snap score or utility knife.
- Curves or tight fits: jigsaw substitute (manual coping/sawing).
- Clean visible edges: fine-tooth handsaw or sanding and sealing.
Common Mistakes and How to Avoid Them
Don’t rush measuring—double-check lengths and mark planks clearly to prevent costly mistakes and damage.
Use the right blade or scoring technique and support the plank to avoid splintering, chipping, or poor fits.
And don’t take unsafe shortcuts with hand tools; secure material, wear protection, and keep hands clear of cutting paths.
Mis-measuring and plank damage prevention steps
If you mis-measure a plank or handle it roughly, you’ll waste material and risk visible damage that’s hard to fix—so take precise measurements and treat each board carefully from the start.
Measure twice, mark clearly, and cut just outside the line. Support planks on a flat surface, clamp when possible, and carry boards flat to avoid bending.
Check orientation before trimming.
Splintering, chipped laminates, and poor fit fixes and preventative techniques
A few careful cuts and steady handling will prevent many of the common problems you’ll face—yet splintering, chipped edges, and poor seams still happen, especially on tricky cuts or tight corners.
Use painter’s tape and score before cutting to reduce tear-out. Sand or file burrs, glue small chips, and dry-fit planks to check alignment.
Trim gradually for a snug, even seam.
Unsafe practices to avoid when working without power tools
When you skip basic safety steps because you’re trying to save time, small mistakes can turn into painful injuries or ruined planks; working without power tools still demands the same respect for sharp edges, stable work surfaces, and proper hand placement.
Don’t force tools, hold materials firmly, cut away from your body, wear gloves and eye protection, and avoid unstable surfaces or rushed shortcuts.
Tips, Best Practices, and Prep for a Professional-Looking Installation
Measure twice and mark once using a tape, square, and a pencil or chalk line for crisp cuts and fast shortcuts like story sticks.
Clamp and support the plank to prevent chip-out, protect surrounding boards with scrap wood, and seal any exposed core or cut edges to stop swelling.
If the job needs long rip cuts or heavy crosscuts, don’t hesitate to rent or borrow a proper saw to save time and get cleaner results.
Measuring and marking like a pro (tools and shortcuts)
Start by gathering a few key tools—tape measure, pencil, speed square, carpenter’s square, and a marking gauge—and you’ll cut straight, consistent boards every time.
Measure twice, note cut direction, and account for tongue or groove. Use the speed square for quick 90° lines and the carpenter’s square for long edges.
Clamp a straightedge and score with a utility knife for clean breaks.
Clamping, support, and protecting surrounding planks
After you’ve marked and scored each board, clamp and support become the next priorities to keep cuts clean and neighboring planks unmarked.
Use a sacrificial strip beneath the cut line, clamp boards firmly to prevent shifting, and rest long pieces on sawhorses or blocking to avoid sag.
Protect surrounding planks with painter’s tape or thin scrap wood to prevent dings while you work.
Finishing edges and sealing exposed core
Clean up and protect any cut edges before you click the boards into place: trim rough fibers with a sharp utility knife, sand lightly with fine-grit paper, and apply a compatible edge sealant or vinyl filler to the exposed core to prevent swelling and mask color differences.
- Wipe dust, then test sealant on scrap.
- Use thin beads; wipe excess.
- Allow full cure before installing.
When to stop and rent/borrow a saw instead
Once you’ve smoothed and sealed the cut edges, know when a handheld utility knife and jigsaw won’t give you the clean, consistent results a circular or miter saw will.
Rent or borrow a proper saw when you face long rip cuts, repeated angled cuts, tight tolerance door jambs, or large areas where speed and repeatability matter. It saves time and prevents costly mistakes.
Tools and Materials Checklist
Before you start cutting, gather a few essential low-cost items you’ll use on every job—measuring tape, pencil, square, utility knife, and a basic saw.
You might also keep optional tools for cleaner, faster cuts, like a miter saw, jigsaw, or a cutting guide and dust collection.
Having both the basics and a couple of upgrades on hand will save time and improve your results.
Essential low-cost items to keep on hand
You don’t need a workshop full of specialty gear to cut and install laminate—just a handful of inexpensive, multiuse tools and basic materials will cover most jobs.
Keep these essentials nearby to work faster and avoid trips to the store:
- Tape measure, carpenter’s pencil, and straightedge.
- Utility knife with spare blades and a scrap block.
- Rubber mallet, pull bar, spacers, and adhesive cleaner.
Optional items for cleaner results
A few optional tools will tighten joints and speed cleanup, so consider adding them to your kit if you want neater, more professional-looking results.
Include a block plane or sanding block for chamfers, a rubber mallet for snug clicks, and a pull bar for end gaps.
Use painter’s tape to prevent chips and a tack cloth for dust-free seams before locking boards together.
FAQ Cutting Laminate Without a Saw (35 Common Questions)
You’ll find answers here to common questions about cutting laminate without a saw, from whether a utility knife will work on every plank to making curved cuts by hand.
You’ll also learn how non-powered methods affect warranties and how to get straight rip cuts without power tools.
Finally, we’ll cover fixes for bad cuts or chipped edges so you can recover cleanly if something goes wrong.
Can I use a utility knife on all laminate planks?
Wondering if a utility knife can cut every laminate plank? You can score and snap thinner, single-layer laminates or worn planks, but not all.
High-density, multi-layer, or oak-look laminates resist knife cuts and need saws or specialized tools.
Always test a scrap, use repeated shallow passes, and wear gloves and eye protection to avoid slips and splinters.
How do I make a curved cut without a saw?
How can you cut a smooth curve in laminate without a saw?
Trace the curve onto the plank, score deeply along the line with a sharp utility knife, and snap away small sections toward the cut.
Use a rasp, file, or coarse sandpaper to refine the curve gradually.
Work slowly, check fit frequently, and wear eye protection and gloves for control and safety.
Will cutting without a saw void warranties or damage flooring?
Will cutting laminate without a saw void the warranty or harm the floor? It depends.
Many manufacturers require recommended tools and professional installation for full warranty coverage, so deviating might limit protection.
Minor hand-tool trims (scoring and snapping) usually won’t damage planks if done carefully, but document instructions and check your warranty terms before proceeding to avoid denied claims.
How do I get perfectly straight long rip cuts without power tools?
Want a razor-straight rip without electric tools? Use a straightedge guide clamped to the plank, mark your cut line, then score repeatedly with a sharp utility knife until the top layer snaps cleanly along the groove.
For longer pieces, support the board on sawhorses, cut in sections, and keep the blade fresh. Slow, steady strokes guarantee accuracy and reduce chipping.
How to repair a bad cut or chipped edge?
If you nick or chip a laminate edge, don’t panic — you can tidy it up with a few simple fixes that blend in well.
Sand lightly with fine-grit paper to smooth roughness, clean dust, then apply matching laminate repair putty or wax stick.
Shape with a scraper, buff gently, and finish with a color-matched marker.
Seal with clear furniture polish for durability.