
How to Cut Pergo Laminate Flooring Cleanly Without Chipping the Surface
You can get chip-free Pergo cuts by using the right tool, steady support, and a sharp fine-tooth blade. Score and snap short rips with a utility knife or scoring tool; use a circular or track saw with a fine-tooth blade and a sacrificial backer for long straight cuts; cut curves with a high-TPI jigsaw blade and support the plank. Clamp, mark with tape, cut slowly, and face the finished side the correct way. Keep going to learn step-by-step techniques and tool choices.
How to Cut Pergo Laminate Flooring Cleanly Without Chipping the Surface
To cut Pergo cleanly without chipping, you’ll want to choose the right method and tools for the cut.
Hand saws or scoring knives work for short straight cuts, while a fine-tooth circular saw or jigsaw with a laminate blade gives the best results for longer or angled cuts.
I’ll recommend specific blades, blades’ tooth counts, and cutting techniques next.
Best Methods at a Glance
Cutting Pergo laminate without chipping comes down to using the right tool and technique for each cut—scoring for short rip cuts, a miter or circular saw with a fine-tooth blade for long straight cuts, and a jigsaw with a clean blade for curves or notches.
For clear guidance on how to cut pergo laminate flooring, match method to cut type, clamp securely, and cut slowly.
Tool Recommendations
1 clear rule will steer your tool choices: match the blade and feed method to the cut—use a scoring knife or snap guide for short rips, a miter or circular saw with a fine-tooth laminate blade for long straight cuts, and a jigsaw with a clean, high-TPI blade for curves and notches so you protect the wear layer and avoid chipping.
- Scoring knife: quick, no tear
- Fine-tooth blade: clean rips
- High-TPI jigsaw blade: smooth curves
Understanding Pergo Laminate and Why It Chips
Pergo laminate is a layered product with a tough wear layer, printed design, core board, and backing. Its surface finish affects how cleanly it cuts.
You’ll see edges chip when cutting because the layered, fibrous core and grain direction separate under blade pressure and vibration.
Knowing whether you need a straight, angled, plunge, or notched cut helps you pick the right tool and technique to minimize chipping.
What Pergo laminate is (layers and surface finish)
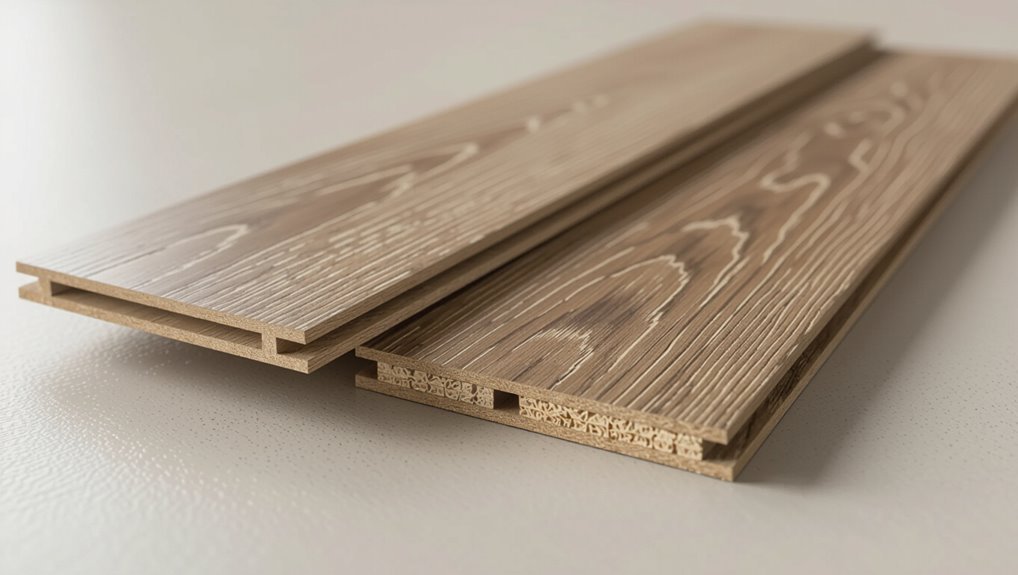
Think of Pergo laminate as a layered sandwich engineered for look, durability, and ease of installation: a wear layer on top protects a high-resolution decorative print that mimics wood or stone, all bonded to a dense fiberboard core and a stabilizing backing.
You’ll notice hardened coatings resist scratches and UV, while textures and embossing recreate grain—so cuts must respect that finished surface.
Why edges chip when cutting (mechanics of laminate, fiber direction, vibration)
Because laminate is a layered, brittle composite rather than a single soft plank, cutting it wrong often flakes or chips the decorative surface and core at the edge.
You must respect the fiber-like orientation of the core and the thin wear layer: blade angle, tooth size, and feed rate affect tear-out.
Excessive vibration or blunt blades lifts and fractures layers, producing ragged edges.
When you need to cut types of cuts (straight, angled, plunge, notches)
When you cut laminate, you’ll encounter four common types of cuts—straight rip and crosscuts, angled miters, plunge cuts, and small notches—and each demands a different technique and tool to avoid chipping.
Use a fine-tooth blade for straight cuts, a miter saw or jigsaw for angles, a plunge saw or router for internal cuts, and score-and-snap or a chisel for tiny notches.
Tools for Clean Cuts Pros, Cons and Use Cases
You’ll want the right tool for each cut to keep edges clean and prevent chipping. A circular saw with a fine-tooth laminate blade or a miter saw with a scoring or upgraded blade gives fast, straight cuts; a jigsaw with the correct blade handles curves and notches.
For short or small pieces, a utility knife and snap method, a laminate cutter, or a guillotine tool can be quicker and neater.
Circular saw with fine-tooth laminate blade
Grab a circular saw fitted with a fine-tooth laminate blade for fast, straight rip and crosscuts on Pergo planks; it slices cleanly through the wear layer and core while minimizing chipping if you support the board and cut face up. You’ll get speedy, accurate cuts but need steady support and safety gear.
| Speed | Accuracy | Chip Risk |
|---|---|---|
| High | High | Low |
Jigsaw with appropriate blade
Reach for a jigsaw fitted with a fine-tooth or laminate-specific blade when you need curved cuts, notches, or on-the-spot adjustments in Pergo flooring; it lets you maneuver around vents, doorways, and irregular edges while keeping splintering to a minimum if you cut face down and use steady, firm support.
| Use | Advantage | Limitation |
|---|---|---|
| Curves | Precise shaping | Slower |
| Notches | Localized cuts | Less straight |
| Repairs | On-site fixes | Blade wear |
Miter saw with scoring blade or upgraded blade
If your jigsaw handles curves and notches, a miter saw picks up where straight, repeatable cuts are needed: fit it with a scoring blade or an upgraded laminate blade and you’ll get razor-sharp, chip-free crosscuts and miters every time. You’ll work faster, hold consistent angles, and reduce tear-out—ideal for long runs and precise miters.
| Blade | Benefit | Tip |
|---|---|---|
| Scoring | Prevents chip | Slow feed |
| Laminate | Faster cuts | Proper RPM |
| Fine-tooth | Smooth edge | Clamp panel |
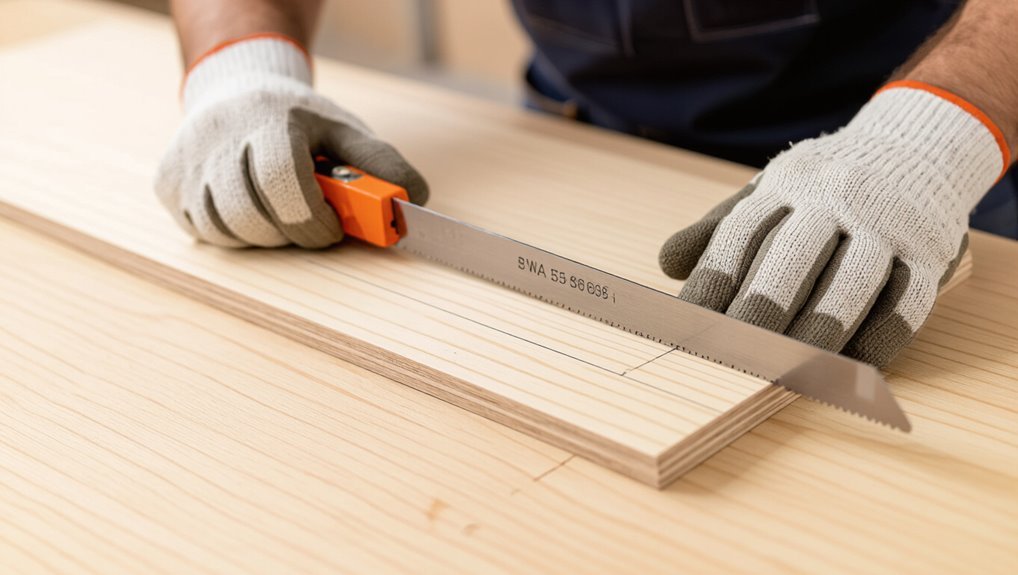
Utility knife and snap method (for short/small cuts)
One or two quick scores with a utility knife and a firm snap gives you a clean, accurate cut for short or small Pergo laminate pieces, and it’s a go-to when you don’t need power tools. You’ll score along a straightedge, bend downward, and snap. It’s fast, cheap, low-dust, but limited to short lengths and thinner planks.
| Advantage | Limitation |
|---|---|
| Low cost | Short cuts only |
| Minimal dust | Not for thick planks |
| Portable | Requires firm snap |
| Fast | Needs straightedge |
| No power | Blade replacement needed |
Laminate cutter and guillotine tools
When you need razor‑straight, dust‑free cuts on multiple planks, a laminate cutter (guillotine) gives you fast, consistent results with minimal effort; you clamp the plank, pull down the blade, and get a clean break without sawdust or noise. You’ll work quickly, avoid chipping, but you’re limited to straight cuts and plank thickness.
| Benefit | Limitation |
|---|---|
| Fast, clean | Straight cuts only |
| No dust/noise | Thickness limit |
Recommended blades, blade tooth counts and RPM considerations
Although blade choice might seem minor, it directly affects cut quality and speed, so pick blades designed for laminate with high tooth counts (80–120 TPI equivalent) and carbide tips to reduce chipping.
You’ll also consider RPM and tool type:
- Circular saw: 3000–4500 RPM, 80–120 TPI carbide blade.
- Jigsaw: 2500–3500 RPM, fine-tooth laminate blade.
- Table saw: lower RPM, high-TPI thin-kerf blade.
Step-by-Step Cutting Methods
Now you’ll learn the step-by-step cutting methods you’ll use on Pergo: scoring and snapping with a utility knife, straight cuts with a circular saw and backer board, curved and plunge cuts with a jigsaw, long straight cuts with a miter saw, and precision notches or end cuts with a handsaw or router.
I’ll show when each tool is best and the exact sequence to get clean, accurate cuts. Follow the instructions and safety tips for each method to avoid chipping and injury.
Method A Scoring and Snapping (utility knife)
Score and snap your Pergo planks quickly with just a utility knife and a straightedge, a method that’s clean, quiet, and ideal for thin cuts or delicate pieces.
You’ll mark, score, and break with control:
- Measure and mark the cut line.
- Clamp a straightedge; score several passes firmly.
- Flip plank over, bend downward to snap cleanly along the scored line.
Method B Cutting with a Circular Saw + Backer Board
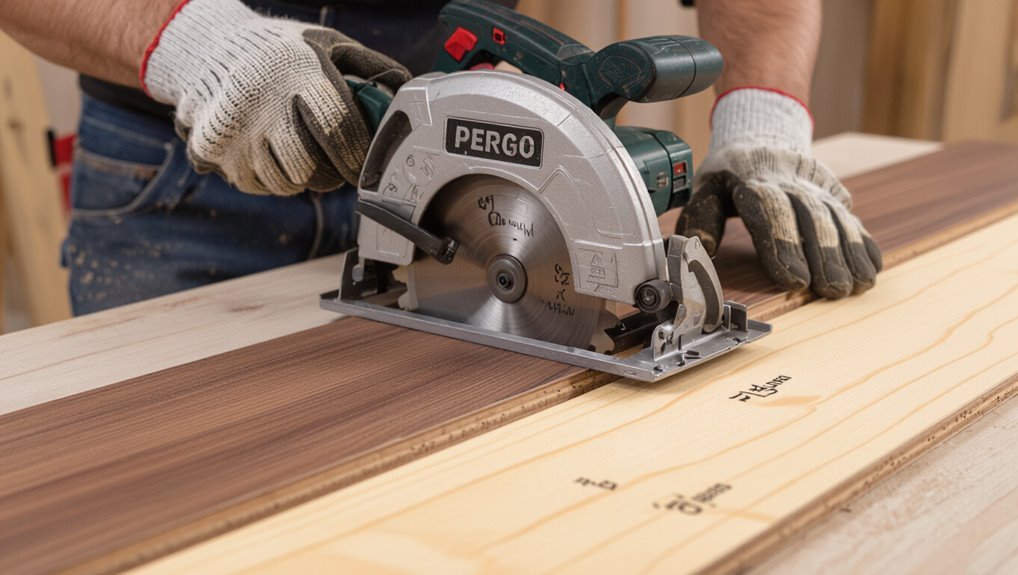
If you need longer straight cuts or are working with thicker Pergo planks, grab a circular saw and a backer board to get fast, accurate results.
Position the backer under the cut to support the laminate. Set blade depth just through the wear layer, clamp plank, and cut slowly.
- Measure and mark.
- Clamp backer and plank.
- Cut with steady feed.
Method C Using a Jigsaw to Cut Curves and Plunge Cuts
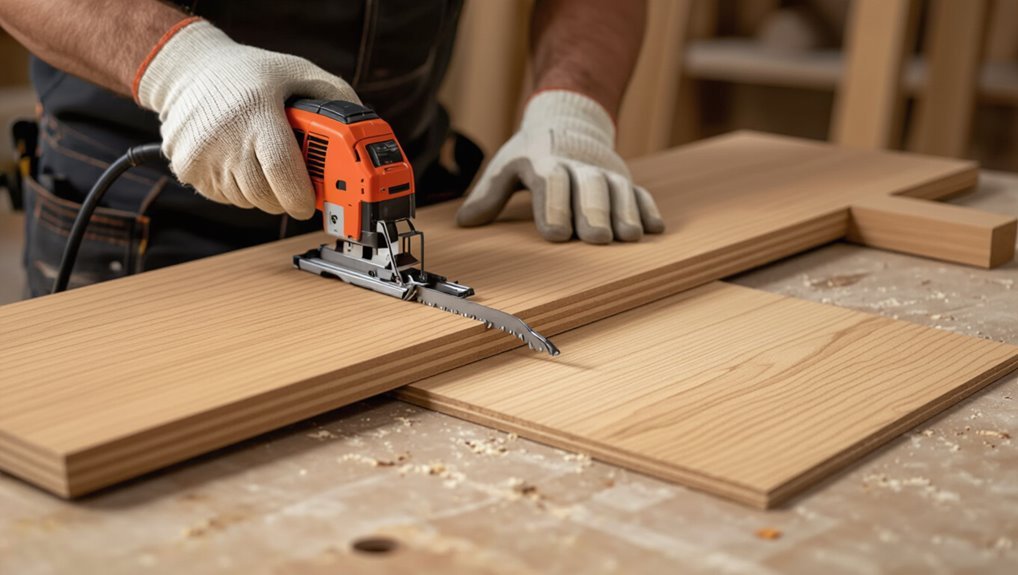
Grab a jigsaw when you need curved cuts, notches, or plunge cuts that a circular saw or handsaw can’t handle—the small blade and maneuverability let you follow patterns, cut openings for vents or pipes, and make tight internal cuts in Pergo planks with precision.
- Use a fine-tooth laminate blade.
- Score the finish first to prevent chipping.
- Clamp a backer piece and cut slowly.
Method D Using a Miter Saw for Long Straight Cuts
When you need long, straight cuts faster and with cleaner ends than a circular saw, a miter saw is your best tool—especially for ripping multiple Pergo planks to consistent lengths.
You’ll work safely and accurately by clamping, scoring, and cutting with a fine-tooth blade.
- Measure and mark.
- Clamp plank face-down.
- Use slow, steady feed.
Method E Precision Notches and End Cuts (handsaw or router)
Cut precise notches and clean end cuts with a handsaw or router to fit planks around door casings, vents, and irregular edges.
Mark cut lines, clamp plank, and score laminate to prevent chipping. Use fine-tooth blade or straight bit and cut slowly.
Sand edges and test fit before locking.
Benefits:
- Cleaner finish
- Minimal chipping
- Accurate fit
Preparation and Setup Key Steps Before Cutting
Before you cut, measure and mark each plank precisely using templates, a sharp pencil, or masking tape to get clean reference lines.
Support the board on a backer or sacrificial piece and clamp it firmly to prevent tear-out and movement.
Wear PPE, control dust, and use scoring tape or a masking strip along the cut to minimize chipping.
Measuring and marking accurately (templates, pencils, mask tape)
Accurate measurements and clear marks make the difference between a seamless install and wasted planks, so take your time to set up reliable templates, a sharp pencil, and painter’s tape for clean reference lines.
Use templates and clamp them, mark on tape to avoid surface damage, and double-check dimensions.
- Template fit
- Pencil sharpness
- Tape placement
Supporting the plank and using backer/sacrificial boards
Now that your measurements and markings are set, make sure the plank sits solidly while you cut by using proper support and a backer or sacrificial board.
Place the plank on a pair of sawhorses or a flat workbench with the cut line overhanging slightly.
Butt a scrap board beneath the blade path to prevent tear-out and absorb pressure, keeping the laminate edge intact.
Clamping, securing and working safely (PPE, dust control)
When you’re ready to cut, clamp the plank firmly to your work surface so it won’t shift under the blade—use two clamps spaced along the length and one near the cut line for extra stability.
Wear safety glasses, hearing protection and a dust mask or respirator.
Use a shop vacuum or dust extractor at the saw, keep cords clear, and maintain a stable stance to control the cut.
Scoring tape and masking techniques to prevent chipping
If you want clean, chip-free edges on Pergo laminate, score a line and apply painter’s or masking tape along the cut before you saw—this supports the wear layer and keeps the blade from tearing the surface.
Follow these steps:
- Score shallowly with a utility knife.
- Apply tape tightly over the scored line.
- Cut slowly, blade teeth upward for laminate.
Techniques to Prevent Chipping Practical Tips
When you cut Pergo, pay attention to blade direction and whether the decorative face should face up or down to reduce tear-out.
Use a steady, appropriate blade speed and feed rate, score the cut when the top layer is fragile (or score after for tricky profiles), and clamp the board to minimize vibration.
Finish any exposed edges with light sanding, a file, or edge sealant to protect the laminate.
Cutting direction and which face to put up or down
1 simple rule will save you from most edge chipping: cut with the finished face either up or down based on your tool and blade.
If using a circular saw, place the finished face down so the top edge isn’t torn by the downward-moving teeth.
For jigsaws or handsaws, keep the finished face up for cleaner visible cuts.
Support the plank firmly to prevent splintering.
Using proper blade speed and feed rate
Although blade choice matters, matching your saw’s speed and how quickly you push the plank through is what really prevents chipping.
Set a moderate RPM for your blade type, and feed at a steady, controlled pace—too fast tears the laminate, too slow burns or melts.
Practice on scraps, adjust speed for thickness, and keep the cut smooth and consistent.
Scoring first vs. scoring after when to do each
If you want cleaner edges, score the laminate before cutting so the top layer separates along the line and the blade exits without tearing; score after cutting when you’re working on short pieces or awkward cuts where keeping the top intact until the final pass reduces splintering.
Use a sharp utility knife for shallow scoring, clamp firmly, and make multiple light passes rather than one deep gouge to maintain control.
Minimizing vibration and movement
When you steady the board and control the tool, you’ll cut cleaner edges and avoid chipping; brace the plank on a sacrificial piece of wood, clamp it securely, and use a backing strip along the cut line to support the laminate surface.
Hold the saw firmly, feed at steady pace, and minimize overhang.
Reduce blade runout, use sharp blades, and stop if vibration starts—recheck clamps.
Edge finishing after cut (sanding, edge sealant, file)
Finish the cut edges to keep your Pergo flooring looking professional and to prevent future chipping:
Lightly sand rough spots with fine-grit paper, work toward the plank face, and remove dust.
Use a small file for tight corners.
Apply edge sealant or laminate-specific sealer to protect exposed layers and let it cure fully.
These steps keep edges smooth, durable, and less prone to delamination.
Common Cutting Mistakes and How to Fix Them
You’ll run into a few common cutting mistakes—using the wrong or dull blade, cutting unsupported edges, and overheating the board—that each have simple fixes.
Swap to a fine-tooth, sharp laminate blade and support the panel fully while cutting to prevent chips and breaks.
Let the blade cool or slow your feed to avoid melted edges.
For small chips or rough cuts, use wood filler or colored touch-up markers and consider edge banding for a clean, durable repair.
Mistake: Using wrong blade or blade condition detection and remedy
Pick the right blade and keep it sharp — using the wrong type or a dull blade causes chipping, burning, and ragged edges on Pergo laminate.
Use a fine-tooth carbide blade designed for laminates, check for missing or damaged teeth, and replace worn blades promptly.
Reduce feed speed, secure the plank, and test cuts on scrap to confirm clean, chip-free results.
Mistake: Cutting unsupported edges immediate fixes
When you cut a Pergo plank with its edge hanging unsupported, the free end can splinter, tear out, or shift mid-cut, ruining the piece and risking a poor seam.
Support the plank with a sacrificial board or clamp near the cut, score the laminate first, and cut slowly.
If tear-out occurs, trim back to solid material and reseal the edge before installing.
Mistake: Overheating and melting edges prevention and repair
If you run a cutting blade too slowly or use a dull bit, heat can build up and melt the laminate’s decorative layer, leaving glazed, gummy edges that won’t lock properly or accept adhesive.
Prevent this by using sharp blades, faster feed rates, and cooling pauses.
Let cuts cool before assembly, wipe residue with isopropyl alcohol, and test-fit pieces to guarantee clean, functional joints.
Repairing minor chips and rough edges (fillers, touch-up markers, edge banding)
Catch small chips and rough edges early so they don’t draw attention or cause locking problems later.
You can fix most damage quickly with proper products and technique. Try these steps:
- Clean area, sand lightly.
- Apply matching filler or edge banding; let dry.
- Use touch-up marker and buff for seamless finish.
Work carefully to maintain fit and appearance.
Comparison: Best Method by Cut Type and Project Size
When you’re tackling a small DIY room, simple tools and careful measuring will usually get you clean cuts without fuss, while a large professional install benefits from powered saws and a skilled crew for speed and consistency. Below is a quick comparison to guide your choice by cut type and project size. Use the table to match your situation to the recommended method.
| Situation | Recommended Method |
|---|---|
| Small room — straight cuts | Utility knife or handsaw, careful scoring |
| Large project — mixed cuts | Table saw/track saw for straight, jigsaw or mitre saw for angles |
Small DIY room vs. Large professional installation recommended approach
Wondering whether you should tackle Pergo cuts yourself or hire pros? For a small room, you can handle straight and simple angled cuts with basic tools; for large installations, pros save time and guarantee precision.
Consider:
- Small DIY: jigsaw or handsaw, practice, patience.
- Medium: rented miter or circular saw, steady setup.
- Large: hire pros for speed, warranty, complex cuts.
Tools, Materials and Consumables Checklist for a Clean Cut
A handful of well-chosen tools and the right consumables will make every Pergo cut cleaner, faster, and safer. You’ll want sharp blades, steady guides, and protective gear.
Essential checklist:
- Fine-tooth circular or jigsaw blade, carpenter’s square, clamps.
- Masking tape, pencil, measuring tape.
- Safety glasses, dust mask, hearing protection.
Use quality consumables and keep blades fresh for chip-free edges.
Maintenance After Cutting and Installation
After cutting and fitting your Pergo, wipe up dust and apply edge sealant to any exposed cut edges to prevent moisture wicking.
Check seams regularly for tightness and gaps, and tap boards back together or replace spacers if you spot separation.
Keep humidity stable and avoid wet-mopping to reduce the risk of long-term delamination.
Cleaning dust and sealing cut edges
Sweep and vacuum the work area thoroughly to remove all dust and debris before you finish the edges—fine dust left in joints or under planks can prevent seals from adhering and will show up over time.
Wipe cuts with a damp cloth, let dry, then apply a thin bead of manufacturer-recommended sealant or clear caulk to exposed edges.
Smooth and remove excess for a neat, protected finish.
Inspecting seams and long-term prevention of delamination
Now that edges are sealed and dust is cleared, check every seam for tightness and evenness before you call the job done.
Press joints, look for gaps, and correct any misaligned planks.
Apply edge sealant where needed and maintain consistent room humidity to prevent swelling.
Periodically inspect and re-seal vulnerable areas to prevent delamination and extend the floor’s lifespan.
FAQ
You probably have quick questions like whether a regular circular saw blade will chip Pergo, whether to cut with the decorative side up or down, or how to trim around door jambs and pipes cleanly.
You’ll also want to know the ideal blade tooth count for laminate and whether damaged edges can be repaired to look new.
I’ll answer each so you can cut confidently and avoid common mistakes.
Can I use a regular circular saw blade to cut Pergo laminate without chipping?
Yes — but only with the right blade and technique: a standard circular saw blade can cut Pergo laminate, yet a fine-tooth, carbide-tipped blade and cutting with the finished side down (or using a sacrificial backer) are essential to prevent chipping.
Use a high RPM, steady feed, and thin kerf blade. Support the board, clamp securely, and score first for extra control.
Is it better to cut laminate with the decorative side up or down?
Which side should face up when you cut laminate? Cut decorative side down if your blade cuts on the upstroke, so the finished surface stays supported and won’t chip.
If your saw tears on the downstroke, put the decorative side up. Test a scrap to confirm.
Use a fine-tooth blade, steady feed, and clamp the board to minimize vibration and splintering.
How do I cut laminate around door jambs and pipes without chipping?
Score the laminate and use a sharp blade and spacer to avoid chipping when cutting around door jambs and pipes.
Measure and mark carefully, then clamp a scrap strip as a backing where the cut will exit.
For door jambs, undercut the jamb with a jamb saw for a neat fit.
For pipes, drill a pilot hole and use a coping saw or jigsaw with fine blade, cutting slowly.
What blade tooth count is best for laminate flooring?
For clean, chip-free cuts on Pergo laminate, pick a saw blade with a high tooth count—typically 80 to 120 teeth on a 10-inch table saw or a 100–120-tooth blade for circular saws—because the finer teeth slice the melamine wear layer smoothly and reduce tear-out.
Use carbide-tipped blades made for laminates, feed material steadily, and keep blades sharp to maintain smooth edges.
Can damaged edges be repaired to look like new?
Even with the right high-tooth carbide blade and careful cuts, edges can get nicked or chipped during installation or moving furniture—but you can often make them look nearly new.
You’ll sand light burrs with fine-grit sandpaper, fill deeper chips with color-matched laminate filler or wood putty, let it cure, then touch up with matching laminate marker or paint and seal for a seamless finish.