How to Install Tile Over Tile: Save Time Without Sacrificing Results
You can save time and money by tiling over existing tile if the old surface is sound, level, and well-bonded. Inspect for loose, cracked, or water-damaged tiles and verify finished height and clearances. Scuff glossy tiles, use a polymer-modified thinset rated for tile-over-tile, prime where needed, and back-butter large tiles for full contact. Use leveling tools, grout and seal properly, and watch warranties and codes—keep going to learn the full prep and technique checklist.
How to Install Tile Over Tile and When It Makes Sense
Yes — you can install tile over tile in many cases, but it only makes sense if the existing tiles are firmly bonded, level, and structurally sound.
Check that there’s no water damage, loose or cracked tiles, or excessive height issues; don’t do it if you’ll exceed door clearances or manufacturer warranties.
When it’s appropriate, you’ll save time and labor costs compared with ripping out the old tile.
Direct answer: Is installing tile over tile possible?
If your existing tile is sound, level, and well-bonded, you can install new tile directly over it, saving time and demo work.
Yes—you can install tile over tile, but you’ll need proper prep: clean, degrease, and scuff the surface, repair loose tiles, and use a suitable thinset or primer.
Learn how to install tile over tile to guarantee long-term adhesion.
Quick checklist: When you should (and should not) install tile over tile
When your existing floor or wall tile is firmly bonded, flat, and in good condition, you can save time by tiling over it—but there are clear limits.
- Do: tile over sound, level tile with intact grout and no moisture issues.
- Do not: layer over loose, cracked, or bowed tile or wet areas.
- Do: verify added height and changes work with doors and fixtures.
Time and cost savings summary
Because you skip the demolition and substrate prep, tiling over existing, sound tile can cut both time and labor costs considerably—often saving a day or more on a small room and hundreds of dollars compared with a full tear-out.
You’ll save on disposal fees and labor, but factor in extra thinset, possible height adjustments, and potential future removal complexity before choosing this faster, cheaper option.
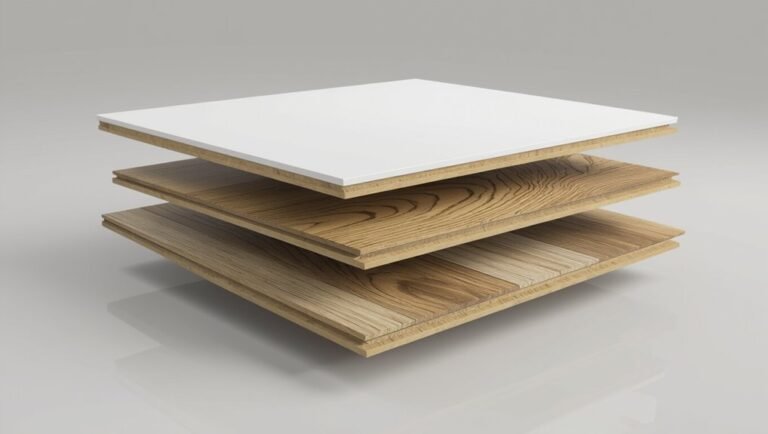
Basic Understanding What “Tile Over Tile†Means and Why People Choose It
When you install tile over tile, you’re putting new tile directly on top of existing tile surfaces in situations like bathroom remodels or quick floor updates.
You’ll weigh benefits like saved time and reduced demolition against drawbacks such as added thickness, potential adhesion issues, and possible code or warranty conflicts.
Check local building codes, structural load limits, and manufacturer warranty terms before you decide.
Definition and common scenarios
If you’re retiling a floor or wall without tearing out the existing ceramic or porcelain, “tile over tile” means bonding new tile directly onto the old surface after proper prep.
You’ll use it for solid, well-adhered tiles, cosmetic updates, or when time and budget limit demo.
Common spots: bathroom floors, shower walls, kitchen backsplashes, and commercial spaces with minimal substrate damage.
Advantages and disadvantages
Now that you know what “tile over tile” looks like and where it’s commonly used, let’s look at why homeowners and pros pick it — and what trade-offs they accept. You’ll save time and disposal costs, but add height and risk adhesion issues. Weigh convenience against potential complications.
| Advantage | Disadvantage | When to Choose |
|---|---|---|
| Faster | Extra thickness | Renovation speed |
| Cheaper | Bond risk | Intact substrate |
| Less mess | Limited fixes | Temporary updates |
Building codes, structural limits, and warranty implications
Because adding a new layer of tile changes the floor or wall assembly, you need to check local building codes, load limits, and manufacturer warranties before proceeding.
You should confirm substrate strength, deflection limits, and fire or moisture rules. Manufacturers may void warranties if you tile over old installations.
If in doubt, consult an inspector or the manufacturer to avoid structural, code, or warranty problems.
Preliminary Assessment Inspecting Existing Tile and Substrate
Before you decide to tile over existing tile, inspect the surface for cracked or loose tiles and signs of water damage.
Check what’s under the tile—thinset, backerboard, or concrete—so you know how well the new adhesive will bond.
Also measure finished floor height, changes, and clearance to avoid trip hazards and door or appliance interference.
How to evaluate tile condition: cracks, loose tiles, water damage
A careful visual and tactile inspection tells you whether existing tile can serve as a stable base for new tile; check for hairline and structural cracks, press on tiles to find any that rock or flex, and look for signs of water damage like staining, efflorescence, or soft grout that indicate moisture has compromised the substrate.
Mark damaged areas, remove loose tiles, test surrounding tiles, and document extent for repairs.
Checking substrate type beneath existing tile (thinset, backerboard, concrete)
When you’re evaluating whether to tile over existing tile, identifying the substrate beneath—thinset mortar, cement backerboard, or poured concrete—is essential because it determines adhesion methods and the repairs you’ll need.
Look for clues like grout joint depth, visible mortar ridges on tile backs, movement or flex suggesting backerboard, and surrounding construction details (e.g., slab vs. framed floor) to narrow the possibilities.
Probe grout lines, remove a loose tile, tap for hollow spots, check for deflection, and note substrate thickness.
Measuring floor height, transitions, and clearance issues
Measure three critical heights: the existing tile surface, finished floor level of adjoining rooms, and thresholds at doorways, since those figures tell you whether added tile will create trip hazards or require leveling strips.
Use a straightedge and laser or level to spot high/low areas, note door clearances and baseboard returns, and plan changes, underlayment thickness, or tapered reducers to keep smooth, code-compliant flows.
Materials, Tools, and Prep You’ll Need
Before you start, gather the right materials—adhesives, grout, primers, and any underlayment suited for tiling over existing tile.
Make a tools checklist (saws, grinders, trowels, and leveling tools) so nothing slows you down.
Don’t forget safety gear and dust-control supplies to protect yourself and contain the mess.
Required materials (adhesives, grout, primers, underlayment)
A successful tile-over-tile job depends on choosing the right adhesives, grout, primers, and underlayment so your new tile bonds securely, stays level, and resists moisture and movement.
Select a polymer-modified thinset rated for tile-over-tile, epoxy or sanded grout suitable for joints, a bonding primer for glossy tiles, and a cement-board or uncoupling membrane underlayment for stress and moisture control.
Tools checklist (saws, grinders, trowels, leveling tools)
You’ll need a compact but complete toolset to cut, shape, set, and level tile properly for a tile-over-tile job.
- Wet saw or angle grinder with diamond blade for cuts.
- Notched trowel, margin trowel, and rubber float for adhesive and grout.
- Tile spacers, leveling clips/wedges, spirit level, and tapping block to guarantee flat, even results.
Safety gear and dust control
Having the right cutting and leveling tools doesn’t matter if you breathe dust or lose an eye—protective gear and dust control keep you healthy and the job clean.
Wear N95 or P100 respirators, safety goggles, hearing protection, gloves, and kneepads.
Use wet cutting, a shop vac with a HEPA filter, and plastic sheeting to contain dust.
Change filters and dispose of waste properly.
Step-by-Step Installation Process
Start by thoroughly cleaning and prepping the existing tile. Then fix or remove any loose or damaged areas so you have a stable surface.
Scuff or mechanically profile glazed tiles, apply the correct primer or bonding membrane, and make sure the new tile will adhere.
Finally, plan your layout and dry-fit the tiles to confirm cuts and spacing before you set anything.
Step 1 Clean and prepare the existing tile surface
Preparation matters: before you lay any new tile, clean and inspect the existing surface so the new adhesive bonds properly.
Remove dirt, grease, soap scum, and loose grout with a degreaser and stiff brush. Rinse thoroughly and let dry.
Sand glossy tiles lightly to dull the sheen and wipe away dust.
Tape off adjacent areas to keep them clean.
Step 2 Repair or remove unstable areas
Inspect the tiled surface carefully and mark any loose, cracked, or hollow-sounding tiles so you can repair or remove them before tiling.
Remove unstable tiles and old thinset where bonding fails, patch substrate damage, and fill voids with appropriate mortar or patching compound.
Confirm repairs cure fully, then re-check stability.
Only proceed when the entire surface is solid and well-supported for new tile.
Step 3 Scuffing or mechanically profiling glazed tiles for adhesion
You’ll need to abrade the glazed tile surface so the new adhesive can grip—mechanical profiling creates the roughness that primer or thinset alone can’t provide.
Use an angle grinder with a diamond cup or a sanding block with coarse grit, keep movements even, and vacuum dust continuously.
Target glossy areas and damaged glaze; stop when you see a consistent matte texture ready for bonding.
Step 4 Apply appropriate primer or bonding membrane
With the tile surface abraded to a consistent matte finish, it’s time to apply a primer or bonding membrane to lock in adhesion and prevent moisture issues.
Choose a manufacturer-recommended primer or uncoupling/bonding membrane compatible with both substrates.
Roll or trowel evenly, follow cure times, and seal seams per instructions.
Proper coverage guarantees your thinset bonds reliably and reduces the risk of delamination.
Step 5 Layout planning and dry-fitting the new tile
Start by mapping a clear layout: dry-fit tiles across the room from your primary focal point (usually the main entrance or a center line) to establish consistent grout lines and balanced cuts at edges.
Walk the pattern, adjust spacing with spacers, and shift your starting line to minimize narrow edge cuts.
Note obstacles, plan changes, and verify full coverage before proceeding.
Step 6 Setting tile over tile: adhesive selection and trowel technique
Now that your layout’s set and dry-fit looks right, it’s time to set tile over tile by choosing the right adhesive and mastering trowel technique.
Use a polymer-modified thinset rated for bonding to existing tile. Spread with a notched trowel matching tile size, combing in straight lines for even coverage.
Back-butter large tiles, press firmly, and wiggle to achieve full contact and transfer.
Step 7 Spacing, leveling, and using tile leveling systems
Check spacing and level frequently as you set tiles so the surface stays flat and grout lines stay consistent.
Use consistent spacers for uniform joints, then remove them as recommended.
Employ a tile leveling system to prevent lippage: insert wedges or caps, tighten evenly, and snap off per manufacturer instructions.
Verify with a straightedge and spirit level, adjusting adhesive or repositioning tiles immediately.
Step 8 Grouting, sealing, and finishing
Finish the job by grouting, sealing, and tidying the area so your new tile looks professional and performs well.
Mix grout to manufacturer specs, force it into joints, and wipe excess with a damp sponge.
After curing, apply a suitable sealer to grout and porous tiles.
Clean remaining haze, reinstall fixtures, and inspect for gaps or chips, touching up as needed for a flawless finish.
Step 9 Handling transitions, thresholds, and trim
Step 9 covers the clean, secure connections between your new tile and adjoining surfaces—connections, thresholds, and trim—and shows how to measure, cut, and install each piece so movement, height changes, and room boundaries look intentional and perform reliably.
Measure gaps, pick connection profiles that match height, trim tiles for tight fits, dry-fit components, adhesive or screw thresholds, and seal edges for a finished, durable junction.
Comparison Tile Over Tile vs. Removal and Re-tile
You’ll want to weigh pros and cons side-by-side to see if tiling over saves you time and money or just postpones problems.
Consider upfront cost, installation time, and likely lifespan so you can compare long-term value.
If the old tile or substrate is damaged or causing drainage issues, removal is usually the smarter long-term choice.
Pros and cons side-by-side
When weighing tile-over-tile against tearing out and re-tiling, consider trade-offs in time, cost, durability, and long-term value so you can choose the approach that fits your budget and goals; tile-over-tile saves labor and disruption but can hide problems and limit lifespan, while removal and re-tile takes more time and money up front but gives a cleaner, longer-lasting result.
| Option | Benefit | Drawback |
|---|---|---|
| Tile-over-tile | Faster | May conceal issues |
| Removal & re-tile | Durable | More invasive |
| Both | Usable finishes | Project-specific limits |
Cost, time, and lifespan comparison
Because your choice affects budget, schedule, and how long the job will last, compare tile-over-tile and full removal on those three fronts before committing:
Tile-over-tile costs less and finishes faster—often days versus a week or more—but may shorten ultimate lifespan if substrate issues exist.
Full removal raises cost and time but yields a longer-lasting, more reliable installation when done correctly.
When removal is the better long-term choice
If your floor or wall shows signs of movement, widespread cracking, water damage, or an uneven substrate, opt for removal and re-tile rather than tiling over the old surface.
You’ll fix hidden issues, guarantee proper waterproofing, and avoid adhesive failures.
Removal costs more up front but prevents recurring repairs, preserves resale value, and gives a stable base for a longer-lasting, professional finish.
Common Problems and Mistakes to Avoid
Don’t skip surface prep or the right bonding agent, or you’ll risk adhesion failures that cause tiles to lift.
Pay attention to overall height and thresholds so doors and connections still work.
Always check for moisture or structural damage and use the correct adhesive for your substrate to avoid costly repairs.
Adhesion failures and how to prevent them
When tile that was supposed to hold ends up popping loose, it’s almost always due to adhesion issues you can prevent with the right prep and materials; clean, degrease, and grind glossy surfaces, remove grout ridges, and make sure existing tile is sound.
Use a bonded, flexible thinset rated for tile-over-tile, back-butter large tiles, maintain correct coverage, and allow proper curing time.
Height and threshold problems
After you’ve secured good adhesion, the next challenge is matching floor heights and handling thresholds so doorways, changes, and appliances sit level and safe.
Measure existing and new tile thickness, plan connections, and trim or build up substrate as needed. Use tapered reducers, threshold strips, or underlayment to avoid trip hazards.
Test doors and appliance clearances before finishing grout and trim.
Ignoring moisture or structural damage
If you skip checking for moisture or structural damage, you’ll almost certainly trap problems under the new tile that will cause adhesion failure, mold, or sagging later.
Inspect subfloor and walls for soft spots, stains, or movement. Repair rot, fix leaks, and verify proper drying before tiling.
Ignoring these steps sacrifices durability and creates costly callbacks you’ll regret.
Using wrong adhesive or skipping bonding agents
Because different tiles and substrates demand specific adhesives, using the wrong product or skipping a bonding agent can doom your job from the start.
You’ll get poor adhesion, lippage, and premature detachment. Match mortar type to tile and substrate, follow manufacturer instructions, and always use a primer or bonding agent where recommended.
Don’t guess—test adhesion if unsure.
Best Practices, Tips, and Pro Installer Strategies
You’ll want to pick adhesives and bonding membranes rated for tile-over-tile and match them to your substrate and the room’s moisture.
Check and correct subfloor deflection and flatness before you start, and plan for temperature limits and curing times—especially in wet areas.
Finally, follow pro maintenance tips like proper grout sealing and periodic inspections to keep the installation long-lasting.
Choosing the right adhesive and bonding membranes
When laying tile over existing tile, choosing the right adhesive and bonding membrane determines whether the job lasts or fails—so pick products rated for bonded tile-over-tile installations, match the adhesive to your substrate and tile type, and use a compatible membrane to prevent delamination and moisture issues.
Use high-quality polymer-modified thinset for porcelain, flexible adhesive for large-format tiles, and manufacturer-approved membranes for wet areas.
Ensuring proper subfloor deflection and flatness
If the subfloor can’t support the tiled surface without flexing, your new tile-over-tile installation will crack or grout will fail.
So confirm deflection and flatness before you set any mortar.
Check joist spacing and L/360 (or L/720 for stone) limits, shim or sister joists if needed, and use a straightedge to spot high/low areas.
Self-leveler fixes minor dips.
Temperature, curing times, and working in wet areas
After confirming your subfloor is flat and stiff, plan for how temperature and moisture will affect adhesives, setting times, and overall performance—these factors can make or break a tile-over-tile job.
Work in 50–80°F ranges when possible, use fast- or extended-set mortars per conditions, control humidity, allow full cure before wet use, and protect fresh work from drafts and standing water.
Long-term maintenance tips for tile-over-tile installations
1 simple routine will keep your tile-over-tile job looking and performing like new: inspect, clean, and address issues promptly.
Sweep and mop regularly with pH-neutral cleaners, reseal grout annually, and tighten or replace loose tiles immediately.
Monitor for moisture or movement, ventilate wet areas, and repair substrate or membrane damage fast.
Keep records of maintenance and warranty details for future reference.
Cost, Time Estimates, and ROI Considerations
You’ll want to balance time, cost, and resale impact before starting — DIY installs usually take a weekend to several days while pros can finish faster but charge for labor.
Expect material costs for tile and thinset plus grout, with pro labor often the largest line item in your budget.
Consider how the update affects home value and buyer appeal in your market to estimate ROI before committing.
Typical timeframes for DIY vs. pro installations
While a DIY tiling project can save you money, it often takes considerably longer than a pro installation—expect weekends stretched over several weeks versus a contractor finishing in a few days.
You’ll handle demolition, surface prep, drying times, cutting, and grouting yourself, so factor in learning curves and interruptions.
Pros work faster with crews and equipment, reducing downtime and risk of mistakes.
Rough cost breakdown: materials and labor
After weighing time differences between DIY and pro installs, it helps to look at money and returns: material costs, labor charges, and how long each route will take to pay off. You’ll spend less on materials DIY but more time; pros cost more upfront yet finish faster. Compare estimates below:
| Item | Typical cost |
|---|---|
| Materials | $100–$800 |
| DIY labor value | Your time |
| Pro labor | $300–$1,500 |
Impact on home value and resale considerations
Because buyers notice updated surfaces first, installing tile over tile can boost curb appeal and speed a sale—but the return depends on quality, style, and market.
You’ll save time and demo costs, but prioritize durable materials, proper substrate prep, and cohesive design.
In strong markets you may recoup expenses; in weaker ones, expect modest ROI.
Disclose methods to avoid surprises for buyers.
Case Studies and Scenario Guidance
You’ll walk through a small bathroom floor example that shows each step from prep to grouting so you can follow a proven workflow.
For a kitchen backsplash, you’ll learn specific adjustments for trimming, substrate prep, and adhesive choice over existing tile.
I’ll also warn you about high‑moisture scenarios like showers where removal or full waterproofing is usually the safer option.
Small bathroom floor step-by-step example
Start by evaluating the existing tile layout and condition: check for loose or cracked tiles, measure the floor, and note changes and fixtures you’ll need to work around.
Remove damaged tiles, clean and prime the surface, and apply an appropriate thinset.
Lay new tile from the focal point, maintain consistent grout joints, cut around fixtures, grout, cure, and seal for a durable finish.
Kitchen backsplash over tile specific adjustments
If your small bathroom floor project taught you how to assess and prep an existing surface, you’ll find similar principles apply when installing a kitchen backsplash over existing tile—but with a few kitchen-specific tweaks.
Focus on degreasing, sanding glossy tile, and checking for hollow spots. Use flexible adhesive and smaller tiles for better adhesion over uneven areas.
Seal edges near counters and appliances.
High-moisture areas (showers) cautionary scenarios
When working in showers, pay extra attention to waterproofing failures and substrate movement because moisture magnifies small problems into leaks and mold quickly.
The case studies below show how missed membranes, improper grout, and reusing old tile without evaluating adhesion led to costly repairs, while correct drainage, full-coverage waterproofing, and flexible mortar avoided them.
You should test adhesion, replace compromised substrates, use liquid-applied membranes, and slope drains properly.
FAQs
You’ll have common questions about whether tile can go over vinyl or other floors and how different substrates like ceramic, porcelain, or natural stone change your approach.
Expect to ask about added floor height, warranty or code impacts, and how long grout needs to cure before normal use.
Let’s answer those so you can decide if tile-over-tile is right for your project.
Can I install tile over vinyl or other flooring types?
Curious whether you can lay tile over existing vinyl or other floorings? You can in some cases, but surface condition matters: vinyl must be well-bonded, smooth, and free of cushioning.
Porous or heavily textured surfaces usually need removal. Concrete, ceramic, and some resilient floors can accept tile with proper prep and primer.
Always check manufacturer specs and local codes before proceeding.
How much extra height will tile-over-tile add?
If you decide to tile over existing tile or vinyl, one practical question is how much the finished floor will rise.
Expect roughly the thickness of the new tile plus adhesive—typically 3/8″ to 3/4″ (9–19 mm) for thin-set and standard tile.
Porcelain or thicker tiles can add more. Factor changes, thresholds, and door clearances when planning.
Will tile over tile affect my warranties or building code compliance?
Wondering whether tiling over existing tile will affect warranties or codes? You should check manufacturer warranties—many void if substrate prep isn’t followed.
Local building codes may restrict thicknesses, clearances, or require permits, especially for changes in elevation and wet areas.
Consult your tile and membrane manufacturers, and contact local building authorities or a licensed contractor to confirm compliance before proceeding.
How long before grout can be walked on or shower used?
After you confirm warranties and code requirements, you’ll want to know how long before grout is safe to walk on or a shower can be used.
Typically, grout firms in 24–48 hours for foot traffic; full cure takes 7 days.
Epoxy grouts allow faster use, often 24 hours.
Always follow manufacturer instructions, verify grout is dry and sealed, and ventilate the area before regular use.
What if the existing tile is ceramic vs. porcelain vs. natural stone?
Tile type matters because ceramic, porcelain, and natural stone each have different porosity, hardness, and surface finishes that affect bonding, prep, and grout choices—so you’ll need to identify the existing tile and adjust your approach accordingly.
Ceramic often bonds well after roughening; porcelain needs stronger etching or a bonding primer; natural stone requires gentle cleaning, compatible adhesives, and grout to avoid staining.
Test adhesion first.