How to Install Vinyl Floor Tiles With Adhesive for a Long-Lasting Bond
You can get a long-lasting bond by properly preparing the subfloor, choosing the right adhesive, and installing tiles with correct technique. First, test and fix moisture, level and clean the concrete or plywood, then acclimate tiles. Spread the manufacturer-recommended adhesive with the correct trowel, work in small sections, press tiles into full contact, and roll with a 100–150 lb floor roller to remove air pockets. Follow curing times and maintenance for lasting results, and keep going for full step-by-step guidance.
Can You Install Vinyl Floor Tiles with Adhesive for a Long-Lasting Bond?
You can get a durable, long-lasting bond with adhesive if your subfloor is clean, flat, and dry and you use the right adhesive for your vinyl type.
Adhesive is best when you need a permanent installation, heavy-traffic durability, or to prevent tiles from lifting or shifting.
For temporary layouts, floating tiles or peel-and-stick options may be simpler and less permanent alternatives.
Short summary of outcome and ideal conditions
When you use the right adhesive, prepare the subfloor properly, and follow manufacturer instructions, vinyl tiles will form a durable, long-lasting bond that stays flat and resists lifting or curling.
You’ll get a smooth, low-maintenance floor suited to moderate-traffic areas.
For best results, guarantee a clean, dry, level substrate, correct adhesive choice, proper acclimation, and tight seams—this is how to install vinyl floor tiles with adhesive.
When adhesive is the best choice vs. alternatives
Although loose‑lay and peel‑and‑stick options can be faster, adhesive is the best choice when you need a permanent, stable floor that resists lifting, edge curling, and movement under moderate to heavy traffic.
Use adhesive if subfloor irregularities need filling, rooms are larger than a few hundred square feet, you want improved sound reduction, or plan long-term durability and easier deep cleaning.
Basic Understanding What Are Vinyl Floor Tiles and Adhesives?
You’ll see three common vinyl tile types—luxury vinyl tile (LVT), vinyl composition tile (VCT), and peel-and-stick—each with different installation needs.
Adhesives range from acrylic and pressure-sensitive to water-based and epoxy, and you’ll pick one based on tile type and subfloor.
How well the adhesive bonds depends on surface prep, moisture, traffic, and correct adhesive choice.
Types of vinyl floor tiles (luxury vinyl tile, vinyl composition tile, peel-and-stick)
Vinyl floor tiles come in three main types—luxury vinyl tile (LVT), vinyl composition tile (VCT), and peel-and-stick—each designed for different budgets, durability needs, and installation methods.
You’ll choose LVT for realistic visuals and durability, VCT for commercial resilience and waxing, or peel-and-stick for quick DIY projects.
Consider traffic, maintenance, and subfloor condition when picking one.
Types of adhesives for vinyl (acrylic, pressure-sensitive, water-based, epoxy)
Because the right adhesive keeps tiles flat, sealed, and long-lasting, choosing among acrylic, pressure-sensitive, water-based, and epoxy glues matters as much as picking the tile itself. You’ll pick acrylic for general bonding, pressure-sensitive for repositionable tiles, water-based for easy cleanup, and epoxy for heavy-duty, moisture-prone areas.
| Type | Best use |
|---|---|
| Acrylic | General |
| Pressure-sensitive | Repositionable |
| Water-based | Easy cleanup |
| Epoxy | Heavy-duty |
How adhesive bonds work and factors affecting longevity
Although adhesives work behind the scenes, they form the real bond that keeps tiles flat, sealed, and durable under foot traffic.
You’ll rely on mechanical and chemical adhesion—surface wetting, polymer interlocking, and curing—to hold tiles.
Longevity depends on substrate prep, moisture, temperature, adhesive type, and installation technique.
Maintain proper cleaning, allow full cure, and control environmental conditions for a lasting bond.
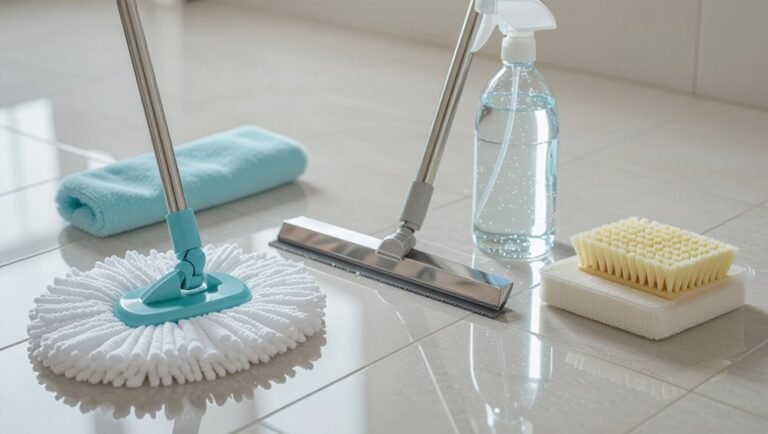
Tools, Materials, and Preparations You Need
Before you start, make a clear checklist of the tools (taping knife, trowel, utility knife, straightedge, roller) and materials you’ll need: tiles, the right adhesive, any underlayment, and trims.
You’ll also want subfloor assessment tools—straightedge, level, hammer and nails or a pry bar—and a reliable moisture testing method to confirm the surface is dry and flat.
With those items ready and the subfloor checked, you can move on to measuring and layout.
Tools checklist
You’ll need a compact set of tools and materials to get your vinyl tiles down quickly and cleanly—think utility knife, straightedge, measuring tape, chalk line, roller, and adhesive plus a few prep items like a floor scraper and leveling compound.
Gather these essentials, keep them organized, and work methodically.
- Utility knife and blades
- Straightedge and chalk line
- Roller (100–150 lb) and trowel
- Scraper and leveling kit
Materials checklist (tiles, adhesive, underlayment, trims)
Gathering the right materials makes installation smooth and prevents costly trips mid-project: pick your vinyl tiles (extra boxes for waste and pattern matching), the recommended adhesive or click-lock system, any underlayment specified by the manufacturer, and finishing trims like quarter-round and reducer strips.
- Vinyl tiles (plus 10–15% extra)
- Manufacturer-approved adhesive or click-lock planks
- Underlayment (as specified)
- Trims, junction strips, and quarter-round
Subfloor assessment tools and moisture testing methods
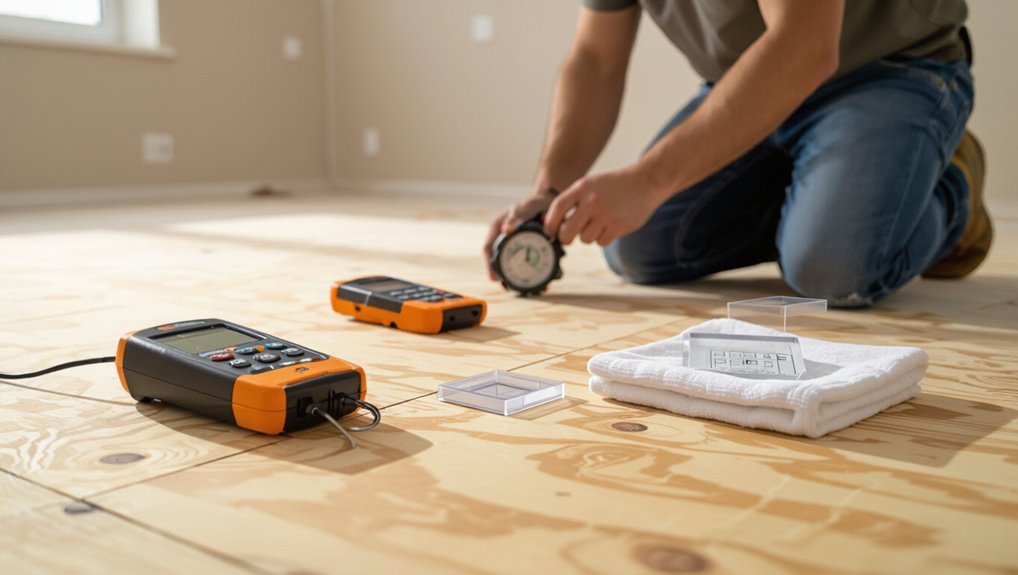
When evaluating your subfloor and checking for moisture, bring a few key tools so you can spot issues early and avoid installation failures: a moisture meter (pin or non‑contact), a concrete hygrometer (relative humidity test), a carpenter’s level, straightedge, chalk line, screwdriver or probe for delamination, and a shop vacuum.
Test multiple spots; document readings and address high moisture or unevenness before tiling.
Surface Preparation Foundation for a Long-Lasting Bond
Before you lay any vinyl tiles, you’ll need to assess the subfloor—concrete, plywood, or existing flooring each needs specific treatments to guarantee adhesion.
Check moisture levels and levelness against manufacturer standards, and address wetness or uneven spots before proceeding.
Finally, thoroughly clean, prime if required, and patch cracks or gouges so the adhesive and tiles bond properly.
Subfloor types and required treatments (concrete, plywood, existing flooring)
1 key to a durable vinyl tile installation is matching your prep to the subfloor type—concrete, plywood, or existing flooring—because each surface needs different cleaning, leveling, and moisture control measures to secure a long-lasting bond.
For concrete, remove debris and etch or prime; for plywood, confirm rigidity, sand, and screw down loose boards; for existing vinyl or tile, clean, scuff, and repair any loose sections before gluing.
Moisture mitigation and levelness standards
Because moisture and unevenness can ruin an otherwise well-laid vinyl floor, you need to verify and correct both before you install tiles.
Test concrete with a moisture meter or calcium chloride test; confirm plywood shows no rot and is properly fastened.
Address high moisture with a vapor barrier or floor-grade sealer, and level uneven areas to within manufacturer tolerances using a suitable leveling compound.
Cleaning, priming, and patching steps
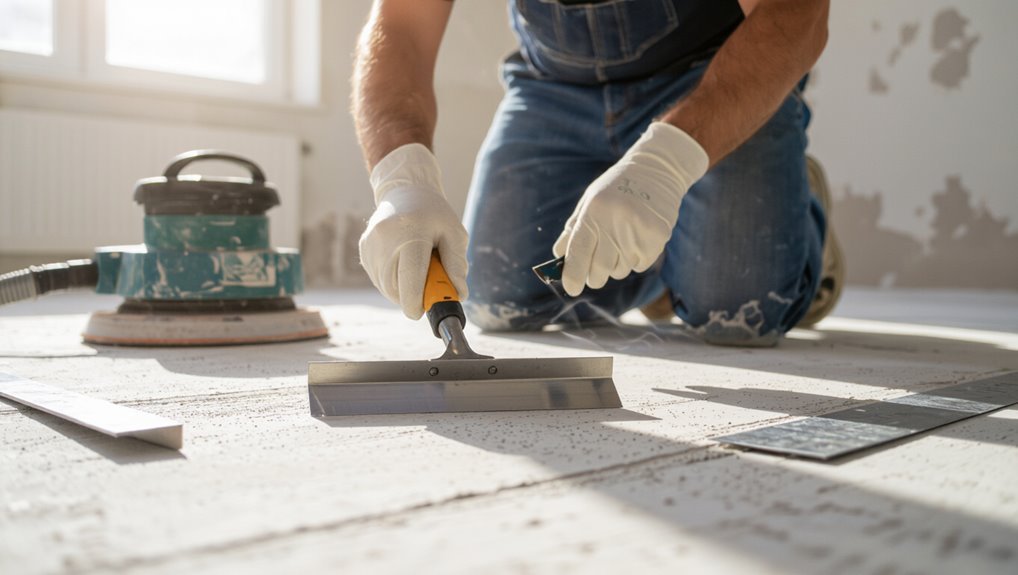
When you’ve confirmed dryness and flatness, thoroughly clean the subfloor so adhesives can bond properly: remove dust, dirt, grease, and old adhesive residues with a vacuum, stiff broom, and a solvent or detergent appropriate for the substrate, then rinse and let it dry completely.
Then prime porous areas, patch low spots with a cementitious compound, sand smooth, and remove dust.
- Prime porous concrete
- Fill depressions
- Feather edges smooth
- Reclean before adhesive
Step-by-Step Installation Process
Now you’ll follow a clear sequence to get the tiles down correctly: acclimate and plan your layout, mark reference lines and cuts, and prepare the adhesive.
Next, apply adhesive with the right trowel and open time, set each tile while keeping seams aligned and spacing consistent.
Then roll and add weight for full contact. Stick to each step and you’ll guarantee a flat, secure finish.
Step 1 Acclimate tiles and plan layout (center line, dry-lay)
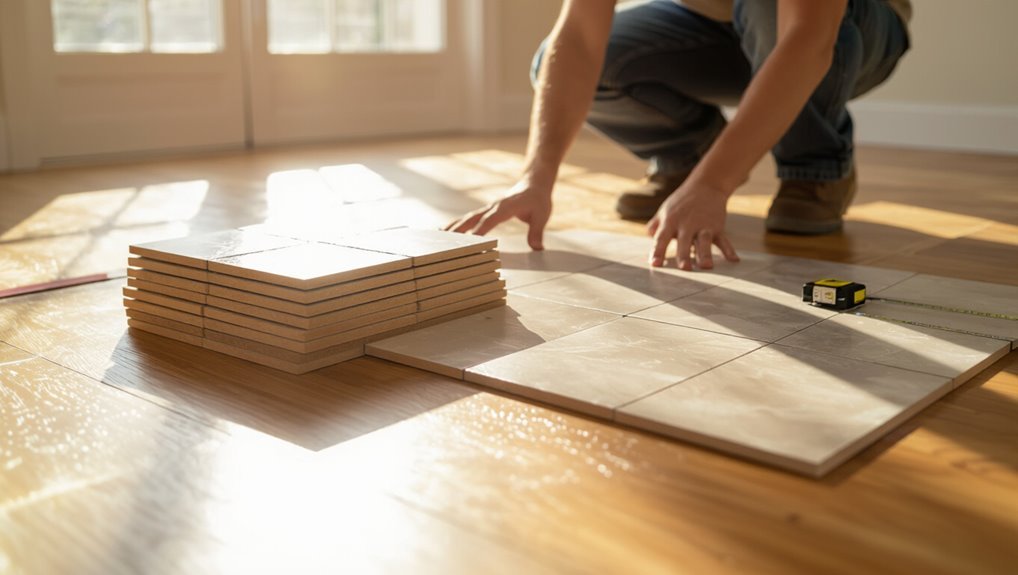
Start by letting your vinyl tiles acclimate in the room where they’ll be installed for at least 48 hours, and use that time to plan a centered layout with a dry-lay.
Unbox tiles, stack them flat, and spread them out to check color and pattern consistency.
Arrange full and edge pieces from the center, noting balance and visual flow before you begin permanent placement.
Step 2 Marking reference lines and cuts
1. You’ll snap your center line and perpendicular guides, using a chalk line to keep tiles square. Measure from walls, leaving expansion gaps, and transfer measurements to tiles for end cuts.
Mark cut lines clearly with a pencil or marker. For irregular edges, template with cardboard, then trace onto tiles so every cut fits tightly and consistently.
Step 3 Applying adhesive correctly (amount, trowel size, open time)
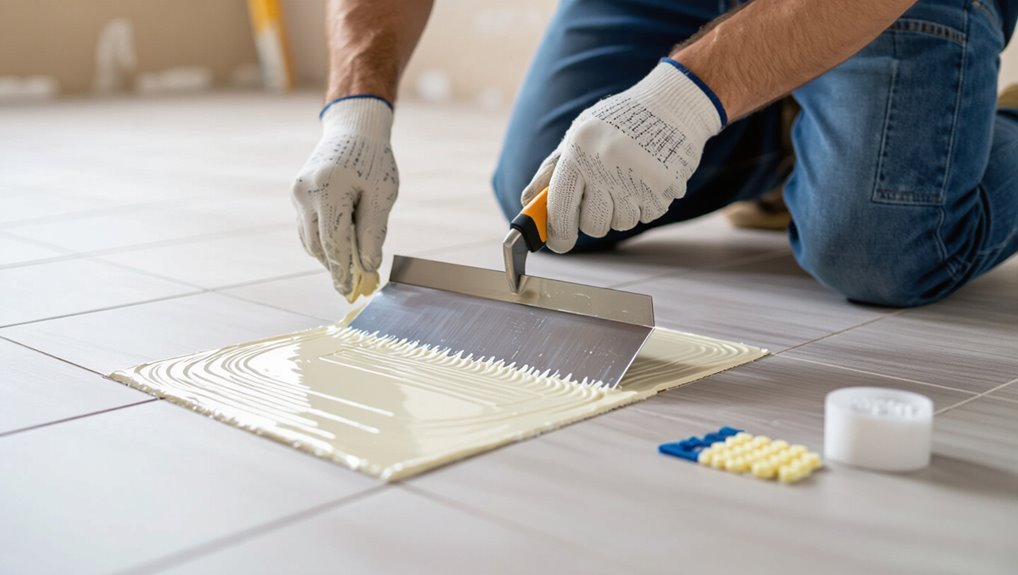
Before you lay a single tile, get the adhesive right: use the manufacturer-recommended trowel notch, spread the correct coverage, and respect the open time so tiles bond properly.
Work in small sections, comb adhesive evenly, and avoid over- or under-application.
Check coverage with a backroll or sample tile.
Follow pot life and repositioning limits to guarantee a durable, permanent bond.
Step 4 Setting tiles, aligning seams, and maintaining spacing
Lay each vinyl tile gently into the wet adhesive, pressing and sliding it slightly to guarantee full contact without trapping air.
Align edges carefully so seams form straight lines; use a chalk line or straightedge as a guide.
Maintain consistent spacing with spacers or a gap tool for grout or expansion needs.
Check alignment frequently and adjust tiles before adhesive skins over.
Step 5 Rolling and weight application for full contact
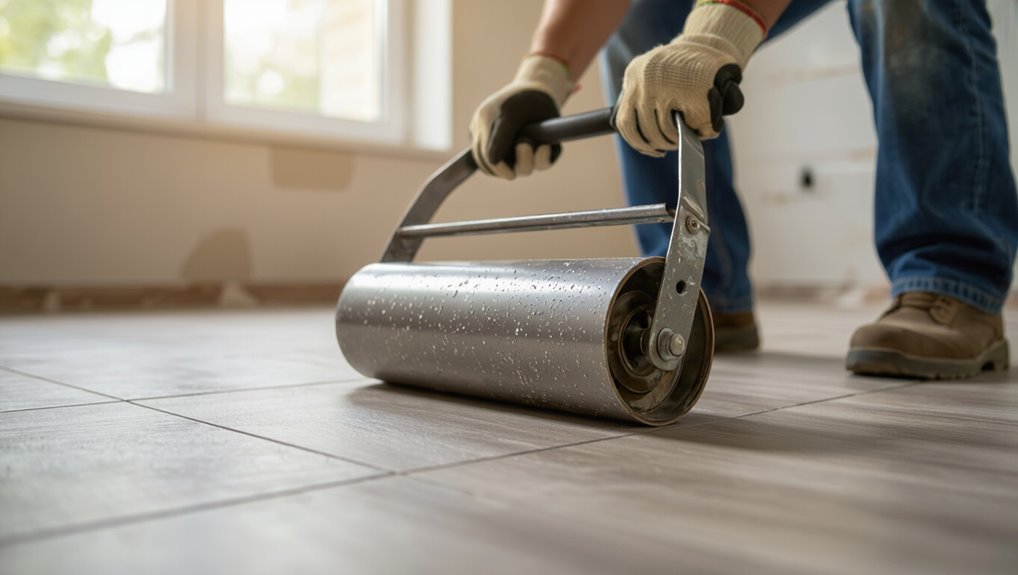
Once your tiles are aligned and the adhesive is still tacky, roll each section to seat the tiles fully and eliminate air pockets.
Use a 100–150 lb floor roller, working in one direction, then perpendicular.
For edges or corners, press with a weighted board or hand roller.
Leave weights as recommended by adhesive instructions to guarantee uniform contact and curing.
Step 6 Trimming edges, transitions, and doorways
Measure and cut tiles carefully around walls, doorways, and junctions so they fit snugly without gaps or buckling.
Use a straightedge and utility knife for clean cuts; score repeatedly and snap tiles.
Fit edge pieces under trim or against threshold strips, trimming as needed.
Allow minimal expansion gap where manufacturer recommends, then press edges firmly and reinstall molding or thresholds to finish connections neatly.
Step 7 Cleaning excess adhesive and initial cure time
After you’ve trimmed and secured the last tiles and replaced molding or thresholds, clean up any adhesive that squeezed out along seams and edges before it skins over.
Use a damp cloth or sponge for water-based adhesive, solvent recommended for pressure-sensitive types.
Remove residue gently, let the floor rest undisturbed for the manufacturer’s initial cure window—usually 24 hours—before light traffic.
Finishing Steps and Post-Installation Care
Once your tiles are laid you’ll do a final rolling, seal any seams if the product requires it, and finish the exposed edges.
Let the floor cure for the manufacturer‑recommended time before walking on it or returning furniture.
Maintain the surface with gentle cleaning and proper care to protect the adhesive bond and prolong the life of the installation.
Final rolling, sealing seams (if required), and edge treatments
Roll the floor with a 100‑lb roller to seat tiles evenly and remove any trapped air.
Then inspect seams and edges for gaps or lifted corners. If seams need sealing, apply color-matched seam sealer sparingly with a fine applicator, wiping excess.
Fit edge trims or reducer strips, secure with adhesive or screws as recommended, and trim junctions for a neat, durable finish.
Curing times and when to resume foot and furniture traffic
With seams sealed and edges trimmed, let the installation set so adhesives and sealers can reach full strength. Curing time determines when you can walk on the floor and bring furniture back in.
Wait the manufacturer’s recommended minimum—often 24–72 hours for light traffic, 72 hours or more for heavy loads.
Use protective pads, lift furniture instead of sliding, and avoid cleaning chemicals until fully cured.
Routine maintenance to preserve adhesive bond
Although the glue’s job is mostly done after curing, you’ll need to keep up a few simple habits to preserve the adhesive bond and extend the life of your vinyl tiles.
- Sweep and vacuum regularly to remove grit.
- Use pH-neutral cleaners; avoid solvents.
- Place mats at entries and pads under furniture legs.
- Inspect seams seasonally and re-glue any lifting edges promptly.
Common Problems and How to Fix Them
After installation you’ll want to watch for common issues like bubbling, lifting, or edge curl caused by adhesive failures and learn quick fixes such as spot re-gluing or edge taping.
Check for moisture problems that can cause buckling or adhesive loss, test moisture levels, and know when excessive dampness means you should remove and replace tiles.
Also inspect for telegraphed subfloor defects—sanding, patching, or installing an underlayment can stop surface imperfections from showing through.
Adhesive failures (bubbling, lifting, edge curl) detection and remedies
When tiles start bubbling, lifting, or curling at the edges, it’s a clear sign the adhesive’s failed and you need to act before damage spreads. You’ll usually see these problems where the subfloor was uneven, moisture got in, or the wrong adhesive was used.
Moisture-related failures remediation and when to remove tiles
Moisture is one of the most common causes behind adhesive breakdown, mold growth, and tile warping.
So once you’ve addressed adhesive issues, you should check for water intrusion before reinstallation. Test moisture with a meter; dry and fix leaks or vapor barriers.
If tiles are moldy, buckled, or adhesive won’t bond despite dry conditions, remove and replace tiles and substrate as needed.
Telegraphed subfloor defects and repair options
Telegraphed defects are visible bumps, dips, seams, or patterns in your finished vinyl that mirror problems in the subfloor beneath; you’ll see these imperfections show up as ridges over joints, depressions where boards have voids, or grout lines from tile below.
Fix by sanding high spots, filling low areas with floor patch, replacing damaged panels, or installing an underlayment to smooth and isolate the surface.
Best Practices and Pro Tips for a Durable Installation
Pick an adhesive formulated for your subfloor and room conditions so the tiles stay put.
Pay attention to temperature, humidity, and timing—start installation only when conditions meet the manufacturer’s specs.
Finish with simple preventative steps and keep records of warranties to protect your investment long-term.
Choosing the right adhesive for your environment
Because the right adhesive makes the difference between a floor that lasts and one that peels, you’ll want to match the glue to your room’s conditions, subfloor type, and tile material.
Choose water-resistant, mold-inhibiting adhesives for bathrooms; high-strength, flexible urethane or pressure-sensitive products for high-traffic areas; and low-VOC options for indoor air quality.
Always follow manufacturer compatibility charts and test a small area.
Temperature, humidity, and installation timing tips
If you install vinyl when temperatures or humidity are out of range, tiles can warp, peel, or shrink—so plan for stable conditions and let materials acclimate before you start.
Aim for manufacturer-recommended temperature and RH ranges during acclimation and installation. Avoid installing during extreme weather or HVAC cycling.
Work in small sections, press adhesive firmly, and allow full cure time before heavy traffic or furniture placement.
Long-term preventative measures and warranty considerations
When you finish installing vinyl, take a proactive approach to maintenance and understand warranty terms so your floor stays protected for years.
Follow the manufacturer’s care guidelines, use recommended cleaners and protective pads, control indoor climate, and inspect seams and edges periodically for signs of wear so small issues don’t become costly repairs.
- Keep records of purchase and installation dates.
- Use approved cleaners only.
- Place felt pads under furniture.
- Monitor humidity and temperature.
Comparison Adhesive vs. Peel-and-Stick vs. Loose-Lay Vinyl
You’ll want to weigh durability, ease of installation, repairability, and cost when choosing between adhesive, peel-and-stick, and loose-lay vinyl.
Adhesive tiles usually last longest but take more time and skill to install, while peel-and-stick is quick and cheap but can be harder to repair cleanly.
Loose-lay offers easy replacement and moderate durability at a midrange price, so pick what matches your skill level and budget.
Durability, ease of installation, repairability, and cost
Though all three vinyl types resist moisture and wear, they differ in how they stand up over time and how easy they are to install and fix: adhesive tiles offer the strongest long-term bond and best resistance to lifting, peel-and-stick gives a quick DIY-friendly stick but can peel at edges, and loose-lay relies on weight and friction—making it the easiest to replace but slightly more prone to shifting in high-traffic spots; cost follows a similar pattern, with peel-and-stick usually cheapest up front, loose-lay midrange, and adhesive installations costing more once you factor in adhesives and professional labor.
| Type | Durability | Ease/Cost |
|---|---|---|
| Adhesive | Highest | Harder install, higher total cost |
| Peel-and-Stick | Moderate | Easiest install, lowest cost |
| Loose-Lay | Moderate-Low | Easiest repair, mid cost |
Mistakes to Avoid
Don’t skip moisture testing or proper subfloor prep, since trapped moisture or uneven surfaces will ruin your installation.
Make sure you use the correct trowel and get full adhesive coverage so tiles bond evenly.
Follow the manufacturer’s guidelines, including adhesive open time, or you’ll risk failures and voided warranties.
Skipping moisture testing or subfloor prep
If you skip moisture testing and proper subfloor prep, you’re risking adhesive failure, buckling, and mold down the line.
Test concrete and wood for moisture, fix high readings, and guarantee subfloor is clean, dry, level, and structurally sound.
Remove contaminants, fill gaps, and sand high spots.
Proper prep prevents failures and saves time and money compared with redoing an improperly bonded floor.
Using wrong trowel or insufficient adhesive coverage
Using the wrong trowel or not spreading enough adhesive will leave tiles poorly bonded and prone to hollow spots, lifting, and premature wear.
You should match trowel notch size to tile backing and adhesive type, apply full coverage skirt-to-skirt, and comb in straight lines.
Check transfer periodically and spread more where coverage is thin to guarantee consistent contact and long-lasting adhesion.
Ignoring manufacturer guidelines and adhesive open time
When you skip the manufacturer’s instructions or let adhesive sit past its open time, you risk weak bonds, staining, and voiding the warranty.
Follow recommended adhesives, trowel size, and temperature/humidity limits. Apply adhesive within the specified open time, press tiles promptly, and remove excess solvent-based adhesive immediately.
Ignoring guidelines shortens lifespan and may ruin your floor — don’t gamble with shortcuts.
FAQ
You probably have a few practical questions about adhesive and care, like how long it needs to cure before you can walk on the tiles and whether it’ll stain or damage your subfloor over time.
You’ll also want to know if you can install adhesive vinyl over existing vinyl, which adhesives work best in bathrooms and kitchens, and how to remove tiles if the adhesive fails.
Below are clear answers to those common FAQs.
How long should adhesive cure before walking on vinyl tiles?
How long should you wait before walking on newly laid vinyl tiles?
Typically, wait 24 hours for pressure-sensitive adhesives and 48–72 hours for wet-set or urethane adhesives to reach initial strength.
Avoid heavy traffic for at least 72 hours.
Follow manufacturer cure times, maintain recommended temperature and humidity, and don’t replace furniture until the adhesive fully sets to guarantee a lasting bond.
Can I install adhesive vinyl tiles over existing vinyl flooring?
Although it’s possible to lay adhesive vinyl tiles over existing vinyl flooring, you’ll need to assess the condition and type of the old floor first to confirm a reliable bond and long-term performance.
Check for loose, bubbled, or damaged areas, strong wax or polish layers, and seams.
Clean thoroughly, sand glossy finishes, and repair imperfections; otherwise remove the old floor to guarantee proper adhesion and longevity.
What adhesive is best for bathrooms and kitchens?
Which adhesive works best in damp, high-traffic rooms?
Use a waterproof, mold-resistant acrylic or urethane adhesive formulated for vinyl flooring. They bond well, tolerate humidity, and resist breakdown from cleaners.
Choose low-VOC products for indoor air quality and follow manufacturer recommendations for porosity and temperature.
Always test adhesion on a small area and confirm subfloor is clean, dry, and level before applying.
How do I remove vinyl tiles if the adhesive fails?
Start by loosening the edges and lifting a corner with a putty knife or floor scraper to see how stubborn the adhesive is.
If tiles lift, peel them slowly, working across the room.
Use a heat gun or steam to soften adhesive for stubborn spots, then scrape residue with a floor scraper.
Clean remaining glue with adhesive remover and a clean rag before prepping the surface.
Will adhesive stain or damage my subfloor over time?
If you’d to soften and scrape adhesive to remove tiles, you might worry about stains or long‑term damage to the subfloor.
Generally, quality adhesives won’t deeply damage sealed plywood or concrete; stains may occur but are usually superficial.
You can prevent problems by using recommended adhesives, testing in a hidden area, sealing porous substrates beforehand, and removing residue promptly with proper solvents and gentle scrapers.