How to Cut Vinyl Floor Tiles Without Cracking or Chipping Them
You can cut vinyl floor tiles cleanly without cracking or chipping by using the right method for the tile type, steady support, and sharp blades. Score thin or peel-and-stick tiles with a utility knife and snap them; use a circular saw with a fine carbide blade for thicker LVT or rigid vinyl; use a jigsaw for curves. Clamp and back the cut, apply masking tape, and cut slowly to avoid tear-out—keep going and you’ll pick up tips for each tool and repair tricks.
Quick Answer Can You Cut Vinyl Floor Tiles Without Cracking or Chipping?
Yes — you can cut vinyl floor tiles cleanly without cracking or chipping if you use the right tools and techniques.
Score-and-snap for thin tiles, a sharp utility knife for straight cuts, and a fine-tooth saw or tile cutter for thicker or stubborn tiles will give the best results.
Take steady, controlled cuts, support the tile fully, and finish edges with a sanding block or file to prevent damage.
Short, actionable summary for best results
You can cut vinyl floor tiles without cracking or chipping by using the right blade, steady support, and a slow, controlled feed. Score-and-snap works for thinner tiles while a fine-tooth carbide blade on a circular saw or jigsaw suits thicker or backed vinyl.
Know how do you cut vinyl floor tiles:
- Clamp firmly
- Score, then snap or saw slowly
- File edges smooth
Basic Understanding Types of Vinyl Tiles and Why They Chip
You’ll first want to know the main vinyl types—LVT, VCT, peel-and-stick, and rigid vinyl—because each cuts differently.
Cracking, chipping, and edge tearing usually come from using the wrong blade, too much pressure, or unstable backing.
Understanding a tile’s composition and backing helps you choose the right cutting method to get clean edges.
Vinyl tile types (LVT, VCT, peel-and-stick, rigid vinyl)
Vinyl tile comes in several common types—luxury vinyl tile (LVT), vinyl composition tile (VCT), peel-and-stick, and rigid vinyl—each with different thicknesses, construction, and durability that affect how and why edges chip. You should match cutting tools and support to type to reduce damage.
| Type | Thickness | Cut tip |
|---|---|---|
| LVT | 2–5mm | Score and snap |
| VCT | 3–5mm | Straight blade |
| Peel-and-stick | 1–2mm | Sharp knife |
| Rigid vinyl | 4–8mm | Saw or shear |
Common causes of cracking, chipping, and edge tearing
Different tile constructions call for different cutting methods, and those same differences explain why edges crack, chip, or tear.
You’ll cause damage by using dull blades, forcing cuts, or cutting too fast. Improper support, wrong tools, and skipping scoring create stress points.
Temperature extremes and bending tiles after cutting also lead to splits. Controlled technique and proper tooling prevent most failures.
How tile composition and backing affect cut quality
Because tile layers and DIYers work with several constructions—solid vinyl, luxury vinyl planks (LVP), and vinyl composition tiles (VCT)—you should expect cut behavior to vary: softer wear layers score cleanly, rigid cores resist deformation, and fiberglass or felt backings stabilize edges.
You should match blade type and support to composition; thin wear layers chip more, rigid cores split if unsupported, and cushioned backs compress during cutting.
Tools and Materials You Need Before You Start
Before you cut, gather the right hand tools—like a utility knife, snap cutter, or hand saw—and pick a power tool if you need faster, straighter cuts (circular saw, jigsaw, oscillating tool, or a tile cutter).
You’ll also want accessories such as a straightedge, clamps, cutting mat, and masking tape for accurate lines.
Don’t forget safety gear: goggles and a mask to protect your eyes and lungs.
Hand tools (utility knife, snap cutter, hand saw)
Grab a sharp utility knife, a snap cutter, and a hand saw—these three hand tools will handle nearly every vinyl tile cut you’ll make.
Use the utility knife for straight score-and-snap cuts, the snap cutter for neat, repeatable breaks on sheet vinyl, and the hand saw for small notches or stubborn corners.
Keep blades sharp and measure twice before cutting.
Power tools (circular saw, jigsaw, oscillating tool, tile cutter)
Power up your work with the right power tools: a circular saw for long straight cuts, a jigsaw for curved or irregular shapes, an oscillating tool for tight corners and plunge cuts, and a tile cutter or wet saw for fast, clean cuts on thicker vinyl or vinyl-backed tile.
Choose fine-tooth or carbide blades, cut slowly to avoid heat buildup, and steady the tile to prevent chatter and tear-out.
Accessories and safety gear (straightedge, clamps, cutting mat, masking tape, goggles, mask)
Once you’ve picked the right saw or cutter, outfit your workspace with the accessories and safety gear that keep cuts accurate and you protected.
Use a straightedge and clamps for steady guides, a cutting mat to prevent tears, and masking tape to mark and reduce chipping.
Wear goggles and a mask.
Visualize:
- straightedge clamped
- mat under tile
- taped cut line
Preparation Steps Setting Up for Clean Cuts
Before you cut, measure and mark each tile precisely so your lines are straight and your fit is snug.
Clamp or weight the tile down, pick the proper blade or blade setting for vinyl, and apply masking tape with a scored line to minimize chipping.
These small setup steps make the actual cut cleaner and faster.
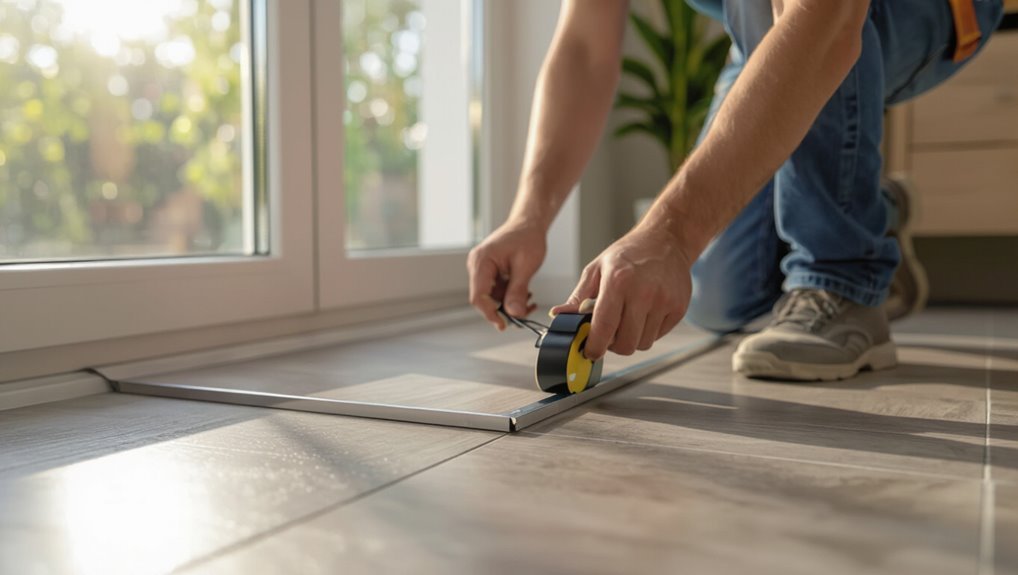
Measuring and marking tiles accurately
Accurate measuring and marking are the foundation of clean vinyl cuts, so measure twice and mark once to avoid wasted tiles.
Use a steel ruler or straightedge and a fine-tip pencil or scoring tool for crisp lines.
Mark from the finished edge, account for seams and trim, and double-check dimensions against the installation pattern before making any cuts.
Securing the tile to prevent movement
After you’ve measured and marked, clamp or weight the tile so it won’t shift while you cut; even a small movement will ruin a precise line.
Use nonmarring clamps, a sacrificial board, or heavy objects at the edges. Press the tile flat against your work surface, secure any loose corners, and recheck alignment before starting.
Stable tiles give cleaner, chip-free cuts.
Choosing the right blade or blade setting for your tool
When you pick a blade or blade setting, match it to the vinyl type and your cutting tool so you get smooth, chip-free edges.
For vinyl, use a fine-tooth carbide blade on saws or a sharp utility knife for thin tiles.
Reduce speed and use shallow passes for thicker or reinforced vinyl.
Test on scrap, adjust depth and feed rate before cutting final pieces.
Using masking tape and score lines to reduce chipping
Although it’s tempting to go straight to the saw or knife, take a moment to apply masking tape and mark a score line—this simple prep cuts down on chipping and keeps edges clean.
You’ll work more confidently when you:
- Lay tape over the cut to support the surface.
- Draw a crisp pencil score along the edge.
- Snap or cut on the line for a cleaner edge.
Step-by-Step Cutting Methods
Now you’ll learn four practical cutting methods so you can pick the right one for each cut.
Score-and-snap with a utility knife or snap cutter works fast for straight lines, while a fine-tooth circular or table saw gives clean long cuts.
Use a jigsaw or oscillating tool for curves and irregular shapes, and keep tile nippers and snips on hand for micro-adjustments.
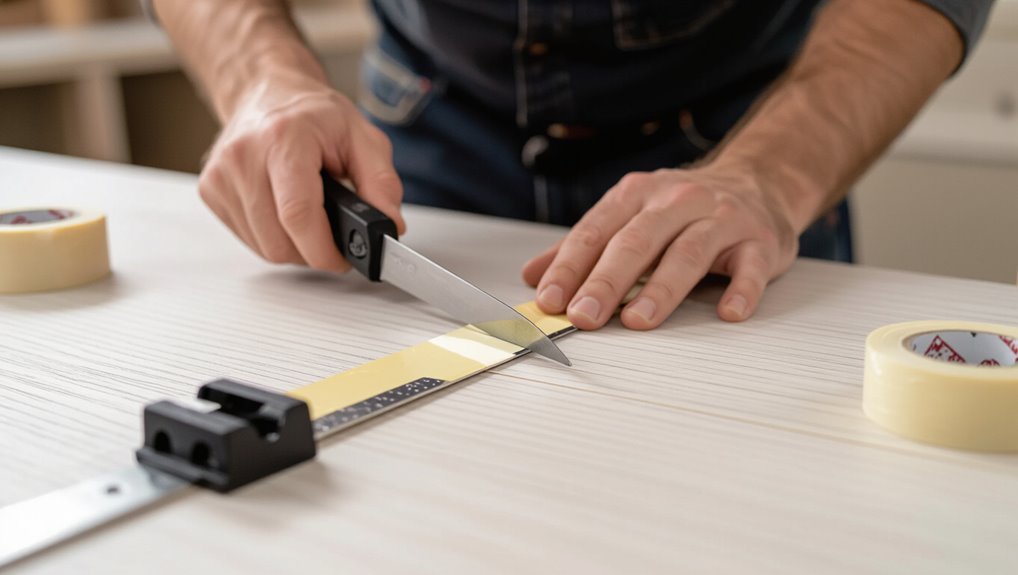
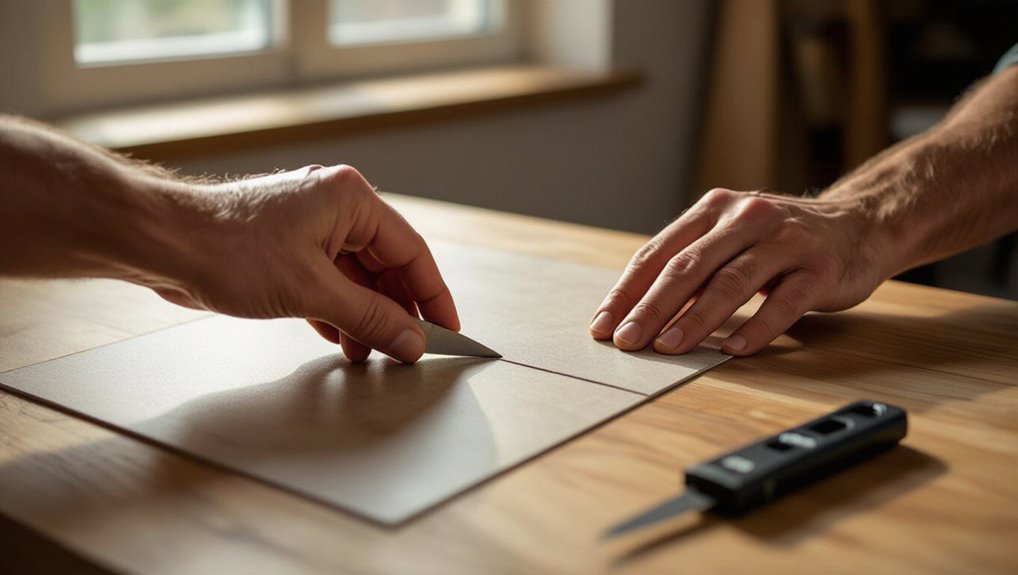
Method 1 Scoring and snapping (utility knife / snap cutter)
Use scoring and snapping when you need straight cuts on standard vinyl tiles or when you want a quick, tool-light option.
Start by making firm, controlled scores along a straightedge, repeating the pass until the groove feels deep and defined.
Then support the tile close to the score and apply steady, even pressure to snap it cleanly without forcing it and risking breakage.
When to use this method
When your cuts are straight and simple—like trimming edges along a wall or cutting full-length rows—you’ll find scoring and snapping fast, clean, and accurate.
Use it when tiles need straight breaks, repeated identical cuts, or quick removal of thin strips.
Choose this method for durable vinyl without intricate shapes, minimizing tool setup and reducing dust compared with power tools.
Step 1: Score technique and repeated passes
Start by laying the tile on a flat surface and marking your cut line with a straightedge; you’ll want a firm guide for every pass.
Score along the line with a sharp utility knife, applying steady pressure. Make multiple shallow passes rather than one deep cut, keeping the blade aligned with the guide.
Clean the scored edge before snapping to guarantee a clean break.
Step 2: Proper snapping technique to avoid breakage
After you’ve scored the line and cleaned the edge, it’s time to snap the tile along that groove so it breaks cleanly.
Position the scored line over a straight edge, hold firmly on one side, and apply steady downward pressure on the overhang.
Don’t jerk or twist. Support the offcut to prevent splintering, and smooth the cut with light sanding if needed.
Method 2 Using a fine-tooth circular saw or table saw
When using a fine-tooth circular saw or table saw, pick a carbide-tipped blade with high tooth count and run the saw at the manufacturer-recommended RPM for clean cuts.
Clamp a fence or use a straight guide and feed the tile steadily to minimize chip-out.
Wear a dust mask, eye protection, and use a shop vac or dust extraction to control vinyl dust and scraps.
Blade selection and RPMs
If you’re using a fine-tooth circular saw or table saw to cut vinyl floor tiles, pick a carbide-tipped blade with 60–80 teeth and run it at a moderate speed (around 3,000–4,000 RPM for most handheld circular saws; table saws will have their own recommended ranges).
This combo minimizes chipping and melts less than a coarse blade at high RPMs. Use a thin-kerf blade, keep blades sharp, and avoid excessive speed spikes.
Fence, guide, and feed speed to minimize chip-out
Because a steady fence, a confident guide, and the right feed speed control where the blade meets the tile, you’ll get clean, chip-free cuts with a fine-tooth circular or table saw.
Clamp a straight guide or fence tight, align the cut, and feed at a consistent, moderate pace—too fast chips, too slow burns.
Keep steady pressure and let the blade do the work.
Dust control and safety tips
While you’re cutting vinyl tiles with a fine-tooth circular or table saw, control dust and protect yourself by using a shop vacuum or dust collection hooked to the saw, wearing an N95 (or better) respirator, and sealing off the work area with plastic sheeting to keep particles from spreading.
Also wear eye and hearing protection, use gloves, guarantee good lighting, keep bystanders away, and unplug before adjustments.
Method 3 Jigsaw or oscillating tool for curves and irregular cuts
For curved or irregular cuts you’ll want a fine-tooth, carbide or bi-metal jigsaw blade and a moderate to high stroke speed so the blade slices cleanly without tearing the vinyl.
Support the tile on a flat surface and feed the tool slowly and steadily, letting the blade do the work to prevent chipping or ragged edges.
Use light pressure and steady hands for the smoothest finish.
Blade type and cutting speed
When you need to cut curves or irregular shapes with a jigsaw or oscillating tool, pick a fine-toothed, carbide-grit or high-tooth-count blade designed for vinyl and plastics to reduce chipping and melting.
Use moderate RPMs; too fast melts vinyl, too slow tears. Test settings on scrap, steady your stroke, and let the blade do the work—apply light pressure and avoid forcing the cut.
Support and slow feed techniques for smooth edges
Because curves and irregular cuts put more stress on the tile, support the vinyl fully and feed the blade slowly so you get clean, chip-free edges.
Clamp or brace the tile over a sacrificial board, hold it flat, and move the jigsaw or oscillating tool at a steady, slow pace.
Pause on tight turns, let the blade do the work, and avoid forcing cuts.
Method 4 Tile nippers and snips for micro-adjustments
When you need tiny adjustments or to nibble out irregular notches, tile nippers and snips are your go-to tools.
Use short, controlled bites and score first with a utility knife to reduce stress on the vinyl and prevent cracking.
Hold the tile firmly on a flat surface and work gradually, checking the fit frequently.
Best use cases and technique to prevent cracking
If you’re making small notches or smoothing irregular edges after a straight cut, tile nippers and snips give you precise control without stressing the vinyl too much.
Use them sparingly, work from the cut edge inward, and make several light bites rather than one heavy pull to avoid cracking.
Hold the tile firmly, support nearby material, clip incrementally, and check fit frequently to prevent overcutting.
Edge Finishing and Repair After Cutting
After cutting your vinyl tiles, you’ll want to sand, file, and smooth any rough edges so seams sit tight and look professional.
If some imperfections remain, install edge trim or border strips to hide them and provide a clean boundary.
Use matching caulk where gaps show to seal and finish the job neatly.
Sanding, filing, and smoothing cut edges
Smooth rough edges right away so your vinyl tiles sit flush and look professional.
Use a fine-grit sanding block or flexible file to remove burrs, working gently along the cut edge. Keep light, even strokes to avoid thinning the tile.
Wipe debris, test fit, and repeat as needed.
Finish with a soft scuff pad for a smooth, consistent edge before installation.
Using edge trim, transition strips, and caulk for concealed imperfections
When cut edges still show slight gaps or unevenness, you can conceal and reinforce them with edge trim, connector strips, and a thin bead of caulk to create a clean, durable finish.
Measure and trim aluminium or PVC edge pieces to fit, snap or screw them in place, then run a narrow caulk line, smoothing it for a seamless, moisture-resistant seal.
Common Mistakes That Lead to Chipping or Cracking
You’ll cause chipping or cracking if you use the wrong tool or dull blade, don’t support or clamp the tile properly, or force a fast cut.
Skipping masking tape or proper scoring also makes the surface tear instead of cleanly separating.
Take the time to pick the right blade, stabilize the tile, and cut slowly for crisp edges.
Wrong tool or blade choice
Picking the wrong tool or blade is a fast track to chipped or cracked vinyl tiles, so choose equipment that matches the tile thickness and material.
Use a fine-tooth utility knife or a carbide-tipped blade for thin vinyl; pick a low-tooth-count blade for thicker, reinforced tiles.
Match blade speed to material, cut slowly, and replace dull blades promptly to prevent splintering.
Insufficient support or clamping
If you don’t support vinyl tiles properly while cutting, the edge will flex and the blade can grab, causing chips or cracks.
Clamp or brace the tile close to the cut line, use a sacrificial backer board under fragile edges, and keep pressure even.
Secure small pieces with tape or a jig so they don’t shift, reducing vibration and preventing fractures.
Cutting too fast or forcing the cut
Move slowly and let the blade do the work—rushing or forcing a cut puts undue stress on vinyl tiles and makes chips or cracks far more likely.
You should feed material steadily, keep consistent pressure, and avoid violent sawing motions.
Let the tool’s speed and sharpness handle the cut; if you’re pushing, stop, check blade condition, and adjust technique to prevent damage.
Skipping masking tape or proper scoring
Although it’s tempting to skip masking tape or proper scoring to save time, doing so greatly raises the risk of chips and cracks when you cut vinyl tiles.
You should apply tape along the cut line, mark precisely, then score firmly with a utility knife before snapping or trimming. That supporting edge prevents tear-out and keeps edges clean, giving professional-looking results without damage.
Best Practices and Pro Tips to Prevent Damage
You’ll get cleaner cuts by matching cutting speed and feed rate to your tool and blade, and by pre-warming rigid vinyl when recommended to reduce cracking.
Plan your layout to avoid fragile edge cuts and minimize waste, and mark tricky pieces before you start.
If a run includes many complex cuts or you’re unsure about warming and tool settings, don’t hesitate to hire a pro.
Optimal cutting speeds and feed rates per tool
When cutting vinyl tile, matching speed and feed to the tool is essential to avoid chipping, melting, or dulling blades.
Use slower rotary speeds with steady, moderate feed for handheld cutters; increase RPM slightly and slow feed for thin vinyl to reduce tearing.
For table saws and jigsaws, run moderate RPM with consistent, firm feed.
Always test on scrap and adjust.
When to pre-warm rigid vinyl before cutting
Matching speed and feed to your cutter helps prevent chipping, but sometimes the material itself needs attention: pre-warming rigid vinyl before cutting loosens internal stresses and reduces brittleness so you get cleaner edges with less cracking.
Warm tiles gently—use a heat gun on low or room-temperature acclimation in sun-warmed space for 30–60 minutes. Don’t overheat; just soften enough for a smoother cut.
Planning cuts to minimize waste and fragile cuts near edges
If you plan cuts before you ever touch the blade, you’ll cut down on waste and avoid risky edge cuts that tend to chip or crack.
Measure and lay out tiles dry, group similar trims to reduce scrap, and orient grain or pattern toward walls.
Use full tiles near visible areas and reserve narrow, fragile edge cuts for less noticeable spots.
When to hire a pro vs. DIY
Deciding whether to hire a pro or tackle vinyl tile yourself comes down to your skill level, the room’s complexity, and how much risk you’re willing to accept for mistakes that can be costly or hard to fix.
If cuts are simple and you’re comfortable with tools, DIY saves money.
Hire a pro for intricate layouts, stair nosing, tight tolerances, or if you lack proper tools or patience.
Comparison of Cutting Methods Pros, Cons, and Best Use Cases
When you’re ready to cut vinyl floor tiles, choosing the right method matters because each tool—utility knife, snap cutter, jigsaw, wet saw, or shears—offers different speed, accuracy, and edge quality. You’ll pick by project size, curve complexity, and finish needs.
| Tool | Speed | Best use |
|---|---|---|
| Knife | Fast | Straight cuts |
| Jigsaw | Moderate | Curves |
| Wet saw | Slow | Perfect edges |
Troubleshooting What to Do If a Tile Chips or Cracks
If a tile chips or cracks, you can often fix small cosmetic damage with a filler or matching paint so it blends with the floor.
For more serious breaks you’ll need to remove and replace the damaged tile—I’ll cover safe removal, preparing the subfloor, and reinstalling a perfect-fit replacement.
Finally, we’ll look at ways to prevent recurrent damage in high-traffic or vulnerable spots so the repair lasts.
Small chip fixes and cosmetic repairs
Though vinyl is durable, chips and small cracks still happen, and you can often fix them without replacing the whole tile.
Clean area, dry thoroughly, then apply a vinyl repair compound or matching colored epoxy with a small spatula.
Smooth, remove excess, and let cure. Lightly sand and buff for texture match.
Seal with clear coat if needed to blend and protect the repair.
Replacing a damaged tile: removal and installation tips
One damaged tile doesn’t mean you need to redo the whole floor; you can remove and replace a single vinyl tile quickly with the right tools and steps.
Score and lift the damaged tile, scrape adhesive, clean the subfloor, and dry-fit the new piece.
Apply adhesive evenly, press the tile firmly, roll to remove air pockets, and trim edges for a seamless finish.
Preventing recurrent damage in problem areas
When a vinyl tile chips or cracks repeatedly in the same spot, tackle the cause as well as the cosmetic fix: check for loose subflooring, uneven subfloor height, heavy point loads, or water intrusion that weaken the tile, then reinforce or repair those underlying issues before installing a replacement.
Use isolation pads, redistribute heavy furniture, improve drainage, or add plywood underlayment to prevent recurrence.
FAQ Common Questions About Cutting Vinyl Floor Tiles
You probably have a few quick questions about cutting vinyl—what tools will work on different tile types, how to handle pipe cutouts or circles, and whether to cut before or after laying the floor.
I’ll also cover the best blade tooth count for clean cuts and how techniques differ for vinyl plank versus vinyl tile.
Read on for clear, practical answers so you can pick the right method and tools.
Can you use a regular utility knife on all vinyl tiles?
Curious if a regular utility knife will do the job? You can use one on thinner, flexible vinyl and luxury vinyl plank with a sharp blade and multiple shallow passes.
But rigid vinyl, thick tiles, or tiles with backing often need a scoring tool, heavy-duty cutter, or saw to avoid uneven cuts.
Always test on a scrap and change blades frequently.
How do I cut perfect circles or cutouts for pipes?
Want a snug, professional-looking hole for a pipe? Mark the center, score a pilot circle with a compass or hole saw guide, then drill a small starter hole.
For small diameters, use a circle cutter or step drill; for larger ones, use a jigsaw with a fine-tooth blade. Cut slowly, support the tile, and deburr the edge for a clean fit.
Is it better to cut vinyl tiles before or after installation?
Should you cut vinyl tiles before laying them or trim them after they’re in place? You’ll usually pre-cut tiles that border walls, cabinets, and fixtures for neat, accurate fits.
Leave full tiles intact during installation to reduce handling damage. After adhesive sets, scribe or trim final edge pieces for perfect gaps.
Work slowly and test-fit pieces to avoid mistakes.
What blade tooth count is best for vinyl?
Which blade should you pick: fine-tooth or coarse?
You’ll want a fine-tooth blade—60 to 80 teeth on a circular saw or a dedicated fine-tooth utility blade—because it delivers smoother cuts and minimizes chipping.
Use carbide-tipped blades for durability.
Match blade RPM and feed rate: slower, steady cuts reduce tear-out.
Test on scrap to confirm clean edges before cutting installed tiles.
How do I cut vinyl plank flooring differently from vinyl tiles?
How you cut vinyl plank flooring differs from cutting vinyl tiles because planks are longer, often thicker, and designed to interlock.
So you’ll focus more on preserving tongue-and-groove edges and making straight, lengthwise cuts.
Use a fine-tooth utility knife for score-and-snap or a straight-edge saw with a non-chip blade.
Support the plank fully, avoid nicking edges, and trim slowly for clean joints.