How to Clean up Drywall Dust From Floors Without Spreading It Everywhere
Seal off the work area, shut HVAC vents, and limit traffic so dust can settle 20–60 minutes. Wear an N95, goggles, and disposable coveralls. Start with a HEPA-rated vacuum to remove loose dust, then wipe surfaces with damp microfiber cloths and tack cloths, working top to bottom. Finish with a damp mop and a final HEPA pass. Don’t sweep or use regular vacuums, and keep tools clean — more tips and step-by-step tricks follow.
How to Clean Up Drywall Dust from Floors Without Spreading It Everywhere
You’ll get the best results by using a damp microfiber mop or HEPA-equipped vacuum so dust gets captured instead of kicked up.
Drywall dust spreads easily because it’s lightweight and becomes airborne with sweeping, walking, or drafts, so minimize traffic and air movement while you work.
Clean as soon as sanding stops—wear a mask and ventilate when safe—to reduce recontamination and protect your lungs.
Quick Answer Best Way to Remove Drywall Dust Without Spreading It
Start by minimizing dust spread: shut off HVAC, close doors to other rooms, and block gaps with towels or plastic; this keeps the mess confined so cleanup methods actually work.
For the quickest, wet-first approach: mist surfaces lightly, wipe with microfiber damp cloths, then vacuum with a HEPA or fine-dust attachment.
Repeat damp-wipe and ventilate. This is how to clean up drywall dust from floor efficiently.
What Causes Drywall Dust to Spread Easily
Because drywall dust is made of extremely fine, powdery gypsum and sanding particles, it gets airborne with the slightest disturbance and settles on every surface unless you control airflow and contact.
You stir it by walking, sweeping, or using a blower; drafts from HVAC, open windows, and fans carry it farther.
Static cling and textured surfaces trap particles, making containment essential.
When to Clean: Timing and Safety Considerations
If you’re working around fresh sanding or demolition, clean up as soon as airborne dust has settled enough to avoid stirring it—typically 20–60 minutes after finishing work, depending on air movement and room size.
Wear a respirator, goggles, and disposable coveralls. Turn off HVAC or seal vents, use tack cloths or a HEPA vacuum, and avoid sweeping.
Recheck after ventilation before final cleaning.
Prepare the Area: Containment and Safety
Before you start cleaning, assess how much dust there’s and which rooms are affected so you can plan containment.
Put on basic PPE—N95 mask, goggles, and gloves—to protect your lungs and eyes.
Then seal vents, doors, and openings and set up plastic sheeting or temporary barriers to keep dust from migrating.
Assess the Work Zone and Dust Levels
When you step into the room, take a quick visual sweep to judge how much drywall dust has settled, where it’s concentrated, and which surfaces and vents might spread it further; this initial assessment tells you what containment and PPE you’ll need and how aggressively to clean.
Note high-traffic paths, carpeted areas, and HVAC returns, then map containment zones and decide order of operations to minimize tracking.
Personal Protective Equipment (PPE) Needed
You’ll want at least three basic pieces of PPE: a NIOSH-approved N95 (or P100) respirator to keep fine dust out of your lungs, safety goggles or a full-face shield to protect your eyes, and disposable coveralls or washable work clothes that you can remove and launder immediately to avoid tracking dust.
Add disposable gloves, sturdy slip-resistant shoes, and a hair cover. Inspect PPE for fit and damage.
Create Containment Barriers
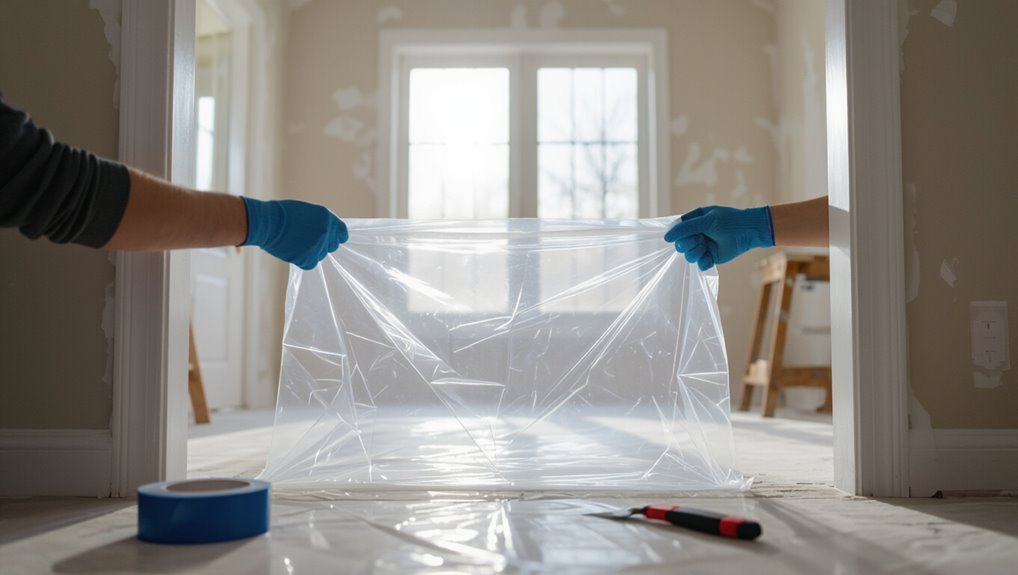
Now that you’ve suited up, set up containment so dust doesn’t spread to the rest of the house.
Hang plastic sheeting from ceiling to floor at doorways, tape seams tightly, and create a simple doorway flap for access.
Lay down walk-off mats or disposable runners inside the zone.
Keep traffic limited, use a HEPA-rated air scrubber if available, and check seals periodically.
Seal Vents, Doors, and Openings to Prevent Migration
1 simple step that makes a big difference is sealing every vent, door gap, and opening before you start sanding; dust will follow the smallest path, so block them off to keep the work zone contained.
You’ll tape vents, hang plastic over doors, seal gaps with foam or tape, and keep HVAC closed to prevent migration.
- Tape vents
- Plastic door curtains
- Foam-gap seal
- Close HVAC ducts
Tools and Materials You’ll Need
You’ll want a HEPA-rated vacuum, microfiber mop, tack cloths, and disposable covers to keep dust from spreading.
Choose products and equipment with true HEPA filtration and easy-to-change disposable parts for the cleanest results.
If you only have a small job, rent specialty gear—buy the tools if you expect frequent use.
Essential Tools (HEPA vacuum, microfiber mop, tack cloth, etc.)
A few well-chosen tools will make removing drywall dust from floors faster and less messy.
You’ll want tools that trap fine particles and avoid kicking dust back into the air. Work methodically from one end to the other and empty or launder items outdoors.
- HEPA-filter vacuum
- Microfiber flat mop
- Tack cloths or disposable dust cloths
- Soft-bristle broom for edges
Recommended Cleaning Products and Equipment Features (HEPA rating, disposable covers)
Now that you’ve picked the basic tools, focus on product features that actually trap fine dust and make cleanup simpler—HEPA-rated filters, disposable covers, and low-dust cleaners.
Choose vacuums with sealed systems and true HEPA cartridges, microfiber pads that hold particles, disposable mop or vacuum bags, and spray-on dust suppressants.
Pick products labeled for fine dust to avoid recontamination.
When to Rent vs. Buy Equipment
Decide whether to rent or buy based on how often you’ll use the equipment and the importance of HEPA-level filtration. If it’s a one-off job, rent a HEPA vacuum; if you’ll clean often, buy for convenience. Compare cost, storage, and maintenance to decide.
| Option | Frequency | Pros/Cons |
|---|---|---|
| Rent | Rare | Low cost, no storage |
| Buy | Frequent | Long-term savings, upkeep |
| Hybrid | Occasional | Rent big, buy small |
Step-by-Step Cleaning Process
Start by letting the dust settle so you don’t stir up fine particles while working.
Then follow a clear sequence: dry removal with a HEPA vacuum, containment wiping with microfiber or tack cloths, careful damp mopping, and a final vacuum and inspection.
Stick to that order and you’ll avoid spreading dust and miss fewer spots.
Step 1 Let Settling Occur: Wait Time and When to Start
Because drywall dust stays airborne for a while, wait at least 30–60 minutes after sanding or cutting before you touch cleanup so most of the fine particles can settle onto surfaces.
Stay out of the room, close vents and doors, and block HVAC return grilles.
Check visually: when dust looks noticeably reduced and larger flakes have settled, you’re ready to begin the initial cleanup steps.
Step 2 Dry Removal: HEPA Vacuum Techniques and Tips
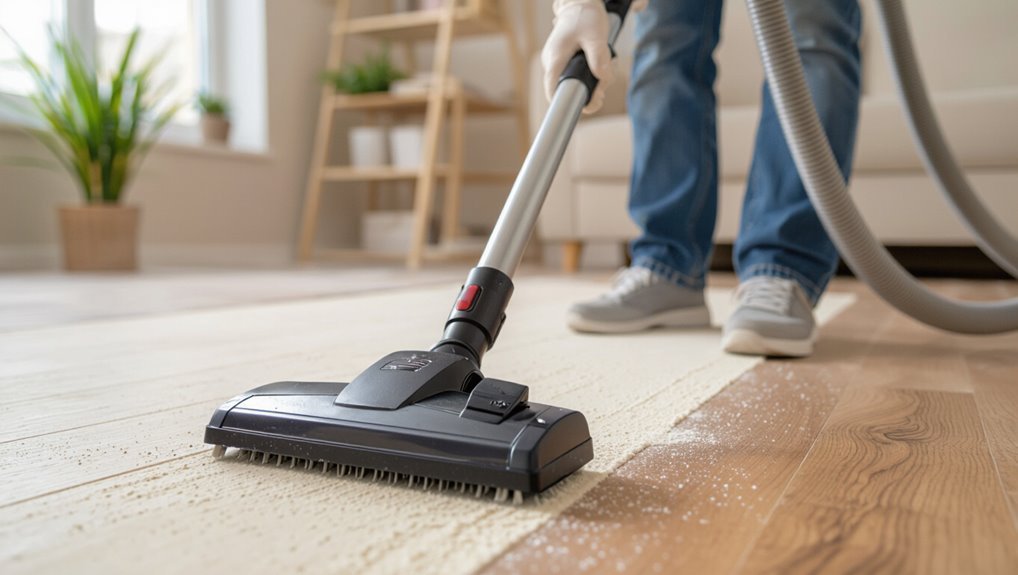
Once most of the dust has settled, bring in a HEPA-equipped vacuum to remove the bulk of the fine particles before you do any wet cleaning.
Move slowly, use a soft brush attachment for baseboards and corners, and overlap passes.
Change or clean filters as recommended, seal bags/containers, and vacuum seating and vents last to avoid reintroducing settled dust elsewhere.
Step 3 Containment Wipe: Microfiber Dry Dusting and Tack Cloth Use
Move methodically across the room with a microfiber mop or cloth to trap the fine drywall dust left after HEPA vacuuming, working from the highest surfaces (crown molding, window sills) down to baseboards and floors so you don’t recontaminate cleaned areas.
Afterward, use a tack cloth for stubborn residue on trim and tight corners; fold and replace as it loads to avoid redistributing dust.
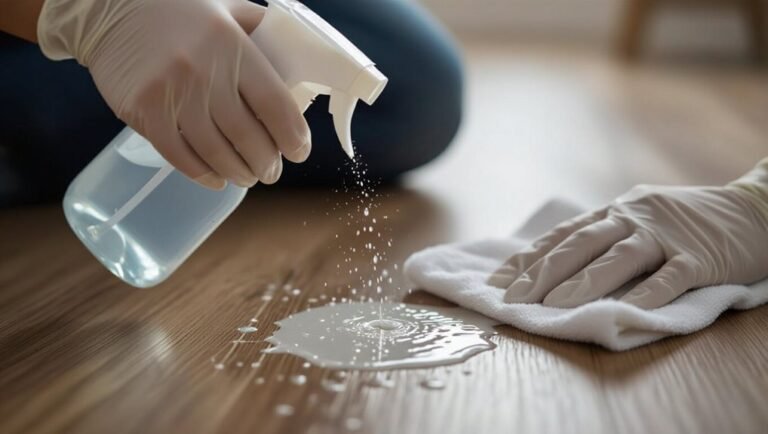
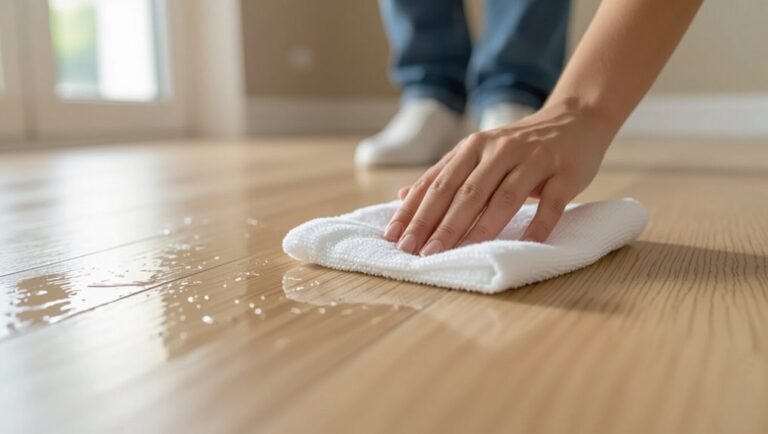
Step 4 Damp Cleaning: Proper Mopping Without Spreading Dust
After you’ve removed as much loose dust as possible, damp mopping will pick up the fine particles that cling to floors without spreading them around.
Fill a bucket with warm water and a few drops of mild detergent, wring a microfiber mop until just damp, work in straight strokes from farthest point toward exit, rinse mop frequently, change water when cloudy, and let floors air-dry.
Step 5 Final Vacuum and Inspection
Step 5 brings the final vacuum and inspection: give the floor a thorough pass with a high-efficiency vacuum (HEPA if available), work in slow overlapping passes to catch lingering dust in seams and corners, and closely inspect baseboards, vents, and junction strips so you don’t miss trapped particles.
Move furniture slightly to vacuum underneath, use crevice tools for edges, and recheck visually for any remaining dust.
Step 6 Dispose of Waste Safely and Prevent Secondary Dust Release
Because drywall dust can become airborne again when handled, you’ll want to seal and bag debris immediately to prevent secondary contamination.
Tie bags securely, double-bag fine dust, and label for disposal. Remove protective covers carefully to avoid shaking.
- Use heavy-duty contractor bags
- Double-bag dusty materials
- Wipe tools before storage
- Transport straight to outdoor bin
Room-Specific Strategies
Now you’ll focus on tailoring your approach to each room type so you don’t spread dust or damage surfaces.
For hard floors like tile, hardwood, and laminate you’ll use dry and damp techniques that protect finish, while carpets and rugs need careful agitation and extraction to pull out embedded dust.
Finally, plan a route and containment strategy for multi-room cleanup and hallway transit to keep dust from migrating.
Hard Floors (Tile, Hardwood, Laminate): Best Practices
When you’re cleaning drywall dust from hard floors, tailor your approach to the room and surface—tile, hardwood, and laminate each need slightly different tools and techniques to avoid damage while getting dust up efficiently.
Start with dry sweeping using a microfiber dust mop, work from farthest corner toward exit, vacuum with hard‑floor attachment, then damp‑wipe with a barely‑wet microfiber cloth and gentle cleaner.
Carpeted Floors and Rugs: How to Extract Dust Without Damage
Tackle drywall dust on carpets and rugs carefully to avoid embedding particles or damaging fibers: vacuum with a canister or HEPA-filter vacuum using a soft brush attachment, moving slowly across the pile.
For stubborn dust, mist the area lightly with water before vacuuming.
Blot any spots with a damp microfiber cloth; don’t rub.
Repeat passes until no visible dust remains.
Multi-Room Cleanup and Hallway Transit Techniques
Start by planning a clear path through rooms and hallways so you move dust out efficiently and don’t track it back in; work from the cleanest room toward the exit.
Carry dust-containment supplies (sealed bags, tack cloths, a broom with a dustpan) in a tote, and use a runner or drop cloth in high-traffic corridors to catch stray dust as you transit.
Move slowly, wipe thresholds, seal collected debris, and vacuum the tote before reentry.
Common Mistakes That Spread Drywall Dust
Don’t make cleanup harder by using a regular vacuum that just blows fine dust back into the air — use a HEPA-equipped unit instead.
Don’t wet mop too soon or scrub aggressively, and don’t walk dust through the house without containing it between rooms.
Also, don’t reuse dirty rags or tools that will just spread dust around.
Mistake 1 Using Regular Vacuums Instead of HEPA
If you keep using a regular vacuum on drywall dust, you’ll likely make the problem worse because most household machines lack sealed systems and HEPA filtration.
So fine particles are blown back into the air and redistributed across your floors and furniture.
Use a true HEPA vacuum or a shop vac with HEPA-rated filter, empty outdoors, and clean or replace filters frequently to prevent recontamination.
Mistake 2 Wet Mopping Too Early or Too Aggressively
Once you’ve contained airborne dust with a HEPA vacuum, don’t rush to mop — wetting drywall dust too soon or scrubbing hard will turn fine powder into a gritty paste that spreads, stains, and clogs drains.
Let remaining dust settle briefly, then tack with a damp microfiber mop or use controlled misting. Work outward, rinse mop often, and empty dirty water immediately.
Mistake 3 Skipping Containment When Moving Between Rooms
While moving tools, debris, or a shop vacuum from room to room, you’ll track fine drywall dust everywhere unless you seal off work areas first.
Use plastic sheeting and zippered doorways to create contained zones, and remove shoes or use disposable booties.
Carry a covered bin for scrap and empty vacuum canisters in the containment area to prevent cross-contamination.
Mistake 4 Reusing Dirty Rags and Tools
Containment helps stop drywall dust from spreading, but your cleaning habits can undo that work fast.
Reusing dirty rags, mops, or vacuum attachments just redistributes fine dust back onto floors and into the air. Change or wash cloths frequently, swap mop heads, and empty vacuums outside.
Keep dedicated, clean tools for final pickup so you’re removing dust instead of moving it around.
Prevention and Best Practices to Minimize Future Dust Spread
To keep drywall dust from taking over, adopt smart worksite habits like cutting and sanding with the right tools and techniques.
Use dust-control tools and add-ons—vacuum attachments, dust bags, and HEPA filters—to capture particles at the source.
Stick to a tight schedule and routine cleanup so dust never has time to accumulate between jobs.
Worksite Habits: Cutting, Sanding, and Tool Choices
When you change how you cut and sand drywall and pick the right tools, you’ll dramatically cut down on dust spread at the jobsite; adopting simple habits like scoring before snapping, using wet-sanding or vacuum-equipped sanders, and keeping blades sharp lets you work cleaner and reduces cleanup time.
Work tidy: contain cut pieces, cut near drop cloths, sand minimally, wipe surfaces often, and remove debris promptly.
Dust-Control Tools and Add-ons for Renovation Work
If you want to keep future jobs cleaner with less effort, invest in dust-control tools and simple add-ons that stop drywall dust at the source: high-efficiency vacuums, HEPA-filtered sanders, dust shrouds for circular saws, and magnetic or adhesive mesh over vents.
Use them consistently to cut airborne dust and simplify cleanup.
- HEPA shop vac
- Sanders with dust ports
- Tool-mounted shrouds
- Vent filters and mesh
Scheduling and Cleanup Routine to Reduce Accumulation
Although dust seems inevitable during drywall work, a consistent schedule and simple cleanup routine will keep it from building up and spreading through your home.
You should set daily quick-cleans: vacuum with HEPA or use a broom with dustpan, wipe surfaces with a damp microfiber cloth, and change HVAC filters weekly.
Seal off work areas and run an air purifier during and after sanding.
When to Hire Professionals
If the dust is widespread, contains visible drywall residue in vents, or you have respiratory sensitivities, it’s a good sign to call pros.
They’ll use HEPA-filtered vacuums and negative air machines to contain and remove fine particles you can’t capture with household gear.
Ask about their equipment, containment methods, cleanup scope, and proof of insurance before hiring.
Signs You Need Professional Cleanup
When dust covers more than just the floor—settling into vents, lighting fixtures, cabinets and HVAC systems—you’ll want professionals to handle the cleanup because they’ve the tools and containment methods to prevent recontamination and protect your home.
Hire pros if dust is extensive, persistent after DIY attempts, triggers allergies or respiratory issues, or if the project involves structural work, multiroom contamination, or safety concerns you can’t manage.
What Professional Services Offer (HEPA filtration, negative air machines)
If you’ve decided professional help is needed, expect specialized equipment and methods that go beyond household vacuums and mops. You’ll get HEPA vacuums, negative air machines, containment setups, and trained technicians who control airflow and capture fine dust before it settles.
| Service | Benefit |
|---|---|
| HEPA filtration | Traps fine particles |
| Negative air | Creates controlled pressure |
Questions to Ask a Cleanup Contractor
Why bring in a pro now?
Ask about licensing, insurance, and experience with drywall dust.
Confirm they use HEPA vacuums, negative air machines, and containment methods.
Request a written scope, timeline, and cleanup verification (wipe tests or visual standards).
Get pricing breakdowns, safety protocols, and references.
Make sure they’ll protect adjacent areas and guarantee final air quality.
FAQ
You probably have a few quick questions about drywall dust—how long it stays airborne and whether it’s hazardous to you or your HVAC.
You’ll also want to know if a shop vac or regular vacuum will work, how to clean vents and HVAC after the job, and the best way to clean baseboards and trim without spreading dust.
Below are clear, practical answers to each point.
How long does drywall dust stay airborne?
Because drywall sanding creates fine particles, the dust can linger in the air from several hours up to a few days depending on ventilation, particle size, and air movement.
You’ll notice heavier dust settles within hours, while ultrafine particles stay suspended longer.
Improve clearance by increasing fresh air, using HEPA filtration, and avoiding disturbances.
Check surfaces before assuming the space is dust-free.
Can I use a shop vac or regular vacuum for drywall dust?
Wondering whether a shop vac or your regular vacuum can handle drywall dust?
Use a shop vac with a fine HEPA or dust filter and a sealed hose—it’s built for heavy dust.
Most regular household vacuums lack proper filtration and can clog or release dust back into the room.
If you must use a home vacuum, attach a HEPA-rated filter and empty it outdoors immediately.
Is drywall dust hazardous to my health or HVAC system?
If you’ve been vacuuming up drywall dust, it helps to know what that dust can do to you and your HVAC system.
Drywall dust is mostly gypsum and fine silica; brief exposure can irritate eyes, throat, and lungs, and aggravate asthma.
It can also clog filters and reduce airflow, stressing fans and lowering efficiency.
Wear PPE and limit spread.
How do I clean vents and HVAC after drywall work?
How do you make sure drywall dust hasn’t clogged your vents and HVAC after a remodel?
Check and replace filters immediately.
Vacuum supply and return grilles with a brush attachment.
Wipe accessible vent covers with a damp microfiber.
If you detect reduced airflow or dust reappearing, shut down the system and call an HVAC pro for duct cleaning and filter housing inspection.
What’s the best way to clean baseboards and trim without spreading dust?
Start by trapping dust instead of sweeping it around: put on a microfiber glove or wrap a damp microfiber cloth around your hand, then run it along the top and face of baseboards and trim to lift and hold drywall dust without kicking it into the air.
Work from one end toward an exit, rinse or change cloths frequently, and finish with a damp mop along the floor edge.