What Is Vinyl Plank Flooring? Everything You Need to Know
Vinyl plank flooring is a waterproof, low‑maintenance synthetic floor that gives you realistic wood or stone looks at a fraction of the cost of hardwood. It’s made of layered vinyl with a durable wear layer, printed design, rigid or cushioned core (SPC or WPC), and backing, and comes in glue‑down, click‑lock, or loose‑lay types. It resists scratches, handles moisture, and installs quickly, though subfloor prep and acclimation matter—keep going to learn specifics and tips.
What Is Vinyl Plank Flooring? Quick Answer and Why It Matters
Vinyl plank flooring is a waterproof, layered synthetic floor that mimics wood or stone while offering a durable wear layer, a printed design film, a core, and an underlayer.
You’ll care about it if you want an affordable, low‑maintenance option for high‑traffic or moisture-prone rooms like kitchens, bathrooms, and basements.
Below we’ll also show the typical plank cross-section and how it looks installed so you can judge fit and style quickly.
Direct Answer Definition in one concise paragraph
Think of vinyl plank flooring as a durable, water-resistant synthetic floor that looks like real wood but costs less and needs less maintenance.
It’s made of layered PVC with a printed design and a protective wear layer, so you get realistic aesthetics, easy cleaning, and strong resistance to moisture and scratches—qualities that matter when you want an affordable, low-maintenance floor for busy areas like kitchens, bathrooms, or rental units.
You’ll know what’s vinyl plank flooring and why it’s practical for everyday life.
Who should care about vinyl plank flooring and common use cases
If you liked the idea of a low‑maintenance, water‑resistant floor from the previous paragraph, you’ll want to know who benefits most from vinyl plank and where it works best.
You should care if you need durable, budget‑friendly flooring for busy homes, rentals, or condos.
It’s ideal for kitchens, bathrooms, laundry rooms, entryways, and basements where moisture, traffic, and easy upkeep matter.
Visual: vinyl plank components and typical installed look
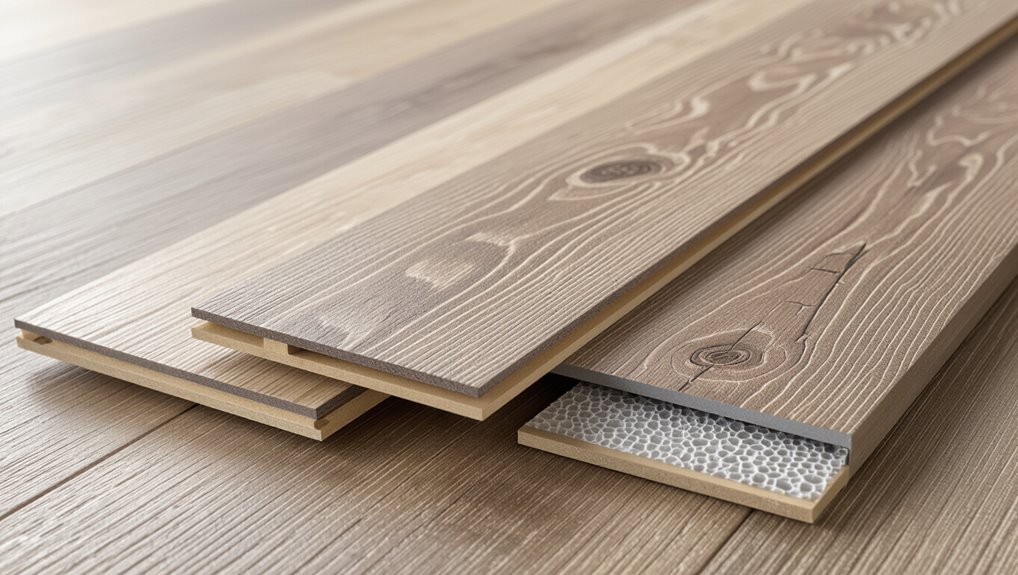
Look for four clear layers when you inspect a plank: a protective wear layer, a printed design layer that mimics wood or stone, a rigid core (or flexible backing) that gives stability and thickness, and an attached backing or underlayment for moisture and sound control.
When installed, planks create continuous grain patterns, tight seams or beveled edges, uniform color tones, and realistic texture that replicates hardwood or tile with easy maintenance.
Basic Understanding Composition and Types
You’ll want to know what vinyl plank is made of—typically a backing, rigid core, printed design layer, and a wear layer that protects the surface.
You’ll also learn how WPC and SPC cores differ, how luxury vinyl plank compares with vinyl sheet, and which surface finishes and wear-layer thicknesses affect durability.
This will help you choose the right type for your room’s traffic and moisture conditions.
What vinyl plank flooring is made of (layers explained)
Vinyl plank flooring is built like a layered sandwich, with each layer serving a clear purpose: a wear layer that resists scratches and stains, a printed vinyl layer that gives the plank its wood or stone look, a robust core that provides stability and water resistance, and an attached backing or underlayment that adds cushioning and sound control.
You’ll find variants in thickness, wear rating, embossing, and adhesive options.
Different product types: WPC, SPC, luxury vinyl plank (LVP) vs vinyl sheet
Once you understand the layers that make up a plank, it’s easier to compare the main product types: WPC, SPC, luxury vinyl plank (LVP), and vinyl sheet. You’ll pick based on rigidity, water resistance, and installation. WPC is softer, SPC is denser, LVP mimics wood closely, and vinyl sheet covers large areas seamlessly.
| Type | Key trait |
|---|---|
| WPC | Cushioned |
| SPC | Rigid |
Surface finishes and wear layers: what they mean for durability
Think of the wear layer as the plank’s armor: it’s the transparent topcoat that takes the daily scuffs, stains, and foot traffic so the printed design underneath stays intact.
You’ll choose wear-layer thickness (measured in mils) and surface finishes—matte, gloss, or textured—for protection and grip.
Thicker wear layers and protective coatings mean better durability, longer life, and less visible wear.
Benefits and Drawbacks
You’ll find vinyl plank flooring offers clear perks—durability, strong water resistance, lower cost, and lots of style options.
You should also weigh common limits like temperature sensitivity, potential VOC emissions, and some installation constraints.
Let’s compare those pros and cons side-by-side so you can decide what matters most for your space.
Key advantages (durability, water resistance, cost, style)
Although vinyl plank flooring looks simple at first glance, it packs several practical advantages that make it a smart choice for many homes and budgets.
- Durable: It stands up to daily wear, scratches, and traffic.
- Water-resistant: You can use it in kitchens and bathrooms confidently.
- Cost-effective: It gives hardwood looks without the high price.
- Stylish: Wide variety of colors, textures, and plank widths to match your decor.
Common limitations (temperature sensitivity, VOCs, installation constraints)
Those advantages make vinyl plank attractive, but it comes with limits you should weigh before choosing it.
- It can expand or warp with extreme heat or cold, so you’ll need acclimation and gaps.
- Some cheaper options emit higher VOCs; choose low-VOC certified products.
- Glued installations are permanent and messy to remove.
- Subfloor imperfections can telegraph through thin planks, requiring prep.
Comparing pros and cons side-by-side
When weighing vinyl plank, put its benefits and drawbacks side-by-side so you can see trade-offs clearly: it’s durable, water-resistant, and cost-effective, but can be temperature-sensitive, vary in VOC levels, and sometimes demands subfloor prep or permanent glue-down installation. Compare quickly:
| Pros | Cons |
|---|---|
| Durable | Temperature-sensitive |
| Water-resistant | VOC variation |
| Affordable | Installation limits |
| Low maintenance | Possible adhesive needs |
How Vinyl Plank Compares to Other Flooring Options
When you compare vinyl plank to hardwood, you’ll see it’s more water-resistant and often less expensive while still mimicking wood grain.
Against laminate, vinyl handles moisture and traffic better, and versus tile or vinyl sheet it can be warmer underfoot and easier to install.
Consider vinyl plank when you need durability, moisture resistance, and budget-friendly realism for high-traffic or wet areas.
Vinyl plank vs hardwood
Curious how vinyl plank stacks up against hardwood? You’ll find vinyl is more water-resistant, budget-friendly, and low-maintenance, while hardwood offers authentic beauty and higher resale value. Choose vinyl for active households and moisture-prone spaces; pick hardwood for warmth and longevity when moisture isn’t a concern.
| Feature | Comparison |
|---|---|
| Water resistance | Vinyl wins |
| Cost | Vinyl cheaper |
| Maintenance | Vinyl easier |
| Appearance | Hardwood richer |
| Resale value | Hardwood higher |
Vinyl plank vs laminate
After comparing vinyl plank to hardwood, it’s helpful to look at how vinyl stacks up against laminate, since both mimic wood and appeal to budget-conscious buyers. You’ll find vinyl resists moisture, feels softer, and often lasts longer. Consider cost, installation, and maintenance when choosing.
| Feature | Vinyl Plank | Laminate |
|---|---|---|
| Water resistance | High | Low |
| Comfort | Softer | Firmer |
| Durability | Long | Moderate |
Vinyl plank vs tile and vinyl sheet
How does vinyl plank stack up against tile and vinyl sheet? You’ll find vinyl plank mimics wood warmth, stays softer and warmer than tile, and looks more natural than sheet vinyl. It’s easier to repair than sheet and faster to install than tile.
| Feature | Tile | Vinyl Sheet |
|---|---|---|
| Feel | Cool | Soft |
| Install | Slow | Fast |
Best scenarios for choosing vinyl plank over alternatives
When you want the look of real wood without the upkeep or the cold feel of tile, vinyl plank is often the smarter choice; it’s especially strong in busy homes, moisture-prone areas, and rooms where quick, budget-friendly installation matters.
Choose vinyl plank when you need durability against scratches, easy cleaning, water resistance, softer underfoot comfort, and realistic visuals without high cost or lengthy installation compared with hardwood or tile.
Buying Guide How to Choose the Right Vinyl Plank
Before you buy, measure the room and consider traffic, subfloor condition, and whether the space needs extra water resistance.
Check key specs like wear layer, overall thickness, locking system, and compare price tiers from budget to premium for long-term value.
Also look for trusted certifications and eco/health labels to guarantee quality and indoor-air safety.
Measuring needs: room type, traffic, subfloor condition
Although it might seem simple, measuring your space accurately and evaluating room type, expected traffic, and subfloor condition will determine which vinyl plank performs best and how much you’ll need.
Measure length and width, add 10% for waste, and note irregular areas.
Assess traffic (family, pets, commercial) and inspect subfloor for flatness, moisture, and damage—repair or level before installation.
What to look for: wear layer, thickness, locking system, water resistance
Think of the wear layer, core thickness, locking system, and water resistance as the four performance pillars that decide how well a vinyl plank will hold up in your space.
Choose a thicker core for stability, a higher mil wear layer for traffic, a robust locking system for easy installation, and full waterproofing for wet areas.
- Wear layer
- Core thickness
- Locking system
- Water resistance
Price ranges and value tiers (budget, mid-range, premium)
When shopping for vinyl plank flooring, you’ll find three clear value tiers—budget, mid-range, and premium—each balancing upfront cost against durability, appearance, and warranty.
Budget options are affordable but thinner with limited wear layers.
Mid-range gives better visuals, thicker cores, and decent warranties.
Premium delivers top realism, robust wear layers, superior stability, and extended warranties—worth it if you want longevity and style.
Trusted certifications and eco/health labels to check
Because indoor air quality and material safety matter as much as looks, you should check for trusted certifications and eco/health labels before buying vinyl plank flooring.
Look for FloorScore or GREENGUARD for low VOCs, Phthalate-free or CPSC compliance for plasticizers, and Declare or EPDs for ingredient transparency and lifecycle impact.
These labels help you choose safer, more sustainable products confidently.
Installation Overview Methods and Steps
You’ll choose among glue-down, click-lock (floating), or loose-lay installations based on your subfloor, traffic, and skill level.
First you’ll inspect and level the subfloor, test for moisture, then plan the layout and acclimate, cut, and fit the planks.
Finish with trims and connections, a thorough cleanup, and decide whether the job matches your DIY comfort or needs a pro.
Main installation methods: glue-down, click-lock (floating), loose lay
Before you pick a method, understand the three common ways vinyl plank gets installed—glue-down, click-lock (floating), and loose lay—since each affects prep, tools, and performance differently.
Glue-down bonds planks permanently for stability in high-traffic areas.
Click-lock snaps together for a floating floor you can remove.
Loose lay relies on weight and friction for quick, adhesive-free installs ideal for rentals or temporary spaces.
Step 1 Preparing the subfloor: inspection, leveling, moisture testing
Start by inspecting and preparing the subfloor thoroughly, since a solid, level, and dry base is essential for any vinyl plank installation.
Remove debris, old adhesives, and loose boards.
Check for level using a straightedge; fill low spots and sand high areas.
Test moisture with a meter or tape method; remediate excess moisture before proceeding to avoid future failure.
Step 2 Installing: layout planning, acclimation, cutting and fitting
Now that the subfloor’s ready, plan your layout and acclimate the planks so installation goes smoothly: measure the room, decide the starting wall and plank direction to minimize waste and highlight the space, and leave the boards in the room for 48–72 hours to equalize to room temperature and humidity.
Next, dry-fit rows, stagger end joints at least 6–8 inches, and cut planks precisely for doorways and edges before locking or gluing them in place.
Step 3 Finishing touches: trim, transitions, cleanup
1 final step ties the installation together: install trims and connections, then clean and inspect the floor.
You’ll fit baseboards, quarter-rounds, and thresholds, secure junctions, caulk gaps where needed, and remove debris.
Finish by wiping the surface and checking seams and alignment.
- Install trim and baseboards
- Fit junction strips
- Caulk and seal gaps
- Clean and inspect thoroughly
When to hire a professional vs DIY decision factors
Although a confident DIYer can save money installing vinyl plank flooring, you should weigh skills, tools, time, and room complexity before committing.
If rooms are large, irregular, or require plumbing/electrical moves, hire a pro.
Choose DIY for simple, square rooms, basic cutting, and if you have proper tools and patience.
Get quotes to compare cost, timeline, and warranty.
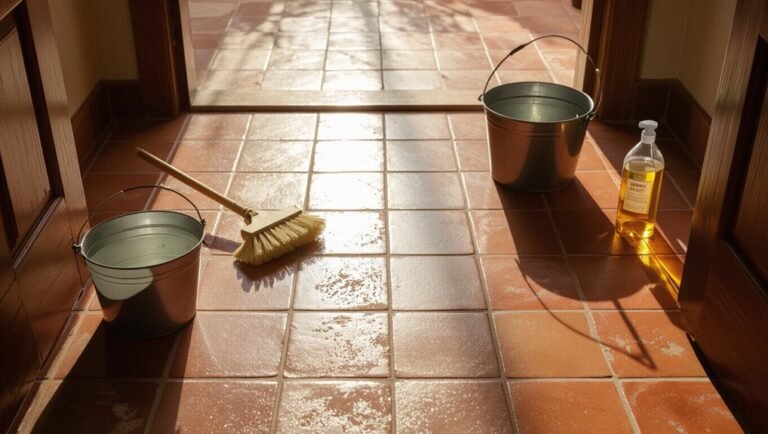
Maintenance, Cleaning, and Longevity
To keep your vinyl plank floor looking great, you’ll want simple daily cleaning routines and prompt spill management to prevent stains.
If a plank gets damaged, you can often patch small spots or swap out a board entirely—I’ll explain when each option makes sense.
Finally, follow a few care habits to maximize the expected lifespan and avoid premature replacement.
Daily and routine cleaning best practices
A simple, consistent routine keeps vinyl plank floors looking their best and prevents dirt and grit from causing scratches.
You’ll sweep or vacuum daily with a soft-brush head, damp-mop weekly with a pH-neutral cleaner, and avoid excess water.
Use protective pads and mats to reduce wear.
- Sweep/vacuum daily
- Damp-mop weekly
- Use pH-neutral cleaner
- Add mats and furniture pads
Stain removal and handling spills
When spills happen, act quickly to blot up liquids and scrape away solids so stains don’t set into the plank seams or finish.
Use a soft cloth, mild detergent, and warm water for most spots. For tougher stains, try a vinyl-safe cleaner or diluted white vinegar.
Rinse, dry thoroughly, and avoid abrasive tools or harsh chemicals that can dull or damage the wear layer.
Repair options for damaged planks: patching vs replacement
If a plank gets gouged or warped, you’ll need to decide whether patching will restore appearance and function or if replacement is the smarter long-term fix.
Small surface scratches, chips, or localized stains you can fill or glue; matching color and texture matters.
For deep damage, water infiltration, or structural issues, replace the plank to prevent recurring problems and maintain floor integrity.
Expected lifespan and how to extend it
Most vinyl plank floors last 10–25 years depending on quality and care, and you can extend that by following a few simple maintenance habits.
Clean regularly with a damp mop and manufacturer-approved cleaner, avoid abrasive tools, and use felt pads on furniture.
Control sun exposure with shades, fix spills quickly, and replace worn mats.
Routine care preserves appearance and performance.
Common Problems and Mistakes to Avoid
When you install vinyl plank flooring, watch for common mistakes like improper seam spacing, poor acclimation, and uneven subfloors since they can cause gaps, buckling, or failure.
Ignoring moisture control or a damaged subfloor will lead to long-term issues such as warping and mold.
To prevent scratches, gaps, and warping, use the right underlayment, control humidity, and follow manufacturer installation guidelines.
Most frequent installation mistakes and consequences
Many installers make a handful of predictable mistakes that can shorten your vinyl plank floor’s life or ruin its appearance; understanding these common errors helps you avoid costly fixes.
- Skipping acclimation — planks warp or gap.
- Uneven subfloor — telegraphing and cracked seams.
- Poor adhesive or lining up — lifting or visible seams.
- Incorrect expansion gaps — buckling when temperature changes.
Long-term issues from improper subfloor or moisture control
If you don’t control moisture or prep the subfloor properly, small problems will grow into major failures over time.
You’ll see cupping, buckling, adhesive failure, mold growth, and persistent odors.
Moisture can delaminate planks and ruin underlayment, while uneven substrates cause gaps and premature wear.
These issues force costly repairs or full replacement if not addressed early and correctly.
How to prevent scratches, gaps, and warping
1 simple routine can cut scratches, gaps, and warping on vinyl plank floors: keep traffic areas clean, control indoor humidity, and use proper underlayment and installation techniques.
Wipe spills quickly, use felt pads under furniture, and avoid dragging heavy items.
Maintain 30–50% humidity, acclimate planks before installation, follow manufacturer spacing for expansion gaps, and inspect seams periodically for movement.
Best Practices and Professional Tips
When choosing vinyl planks, you’ll want to match the color, texture, and plank width to your room’s style and lighting so the floor enhances the space.
Consider seasonal and climate factors like humidity and temperature changes to prevent warping and gaps.
Also, you can save money by comparing warranties, shopping sales, and prioritizing core quality features rather than the fanciest finishes.
Tips for matching plank style to room design and lighting
How do you pick a vinyl plank that truly complements your room’s design and lighting?
Consider plank width and grain: narrow planks suit traditional, wide planks feel modern.
Match undertones to existing finishes and test samples under real light at different times.
Choose matte finishes to hide glare, higher gloss for bright, airy spaces, and contrast planks to anchor focal areas.
Seasonal and climate considerations
Because temperature and humidity swing with the seasons, you’ll want vinyl plank that can handle expansion, contraction, and moisture without warping or gaps.
Choose products with proven dimensional stability and enhanced moisture barriers. Acclimate cartons before installation, leave proper expansion gaps, and use recommended adhesives or click systems.
In damp climates, prioritize waterproof cores and tight seam welding for long-term performance.
Budget-saving strategies without sacrificing quality
If you shop smart and plan your project, you can cut costs without compromising durability or appearance.
Compare brands for wear layer and warranty, buy slightly more than needed to avoid seams, choose realistic wood visuals, salvage quality underlayment, and install yourself if confident.
Schedule purchases during sales, get multiple quotes for professional install, and prioritize high-traffic areas for premium planks.
Cost Breakdown and ROI
You’ll want to break costs into clear components—materials, underlayment, labor, and accessories—so you can spot where to save.
I’ll show example price ranges for small, medium, and large rooms to help you budget.
Then we’ll cover how vinyl plank affects resale value and long-term ROI so you can compare upfront cost to future gains.
Typical cost components: materials, underlayment, labor, accessories
Cost is the biggest question for most people considering vinyl plank flooring, and it breaks down into a few clear components you’ll want to track: the planks themselves, underlayment, installation labor, and finishing accessories like trim and connector strips.
Expect plank quality to dominate cost, underlayment for comfort and moisture protection, labor for prep and fitting, and accessories for clean changes and trims.
Example cost scenarios by room size
Start by sizing your project: a small bathroom, a medium bedroom, and a large open-plan living area will each produce very different bills and returns. Estimate material, labor, and extras per room, then compare totals. Use scenarios to set realistic budgets and prioritize upgrades.
| Room | Size (sq ft) | Estimated Cost |
|---|---|---|
| Bathroom | 40 | $500–$1,200 |
| Bedroom | 150 | $1,200–$3,000 |
| Living area | 400 | $3,200–$8,000 |
| Contingency | — | 10–15% |
Resale value impact and long-term return on investment
After mapping out room-specific costs and contingencies, it’s time to look at how those investments affect resale value and long-term ROI.
You’ll typically recoup a good portion of quality vinyl plank costs because buyers value durability, low maintenance, and modern looks.
Choose neutral styles and professional installation to maximize appeal; track costs and longevity to measure true return over years.
FAQ Frequently Asked Questions
You probably have practical questions like whether vinyl plank is waterproof, if it can go over your existing floors, and how long it’ll last.
You’ll also want to know if it’s safe for pets and kids and whether it can be refinished.
I’ll answer each of these clearly so you can make a confident choice.
Is vinyl plank waterproof?
Wondering whether vinyl plank is truly waterproof? You’ll find most luxury vinyl plank (LVP) is water-resistant and many are fully waterproof thanks to a rigid core and sealed layers.
That makes them great for kitchens, bathrooms, and basements.
Still, you should follow manufacturer guidelines, seal edges where recommended, and clean spills promptly to protect seams and adhesive over time.
Can vinyl plank flooring be installed over existing floors?
Can vinyl plank go right over your old floor? Yes, you often can install vinyl planks over existing floors like tile, hardwood, or vinyl if the subfloor is stable, level, and dry.
Remove loose trim, repair imperfections, and clean thoroughly. Use appropriate underlayment if recommended.
Avoid layering over cushioned vinyl or warped surfaces—these can cause problems with locking or adhesion.
How long does vinyl plank flooring last?
How long your vinyl plank flooring lasts depends mainly on the quality of the product, how well it’s installed, and how you maintain it.
Expect 10–20 years for residential commercial-grade planks, and up to 25 years for high-end products with good care.
Regular cleaning, avoiding sharp objects, using furniture pads, and controlling sunlight and moisture will maximize lifespan and appearance.
Is vinyl plank flooring safe for pets and kids?
Is vinyl plank flooring a good choice for homes with kids and pets? Yes—it’s durable, scratch- and water-resistant, and easy to clean, so spills and accidents are manageable.
Soft underfoot options reduce slips and noise. Choose low-VOC, phthalate-free products and proper installation to avoid seams where dirt hides.
Regular cleaning keeps it hygienic and safe for your family.
Can vinyl plank flooring be refinished?
Want to restore worn vinyl plank flooring? You generally can’t sand and refinish vinyl like hardwood.
Instead, you repair or replace damaged planks or use a topical refinishing product designed for vinyl to refresh the wear layer.
Light scratches can be buffed and sealed; extensive damage requires plank replacement.
Check manufacturer guidelines and warranty before using any refinishing product or method.
Resources and Next Steps
Use the checklist to compare styles, measurements, and installation methods so you can pick the right vinyl plank for your space.
If your subfloor, room layout, or warranty questions feel complex, consult a flooring professional before you buy.
For more detail, follow the suggested reading list and manufacturer guides to confirm specs and care instructions.
Checklist for selecting and installing vinyl plank flooring
Before you buy or install anything, gather the right resources and outline clear next steps so the project stays on schedule and within budget.
You’ll want a concise checklist to choose materials, measure accurately, prep subfloors, and plan installation timing.
- Measure rooms and order 10% extra
- Pick wear layer, thickness, style
- Prepare and level subfloor
- Schedule acclimation and install dates
When to consult a flooring professional
When should you call a flooring professional? You should consult one when a project exceeds your skills, requires moisture mitigation, needs subfloor repair, or involves complex patterns.
A pro saves time, guarantees warranty compliance, and prevents costly mistakes.
- Large rooms or multi-room shifts
- Active moisture or past water damage
- Uneven or damaged subfloor
- Intricate layouts or glued installations
Suggested further reading and manufacturer guides
If you want to dive deeper or verify specs for your specific product, check manufacturer installation guides, warranty documents, and industry standards first. They’ll clarify care, limits, and compatible adhesives.
- Manufacturer installation guide — follow step-by-step.
- Warranty terms — note exclusions and claim steps.
- Industry standards (e.g., ASTM) — confirm performance ratings.
- Reliable how-to articles and videos — for prep and maintenance.