How to Replace Bathroom Floor Tile Without Removing the Toilet
You can replace bathroom floor tile without removing the toilet by cutting tiles to fit snugly around the base, protecting the flange, and sealing the joint with silicone. Shut off water, drain the tank, and cover the toilet. Remove grout, lift tiles up to the flange, prep and level the substrate, then dry-fit, thinset, and grout tiles with spacers. Finish with a watertight caulk bead around the bowl — keep going to learn detailed steps, tools, and troubleshooting.
Can You Replace Bathroom Floor Tile Without Removing the Toilet?
You can sometimes replace bathroom floor tile without removing the toilet, which can save time and cut costs—expect a DIY job to take a few hours to a day and a pro to charge less than a full tear-out.
It’s appropriate when you’re just retiling a small area around the flange or the existing tile is in good shape; it’s not a good idea if the flange, subfloor, or waterproofing needs repair.
Before you start, assess access, the toilet’s seal, and whether working around the bowl will compromise a quality installation.
Short summary of feasibility and typical time/cost
Although it’s possible to replace bathroom floor tile without removing the toilet in many cases, doing so adds complexity and usually raises labor time and cost; expect the job to take a skilled DIYer or pro 4–8 hours for a small bathroom and cost more per hour if plumbers’ help or extra materials are needed.
You’ll need careful planning, specialty tools, and steady hands to learn how to replace bathroom floor tile safely.
When it’s appropriate and when it’s not
If the toilet sits solidly and the flange lines up with the replacement tile, you can often swap flooring without pulling the fixture—but only when tile edges, subfloor access, and waterproofing needs allow it.
You should avoid saving the toilet if leaks, uneven subfloor, damaged flange, or full waterproofing replacement are required.
Remove the toilet when you need full access, proper sealing, or a secure flange replacement.
Basic Understanding What’s Involved and Why People Keep the Toilet Installed
Before you start, you should know how toilets attach to the floor — flange, wax ring, and bolts — because that hardware affects how tiles fit around the base.
Leaving the toilet in place can save time and avoid re-seating the flange, but it can also limit tile access, make a neat grout line harder, and risk wax-ring damage.
I’ll cover the practical pros and cons and the main risks of tiling around an installed toilet so you can decide which approach suits your job.
How toilets are installed (flange, wax ring, bolts)
When you remove or replace bathroom tile, you don’t always have to pull the toilet—because understanding how a toilet is installed (flange, wax ring, and bolts) helps you decide whether you can work around it or need to take it off.
The toilet sits on a flange bolted to the drain; a compressed wax ring seals the joint.
Bolts anchor the bowl, so loosen or unbolt if removal’s required.
Pros and cons of leaving the toilet in place
Although leaving the toilet in place can save time and effort, you’ll want to weigh the trade-offs: it preserves the seal and avoids unbolting and resetting the fixture, but it can limit access for full tile removal, risk damaging the flange or wax ring, and complicate precise tile cuts around the base.
- Saves time and preserves seals
- Restricts access for thorough demo
- Requires careful cuts and protection
Risks and limitations of tiling around an installed toilet
If you keep the toilet in place while tiling, you’ll save time but face several practical risks and limitations: you’ll struggle to cut tiles precisely around the flange, increasing gaps and uneven grout lines.
Water exposure and poor seals raise leak and mold risks.
Accessibility for proper waterproofing and future repairs is limited, and replacing the toilet later becomes messier and more costly.
Overview of Methods Approaches to Replace Tile Without Removing the Toilet
You can tackle the job several ways depending on your skill, budget, and how permanent you want the fix to be.
You might tile up to the toilet base and finish with trim and caulk, partially lift tiles around the flange while preserving the seal, or build a raised platform or niche to sit the toilet on.
Each method differs in cost, complexity, and long-term durability, so weigh those factors before you start.
Method A Tile up to the toilet base (trim and caulk)
Work up to the toilet base and stop the new tile a few inches short of the flange; then finish the gap with trim and a bead of silicone so you don’t have to remove the toilet.
Cut tiles cleanly to fit, set them with thinset, and grout to match.
Install a vinyl or quarter-round trim, secure it, then apply a continuous silicone bead to seal and tidy the edge.
Method B Partial lift around flange with seal maintenance
While you won’t be removing the toilet, this method has you lift just enough tile and underlayment around the flange to replace or refresh the wax ring and preserve the toilet’s seal.
You cut a neat access patch, remove and inspect the flange, replace the wax ring or use a modern gasket, reseat and torque the bolts, then reinstall patch and tile for a watertight finish.
Method C Using a raised tile or niche around toilet (platform solutions)
If you prefer not to disturb the toilet or cut into the flange area, consider building a raised tile platform or recessed niche around the base to conceal a height change and create a clean, watertight edge.
You’ll build a thin plywood or cement board ring, level it to surrounding tile, waterproof seams, then tile the ring. This hides gaps and preserves the existing flange.
Comparison of methods (cost, complexity, durability)
That raised platform is a practical way to avoid touching the flange, but you’ll want to weigh it against other options before deciding. Consider cost, skill, and longevity: platforms are cheap and simple but less seamless; cut-and-seal is moderate cost and technical; full re-set is costly, complex, and durable.
| Method | Notes |
|---|---|
| Platform | Low cost, easy |
| Cut-and-seal | Moderate, technical |
| Full re-set | High cost, durable |
| Niche | Moderate, aesthetic |
Tools, Materials, and Safety Preparations
Before you start, gather an essentials checklist—tile cutter, pry bar, thinset, grout, backer board and replacement tiles—so you won’t stop mid-job.
Wear gloves, knee pads, eye protection and a dust mask, and clear or cover nearby fixtures to keep the workspace safe.
Shut off the water, drain the tank, and disconnect or secure the toilet as needed before removing any flooring.
Essential tools and materials checklist
You’ll need a compact set of reliable tools, quality materials, and basic safety gear to remove old tile and lay new flooring correctly; gather a hammer, chisel or rotary hammer with a masonry bit, tile cutter or wet saw, notched trowel, grout float, level, tape measure, spacers, backer board (if needed), thinset mortar, grout, waterproofing membrane, replacement tiles, and personal protective equipment like safety glasses, knee pads, gloves, and a dust mask.
- Tools: cutter, hammer, trowel
- Materials: thinset, grout, membrane
- Accessories: spacers, backer board, level
Recommended protective gear and workspace setup
1 clear rule: protect yourself and prep the workspace before removing or installing tile.
Wear safety glasses, knee pads, gloves, and a dust mask.
Clear and tape off the area, lay down drop cloths, and set up bright task lighting.
Keep a trash bin and broom nearby, and ventilate the room.
- PPE
- Containment
- Cleanup tools
How to shut off water and prepare the toilet for work
With the work area secured and dust containment in place, turn your attention to the toilet so you don’t risk water damage while removing or replacing tile.
Shut off the supply valve, flush to drain the tank, and sponge remaining water.
Protect the bowl and base, unplug or cap any electrical bidet connections, and keep towels ready for spills.
- Turn supply off
- Drain and dry
- Protect and isolate
Step-by-Step Guide Replace Bathroom Floor Tile Without Removing Toilet
Start by inspecting and photographing the current installation so you know how the tile meets the toilet flange and where repairs are needed.
Carefully remove old grout and any loose tiles around the toilet, then clean and level the substrate near the flange to guarantee a solid base.
Use templates to cut tiles to fit snugly against the toilet base, apply thinset, and set the tiles with proper spacing.
Step 1 Inspect and document current installation
Before you lift a single tile, walk the room and inspect every element that can affect the job: the toilet base and flange, floor changes, baseboards, vent and drain locations, existing grout and adhesive, and any signs of water damage or uneven subfloor.
Note measurements, take photos, and mark problem areas.
- Measure clearances
- Photograph condition
- Flag soft spots
Step 2 Remove old grout and loose tiles around toilet with care
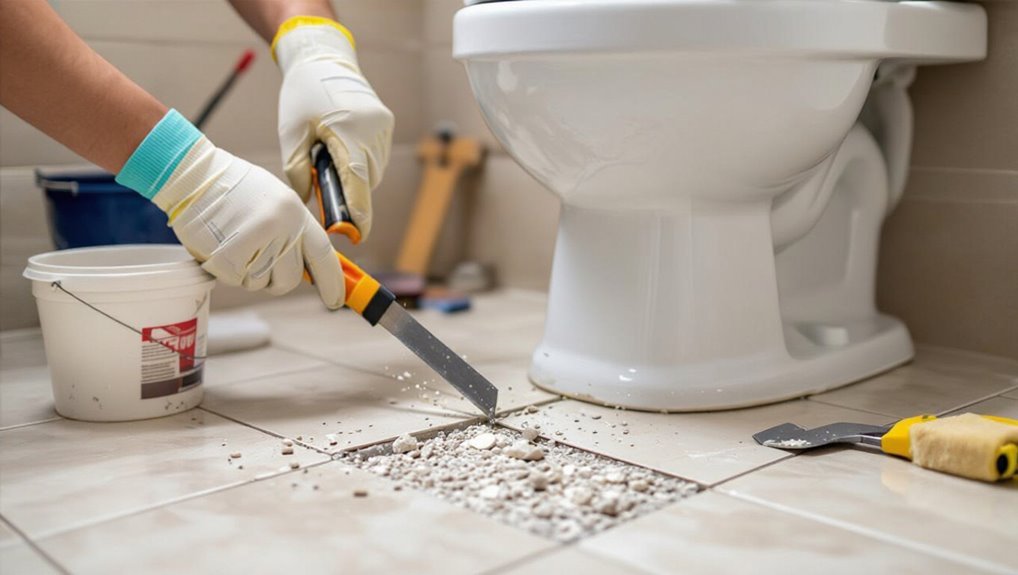
Now that you’ve documented clearances, soft spots, and problem areas, it’s time to remove the grout and any loose tiles around the toilet carefully so you can work without removing the fixture.
Use a grout saw or oscillating tool with a narrow blade, wear eye and dust protection, and pry loose tiles gently.
Clear debris, avoid striking the flange, and check for hidden damage.
Step 3 Clean and level substrate near toilet flange
Clear away all dust and loose mortar around the toilet flange, then inspect the subfloor for gaps, soft spots, or high edges that could keep new tile from sitting flat.
Remove debris, scrape uneven mortar, and sand down high spots. Fill low areas with a fast-setting patch or floor leveling compound, feathering edges smooth.
Let it cure fully before proceeding.
Step 4 Cut new tiles to fit tight against toilet base (templates and tips)
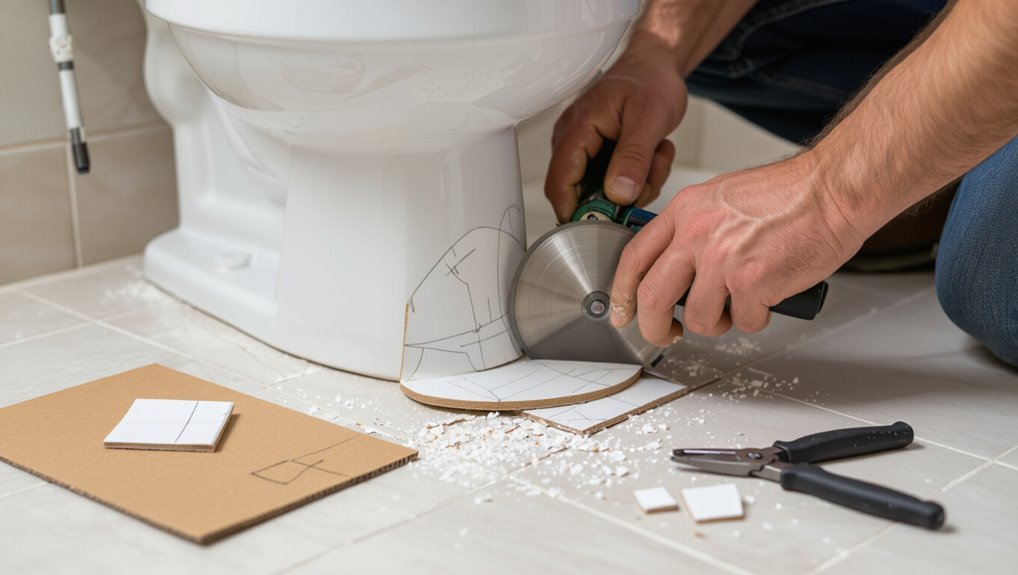
With the substrate smooth and cured, you can move on to shaping tiles so they sit snug around the toilet base.
Trace a paper or cardboard template against the flange and bolts, transfer it to the tile, and cut using a wet saw or nipper.
File edges for a clean fit.
Dry-fit pieces, adjust as needed, and label each for placement.
Step 5 Apply thinset and set tiles around toilet; maintain proper spacing
Spread a thin, even layer of thinset where each cut tile will sit, then press the tiles into place so they bond firmly to the substrate.
Use a notched trowel for consistent coverage, back-butter oversized cuts if needed, and seat tiles with a slight twist.
Insert spacers to maintain uniform grout joints around the toilet, checking alignment and level as you proceed.
Step 6 Grout, seal, and finish edges around toilet base
Finish the job by grouting, sealing, and trimming the edges around the toilet base to create a watertight, professional-looking result.
Mix grout to manufacturer specs, force it into joints, and wipe excess with a damp sponge.
After curing, apply a thin bead of silicone sealant where tile meets toilet, smoothing with a finger or tool.
Clean up residue for a neat finish.
Step 7 Recaulk and reseal toilet perimeter; check wax ring integrity
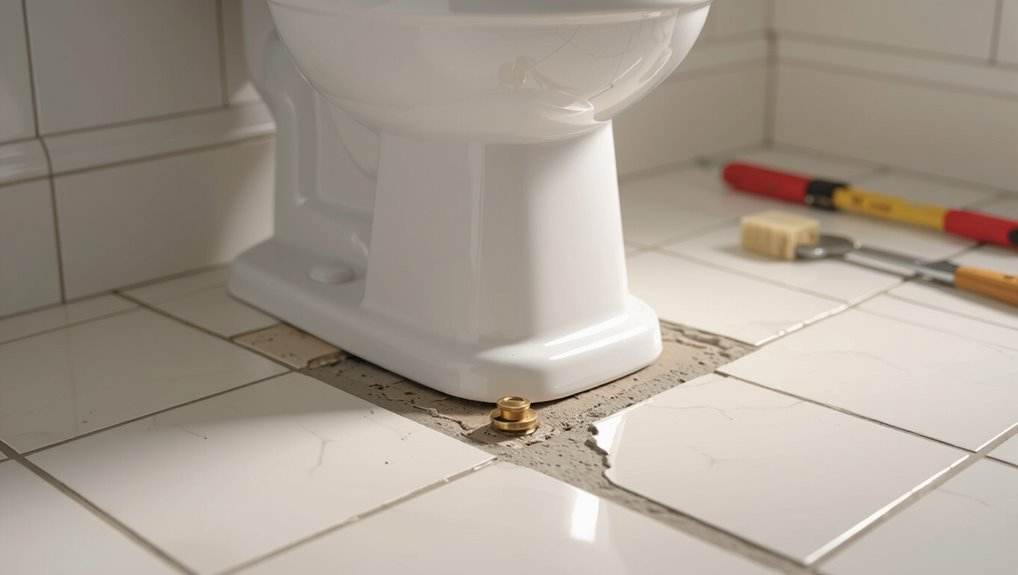
After the grout and sealant have cured, turn your attention to the toilet perimeter and wax ring—this is where you’ll prevent leaks and odors before using the toilet again.
Remove old caulk, inspect the wax ring through the base gap, and replace it if compressed or brittle.
Apply a continuous bead of silicone caulk around the base, smooth it, and let it cure per manufacturer instructions.
Step 8 Final inspection and cleanup
Give the whole floor a careful once-over to catch any missed grout lines, sealant gaps, or loose tiles, and clean up all debris so the room’s ready for use.
Inspect seams, connections, and toilet base for proper seal.
Remove haze with a damp sponge, vacuum edges, and mop.
Dispose of waste, store leftover materials, and ventilate until everything’s dry and odor-free.
Alternative Workflow If You Need to Access or Replace the Flange/Wax Ring
If your toilet rocks, leaks, or you can see water damage around the flange, you’ll need to remove it to replace the flange or wax ring.
You’ll shut off the water, drain and disconnect the toilet, unbolt and lift it off the flange, then proceed with flange repair or wax ring replacement before setting the toilet back in place.
Reinstalling means aligning the bowl, tightening bolts evenly, reconnecting the water, and testing for stable, leak-free operation.
Signs you must remove the toilet anyway
When you notice persistent leaking, wobbling, or a foul sewer smell, you’ll need to remove the toilet to inspect or replace the flange and wax ring; these issues won’t be fixed by simply tiling around the base.
Other clear signs include water stains or soft subfloor near the bowl, recurring clogs tied to seal failure, and visible flange corrosion or broken bolts that compromise stability and sealing.
Quick outline of toilet removal and reinstallation steps
Start by shutting off the water and flushing the toilet to empty the tank and bowl.
Then disconnect the supply line and remove the caps and bolts holding the base.
You’ll lift the bowl off the flange, plug the drain, replace the wax ring or flange as needed, then reset and bolt the toilet, reconnect supply, and test for leaks.
- Remove
- Repair/replace
- Reinstall
Common Problems and How to Fix Them
As you reinstall the toilet, you’ll likely run into issues like gaps at the toilet base, uneven floor height at the flange, a damaged wax ring or flange, or tiles cracking from movement.
We’ll cover practical fixes for each—from shims and trim to flange extenders, replacing the wax ring or flange, and stabilizing or replacing cracked tiles.
Follow these steps and you’ll prevent leaks and guarantee a stable, long-lasting floor.
Problem: Gaps between tile and toilet base solutions
A small gap between the new tile and your toilet base isn’t just unsightly—it can let water and grime collect and may cause wobbling over time, so you’ll want to seal and stabilize it properly.
Clean the gap, dry thoroughly, then pack thin backer rod for wide spaces.
Apply flexible silicone caulk around the base, smoothing for a watertight seal.
Check bolts; tighten if needed.
Problem: Uneven floor height at flange solutions
If your toilet flange sits too high or too low compared with the new tile, the toilet won’t seal properly and can wobble or leak—so you’ll need to correct the flange height before reinstalling the fixture.
Shim low flanges with flange extenders or a ring and thinset under the tile.
For high flanges, trim or sand the flange lip or use a compressed gasket to guarantee a flat, level seal.
Problem: Damaged wax ring or flange discovered solutions
When you remove the toilet to check flange height, you may find the wax ring crushed or the flange cracked—both will cause leaks and poor seals and must be fixed before reinstallation.
Replace the wax ring with a new one or a reinforced wax-free seal.
If the flange is cracked or too low, install a flange repair kit or use an extender, then secure and level it before setting the toilet.
Problem: Tile cracking from movement solutions
Don’t ignore small hairline cracks—movement in the subfloor or underlayment is the usual culprit and will keep cracking new tiles unless you fix the underlying instability first.
Check for loose joists, rot, or deflection. Reinforce or sister joists, replace damaged underlayment, and use an uncoupling membrane or flexible adhesive.
After stabilizing, retile and grout with a flexible, crack-isolating system to prevent recurrence.
Best Practices and Preventive Tips
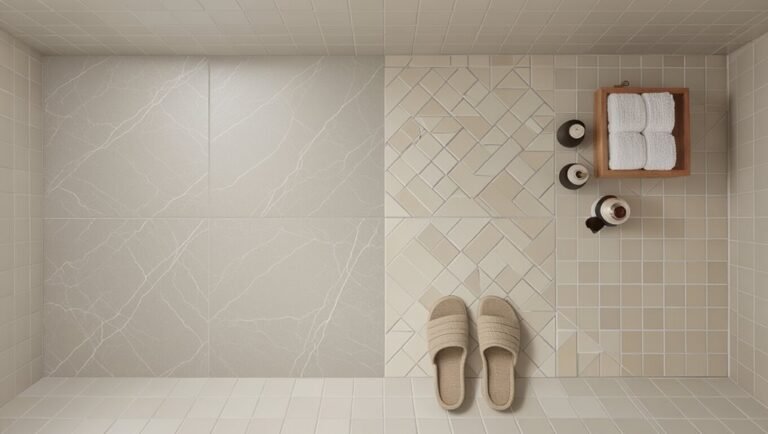
When planning your replacement, pick a tile size and layout that fits snugly around the toilet to minimize cuts and grout lines.
Use high-quality caulk and sealants rated for bathrooms to keep joints watertight and long-lasting.
Keep up with simple maintenance—regular grout cleaning, resealing when needed, and checking caulk—for preventing leaks and costly repairs.
How to choose tile size and layout for tight toilet areas
If your bathroom has a tight toilet area, pick smaller tiles or narrow planks and plan a layout that minimizes tiny cut pieces and awkward joints.
You’ll align grout lines to the room’s flow, keep junctions tidy, and allow easier fit around the toilet base.
- Use compact tiles for tighter cuts.
- Offset seams from fixture edges.
- Dry-fit patterns before setting.
Caulking and sealant recommendations for durability
Good caulking and sealant choices make the difference between a short-lived repair and a watertight floor that lasts—so pick products formulated for bathrooms and apply them correctly.
Use 100% silicone or hybrid MS polymer caulk for joints near the toilet and tub.
Prep surfaces, mask edges, and tool beads smooth.
Allow full cure per manufacturer instructions before exposing to water for lasting durability.
Maintenance tips to avoid future leaks and damage
Because small problems compound quickly in a bathroom, you’ll want a regular maintenance routine to catch leaks and wear before they cause major damage.
Check seals, grout, and toilet base monthly. Keep vents and fans clear to reduce humidity. Promptly address any discoloration or soft spots.
- Inspect seals and grout monthly
- Control humidity with ventilation
- Repair stains or soft spots immediately
Tools and Materials Cost & Time Estimates
You’ll want a clear cost breakdown for materials and tools—tile, thinset, grout, underlayment, and any rental tools—so you can compare DIY vs. pro prices.
Expect time to vary by skill and method: a novice using a full tear-out may need a weekend, while an experienced DIYer with prep and smaller repairs can finish in a day.
I’ll outline typical costs and give realistic time estimates so you can plan budget and schedule.
Typical DIY cost breakdown
A straightforward DIY bathroom floor tile job will typically cost you between $200 and $800 in materials and tool rentals, depending on tile type, subfloor repairs, and whether you already own key tools. Plan for tile, thinset, grout, and rental saws; add a small contingency for unexpected repairs.
| Item | Low | High |
|---|---|---|
| Materials | $100 | $500 |
| Tools/rental | $50 | $300 |
Time estimates by skill level and method
Expect the timeline to vary widely depending on your skill level and the method you choose: a confident DIYer using peel-and-stick or large-format tiles can finish a small bathroom in a weekend, while a beginner tackling full tile, thinset, and grout may need two to three days of focused work plus drying time.
- Quick: 1–2 days (peel-and-stick)
- Moderate: 2–3 days (thinset)
- Slow: 3–5+ days (complex patterns, repairs)
FAQ
You’ll get answers to common concerns like whether you can tile under the toilet without removing it and if leaving it in place will cause leaks or odors later.
You’ll also learn how to cut tile around a curved toilet base, how long to wait after grouting before using the toilet normally, and when it’s smarter to call a pro.
Read on for concise, practical guidance.
Can I tile under the toilet without removing it?
Wondering whether you can tile under the toilet without removing it? You can in limited cases: small perimeter cuts or under-rim tiles if the base and flange stay secure.
Work carefully around the flange, use thin-set for tight gaps, and cut tiles to fit.
Expect imperfect edges and limited access for future repairs; full removal gives a cleaner, longer-lasting result.
Will leaving the toilet on cause leaks or odor problems later?
Leaving the toilet in place can be fine short-term, but it can also raise risks you should know about.
If the flange or wax seal is disturbed during tiling, you may get slow leaks later or sewer odors.
Check the seal, tighten bolts, and test for leaks before finishing.
Plan regular inspections; catching issues early prevents water damage and persistent smells.
How do I cut tile to fit perfectly around a curved toilet base?
How do you cut tile to snugly follow a rounded toilet base without guessing?
Trace the base onto a paper template, trim to fit, then transfer the outline to the tile.
Use a wet saw for long cuts and a tile nipper or angle grinder for curves, smoothing edges with a diamond file.
Test-fit, adjust gradually, and keep consistent grout gaps around the flange.
How long after grouting can the toilet be used normally?
Once the toilet’s flange and tile cuts fit snugly, you’ll want to know when it’s safe to use the toilet after grouting.
Wait at least 24 hours for standard grout to cure enough for light use; 48–72 hours gives full strength and water resistance.
Keep traffic light, avoid heavy cleaning or showering nearby, and follow manufacturer cure times for epoxy or rapid-set grouts.
When should I call a pro instead of doing this myself?
Wondering whether this is a job you should tackle or hand off to a pro?
Call a pro if you spot hidden plumbing damage, an uneven subfloor, mold, or corroded flange; if the toilet must stay in place but sealing requires complex adjustments; or if you lack tools, experience with tile layout, or confidence removing/setting wax ring and bolts.
Pros prevent leaks and costly mistakes.