
How to Clean White Grout in Floor Tiles and Keep It Looking Bright
You can keep white grout bright by cleaning regularly and tackling stains quickly. Sweep or vacuum, mop with warm water and a mild cleaner, then spot-treat grout with a baking soda paste—let it sit 10–15 minutes, scrub with a stiff nylon brush, rinse and dry. For deep stains or mold, use a steam cleaner or a grout-specific cleaner, test first, and reseal cementitious grout every 1–3 years. Follow these steps and you’ll pick up extra tips to make upkeep easier.
How to Clean White Grout in Floor Tiles and Keep It Looking Bright
For a quick fix, you can brighten white grout fast with a baking soda paste and a stiff brush to lift surface grime.
Use a stronger cleaner or steam for deep-cleaning when stains, mold, or discoloration won’t budge with a touch-up.
You’ll know it’s time for a deep clean if the grout stays dingy after a routine spot treatment.
Quick Answer Best Fast Method to Brighten White Grout
The fastest way to brighten white grout is to make a simple paste of baking soda and water. Apply it to the grout lines, let it sit 10–15 minutes, then scrub with a stiff brush and rinse — it lifts most surface stains quickly without harsh chemicals.
You’ll find this core tip helps when learning how to clean white grout in floor tiles.
- Use a nylon grout brush
- Work in small sections
- Rinse thoroughly after scrubbing
- Repeat for stubborn spots
- Dry to prevent new staining
When to Deep-Clean vs. Quick Touch-Up
How do you know whether to do a quick touch-up or a full deep-clean?
Check the grout: light surface dirt and recent spills need a touch-up with a scrub brush and cleaner.
If grout shows staining, mold, or ingrained discoloration, schedule a deep clean with stronger cleaners, a grout brush or steam, and possibly resealing.
Test a small area first.
Understanding White Grout: What It Is and Why It Discolors
Grout is the material that fills gaps between tiles, and it’s usually either cementitious (powder mixed with water) or epoxy (durable, resin-based).
You’ll see cement grout absorb dirt, soap scum, mold, efflorescence, or darken when sealant fails, while epoxy resists many stains but isn’t immune to surface grime.
Knowing which type you have helps you choose the right cleaning and prevention steps.
What grout is made of (cementitious vs. epoxy)
Think of grout as the mortar between tiles: it comes in two main types—cementitious and epoxy—and each behaves differently. You’ll find cementitious grout is porous, easier to work with, and needs sealing; epoxy grout is nonporous, more stain-resistant, and harder to install. Choose based on durability, maintenance, and budget.
| Type | Key trait |
|---|---|
| Cementitious | Porous |
| Epoxy | Nonporous |
| Cementitious | Needs sealing |
| Epoxy | Durable |
Common causes of grout staining and discoloration (dirt, mold, soap scum, efflorescence, sealant failure)
Since cementitious grout soaks up moisture and epoxy resists it, the type you picked affects how and why white grout will stain or discolor.
You’ll notice dirt, mold, soap scum, efflorescence, and sealant failure show differently depending on porosity and use. Address source, dry thoroughly, and choose cleaners accordingly.
- Dirt and tracked grime
- Mold and mildew in damp spots
- Soap scum buildup
- Efflorescence from salts
- Failed or wearing sealant
Safety and Preparation Before You Clean
Before you start, put on gloves, eye protection, and guarantee good ventilation so fumes don’t build up.
Gather a basic kit—brushes, scrub pad, bucket, and cleaner—and consider optional tools like a steam cleaner or grout saw for tougher jobs.
Test any cleaner on a small, hidden area and tape off nearby surfaces to avoid damage.
Safety gear and ventilation recommendations
Because grout cleaners can contain strong acids, alkalis, or bleach, you should protect your skin, eyes, and lungs before you start scrubbing.
Wear proper, well-fitting gear and open windows or run fans to reduce fumes. Follow product label instructions and never mix chemicals.
- Nitrile gloves
- Splash goggles
- Respirator or mask (appropriate filter)
- Good cross-ventilation
- Closed-toe shoes
Tools and supplies checklist (basic and optional professional tools)
1 clear setup of the right tools makes grout cleaning faster and safer: you’ll need a few basics—stiff-bristled brush or grout brush, pH-appropriate cleaner (or baking soda and vinegar for mild jobs), a spray bottle, microfiber cloths, a bucket, and disposable or reusable gloves—and you can add optional professional items like an oscillating grout brush, steam cleaner, or grout sealer for tougher or large-area work.
- grout brush
- cleaner
- spray bottle
- microfiber cloths
- gloves
How to test cleaners on a small area and protect surrounding surfaces
When you’re about to try a cleaner, always test it on an inconspicuous patch of grout and tile first so you can spot any discoloration or surface damage before it hits the whole area.
Let it sit according to instructions, rinse, and inspect. Protect surrounding surfaces and finishes, and ventilate the space.
- Use a cotton swab test
- Mask nearby surfaces
- Cover fixtures
- Ventilate room
- Wear gloves
Step-by-Step Cleaning Methods
Now you’ll learn practical, step-by-step methods for cleaning white grout based on how dirty it is.
Start with routine maintenance, move to natural remedies like baking soda or vinegar alternatives for moderate stains, and use commercial cleaners or oxygen bleach for tougher spots.
Finally, treat mold and mildew safely (bleach vs. hydrogen peroxide) and consider steam cleaners or mechanical scrubbing for deep-cleaning.
Step 1 Routine maintenance cleaning for lightly soiled grout
Start by sweeping or vacuuming the area to remove loose dirt and grit that can scratch tile or settle back into grout.
Then mop with warm water and a mild pH-neutral cleaner, focusing on grout lines. Use a soft brush for stubborn spots and rinse thoroughly. Dry to prevent residue.
- Use microfiber mop
- Dilute cleaner per label
- Work small sections
- Agitate gently
- Inspect as you go
Step 2 Natural/home remedies for moderate stains (baking soda, vinegar alternatives)
Because harsh chemicals aren’t your only option, you can tackle moderate grout stains using gentle, homemade cleaners like baking soda pastes and non-acidic rinse alternatives to vinegar.
Mix, apply, scrub, rinse, and repeat as needed. Test a small area first.
- Baking soda paste for scrubbing
- Hydrogen peroxide spot brightener
- Castile soap rinse
- Lemon juice diluted (spot test)
- Steam treatment after cleaning
Step 3 Commercial grout cleaners and oxygen bleach for tough stains
Reach for commercial grout cleaners or oxygen bleach when household remedies don’t cut it—these products are formulated to break down deep-set stains and mildew without excessive scrubbing.
- Test a small area first for colorfastness.
- Follow label dilution and dwell-time instructions.
- Use a stiff brush and avoid metal tools.
- Rinse thoroughly and neutralize if required.
- Wear gloves, eye protection, and guarantee ventilation.
Step 4 Removing mold and mildew safely (bleach vs. hydrogen peroxide)
4 key differences matter when choosing between bleach and hydrogen peroxide for mold and mildew: effectiveness, surface safety, fume/toxicity, and required contact time.
You should test a small area, ventilate, and wear gloves.
Choose bleach for severe outbreaks; use peroxide for porous grout or colored tiles.
- ventilation and PPE
- test a hidden spot
- dilute per label
- keep contact time
- rinse thoroughly
Step 5 Deep-cleaning with steam cleaners and mechanical scrubbing
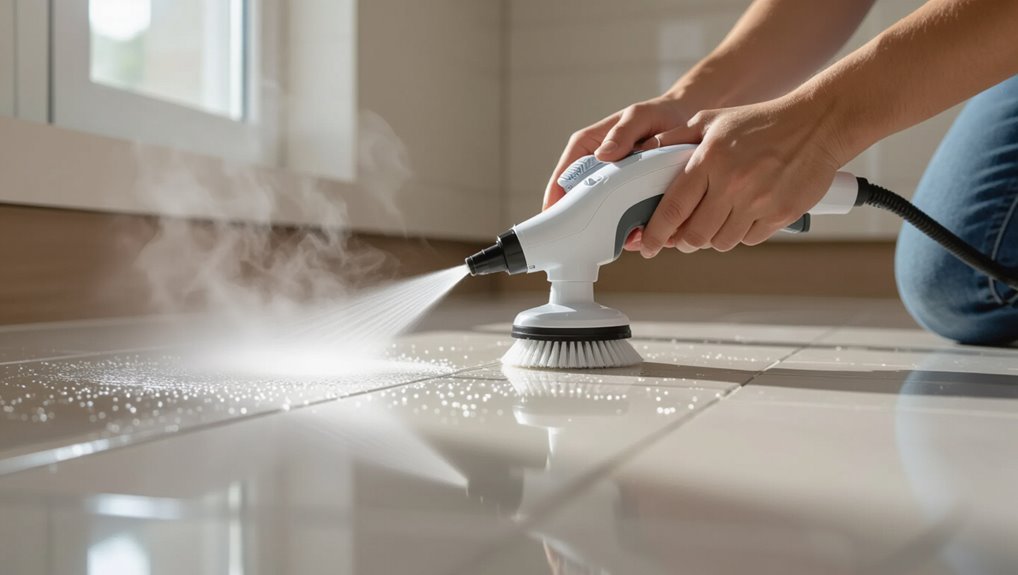
Bring out the heavy-duty tools: for deeply stained or old grout, steam cleaners and mechanical scrubbing are the fastest way to restore whiteness without harsh chemicals.
You’ll prep, test a small area, and work systematically, letting steam loosen grime before scrubbing with appropriate pads.
- Use adjustable-steam settings
- Choose grout brushes or rotary attachments
- Test tile tolerance first
- Work in small sections
- Rinse and dry thoroughly
Step 6 Repairing and regrouting badly damaged grout (when to replace vs. clean)
Once steam and scrubbing can’t fully restore the grout’s color or integrity, it’s time to assess whether repair or full regrouting will save the job.
You’ll inspect depth, crumble, mold, and gaps, then choose targeted patching or complete removal. Prioritize safety, match grout color, and use proper sealant after curing.
- Check structural damage
- Test for persistent staining
- Remove loose grout
- Regrout small areas first
- Seal thoroughly after repair
Comparison: Cleaning Methods, Effectiveness, Cost, and Tile Compatibility
When you choose a grout-cleaning method, weigh how well it removes stains, how much you’ll spend, and whether it’s safe for your tile—because a cheap product that strips sealant or a powerful cleaner that etches porcelain can leave you with bigger problems.
| Method | Best for |
|---|---|
| Baking soda paste | Light stains, sealed grout |
| Vinegar | Organic grime, unsealed grout |
| Bleach | Mold, heavy whitening |
| Commercial cleaner | Tough stains, varied tiles |
| Steam | Deep cleaning, safe tiles only |
Common Mistakes to Avoid When Cleaning White Grout
Don’t use harsh acids or abrasive tools that can eat away grout or scratch your tile.
Avoid overusing bleach or mixing cleaners improperly, since that can cause stains or toxic fumes.
Always test a small area and rinse thoroughly to prevent damage or residue buildup.
Using harsh acids or abrasive tools that damage grout or tile
Although powerful cleaners can seem like a quick fix, using harsh acids or abrasive tools will eat away at grout and scratch tile, leaving surfaces vulnerable and discolored.
You should choose gentle, pH-neutral cleaners and soft brushes, test products in a hidden spot, and rinse thoroughly to protect finishes.
- Use soft nylon brushes
- Avoid muriatic acid
- Skip steel wool
- Test first
- Rinse well
Overusing bleach and improper mixing of cleaners
If you rely on bleach as your go-to for white grout, you’ll often do more harm than good—overuse weakens grout, causes yellowing over time, and can irritate your skin and lungs.
Don’t mix cleaners; toxic gases and ruined finishes follow. Use mild, tested products and ventilate.
- Avoid combining bleach with ammonia
- Skip acid–bleach mixes
- Measure cleaners precisely
- Use protective gear
- Test on a hidden spot
Skipping testing or failing to rinse thoroughly
When you skip testing a cleaner or rush past rinsing, you risk staining, dulling, or even degrading your grout—so always try a product on a hidden spot and rinse thoroughly until the water runs clear.
You should patch-test, use gentle cleaners, rinse until suds are gone, blot excess moisture, and allow full drying to prevent residue, discoloration, or weakened grout.
- Patch-test first
- Use gentle solutions
- Rinse until clear
- Blot excess water
- Let grout dry
Prevention and Maintenance Strategies to Keep Grout Bright
To keep white grout bright, you’ll want to use the right sealer, apply it on the schedule recommended for your grout type, and follow simple application tips.
Make daily and weekly routines—wiping down tiles after use and a weekly gentle scrub—to stop stains before they set.
Use mildew-resistant products, reduce soap scum with low-residue cleansers, and adopt habits like rinsing and drying surfaces to prevent mold and dirt buildup.
Sealing grout: types, frequency, and application tips
Because grout is porous and attracts dirt, sealing it’s one of the most effective steps you can take to keep lines bright and reduce cleaning frequency.
Choose penetrating or surface sealers, reapply every 1–3 years depending on traffic, and test first. Apply with a brush or applicator, wipe excess, and allow full cure before use.
- Penetrating (silane/siloxane)
- Surface (topical)
- High-traffic = more often
- Test on inconspicuous area
- Follow manufacturer cure time
Daily and weekly maintenance routines that prevent staining
Sealing will cut down on how often you need deep cleans, but staying on top of dirt with simple daily and weekly habits will keep grout bright and stain-free.
You should wipe spills immediately, sweep or vacuum daily, mop weekly with a pH-neutral cleaner, spot-treat stains promptly, and inspect grout for wear so you can reseal when needed.
- Wipe spills immediately
- Sweep or vacuum daily
- Mop weekly (pH-neutral)
- Spot-treat stains promptly
- Inspect and reseal as needed
Products and habits that reduce mold, soap scum, and dirt buildup
When you pair the right products with simple daily habits, you’ll dramatically cut down on mold, soap scum, and dirt before they set into grout.
Use mildew-resistant cleaners, squeegees, and quick-dry mops; spot-treat stains, and reseal grout annually to protect.
- Use a daily shower spray
- Squeegee after use
- Ventilate thoroughly
- Clean weekly with enzyme cleaner
- Reseal grout yearly
Tools, Products, and DIY Recipes Recommended Options
You’ll want the right tools—stiff nylon brushes, a grout brush or small scrubber, and a handheld steamer or oscillating grout cleaner—for stubborn stains.
Choose commercial cleaners formulated for your tile type (porcelain, ceramic, or natural stone) and follow label directions to avoid damage.
For quick DIY mixes, I’ll show safe recipes like baking soda with water or diluted vinegar for non-stone tiles and exact mixing steps to prevent reactions.
Best brushes, steamers, and gadgets for grout cleaning
Pick tools that match your grout’s condition and the job’s scale—stiff nylon brushes for scrubbing small spots, adjustable steamers for deep-set grime, and narrow electric scrubbers for long runs of tile.
Choose ergonomics, bristle stiffness, and heat settings carefully to avoid damage. Carry out tests in inconspicuous areas first.
- Stiff nylon grout brush
- Steam cleaner with nozzle
- Narrow battery scrubber
- Toothbrush for detail
- Microfiber mop
Recommended commercial cleaners by grout/tile type
Any cleaner you choose should match both your tile material and grout condition to avoid damage and get the best results. Pick pH-neutral cleaners for natural stone, bleach-based for white ceramic grout stains, and oxygen cleaners for sealed grout. Test first.
| Tile Type | Cleaner | Notes |
|---|---|---|
| Natural stone | pH-neutral | Avoid acids |
| Ceramic/porcelain | Bleach-based | For tough stains |
| Sealed grout | Oxygen bleach | Gentle, effective |
Simple DIY cleaning solutions and how to mix them safely
While store-bought cleaners work well, simple DIY solutions can tackle most white grout stains using common household items you probably already have.
You’ll mix safe ratios, test a hidden spot, wear gloves, and ventilate. Use gentle tools to avoid damage.
- Baking soda + water paste for scrubbing
- Vinegar diluted for mildew (test first)
- Hydrogen peroxide spot treatment
- Mild dish soap solution
- Oxygen bleach soak (follow label)
Troubleshooting When Cleaning Doesn’t Work
If repeated cleaning doesn’t lift the discoloration, you’ll want to check whether it’s efflorescence (a powdery white residue), deeply ingrained stains, or failing sealer.
Each issue needs a different fix—efflorescence requires addressing moisture, ingrained stains may need professional cleaning or regrouting, and sealer failure calls for resealing or replacing grout.
If DIY methods fail, consider hiring a pro or replacing grout or tile to restore a clean look.
How to identify efflorescence, ingrained stains, and sealer failure
How do you tell whether white grout is simply dirty or suffering from something more serious like efflorescence, ingrained stains, or sealer failure?
Look for texture, residue, and moisture signs so you can diagnose correctly.
- Powdery white blooms that brush off easily (efflorescence)
- Deep, colored spots that persist after cleaning (ingrained stains)
- Darkened, damp grout lines (moisture intrusion)
- Flaking or peeling finish (sealer failure)
- Uneven absorption during water test
Next steps: professional cleaning, regrouting, or tile replacement
When routine scrubbing and spot treatments don’t restore your grout, it’s time to weigh professional cleaning, regrouting, or replacing tiles based on severity, cost, and long-term goals.
Decide by evaluating damage, budget, and timeline; hire pros for deep stains or structural issues.
Consider these options:
- Deep steam/chem cleaning for stubborn stains
- Targeted regrouting for cracked or crumbly joints
- Full regrout for widespread discoloration
- Tile replacement for broken or warped tiles
- Cost vs. longevity analysis before deciding
Cost and Time Estimates for Different Cleaning Approaches
Cleaning white grout can take anywhere from a quick half-hour touch-up to several hours or a full day depending on the method you pick, so you’ll want to match time and budget to the job’s severity. You can DIY cheaply but slower, rent tools for mid cost and speed, or hire pros for fastest, pricier results.
| Method | Time | Cost |
|---|---|---|
| DIY | 0.5–4 hrs | Low |
| Rental/tools | 1–6 hrs | Medium |
| Professional | 1–8 hrs | High |
Frequently Asked Questions (FAQ)
You probably have specific questions about maintenance and tricky stains, so we’ll answer common concerns like how often to deep-clean and reseal grout and whether bleach is safe for your grout and tile.
We’ll also cover steam cleaning, removing rust or oil stains, and when regrouting makes more sense than repeated cleaning.
Read on for clear, practical answers you can use right away.
How often should I deep-clean and reseal white grout?
How often you should deep-clean and reseal white grout depends on where it’s located and how much traffic and moisture it gets.
Generally, deep-clean every 6–12 months in low-traffic dry areas and every 3–6 months in high-traffic or wet zones like bathrooms and entryways.
Reseal after a deep clean or when water no longer beads on the grout surface.
Can I use bleach on all types of grout and tile?
Wondering whether bleach is safe for every grout and tile? You can use diluted bleach on unsealed, light-colored grout and some glazed ceramic or porcelain tiles, but avoid natural stone (marble, travertine, limestone) and colored grout—bleach can etch or fade them.
Always spot-test, ventilate, wear gloves, and rinse thoroughly. For sensitive surfaces, choose pH-neutral cleaners instead.
Will steam cleaning damage grout or tiles?
Although steam cleaning can be a highly effective, chemical-free way to lift dirt and sanitize grout and tile, it’s not risk-free—high heat and pressure can loosen grout, soften some adhesives, or damage porous or unsealed stone.
You should test a small area, use low-pressure settings, keep the nozzle moving, and avoid prolonged heat on older grout or fragile tile to minimize harm.
How do I remove rust or oil stains from white grout?
If steam cleaning risks loosening older grout, you’ll want gentler, targeted methods for stubborn rust or oil stains on white grout.
For rust, apply a commercial rust remover or a paste of lemon juice and baking soda, wait a few minutes, then scrub with a nylon brush.
For oil, use dish soap or a degreaser, rinse thoroughly, and repeat until the stain lifts.
Is regrouting better than trying multiple cleaning methods?
When you’ve tried stain removers and scrubbing without success, regrouting can be the smarter choice—it’s often faster and delivers a like-new look rather than chasing diminishing returns with repeated cleanings.
You should regrout when grout is stained, crumbling, or moldy. Cleaning suits surface grime; regrouting solves structural or deeply embedded damage.
Factor cost, time, and desired longevity before deciding.