How to Build a Shed With a Concrete Floor: Foundation to Finish
You can build a durable shed by pouring a reinforced concrete slab sized for your loads and climate. Start by evaluating the site, marking the footprint, excavating and compacting the subgrade, adding a gravel base, vapor barrier, and reinforcement, then form and pour concrete, finish, and cure properly before attaching the sill plate. Plan for drainage, insulation, and utilities, follow local codes and curing times, and keep a checklist—continue for step-by-step details and tips.
Can You Build a Shed with a Concrete Floor and How Long It Takes
You can pour a concrete floor by preparing the site, setting forms and reinforcement, pouring and finishing the slab, and expect the whole process to take a few days to a week plus 28 days for full curing.
Choose concrete when you need a durable, level, pest-resistant base for heavy tools or frequent vehicle use.
If you want mobility, cheaper DIY options, or faster use, a wood or gravel floor might be a better fit.
One-sentence summary of steps and time estimates
Building a shed with a concrete floor is doable for most DIYers and typically follows five main stages—site prep and footing (1–2 days), pouring and curing the slab (3–7 days including cure time), framing the floor/walls/roof (2–4 days), exterior finishes and roofing (1–3 days), and interior/trim work (1–2 days)—so plan for about one to two weeks of active work plus several days of concrete curing.
You’ll prep, form, pour, cure, then frame, finish, and trim, following how to build a shed with a concrete floor checklist and simple time estimates to keep the project on schedule.
When a concrete floor is the right choice
After outlining the basic stages and timeline, it’s worth deciding whether a concrete floor fits your shed’s purpose, budget, and site conditions.
You’ll choose concrete when you need durability, level storage, pest resistance, or a finished workspace.
Consider:
- Heavy equipment or vehicle storage
- Workshop or finished interior
- Wet or frost-prone sites
- Long-term investment and resale value
Basics What Is a Concrete Shed Foundation and Why Choose It
When you’re planning a shed, a concrete foundation gives you several options—full slab, perimeter footing, or a floating slab—each with different costs and load capacities.
You’ll want to weigh concrete’s durability and low maintenance against the lower cost or easier installation of wood, gravel, or pavers.
Also check local building codes and permit requirements and evaluate soil, drainage, and access before you start.
Types of concrete foundations for sheds (slab, perimeter footing, floating slab)
Concrete foundations come in a few common styles—full slab, perimeter footing, and floating slab—each suited to different shed sizes, soil conditions, and budget constraints.
You’ll choose based on load, frost depth, and drainage. Consider:
- Full slab — solid, easy interior finish.
- Perimeter footing — lighter, supports walls.
- Floating slab — shallow, on compacted base.
- Hybrid — combine for site-specific needs.
Advantages and disadvantages compared to wood, gravel, and pavers
Choosing among slab, perimeter footing, or floating slab sets the stage for the bigger decision: whether to use concrete at all. You get durability, low maintenance, and a level floor with concrete, but higher cost and permanence. Wood’s cheaper and flexible; gravel drains but shifts; pavers ease repairs.
| Material | Pros | Cons |
|---|---|---|
| Concrete | Durable, level | Cost, permanent |
| Wood | Cheap, light | Rot, pests |
| Gravel/Pavers | Drainage, repairable | Unstable, uneven |
Building codes, permits, and site considerations
Because your shed sits on the ground for years, you’ll need to check local building codes and permits before you pour any foundation.
Verify setbacks, height limits, and required inspections. Ask about utility locates and drainage rules.
Choose a site that’s level, well-drained, and accessible for concrete delivery.
Keep erosion control and neighbors’ sightlines in mind to avoid costly revisions.
Planning and Preparation
Before you pour concrete, you’ll check the site for soil type, drainage, and nearby utilities so the slab sits on solid ground and won’t cause surprises.
You’ll also decide shed size and expected loads to set the correct slab thickness, list materials and tools, and estimate costs.
Finally, don’t forget to review required permits and inspections so your build stays legal and on schedule.
Assessing site, soil, drainage, and utilities
When you’re planning where to place your shed, evaluate the site, soil, drainage, and nearby utilities so the foundation stays stable and you avoid costly surprises; check for level ground, compactness and type of soil, surface and subsurface drainage patterns, and the location of gas, water, electric, and sewer lines.
Mark utility locations, slope site away from the shed, remove topsoil, and test compaction.
Determining shed size, load requirements, and slab thickness
Start by sizing the shed to match how you’ll use it and what you’ll store. Then translate that use into loads the slab must support so you pick the right thickness.
Calculate dead loads (shelf, framing), live loads (people, equipment), and concentrated loads (lawnmower, vehicle).
Choose slab thickness and reinforcement based on load, soil bearing capacity, and local code or engineer recommendations.
Materials, tools, and estimated costs
1 clear materials list and the right tools make the job faster and keep costs predictable: you’ll need concrete, reinforcement (rebar or wire mesh), form boards, anchor bolts, and vapor barrier for the slab; basic framing lumber, sheathing, roofing materials, and fasteners for the shed; plus mixes, sealers, and flashing.
| Item | Typical cost |
|---|---|
| Concrete slab | $500–$1,200 |
| Framing & roof | $300–$1,000 |
Required permits and inspections checklist
Before you break ground, check local zoning and building codes so you know exactly which permits and inspections your shed needs.
You’ll avoid fines and delays by confirming requirements, timelines, and fees. Prepare documentation and notify inspectors at key stages:
- Permit application and site plan
- Footing and foundation inspection
- Pre-pour concrete inspection
- Final inspection and certificate of occupancy
Step-by-Step Build: From Excavation to Finished Concrete Floor
Now you’ll mark the shed footprint with stakes and batter boards so every corner and line is exact.
Then you’ll excavate and compact the subgrade, set formwork square and braced, and install a gravel subbase with proper drainage and slope.
Finally you’ll lay a vapor barrier and choose insulation options before pouring the concrete floor.
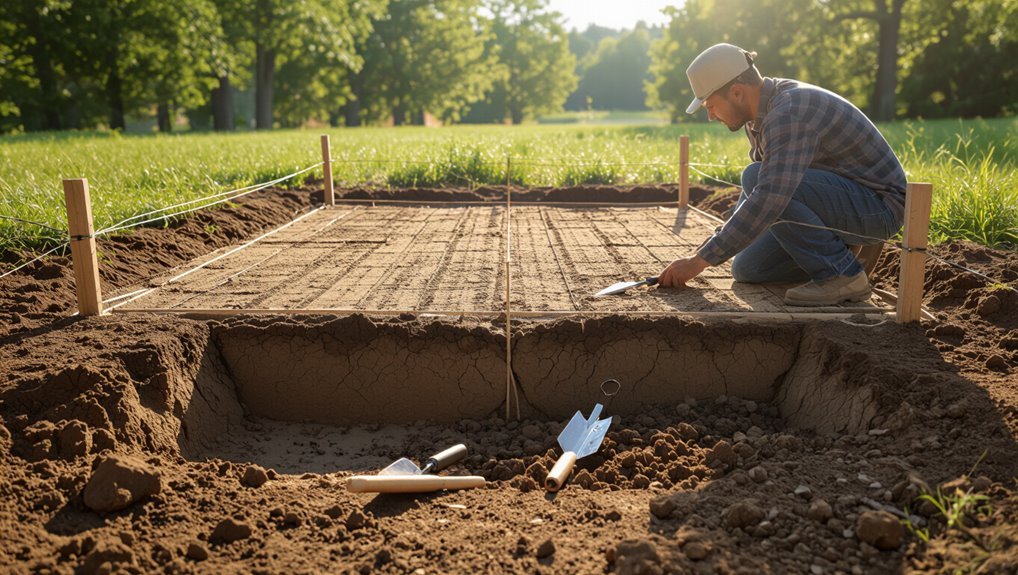
Step 1 Site layout and marking (stakes, batter boards)

Start by staking out your shed footprint so you can visualize and verify dimensions on the ground; you’ll drive corner stakes, stretch string lines, and set batter boards to hold exact positions while you dig.
Check squareness with diagonals, confirm level reference lines, and note offsets for walls and door openings.
Label stakes, record measurements, and protect layout until excavation begins.
Step 2 Excavation and subgrade preparation (depth, compaction, geotextile)
Dig out the shed footprint to the required depth, removing topsoil and organic material until you reach a firm subgrade; this makes room for granular fill, proper compaction, and any vapor barrier or geotextile.
Spread and compact crushed stone in 2–4 inch lifts to achieve uniform density, check levels, trim high spots, and roll edges.
Install geotextile where drainage separation is needed.
Step 3 Formwork construction (materials, squaring, bracing)
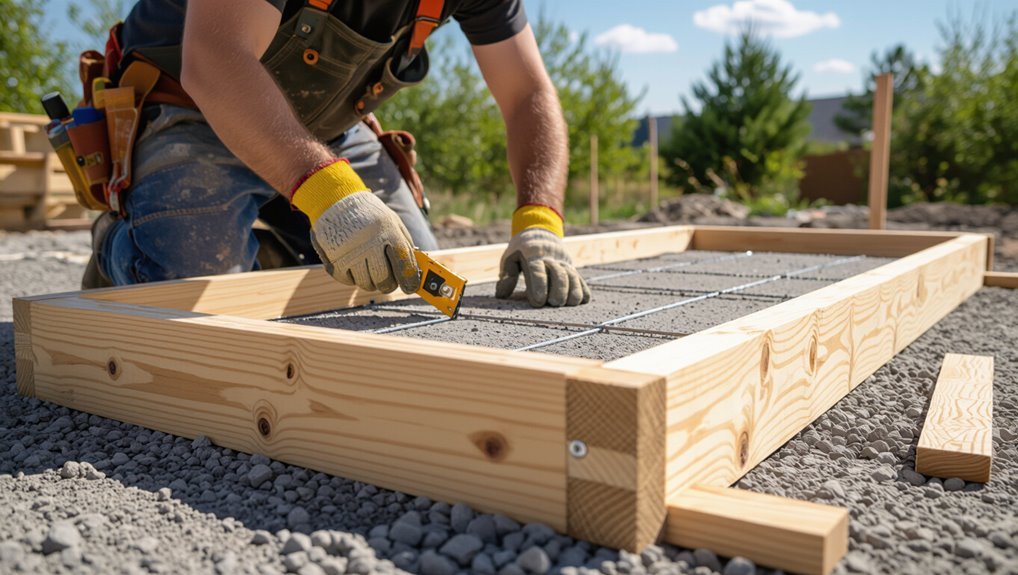
Lay out and build the formwork carefully—this temporary frame holds the concrete to shape the slab, set the finished floor elevation, and keep edges straight.
Use straight, treated 2×6 or 2×8 boards staked firmly. Square corners with diagonal measurements, brace every few feet to resist pressure, and shim to achieve level.
Confirm heights with a laser or string line before pouring.
Step 4 Subbase and drainage installation (gravel, pipe, slope)
4 key layers go into a solid subbase and drainage system: compacted fill, a graded gravel layer, a perforated drain pipe where needed, and a consistent slope to shed water away from the shed.
Compact fill in 4–6″ lifts, tamping each.
Spread 3/4″ crushed gravel, pitch the base 1/8″–1/4″ per foot toward the drain, and install pipe with geotextile wrap.
Step 5 Vapor barrier and insulation options
With the subbase shaped and drainage set to carry water away, it’s time to stop moisture at the slab with the right vapor barrier and consider insulation below or around the concrete.
Lay 6-mil or thicker polyethylene, tape seams, and run up edges.
Add rigid foam under the slab or along perimeter for thermal performance.
Maintain barrier continuity around penetrations before pouring.
Step 6 Reinforcement placement (rebar vs wire mesh, spacing)
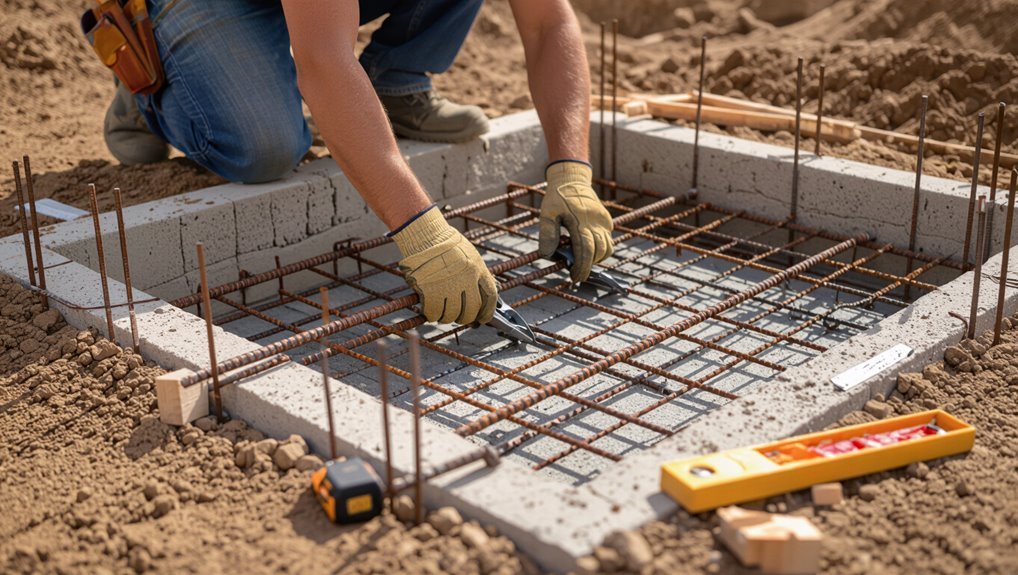
Before you pour, decide whether rebar or wire mesh best suits your shed slab and place it so it’ll sit near the slab’s mid-depth where tensile stresses occur.
Use rebar for heavier loads or wider spacing; tie chairs or use concrete bricks to hold it.
For lighter loads, wire mesh works with 6×6 W1.4/W1.4 at mid-span.
Follow local codes for spacing.
Step 7 Concrete pour and screeding techniques (mix, pumping, consolidation)
Now that reinforcement is secured at mid-depth, you’re ready to pour concrete and get the slab to final level.
Use the specified mix slump for proper flow; pump or wheelbarrow continuously to avoid cold joints.
Consolidate with a vibrating screed or hand-held vibrator to remove voids, then strike off with a straightedge guided by screed rails.
Keep pours steady and monitor thickness.
Step 8 Finishing the surface (trowel, broom finish, control joints)
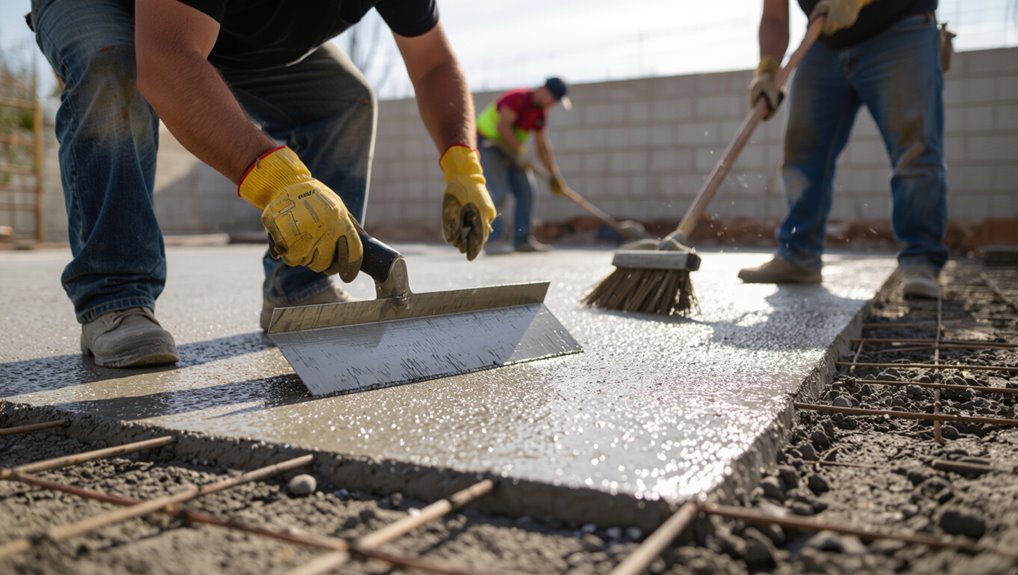
Step 8 focuses on getting the slab’s surface to the desired texture and control so it performs and looks right; you’ll start by floating and troweling to close the surface, then choose a broom finish for traction and cut control joints to control cracking.
Use a magnesium float, then a steel trowel for smoothness; drag a broom for grip and saw or rake joints at right intervals.
Step 9 Curing, protection, and timing before load or framing
Although the concrete looks set, you’ll need to cure and protect the slab properly to reach its full strength and avoid premature cracking; keep it moist with wet burlap, plastic sheeting, or a curing compound for at least seven days (longer in cold or high-wind conditions).
Block traffic, avoid concentrated loads, and wait the specified days before framing or heavy equipment to prevent damage.
Step 10 Attaching shed framing and sill plate to concrete (anchor bolts, sill sealer)
1. You’ll fasten a treated sill plate to cured concrete using embedded anchor bolts or wedge anchors; pack a sill sealer under the plate to block moisture and air.
Drill and set anchors through predrilled plate holes, torque to spec, and check alignment and level.
Secure corners and splice plates solidly before framing walls to guarantee a stable, sealed connection.
Materials, Tools, and Cost Breakdown
Now that your slab’s set, let’s look at the materials, tools, and costs you’ll need to finish the shed.
You’ll get concrete mix options and a simple quantities calculator, a reinforcement and hardware checklist, plus essential tools and rental tips.
Finally, I’ll compare labor versus DIY costs so you can pick the most cost-effective approach.
Concrete mix options and quantities calculator
Picking the right concrete mix and calculating how much you need will save time, money, and headaches once you start pouring; this section lays out common mix types (ready-mix, bagged concrete, and DIY cement-sand-gravel blends), how their strengths and workability differ, the basic tools you’ll need for mixing and placing, and a simple calculator method to estimate quantities and costs for typical shed foundations.
| Mix Type | Strength | Typical Use |
|---|---|---|
| Ready-mix | High | Slabs |
| Bagged | Medium | Small pours |
| DIY blend | Variable | Patching |
Reinforcement and hardware list
A concise reinforcement and hardware list will keep your foundation strong and the build on schedule; below you’ll find the essential materials, the tools to install them, and a practical cost breakdown so you can budget accurately.
Include rebar (#3–#4), wire mesh, anchor bolts, concrete screws, form ties, epoxy, and masonry washers.
Expect $150–$350 materials; basic hand tools complete installation.
Essential tools and rental tips
Rent or buy only what you’ll actually use: basic hand tools (hammer, level, tape measure, speed square), power tools (circular saw, drill/driver, reciprocating saw), and a few specialty items (concrete mixer or mixer rental, plate compactor, post-hole digger, and a jackhammer or breaker for tough footings).
- Check rental rates
- Inspect gear before leaving
- Reserve heavy equipment early
- Factor fuel and delivery
Labor vs DIY cost comparison
Wondering whether you should hire help or tackle the shed yourself?
Compare labor rates versus DIY time: pros hire skilled crews (faster, fewer mistakes) but cost more; DIY saves cash if you already own or can rent tools and follow plans.
Tally concrete, lumber, fasteners, permits, tool rentals, and your hourly value to decide which option fits budget and timeline.
Common Problems, How to Avoid Them, and Troubleshooting
You’ll run into common issues like concrete cracking, poor drainage and frost heave, uneven slabs, and weak bonding between the slab and sill plate if you don’t plan ahead.
I’ll show what causes each problem, how to prevent it, and simple fixes—like mix adjustments, drainage trenches, leveling compounds, and proper anchoring or adhesive.
Follow these tips and you’ll avoid most repairs and know what to do if something goes wrong.
Cracking causes, prevention, and repair
When cracks appear in siding, trim, or foundation materials, they usually stem from moisture changes, temperature swings, settling, or improper installation; identifying the cause quickly lets you choose the right prevention or repair method.
You should control humidity, allow proper movement gaps, use compatible materials, and follow manufacturer installation.
For repairs, clean, fill with appropriate flexible sealant or epoxy, then monitor for recurrence.
Drainage and frost heave issues prevention and fixes
Cracks and moisture problems often signal broader site-drainage or freeze-thaw issues. So after sealing visible gaps, you should check how water moves around your shed.
Grade soil away from the slab, install gutters and downspouts, and use gravel trenches or French drains to divert runoff.
For frost heave, keep frost-prone soils insulated with compacted granular fill and avoid planting water-retaining vegetation nearby.
Uneven slab or low spots correction methods
If your shed slab has low spots or an uneven surface, you can usually fix them without tearing out the whole slab by diagnosing the cause and choosing the right repair—leveling with self-leveling compound for small depressions, mudjacking or slabjacking for localized voids, and partial replacement or concrete overlays for severe settling.
Prevent recurrence by improving drainage, compacting subbase, and addressing sinkage promptly.
Bonding issues between concrete and sill plate solutions
After you’ve fixed slab low spots and addressed drainage, the next concern is how well the sill plate will bond to the concrete—poor adhesion lets moisture, pests, and movement undermine your shed.
Use pressure-treated sill plates, a continuous gasket or sill sealer, and anchor bolts or epoxy anchors.
Caulk gaps, apply waterproof membrane, and check for rocking; replace or re-anchor if you detect movement.
Best Practices, Tips, and Upgrades
To keep your shed useful for years, focus on long-term moisture control and reliable sealing options.
If you plan to heat or condition the space, consider proper insulation and interior finishes, and plan safe integration of utilities like electricity, plumbing, or HVAC.
Also weigh eco-friendly materials and alternative construction techniques to cut costs and environmental impact.
Long-term moisture control and sealing options
Because moisture is the silent enemy of any shed, you’ll want a clear plan that combines drainage, ventilation, and durable seals to keep water out for years, not months.
Grade ground to slope away, install perimeter drains, use a vapor barrier under concrete, seal joints with polyurethane caulk, apply a breathable exterior membrane, and maintain gaps for airflow to prevent trapped humidity and rot.
Insulating and finishing options for heated or conditioned sheds
Keeping moisture out sets the stage for effective insulation and finishing, since trapped damp will undermine any thermal upgrades you add.
Choose closed-cell spray foam or rigid foam on concrete walls and under framed walls for high R-value and vapor control.
Finish with moisture-resistant drywall or tongue-and-groove pine, add thermal breaks at studs, and seal all joints and penetrations carefully for efficiency and durability.
Integrating utilities (electric, plumbing, HVAC) safely
When you add electricity, plumbing, or HVAC to your shed, plan each system around safety, code compliance, and future access so upgrades won’t require tearing out finished walls.
Run conduit, sleeves, and service loops before finishing; mount panels, shutoffs, and condensate drains accessible.
Use GFCI/AFCI protection, label circuits, pressure-test plumbing, and hire licensed pros for complex work or inspections to guarantee safe, compliant systems.
Eco-friendly and alternative materials or techniques
If you want a greener, more durable shed, choose materials and techniques that cut waste, reduce embodied energy, and improve longevity—think reclaimed or sustainably sourced lumber, recycled-metal roofing, and low-VOC finishes.
Consider these options to upgrade sustainably:
- Reclaimed lumber for framing and trim.
- Recycled metal or composite roofing.
- Insulation from cellulose or sheep’s wool.
- Rainwater harvesting and permeable surrounds.
Comparison: Concrete Floor vs Other Shed Flooring Options
When you choose a shed floor, weigh performance, cost, longevity, and maintenance so the surface fits your needs.
Concrete gives durability and low upkeep but costs more up front, while wood, composite, or modular floors can save money and suit lighter uses.
Consider how you’ll use the shed—heavy equipment, storage, or a workspace—to pick the best option.
Performance, cost, longevity, and maintenance comparison
Although a concrete floor demands more upfront work and expense than timber or compacted gravel, it delivers unmatched durability, load-bearing capacity, and low long-term maintenance. You’ll pay more initially but save on repairs; cleaning is easy and lifespan is decades. Compare at a glance:
| Attribute | Concrete | Alternatives |
|---|---|---|
| Cost (initial) | High | Low–Medium |
| Longevity | Decades | Years–Decades |
| Maintenance | Low | Moderate–High |
Best use cases for each flooring type
Because different activities and budgets demand different priorities, choosing the right shed floor comes down to how you’ll use the space:
- Concrete: workshop, heavy equipment, moisture resistance, long life.
- Treated plywood: light storage, cheaper, easy repairs.
- Composite decking: elevated sheds, aesthetics, rot resistance.
- Gravel or compacted stone: temporary sheds, drainage, low cost and minimal prep.
Step-by-Step Checklist and Timeline for a DIY Build
Before you start building, make a pre-build checklist that covers permits, site prep, materials, tools, and safety gear so nothing stalls the job.
Follow a clear day-by-day timeline for a small-to-medium shed—site prep and foundation first, frame and roof next, then siding, doors, and finishing touches.
Stick to the schedule and adjust only for weather or permit delays to keep the build efficient.
Pre-build checklist
1 clear checklist will save you days of confusion on build day: this pre-build checklist lays out the essential permits, site prep, material orders, tools, and a simple timeline so you can move through each step without costly delays.
Confirm permits and utility locates, measure and mark the site, order concrete and lumber, gather tools and safety gear, and schedule deliveries and helpers.
Day-by-day timeline for a typical small-to-medium shed
A clear day-by-day timeline turns a messy project into a smooth, predictable process: this guide gives you a compact, step-by-step schedule for a typical small-to-medium shed so you know what to do each day, which tasks can overlap, and when to call for help or inspections.
Day 1: site prep.
Days 2–3: footing and pour.
Days 4–6: cure and framing.
Days 7–9: roofing.
Days 10–12: siding, doors, trim, finish.
FAQ
You’ll find answers here to common concrete-floor questions like thickness, whether to use rebar, and if you can pour the slab yourself or should hire a pro.
I’ll also cover safe anchoring methods and basic maintenance to keep the floor sound. Use these FAQs to decide what’s practical for your shed and skill level.
How thick should a concrete shed floor be?
For a typical backyard shed, plan on pouring a concrete slab that’s 4 inches thick if you’ll store lawn tools and lightweight equipment.
If you expect heavier gear, consider increasing thickness to 5–6 inches and use a properly compacted base and good drainage.
Thicker slabs support more weight and reduce cracking; confirm local codes and anticipated loads before pouring.
Do I need reinforcement or rebar for a small shed slab?
If your shed slab jumps from the 4-inch recommendation to 5–6 inches because you’ll park heavier equipment, you’ll also want to evaluate reinforcement to control cracking and add strength.
For small garden or storage sheds, a welded wire mesh or single layer of #3–#4 rebar spaced 18–24 inches is usually sufficient.
Use chairs to center reinforcement and tie overlaps securely.
Can I pour a slab myself or should I hire a contractor?
Wondering whether to tackle a slab yourself or hire a contractor? You can pour a small shed slab if you’ve got basic concrete skills, proper tools, and time.
DIY saves money but risks mistakes—leveling, mix consistency, and curing matter.
Hire a pro for larger slabs, tight timelines, or if you lack experience.
Weigh cost, confidence, and complexity before deciding.
How do I anchor the shed to the concrete safely?
How do you anchor your shed to a concrete slab so it stays secure in wind and use?
Bolt the sill plate with concrete anchors or wedge anchors spaced per plans, set into cured slab. Use stainless or galvanized hardware to resist corrosion.
For heavy winds, add shear plates or anchor straps tied to embedded anchors.
Verify anchor torque and follow local code for spacing and sizes.
What maintenance does a concrete shed floor require?
Once your shed’s anchored to the slab, plan for simple, regular upkeep to keep the concrete sound and safe.
Sweep and wash periodically, mop spills promptly, and reseal every 2–5 years depending on wear.
Repair cracks with epoxy or patch compound, maintain drainage and gutters to avoid standing water, and use mats under heavy tools to prevent abrasion and stains.
Resources and Templates
You’ll find ready-to-use tools like a concrete volume calculator with a printable form layout to speed up measurements.
Use the permit and inspection checklist template to make sure you meet local requirements.
I’ve also included links to supplier lists, rental equipment guides, and local code resources so you can source materials and verify rules.
Concrete volume calculator and printable form layout
Because accurate concrete estimates save time and money, we’ll use a simple calculator and a printable form to track volumes, mix ratios, and pour dates. You’ll plug slab dimensions, thickness, and waste factor into the calculator, print the form, and note batch sizes and pour times for confidence.
| Item | Emotion |
|---|---|
| Volume | Relief |
| Mix | Control |
| Date | Assurance |
| Notes | Pride |
Permit and inspection checklist template
A clear, concise permit and inspection checklist helps you track required approvals, document inspection schedules, and avoid costly delays during your shed build.
Use a simple template to record application dates, permit numbers, inspector names, and outcomes. Review before each milestone to confirm compliance.
- Permit application info
- Scheduled inspections
- Inspection results & notes
- Final approval date
Links to supplier lists, rental equipment guides, and local code resources
Looking for reliable suppliers, rental gear, and local code references to keep your shed project on track?
You’ll find curated links to materials suppliers, tool rental guides, permit offices, and inspection checklists so you can plan, price, and comply confidently.
- Materials suppliers
- Rental equipment guides
- Local building codes
- Permit & inspection contacts