
How to Fit Laminate Flooring: a Practical Guide From Start to Finish
You can fit laminate flooring yourself if you’re comfortable with measuring, cutting, and basic tools. Start by evaluating and prepping a dry, flat subfloor, acclimatize boards for 48 hours, then lay appropriate underlay. Click planks together with spacers for a 10–12 mm expansion gap, trim around obstacles, and finish with trims and thresholds. Keep spills off and use pads under furniture to protect the surface. Continue for step-by-step techniques, troubleshooting, and cost estimates to complete the job confidently.
Can You Fit Laminate Flooring Yourself?
You can expect to measure, prepare the subfloor, cut and click boards together, and fit trims — a straightforward job that usually takes a weekend for a single room with basic tools like a saw, spacers, tapping block and pull bar.
Difficulty is moderate: if you’re comfortable with measuring, cutting and lifting, you’ll likely manage; hire a pro if the floor is large, irregular, has radiant heating, or needs complex thresholds.
We’ll cover when DIY is sensible and when to call an installer.
Short summary of steps and expected time, difficulty, and tools
Fitting laminate flooring is a doable DIY project for most homeowners, and it typically follows a clear sequence: prepare the subfloor, lay an underlay, click the boards together, trim edges, and fit trim and junction strips.
If you’ve asked how do you fit laminate flooring, expect 1–2 days for an average room, moderate difficulty, and basic tools.
- Tape measure
- Saw
- Rubber mallet
- Spacers
When to hire a professional vs DIY
After you’ve measured the room, prepped the subfloor, and gathered basic tools, decide whether to tackle the job yourself or call a pro.
If you’re handy, patient, and the layout is simple, DIY saves money.
Hire a professional for large areas, tricky cuts, uneven subfloors, or if you want a guaranteed finish and warranty.
Consider time, skill, and risk.
What Is Laminate Flooring and Why Choose It?
Laminate flooring is a layered product with a wear-resistant top, a decorative printed layer mimicking wood or stone, and a core of HDF or MDF—different types suit different budgets and traffic levels.
You’ll find it’s cheaper and easier to install than hardwood, more rigid than vinyl, and less cold than tile, but it can be prone to moisture damage and isn’t refinishable like solid wood.
It’s best for living areas, bedrooms, and hallways over a flat, dry subfloor—avoid it in wet rooms unless you choose specially rated, water-resistant options.
Composition and common types of laminate
Think of laminate as a layered engineered floor that gives you the look of wood or stone without the cost or upkeep of the real thing. You get a wear layer, printed design, core (HDF/MDF), backing, and sometimes a bevel. Choose based on thickness, AC rating, water resistance, and finish.
| Component | Purpose |
|---|---|
| Wear layer | Durability |
| Design layer | Appearance |
| Core | Stability |
| Backing | Moisture balance |
| Edge | Installation |
Pros and cons compared to hardwood, vinyl, and tile
While cheaper than hardwood and more realistic-looking than many vinyl options, laminate gives you a middle ground that balances cost, durability, and appearance.
You’ll get scratch resistance, easy maintenance, and fast installation, but less resale value and refinishing options than hardwood.
Compared with tile, laminate’s warmer feel is softer underfoot yet less water-resistant and less durable for heavy moisture areas.
Suitable rooms and subfloor requirements
Because it’s engineered as a floating, click-lock floor with a wear layer over an inner core, laminate works best in living areas, bedrooms, hallways, and other low- to moderate-moisture rooms.
You should avoid bathrooms and basements unless moisture is controlled.
Install over clean, dry, level subfloors—plywood, OSB, or concrete with a vapor barrier and underlay.
Remove debris and repair uneven spots first.
Preparation Before You Start
Before you lay a single plank, measure the room carefully and calculate how much laminate you’ll need, including a wastage allowance.
Check and prepare the subfloor (concrete, plywood, or existing floor), let the laminate acclimatise and inspect each board, then gather your tools and materials.
Finally, set up a safe, cleared workspace and follow basic safety precautions.
Measure the room and calculate materials (wastage allowance)
Start by measuring the length and width of the room in feet (or meters) and multiply those numbers to get the total square footage. If the room isn’t a perfect rectangle, break it into rectangles or measure each wall-to-wall area and add them together.
- Add 5–10% for straight runs.
- Add 10–15% for diagonal patterns.
- Round up to full packs.
- Include trims and thresholds.
Assess and prepare the subfloor (concrete, plywood, existing floor)

When you’re ready to lay laminate, inspect the subfloor carefully so you know what prep work’s required: check for level, moisture, cracks, and loose or uneven areas on concrete, plywood, or existing floors.
Patch cracks, grind high spots, level low areas with compound, secure loose boards, and clean thoroughly.
Install an appropriate damp-proof membrane or underlay for moisture control before you start laying planks.
Acclimatising and inspecting laminate boards
Although the room may look ready, let your laminate sit in the space for at least 48 hours so the boards can acclimatize to temperature and humidity; this prevents warping and gaps after installation.
Unpack and lay boards flat, inspect each for defects, color variation, and damaged edges.
Rotate packs to mix shades, note batch numbers, and set aside any flawed pieces before you start.
Tools and materials checklist
Now that you’ve inspected and acclimatized the boards, gather the right tools and materials so the installation goes smoothly.
You’ll need precise, quality items to avoid delays and poor joins.
- Tape measure, chalk line, and carpenter’s square
- Laminate cutter or saw, jigsaw for cuts
- Underlay, moisture barrier, and spacers
- Pull bar, tapping block, mallet, and adhesive (if required)
Safety precautions and workspace setup
Before you lay a single plank, clear and secure the workspace so you can move freely and see what you’re doing.
Wear safety goggles, ear protection and a dust mask when cutting. Use knee pads and work gloves.
Keep tools organized, cords out of walkways, and a firmer light source. Ventilate the room, store leftover planks flat, and mark hazards to prevent trips.
Quick Materials Comparison and Selection Guide
Now you’ll compare key material choices that affect durability and appearance: plank size, thickness, AC rating, and finish.
You’ll also pick the right underlay and moisture barrier for your subfloor and room conditions.
Finally, decide on trims, thresholds, and accessories that match the profile and height of your new floor.
Selecting plank size, thickness, AC rating, and finish
Start by matching plank size, thickness, AC rating, and finish to your room’s use and style so you get durable, attractive results. Choose wider planks for larger spaces, thicker boards for stability, AC3+ for homes, AC4/5 for heavy use, and a finish that hides wear.
| Feature | Recommendation |
|---|---|
| Plank size | Wide for open rooms |
| AC rating | AC3+ normal use |
Selecting underlay types and moisture barriers
Once you’ve picked plank size, thickness, AC rating, and finish, pick the right underlay and moisture barrier to protect performance and comfort.
Choose foam for basic cushioning and sound, cork for superior sound and thermal insulation, rubber for durability and impact resistance.
Use a polyethylene vapor barrier over concrete or in high-moisture areas.
Match underlay thickness to manufacturer specs to preserve locking joints.
Trim, thresholds, and accessories selection
While trim, thresholds, and accessories might seem like finishing touches, they determine your floor’s durability, appearance, and alteration performance—so pick materials that match traffic, moisture exposure, and style.
- Aluminum thresholds: durable, good for alterations.
- PVC trims: moisture-resistant, budget-friendly.
- Wood profiles: match décor, best in dry areas.
- Rubber/vinyl seals: soundproofing and wet-area protection.
Step-by-Step Installation Process
Now you’ll follow a clear sequence to fit the floor, starting by planning your layout and picking the starting wall.
You’ll lay underlay and a moisture barrier, fit the first row while keeping an expansion gap, and stagger joints as you cut end pieces.
Finally, you’ll tackle awkward spots like doorways, radiators, and pipe penetrations.
Step 1 Plan the layout and establish starting wall

Start by measuring the room and sketching a simple layout so you can see how the planks will run and where cuts will fall.
Choose the main sightline—usually the longest wall or entry—and decide plank orientation. Allow a 8–10mm expansion gap around edges.
Mark starting line with spacers and a chalk line, trimming first row if needed so narrow end pieces aren’t less than recommended width.
Step 2 Install underlay and moisture barrier

1. Lay the underlay rolls parallel to the boards, smoothing seams and trimming to fit.
If using a combined moisture barrier, overlap edges per manufacturer instructions and tape seams. For separate barriers, place the damp-proof membrane first, then underlay.
Keep underlay continuous across the room, avoiding gaps. Check for damage and replace any compromised sections before you start fitting.
Step 3 First row installation and maintaining expansion gap
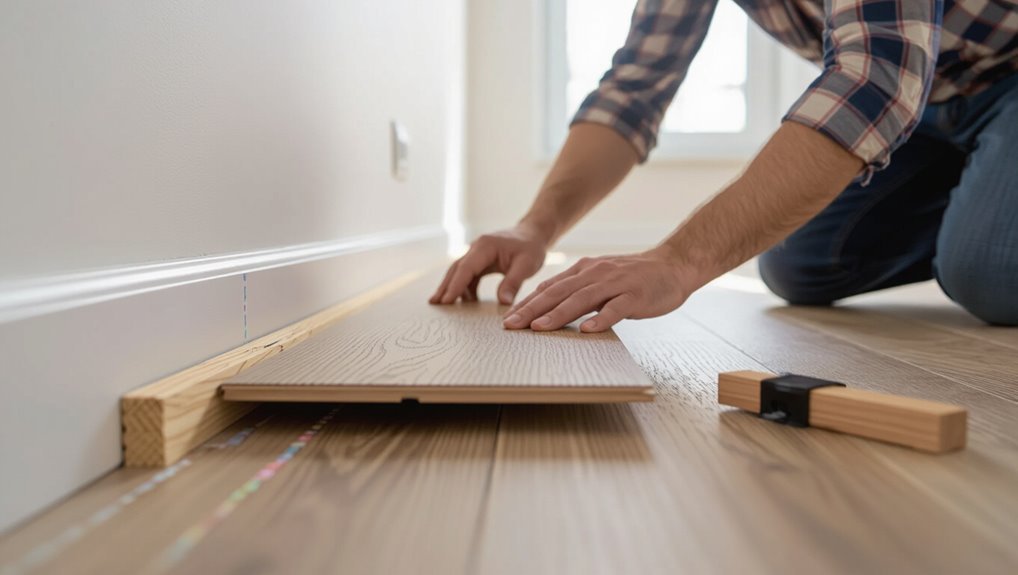
With the underlay and moisture barrier in place, you’re ready to lay the first row of laminate boards; get this row straight and the rest will follow more easily.
Position boards tongue-side toward the wall, using spacers to maintain a consistent expansion gap (typically 8–12 mm).
Check alignment frequently, press joints snugly, and secure the row by hooking or tapping per the manufacturer’s locking system.
Step 4 Staggering joints and cutting end pieces

Stagger the end joints by at least 20–30 cm so seams don’t line up across adjacent rows; this not only looks better but keeps the floor stronger.
Plan layout so short end pieces are at least 30 cm.
Measure and cut end boards with a square and fine-tooth saw, allow the expansion gap, dry-fit each piece, then click or tap boards into place for a tight, even finish.
Step 5 Working around doorways, radiators, and pipes

When you hit doorways, radiators, or pipes you’ll need to take a few precise cuts and leave proper expansion clearances so the floor looks tidy and performs well; measure openings carefully, mark panels before cutting, and always dry-fit pieces before final placement.
Use a jigsaw for awkward shapes, notch around pipe sleeves, remove trim where needed, and maintain the manufacturer’s gap around fixed objects.
Step 6 Final rows, fitting last pieces, and securing transitions

By now you’ll be working on the final rows and the last, often awkward, pieces that require exact trimming and proper connector strips; measure twice, cut once, and dry-fit each piece to verify gaps and alignments are correct before locking everything in.
Trim boards to maintain expansion gaps, use a pull bar to click last seams, fit reducer or T-mould junctions, and secure them per manufacturer instructions.
Step 7 Installing skirting boards, trims, and thresholds

Finish the job by installing skirting boards, trims, and thresholds to hide expansion gaps and give your floor a polished look.
Measure and cut skirting to fit, allow expansion gap clearance, and fix with adhesive or nails.
Fit trim around doorways and thresholds at junctions, ensuring flush, neat joints.
Seal gaps with silicone where needed and touch up with paint for a finished appearance.
Cutting and Special Techniques
You’ll need the right tools and methods for straight cuts, angled cuts, and notches—saws, jigs, and templates make those precise.
Plan and leave proper expansion joints, plus isolate doorways with thresholds or reducers to prevent buckling.
For uneven walls or floors you’ll use scribing, shims, and selective board height adjustments to get a flat, professional finish.
Tools and methods for straight cuts, angled cuts, and notches
Cutting laminate requires the right tools and a steady hand, since straight cuts, angled cuts, and notches each demand different blades and setups to stay clean and accurate.
You’ll pick tools based on cut type and finish.
- Circular saw with fine-tooth blade for straight cuts.
- Mitre saw for precise angles.
- Jigsaw for curved notches.
- File and sandpaper for cleanup.
Creating expansion joints and isolating doorways
When installing laminate, leave a consistent gap around the room and at doorways so the floor can expand and contract without buckling.
Use spacers to maintain the gap, then cover it with trim or reducers at thresholds.
For doorways, isolate runs between rooms with expansion profiles or T-molding.
Make certain profiles sit flush and allow movement without trapping the boards.
Dealing with uneven walls and floor-level adjustments

If walls bow or floors slope, don’t panic—plan your cuts and adjustments before you click any planks together.
Measure gaps at multiple points, scribe planks to follow contours, and trim with a jigsaw or coping saw.
Use tapered shims under underlayment to level minor dips and consider self-leveling compound for larger low spots.
Maintain expansion gaps and check fit as you go.
Common Problems and How to Fix Them
You’ll run into a few common issues—gaps between boards, squeaks, buckling or swelling, and occasional damaged planks—and you’ll need to know how to diagnose and address each.
I’ll show how to identify causes (like poor acclimation or moisture), when to repair versus replace, and quick fixes for squeaks and small gaps.
Follow the prevention tips to avoid moisture-related problems before they start.
Gaps between boards causes and remedies
Even with careful installation, gaps can appear between laminate boards because of moisture changes, subfloor irregularities, improper acclimation, or poor locking-tongue engagement; you’ll want to diagnose the cause quickly so you can choose the right fix, from tightening or replacing affected planks and correcting expansion gaps to improving floor flatness or controlling humidity.
Inspect joints, re-seat or replace loose boards, sand high spots, and use trim or filler where appropriate.
Squeaks, buckling, and swelling diagnosis and fixes
Gaps often signal underlying issues that can also lead to squeaks, buckling, or swelling. So once you’ve checked joints and humidity, turn your attention to movement and moisture symptoms.
Tighten loose boards by locating and securing subfloor gaps or adding screws through tongues where accessible.
Relieve buckling by expanding perimeter gaps, trim swelling-cut affected boards outboard, and eliminate moisture sources before refitting.
Damaged boards after installation repair vs replace
When a board gets cracked, chipped, or badly scratched after installation, you’ll need to decide whether to repair it on the spot or replace it entirely based on the damage’s location, extent, and your skill level.
Surface scratches and small chips you can fill with laminate repair kits or touch-up markers.
For deep cracks or edge damage, release and swap the board to guarantee stability and appearance.
Moisture-related issues and prevention
Because laminate isn’t waterproof, moisture is one of the most common troublemakers you’ll face—swelling, warping, and buckling can start from spills, high humidity, or subfloor leaks.
Prevent issues by fixing leaks, using moisture barriers, acclimating boards, and maintaining indoor humidity around 35–55%.
Wipe spills immediately, avoid wet mopping, and replace affected planks promptly to stop damage from spreading.
Tips, Best Practices, and Time-Saving Tricks
Plan your layout to cut down on waste, use efficient cutting and sequencing to speed installation, and follow simple maintenance steps to keep the floor looking new.
You’ll save time and money by staggering boards to minimize offcuts and batching similar cuts together.
With a few smart habits—like protecting edges and cleaning spills promptly—you’ll extend the life of your laminate.
Layout patterns that minimize waste
If you want to cut waste and save time, choose a layout that lets you use full-length boards as much as possible and keeps short offcuts consistent across rows. Staggering joints by a half- or third-board pattern and working parallel to the longest wall typically accomplish this.
Plan starting and ending rows to avoid tiny final pieces, maintain consistent plank lengths, and mirror cuts across opposite walls to reuse offcuts.
Efficient cutting and sequencing strategies
When you sequence cuts logically and batch similar cuts, you’ll move faster and waste less material; plan rows so end pieces form full planks elsewhere.
Cut long runs first, group repeated offcuts, and use a stop block for consistent lengths.
Mark and number boards, cut difficult pieces last, and keep blades sharp. This reduces mistakes, saves time, and preserves stock.
Maintenance tips to prolong laminate life
After you’ve trimmed, sequenced, and installed boards efficiently, keeping that floor looking and performing like new comes down to consistent care and a few smart habits.
- Sweep or vacuum daily with a soft attachment to remove grit.
- Wipe spills immediately with a damp cloth; avoid soaking.
- Use pads under furniture and avoid dragging heavy items.
- Clean with a manufacturer-approved laminate cleaner occasionally.
Cost, Time Estimates, and Project Planning
You’ll get a clear cost breakdown—materials, underlay, trims and any special tools—so you can budget accurately.
Expect time estimates that vary by room size and your skill level, plus a checklist showing what you can finish in a single day versus what needs multiple days.
Use those numbers to plan materials, help, and when to schedule the job.
Typical cost breakdown (materials, underlay, trims, tools)
Budgeting your laminate-flooring project starts with breaking down the main expenses: the planks themselves, underlayment, trims and connections, and any tools or rental equipment you’ll need. Price ranges: planks $1–$5/sq ft, underlay $0.20–$0.80/sq ft, trims $20–$100. Factor tools: buy vs rent, adhesives, and waste (usually 5–10% extra).
| Item | Typical cost |
|---|---|
| Planks | $1–$5/sq ft |
| Underlay & trims | $0.20–$100 |
Time estimates per room size and skill level
Knowing your costs helps set realistic time expectations, since material choices and whether you buy or rent tools affect how fast you can work.
For a small room (10–12 m²) expect 3–6 hours if you’re experienced, 6–10 if you’re a beginner.
Medium rooms take a day for pros, 1–2 days for novices.
Large or complex spaces need multiple days regardless of skill.
Checklist for a single-day vs multi-day install
Decide up front whether you can finish in a single day or need multiple days, because that choice shapes your cost, scheduling, and prep work.
Plan tools, deliveries, and helpers accordingly. Balance speed against quality.
- Measure, order materials with 10% waste.
- Clear, protect adjacent rooms.
- Schedule delivery and helpers.
- Leave time for acclimation and finishing touches.
Frequently Asked Questions
You’ll find answers here to common concerns like fitting laminate over existing floors, required expansion gaps and why they matter, and whether it’s suitable for bathrooms or basements.
I’ll also cover how to shift to other floor types and what regular maintenance and cleaning you should do.
If you have a specific situation, mention it and I’ll give tailored advice.
Can laminate be installed over existing flooring?
If your existing floor is flat, dry, and securely attached, you can usually install laminate right over it—no tear-out required.
You can lay laminate over vinyl, tile, or well-adhered hardwood, provided you check height, changes, and moisture.
Remove loose or cushioned underlay, repair damage, and guarantee subfloor stability.
Follow manufacturer guidelines for compatibility and warranty compliance.
How much expansion gap is needed and why?
When you lay laminate over an existing floor, you still must leave room for the boards to expand and contract with humidity and temperature changes.
Leave a 10–12 mm gap around all walls and fixed objects for typical domestic installations; wider (12–15 mm) in large rooms or sunlit areas.
This prevents buckling and keeps joints intact as the floor moves.
Can I install laminate in bathrooms or basements?
Although laminate resists everyday moisture, you shouldn’t assume it’s suited for bathrooms or damp basements without precautions; standard laminate isn’t waterproof and can swell or warp if exposed to persistent water or high humidity.
You can use water-resistant or waterproof laminate, improve subfloor drainage, install a vapor barrier, and guarantee good ventilation.
For very wet areas, choose truly waterproof flooring like vinyl or tile.
How do I transition between laminate and other floor types?
Moving from a laminate area into another floor type—like tile, hardwood, or carpet—calls for a proper edge to keep moisture, movement, and height differences from causing damage.
Use edge strips (T-molding, reducer, or threshold) matched to profiles and heights. Secure strips to subfloor, not laminate, to allow movement.
For uneven heights, plane or add underlayment to minimize gaps and trip hazards.
What maintenance is required and how to clean laminate?
How often should you clean laminate? You should sweep or vacuum daily or every few days to remove grit, and mop weekly with a damp (not wet) microfiber mop using a laminate‑safe cleaner.
Wipe spills immediately to avoid swelling. Don’t use steam cleaners, wax, or abrasive tools.
Protect high‑traffic areas with rugs and felt pads under furniture to prevent scratches and wear.
