How to Clean Tile Floor Grout Easily Without Hours of Scrubbing
You can get grout looking nearly new without hours of scrubbing by using targeted cleaners, a stiff brush, and smart tools. Start by vacuuming grout lines, apply a baking soda paste or oxygen bleach, let it sit, then scrub briefly with a grout brush or use a steam cleaner for chemical-free lift. Rinse with clean water and dry fast with microfiber. Follow with periodic spot treatments and reseal every 1–3 years for lasting results—keep going to see step-by-step tips and pro tricks.
Clean Tile Floor Grout Without Hours of Scrubbing
You can clean grout quickly by using a baking soda paste and a spray-on vinegar solution, then letting it sit for 10–15 minutes before a brief scrub and rinse.
This method lifts most stains without hours of elbow grease, leaving grout visibly brighter and fresher.
Expect noticeably cleaner grout on light to moderate stains; very deep discoloration may need a repeat treatment or a stronger product.
Fast summary of the easiest method and expected results
In just a few simple steps, you can lift deep grime from tile grout without spending hours scrubbing: mix baking soda and water into a paste, apply to grout, spray vinegar, let fizz for 5–10 minutes, then wipe or lightly brush and rinse.
This method shows dramatic improvement on stained grout, restoring color and reducing bacteria, so you’ll see fast, reliable results.
Why Grout Gets Dirty and When Deep Cleaning Is Needed
Grout is the porous filler between tiles, not the hard surface you walk on, so it soaks up dirt and spills more easily.
Over time dirt, mold, mildew, and soap scum build up in those pores, causing discoloration and odor.
If stains are widespread, grout feels gritty, or cleaning one spot doesn’t help, it’s time for a deep grout cleaning rather than just spot-treating.
What grout is and how it differs from tile
Think of grout as the mortar in a brick wall: it fills the gaps between tiles, anchors them, and absorbs more water, dirt, and oils than the tile surface does, which is why it stains faster and often needs deeper cleaning than the tile itself.
Grout is porous and softer; tile is glazed, nonporous, and more durable, so they require different cleaners and care.
Common causes of grout staining (dirt, mold, mildew, soap scum)
Because grout sits lower and soaks up whatever your tiles shed, it collects dirt, oils, and residues much faster than the tile surface does.
Foot traffic grinds in soil and dust, cooking oils and spills leave stains, and damp areas promote mold and mildew.
Soap scum builds from cleansers and hard water, darkening joints and making grout look aged unless you clean it regularly.
Signs you need deep grout cleaning vs. spot cleaning
All that built-up dirt, oils, and mildew doesn’t always mean you need a full-scale restoration—sometimes a quick spot treatment will do.
If stains are isolated, grout texture feels mostly intact, and no strong odors or widespread discoloration exist, spot-clean.
Choose deep cleaning when grout is dark throughout, crumbling, has persistent mildew, or cleaning repeatedly fails.
Deep work restores color and integrity.
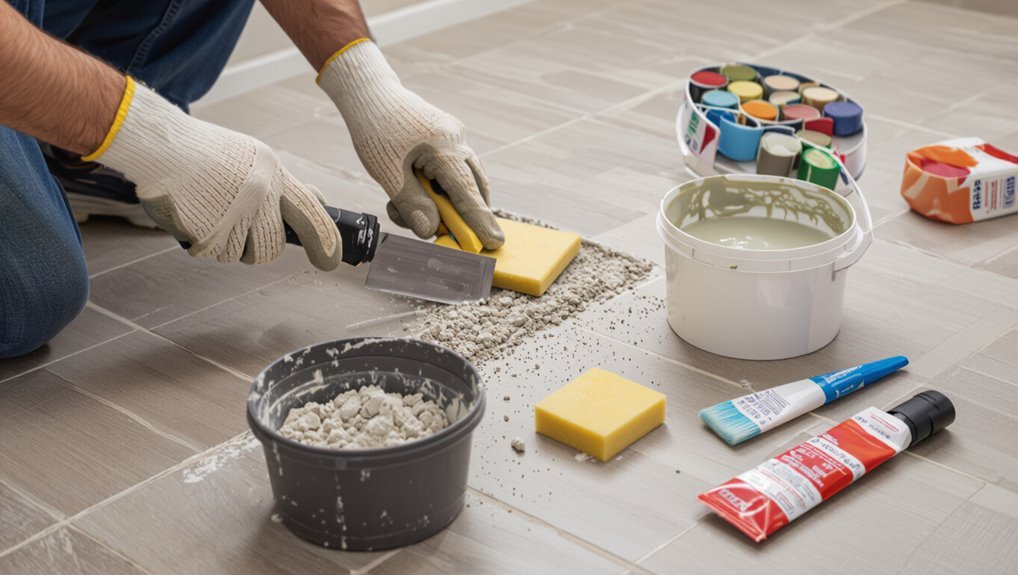
Tools and Materials You Need (Quick Checklist)
You’ll want the right tools, cleaners, and safety gear to get grout looking its best without wasting time.
Below is a quick checklist so you can grab what you need and get started safely and effectively. Use items suited to your grout type and follow any product instructions.
- Brushes (stiff grout brush, old toothbrush), steam cleaner, microfiber cloths
- Effective cleaners (baking soda + vinegar or hydrogen peroxide mixes, commercial grout cleaners)
- Safety gear (gloves, eye protection, ventilation mask)
Recommended cleaning tools (brushes, steam cleaner, microfiber)
Start with three reliable tools: a stiff nylon grout brush for scrubbing, a microfiber mop or cloth for wiping and absorbing loosened dirt, and a steam cleaner (or handheld steam cleaner) for deep, chemical-free cleaning where grout is badly stained.
Add a small stiff-bristled toothbrush for tight spots, a bucket, rubber gloves, and a spray bottle for applying cleaners and rinsing grout efficiently.
Effective cleaning agents (homemade and commercial)
Now that you’ve got the right tools, pick cleaning agents that match the grout’s condition and your tolerance for chemicals.
For light dirt, mix baking soda and water into a paste; add vinegar for stubborn stains.
For deep cleaning, use commercial grout cleaners or oxygen bleach following label directions.
Test any product on a small area first to avoid discoloration.
Safety gear and precautions
1. Wear gloves, goggles, and a mask when mixing or using cleaners to protect skin, eyes, and lungs.
Ventilate the area by opening windows or running a fan.
Test cleaners on a small patch first.
Avoid mixing bleach with ammonia or acids.
Keep pets and kids away, store chemicals safely, and follow product instructions and disposal guidelines to prevent accidents.
Best Easy Methods Ranked Quick Comparison
You’ll get a quick, practical comparison of steam cleaning, baking soda + vinegar, oxygen bleach, and commercial grout cleaners so you can pick the right approach for your tile type, stain severity, and time constraints. Below is a compact table to help you weigh pros and cons at a glance. Use it to decide which method fits your floor and schedule.
| Method | Best for | Notes |
|---|---|---|
| Steam cleaning | Porcelain/ceramic, quick sanitizing | No chemicals, gentle on sealed grout |
| Baking soda + vinegar | Light stains, grout-safe tiles | Cheap, fast for spot cleaning |
Steam cleaning vs. baking soda + vinegar vs. oxygen bleach vs. commercial grout cleaners
While each method can lift grime, choosing the right one depends on how dirty your grout is, the grout type, and how quickly you want results.
Steam cleans without chemicals and sanitizes but needs time.
Baking soda + vinegar is cheap for light stains.
Oxygen bleach whitens safely over hours.
Commercial cleaners act fast on tough grime but can be harsh—use gloves and ventilation.
When to choose each method (tile type, stain severity, time available)
Because grout and tile vary so much, pick a cleaning method that matches your tile type, how bad the stains are, and how much time you have.
For glazed or delicate tile, use gentle cleaners or steam.
For moderate stains, try baking soda and vinegar or oxygen bleach.
For heavy mold or set-in grime, use commercial grout cleaners or oxygen bleach and allow longer dwell time.
Step-by-Step: Fast, Low-Effort Grout Cleaning
Start by clearing the area, dry-vacuuming, and spot-testing your cleaner so you don’t damage tiles.
Apply your chosen cleaner, let it dwell the recommended time, then agitate with a stiff brush or scrub tool for best results.
Rinse and extract carefully to remove residue without spreading dirt.
Preparation clear area, dry vacuum, spot test
1. Clear the area: move rugs, furniture, and fragile items so you have full access.
Dry-vacuum the grout lines and surrounding tiles to remove dust and debris that block cleaners.
Do a small spot test of your chosen cleaner on an inconspicuous tile, wait the recommended time, then check for discoloration or damage.
Proceed only if the test shows no adverse effects.
Step 1: Apply chosen cleaner (homemade or commercial)
Apply your chosen cleaner evenly along the grout lines, working in a small section at a time so the solution doesn’t dry before you scrub.
Use a spray bottle or pour sparingly, targeting grout not tile. For homemade mixes, stir and apply fresh.
For commercial products, follow label precautions. Wear gloves and avoid over-saturating adjacent flooring or fixtures.
Step 2: Let dwell for optimal time
After you’ve applied the cleaner, let it sit so it can break down dirt and stains—this pause makes scrubbing faster and more effective.
Let dwell time match the product: 5–10 minutes for mild cleaners, 10–20 for stronger solutions.
Keep the area damp, cover with plastic if needed to prevent evaporation, and avoid walking on it until the cleaner has had time to work.
Step 3: Agitate efficiently (best brushes and techniques)
Tools matter: pick a stiff-bristled grout brush or a narrow scrub brush with a comfortable handle so you can work pressure into the grout lines without tiring your wrist.
Use short, back-and-forth strokes along grout, focusing pressure directly in the joints. For corners or deep stains, use a toothbrush or pointed nylon brush.
Move systematically across tiles so you don’t miss spots.
Step 4: Rinse and extract without spreading dirt
1 quick rinse can make the difference between a clean floor and a muddy mess: rinse grout lines with plain water and immediately extract the dirty water so you don’t re-deposit grime.
Work in small sections, swabbing with a wet microfiber mop or using a wet-vac to lift cloudy runoff. Change rinse water often, rinse tools, and avoid dragging dirty water across cleaned areas.
Step 5: Drying and finishing touches
Once you’ve rinsed and extracted the dirty water, dry the grout quickly to prevent streaks, water spots, and new soil from settling back in.
Use microfiber towels or a clean, absorbent mop, working along grout lines.
Ventilate the room and run a fan or dehumidifier to speed drying.
Inspect for missed spots, touch up with a small brush, then replace rugs.
No-Scrub & Minimal-Scrub Options
If you want to avoid hard scrubbing, you can use a steam cleaner—set it to the grout-appropriate pressure and glide slowly to loosen dirt, but be aware it won’t remove deep stains or damaged grout.
For a chemical-free soak, mix oxygen bleach according to package directions (usually about 1–2 tablespoons per quart of warm water), apply, wait 10–20 minutes, then mop and rinse.
You can also try enzyme or commercial no-scrub cleaners for organic soils, noting they’re gentler but often slower and may need repeat applications.
Using a steam cleaner setup, technique, limitations

A steam cleaner can be one of the quickest ways to lift dirt from grout with little or no scrubbing; set it up with the grout-cleaning nozzle and a clean water tank, allow it to heat fully, and work in short passes so the steam loosens soil without over-wetting surrounding tiles.
Move methodically, vacuum or blot residue, avoid steam on delicate grout sealer, and test a corner first.
Oxi-based soak and mop method (oxygen bleach) proportions and timing
Steam and oxygen bleach tackle grout differently, so after you’ve tried a steam cleaner you can switch to an oxi-based soak for stains that need longer contact time.
Mix 1/2 cup oxygen bleach powder per gallon of warm water. Mop or pour onto grout, keep surface damp under plastic for 20–60 minutes, then rinse and mop.
Repeat for stubborn spots.
Enzyme cleaners or commercial no-scrub products pros and cons
While enzyme cleaners and commercial no‑scrub products use different chemistries, they both aim to break down organic residues so you can clean grout with minimal elbow grease.
You’ll appreciate enzymes for gentle, eco-friendly stain removal and odor control, but they’re slower and less effective on mineral buildup.
No‑scrub formulas act faster and tackle tougher grime, yet can contain harsher chemicals and cost more.
Deep Stains, Mold, and Discolored Grout: Advanced Fixes
When stains, mold, or stubborn discoloration won’t come out with regular cleaning, you’ll need stronger solutions and safety precautions.
Learn when to use bleach versus a dedicated fungicide, and when recoloring or full regrouting is a better long-term fix.
If the damage is extensive or persistent, call a professional to assess and restore the grout properly.
Treating mold and mildew safely (bleach vs. fungicide)
If mold or mildew has taken hold in your grout, you’ll want a treatment that kills spores without damaging tile or harming your family, pets, or finishes.
Test bleach on a hidden spot; use diluted bleach for porous grout, rinse thoroughly, and ventilate.
Prefer commercial fungicide for persistent growth—follow label PPE and dwell times.
Dry area completely to prevent recurrence.
Recoloring or regrouting when cleaning fails
Should cleaning, bleach, or fungicide haven’t removed deep stains, persistent mold, or severely discolored grout, recoloring or regrouting may be your best option.
You can use a grout pen or dye to restore color quickly; it’s cheap and DIY-friendly.
For crumbled or porous grout, remove and replace it: match color, apply new grout, seal once cured to prevent recurrence and simplify future cleaning.
When to call a professional
Although DIY fixes work for many grout problems, call a professional if stains penetrate deep, mold keeps coming back, or grout is crumbling and widespread discoloration won’t budge.
A pro assesses substrate damage, tests for toxic mold, and recommends regrouting, sealing, or tile replacement.
You’ll save time, avoid health risks, and get durable results rather than repeated temporary fixes.
Common Mistakes That Make Grout Worse
Don’t grab harsh acidic cleaners if your tiles are sensitive — they can etch or discolor the surface.
Don’t over-scrub; aggressive brushing can wear away grout and even chip tiles.
And don’t skip sealing or ignore ventilation, because unprotected, damp grout will just keep attracting mold and stains.
Using acidic cleaners on sensitive tiles
If you use acidic cleaners on sensitive tiles like marble, limestone, or some glazed ceramics, you’ll etch the surface and loosen grout, making stains worse and shortening the floor’s life.
Don’t reach for vinegar, citrus, or harsh commercial acids. Test cleaners on an inconspicuous spot, use pH-neutral tile cleaners instead, and rinse thoroughly to protect tiles and grout from chemical damage.
Over-scrubbing that damages grout or tile
When you scrub grout too hard or use stiff brushes and abrasive pads, you can actually wear away the grout lines and scratch nearby tiles, making the floor look worse and letting dirt settle deeper.
Stop using metal brushes or harsh scrubbing motions. Use softer nylon brushes, gentle cleaners, and short, controlled strokes.
Test methods on an inconspicuous spot first.
Ignoring grout sealer and ventilation
Because grout is porous and needs protection, skipping a sealer or proper ventilation lets moisture, dirt, and mildew sink in and makes stains much harder to remove.
You should seal grout after cleaning and reapply every year or two.
Also run fans, open windows, or use a dehumidifier to keep tiles dry.
That prevents mold, reduces staining, and makes future cleaning easier.
Preventive Maintenance to Keep Grout Clean Longer
To keep grout cleaner longer, you’ll want to know when to apply a sealant and how to do it properly.
Set up simple weekly and monthly cleaning routines with the right tools and products to prevent grime from settling in.
Use quick spot‑clean hacks—like a squeeze bottle of diluted cleaner or a magic eraser—for spills before they become stains.
Sealing grout: when and how to apply sealant
Sealing grout after it’s fully clean and dry gives you a protective barrier that repels stains and moisture, so you won’t have to deep-clean as often.
Choose a penetrating or topical sealant based on grout type, follow manufacturer directions, apply evenly with a brush or applicator, wipe excess, and allow full cure time.
Reseal every 1–3 years or when water no longer beads.
Weekly and monthly cleaning routines (tools and products)
Set a simple routine—quick weekly wipe-downs and a focused monthly scrub—and you’ll keep grout looking good without heavy effort.
Use a microfiber mop weekly and a pH-neutral cleaner; monthly, scrub with a soft brush and diluted baking soda paste; reapply grout sealer every 6–12 months as needed.
- Microfiber mop + pH-neutral cleaner
- Soft brush + baking soda paste
- Grout sealer touch-up schedule
Quick spot-clean hacks to prevent buildup
1 simple habit can stop grime before it starts: deal with spills and spots the moment you see them.
Keep a microfiber cloth and spray bottle of diluted vinegar or mild cleaner handy. Blot, don’t rub, then rinse.
For greasy or stubborn spots, sprinkle baking soda, spray, wait five minutes, scrub gently with a toothbrush, and wipe clean to prevent buildup.
Cost, Time, and Effort Estimates
Expect different methods to take varying amounts of time and money—simple scrubbing with a brush might cost under $20 and take an hour for a small bathroom, while professional steam cleaning can run hundreds and take a few hours.
How long and how much you’ll spend depends on square footage, how deep the stains are, and whether you already own or need to buy tools and cleaners.
Below we’ll break down average time and cost for each method and the key factors that affect effort.
Average time and cost for each method
Here’s a quick breakdown to help you choose a grout-cleaning method: each approach has predictable time, cost, and effort trade-offs—
DIY cleaning with a brush and cleaner usually takes 1–4 hours for a small-to-medium room and costs $5–30 in supplies;
a steam cleaner or rented machine cuts scrubbing time to 30–90 minutes but runs $40–150 to buy or rent;
professional cleaning typically finishes in 1–3 hours for most rooms, costs $100–400 depending on size and condition, and saves you physical effort while delivering deeper results.
Consider durability of results and convenience when deciding.
Factors that affect time (square footage, stain level, tools)
Because grout cleaning involves multiple variables, the time, cost, and effort you’ll need depend mainly on three things: the square footage you’re tackling, how deep or old the stains are, and the tools or method you choose.
You’ll spend minutes per square foot with mild discoloration, hours for large areas or set-in stains, and more if you use manual brushes versus powered scrubbers or professional services.
Frequently Asked Questions (FAQ)
You probably have questions like whether you can use bleach every time, if vinegar will harm your tile or grout, or how often you should seal grout.
You might also wonder whether steam cleaning is safe for your tile type and how to remove old grout stains for good.
Keep reading for clear, practical answers to each question.
Can I use bleach on grout every time?
Can you use bleach on grout every time? You can use diluted bleach occasionally for stubborn stains, but don’t rely on it repeatedly.
Bleach can weaken grout, discolor colored grout, and release strong fumes. Spot-test first, ventilate thoroughly, and wear gloves.
For routine cleaning, choose milder cleaners or baking soda paste to protect grout integrity and avoid ongoing damage.
Will vinegar damage my tile or grout?
Wondering whether vinegar will harm your tile or grout?
Vinegar’s acidity can etch natural stone like marble, travertine, and some limestone, so avoid it there.
For glazed ceramic or porcelain, diluted vinegar (equal parts water) is generally safe for occasional cleaning.
Don’t overuse it on grout—prolonged acid exposure can weaken cementitious grout.
Rinse thoroughly and test a small area first.
How often should I seal grout?
How often you should seal grout depends on the type of grout, traffic levels, and the sealer used—most homeowners should reapply every 1–3 years.
High-traffic or wet areas (like showers and entryways) often need resealing annually.
Check by sprinkling water: if it beads, the seal is fine; if it soaks in, clean then reseal.
Test small areas first.
Is steam cleaning safe for all tile types?
Is steam cleaning safe for all tile types? It works well for glazed ceramic and porcelain, loosening grime without chemicals.
Avoid steam on unglazed, natural stone (marble, travertine, limestone) and soft or damaged grout—heat and moisture can etch stone or weaken grout.
Always check manufacturer guidance, test a hidden spot, and use moderate steam settings with quick drying to prevent moisture damage.
What’s the best way to remove old grout stains permanently?
Looking for a permanent fix for old grout stains? You’ll need to remove and replace the grout.
Scrape or grind out damaged grout, clean the joints, apply new grout matching color and type, then seal it after curing.
For large areas or structural issues, hire a pro.
Regular sealing and prompt cleaning will keep stains from returning.