How to Prep a Concrete Floor for Paint So It Actually Sticks and Lasts
You’ll get paint to stick and last by cleaning, repairing, profiling, and priming the slab first. Remove oil, grease, and old coatings with degreasers and grinders; test for moisture and efflorescence and fix any damp issues. Patch cracks with polymer or epoxy filler, then etch or mechanically abrade to create a tooth. Vacuum and rinse thoroughly, let fully dry, apply a compatible concrete primer, then thin even coats of paint—keep going and you’ll learn the full process.
How to Prep a Concrete Floor for Paint So It Actually Sticks and Lasts
Yes — painted concrete can last for years if you prep it right, and the key steps are cleaning, repairing cracks, etching or grinding, and using the right primer and paint.
This guide walks you through those essential prep tasks and explains which products work best for garages, basements, and high-traffic areas.
If you want durable results without guesswork, you’ll get clear, step-by-step instructions tailored to your floor and use.
Can painted concrete last and what prep is essential?
If you want painted concrete to last, you’ve got to strip away anything that’ll stop the coating from bonding—dirt, oil, previous paint, and loose concrete all break adhesion and shorten the life of the finish.
You’ll clean, degrease, etch or mechanically profile, repair cracks, and prime as needed.
Follow how to prep concrete floor for paint steps precisely to maximize durability.
What this guide covers and who it’s for
This guide walks you step-by-step through prepping a concrete floor so paint actually bonds and lasts: evaluating surface condition, cleaning and degreasing, removing old coatings, etching or mechanically profiling, repairing cracks and spalled areas, and choosing primers and paints that match your use and environment.
It’s written for DIYers, handypersons, and pros wanting reliable results; you’ll get practical steps, tool lists, and troubleshooting tips.
Basic Understanding Why prep matters for painted concrete
You need to know that concrete’s mix and porosity determine how well paint soaks in and bonds.
Problems like moisture, oil, efflorescence, or an overly smooth surface are the usual reasons paint peels or blisters.
Prep also varies by surface—troweled, broom-finished, sealed, or previously painted—so you’ll pick different cleaning and profiling steps for each.
How concrete composition and porosity affect paint adhesion
Because concrete is a mix of cement, aggregates, and water, its surface chemistry and porosity directly determine how well paint will stick and how long the finish will last.
You’ll find dense, low-porosity slabs give fewer mechanical bonds, needing primers for adhesion, while high-porosity surfaces absorb coating and may require sealers or fillers.
Match preparation to composition for durable results.
Common causes of paint failure on concrete (moisture, oil, efflorescence, poor profile)
When paint peels, bubbles, or flakes on concrete, it’s usually due to underlying contaminants or improper surface profile that keep coatings from bonding to the slab.
You can prevent failure by identifying causes and fixing them before painting.
- Moisture vapor drive lifts coatings.
- Oil and grease repel paint.
- Efflorescence crystallizes and breaks film.
- Smooth or glazed surfaces lack bite.
Types of concrete surfaces and finishes (troweled, broom-finished, sealed, old paint)
Concrete surfaces come in several distinct finishes—troweled, broom-finished, sealed, or previously painted—and each one needs different prep before you roll on paint.
Troweled is smooth and needs profiling; broom-finished gives mechanical bite.
Sealed floors require strip or etch to remove film.
Old paint must be tested, scraped, and sanded.
Match prep to finish for adhesion and longevity.
Tools, Materials, and Safety You’ll Need
You’ll want a clear checklist of essential tools—scrapers, grinders or etchers, rollers, brushes, and a shop vacuum—so you’re prepared before you start.
Choose the right coating for your floor (epoxy for durability, acrylic for easy application, or masonry paint for breathability) and pair it with a concrete primer.
Wear proper safety gear—gloves, eye protection, and a respirator—and make sure the work area has good ventilation.
Essential tools and equipment checklist
Getting the right tools and safety gear upfront makes prepping a concrete floor faster and safer, so gather items like a stiff-bristle broom, floor sander or diamond grinder (depending on surface condition), vacuum with a HEPA filter, degreaser, concrete patch, trowels, paint roller with extension, and PPE such as gloves, eye protection, and an N95 respirator.
- Mixing bucket and drill mixer
- Wire brush and scraper
- Floor patch kit and putty knife
- Shop vac and drop cloths
Recommended paints and primers for concrete (epoxy, acrylic, masonry)
Choosing the right coating will determine how well your floor resists wear, stains, and moisture, so match the paint and primer to the traffic level and environment. Use epoxy for heavy traffic, acrylic for light to medium, and masonry-specific primers for porous surfaces. Pick a concrete primer before topcoat to improve adhesion and durability.
| Type | Best For |
|---|---|
| Epoxy | Garages, heavy use |
| Acrylic | Basements, patios |
Safety gear and ventilation requirements
After picking the right primer and topcoat for your floor, turn attention to the gear and airflow you’ll need to stay safe while prepping and painting.
Wear N95 or P100 respirator for dust and fumes, safety goggles, chemical-resistant gloves, and knee pads.
Use fans and open windows for cross-ventilation; run an exhaust fan or box fan to push fumes outside.
Take breaks outdoors.
Quick Prep Assessment Inspecting your floor before you start
Before you paint, you’ll run a few quick checks to make sure the concrete is ready.
Tape a plastic sheet down for 24–48 hours to test for moisture, look for stains or old coatings that signal oil, grease, efflorescence, or paint, and inspect the surface by tapping with a hammer, prying with a chisel, and scratching to confirm soundness and profile.
Address any moisture, contamination, or loose material before moving on.
How to test for moisture (plastic sheet test) and interpret results
One simple test lets you check whether moisture could ruin your paint job: tape a 2–3 foot square of clear plastic to the concrete, seal the edges with duct tape, leave it for 24–48 hours, then peel it back and inspect for condensation or darkening.
If you see wetness or a dark patch the slab is releasing moisture and you’ll need to address it before painting. If dry, proceed.
How to identify contaminants: oil, grease, efflorescence, and existing coatings
Wondering what could stop paint from sticking? Look for dark, slick spots or stains—those are oil/grease; clean with a degreaser and scrub.
White, powdery deposits indicate efflorescence; remove and address moisture.
Tap, peel, or scrape any glossy or flaking areas to reveal existing coatings; test adhesion with a small patch of solvent or sanding.
Note locations before prepping.
How to check surface profile and soundness (hammer tap, chisel, scratch test)
Start by walking the room and visually noting any cracks, delamination, or areas that look powdery or hollow—these clues tell you where to test the surface profile and soundness.
Tap suspect spots with a hammer; hollow sounds mean delamination.
Use a chisel to pry loose areas and a screwdriver or coin to scratch for powdery residue.
Mark failed zones for repair or removal before painting.
Step-by-Step Concrete Prep
Now you’ll follow a clear, five-step process to get your concrete ready for paint.
Start by clearing and protecting the area, then remove loose coatings and address oil stains with degreasers or poultices.
Finish by tackling salts or efflorescence and profiling the surface through etching or mechanical methods so the paint will bond properly.
Step 1 Clear and protect the area (move items, mask edges)
Clear the room and give yourself space to work: move furniture, rugs, and any stored items out of the area, and set smaller things like tools and plant pots aside so they won’t get in the way.
Then protect trim and openings, and lay down drop cloths so dust and spills stay contained.
- Tape baseboards and door frames
- Cover vents and outlets
- Spread durable drop cloths
- Create a clear walk path
Step 2 Remove loose paint, coatings, and flaking concrete (tools and techniques)
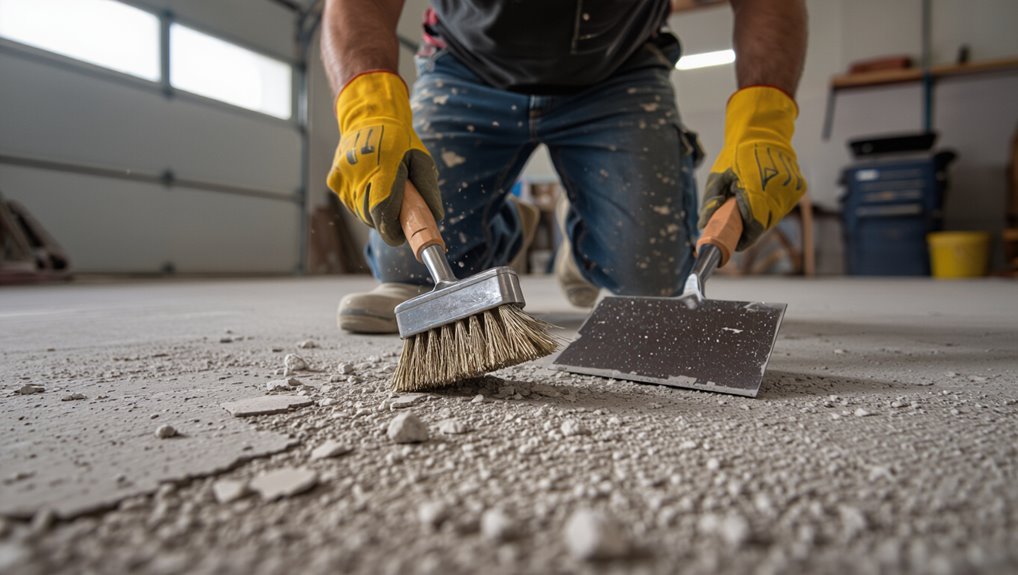
Grab your scraper and wire brush—removing loose paint, old coatings, and flaking concrete is essential to guarantee new paint bonds properly and lasts.
Scrape bubbling or peeling areas, then scrub with a stiff wire brush or abrasive pad. For larger jobs, use a floor grinder or rotary tool with a diamond cup wheel.
Vacuum debris and wipe dust before moving to the next step.
Step 3 Degrease and remove oil stains (cleaners, poultices, pressure washing)
Scrub stained areas with a degreaser or heavy-duty concrete cleaner to break down oil and grease so paint will stick and not discolor.
Apply cleaner, let it sit per instructions, then scrub with a stiff brush.
For stubborn spots, use a poultice or commercial oil remover.
Rinse thoroughly—pressure wash if available—and let the concrete dry completely before proceeding.
Step 4 Eliminate efflorescence and salts (acid wash vs. detergent rinse)
Address efflorescence and surface salts before painting, because these mineral deposits repel moisture and can cause paint to peel or bubble.
Test by wetting small areas; white powder reappearing means salts are active.
For light deposits, scrub with a stiff brush and detergent rinse until clear.
For heavy buildup, use a diluted muriatic acid wash carefully, neutralize, rinse thoroughly, and allow full drying before continuing.
Step 5 Etch or mechanically profile the surface (acid etching, shot blasting, diamond grinding)
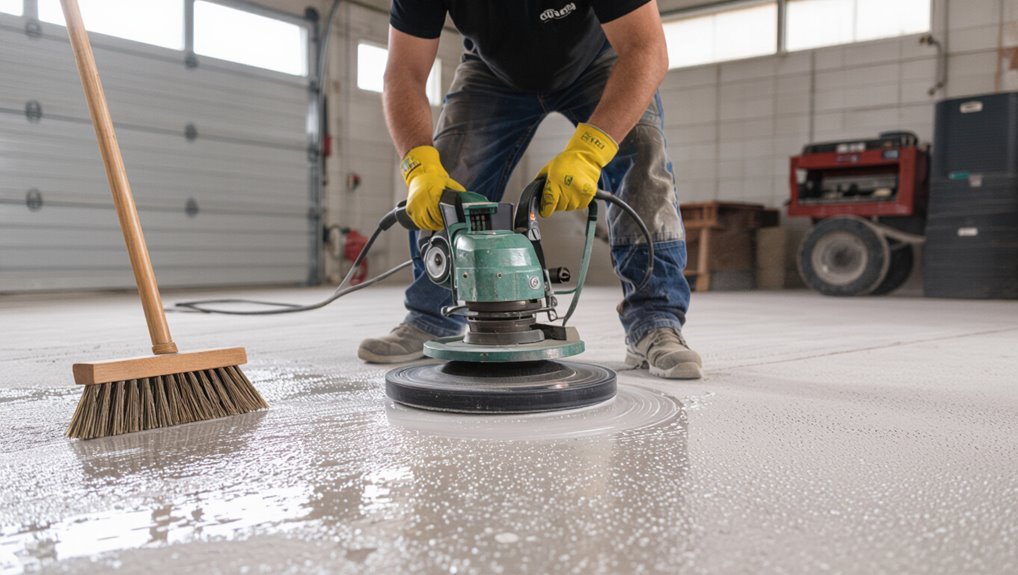
Next you’ll create a proper profile so paint can bond—either by acid etching or by mechanical methods like shot blasting or diamond grinding.
Choose etching for light profiling and porous surfaces, follow product instructions, neutralize and rinse thoroughly.
Use shot blasting or diamond grinding for heavy coatings, contamination, or dense concrete; they give consistent texture and better adhesion.
Always vacuum and wipe residue before coating.
Step 6 Repair cracks, spalls, and holes (patch products and application tips)
Patch visible damage before painting so your finish sticks and looks professional.
Clean debris, widen hairline cracks with a V-groove tool, and remove loose spall edges.
Use a polymer-modified patch or epoxy filler for structural gaps; apply in thin layers, trowel smooth, and let cure per instructions.
Feather edges to blend with the slab and sand high spots before coating.
Step 7 Final cleaning and neutralizing (rinse, dry times, vacuuming)
One last thorough clean will make or break your paint job, so rinse away dust, salts, and repair residue before the coating goes on.
Use clean water and a stiff broom or pressure washer to remove particulates, then neutralize any etching solution per label instructions.
Allow full drying—often 24–48 hours depending on humidity—then vacuum and tack cloth to capture remaining fine dust.
Step 8 Apply primer and paint timing, thickness, and application methods
Now that the surface is clean and fully dry, apply a compatible primer before painting to guarantee adhesion, even coverage, and longer-lasting results.
Choose a primer recommended for concrete; roll or low-pressure spray for uniformity. Apply thin, even coats—don’t overload.
Wait manufacturer-specified dry times between primer and topcoats. For paint, use two thin coats rather than one thick coat for durability and faster curing.
Comparison Prep Methods vs. Surface Conditions
Decide whether mechanical profiling or acid etching suits your slab by matching the method to surface hardness and contamination.
For oil spots use strong degreasers and possibly spot grinding, while stubborn adhesion problems often need sanding or full profiling before painting.
Choose primers based on condition—bonding primer for old painted concrete, penetrating primers for new concrete, and moisture-tolerant primers for damp-prone surfaces.
When to choose mechanical profiling vs. acid etching
When your concrete surface varies in hardness, contamination, or existing coatings, you’ll choose mechanical profiling for heavy-duty preparation and acid etching for mild, uniform surfaces—each method suits different conditions and risks. You’ll pick grinders or shot blasters for toughness and acids for light etch; consider safety, dust, cost, and desired profile depth.
| Method | Feeling |
|---|---|
| Mechanical | Powerful |
| Acid etch | Gentle |
| Both | Purposeful |
| Choice | Relief |
Best cleanup method for oil stains vs. paint adhesion issues
Start by matching the cleanup to the problem: oil stains need degreasing and solvent-based cleaners to remove contaminants that block adhesion, while paint adhesion issues usually call for mechanical abrasion or chemical strippers to expose a clean, profiled surface.
For oil, scrub, rinse, repeat; use oil-specific degreasers and poultices.
For adhesion failures, grind or strip, vacuum, and wipe to guarantee a textured, contaminant-free substrate.
Primer choices by concrete condition (new, old painted, damp-prone)
Because concrete can vary widely in age, previous coatings, and moisture exposure, your primer choice should match the specific condition of the slab:
Fresh pours need breathable, alkali-resistant primers;
Previously painted surfaces usually require adhesion-promoting or bonding primers after proper removal of loose paint;
And damp-prone floors demand moisture-tolerant or vapor-permeable primers (or a concrete-specific moisture barrier if vapor transmission is high) to prevent peeling and blistering.
Choose: breathable primers for new concrete, bonding primers for old paint, and vapor-permeable or moisture-mitigation systems where dampness exists.
Common Mistakes That Cause Paint to Fail
Don’t skip moisture testing or paint over damp concrete, because trapped water will lift coatings.
Make sure you clean and profile the surface properly and choose a primer and paint that match the concrete and the environment.
Also follow proper curing and recoat timing so your finish can bond and last.
Skipping moisture testing or painting over damp concrete
If you skip moisture testing or paint over damp concrete, the coating won’t adhere and will blister, peel, or flake long before its time.
You need to check moisture with a reliable test (calcium chloride or relative humidity probe), wait for readings within manufacturer limits, and dry or remediate the slab.
Don’t guess—moisture is a hidden failure mode that ruins paint.
Inadequate surface profiling or cleaning
Moisture problems aren’t the only thing that can doom a paint job—poor surface profiling and cleaning will, too.
If you don’t etch, grind, or mechanically profile smooth concrete, paint won’t key and will peel.
Fail to remove dust, oils, efflorescence, or loose residue and adhesion suffers.
Clean, repair, and profile to specified roughness before priming and painting.
Using the wrong primer/paint for the surface or environment
When you choose a primer or paint that’s not formulated for concrete or for the conditions the floor will face, adhesion, durability, and appearance all suffer.
You’ll need products labeled for concrete, moisture conditions, and traffic levels. Use breathable primers for basements, high-adhesion primers for smooth slabs, and epoxy or acrylic coatings rated for your environment so the finish won’t peel, chalk, or wear prematurely.
Improper curing and recoat timing
Although it’s tempting to rush the job, improper curing and recoat timing will undermine paint adhesion and durability.
You must let new concrete cure fully—often 28 days—or follow manufacturer cure times for sealers and primers.
Recoating too soon traps moisture and prevents bonding; waiting too long can create a weak, dusty surface.
Test adhesion and follow product dry times for reliable results.
Best Practices and Longevity Tips
Plan your painting around temperature and humidity so the coating cures properly, and keep seasonal changes in mind if the floor is exposed to the elements.
You’ll extend the finish by cleaning regularly, doing timely touch-ups, and avoiding harsh chemicals or abrasive tools.
Consider a compatible sealer or topcoat—applied after proper curing—to boost durability and choose one rated for your traffic and environment.
Seasonal and environmental considerations (temperature, humidity)
Because temperature and humidity directly affect how paint cures, you’ll want to check both before you start—and keep monitoring them while the floor dries.
Aim for manufacturer-recommended ranges (usually 50–85°F and 40–60% RH).
Avoid painting during rapid temperature swings, rain, or high humidity that traps moisture.
Use heaters, dehumidifiers, or fans to maintain stable conditions until the coating fully cures.
Maintenance tips to extend painted floor life (cleaning, touch-ups)
If you want your painted concrete to last, keep a regular maintenance routine that focuses on gentle cleaning, prompt touch-ups, and protection from heavy wear.
Sweep and mop with pH-neutral cleaner, blot spills quickly, and avoid harsh chemicals or abrasive tools.
Inspect periodically for chips or peeling, sand edges lightly, apply matching paint to small areas, and use mats or pads under heavy items.
Sealers and topcoats: when to add them and which to use
After you’ve kept the paint clean and handled minor repairs, add a sealer or topcoat to lock in protection and boost durability.
Choose acrylic or epoxy sealer for garage floors; water-based polyurethanes suit indoor areas.
Apply after paint cures (usually 24–72 hours per product), use thin even coats, and allow full cure before traffic.
Recoat every few years or as wear appears.
Troubleshooting Common Problems After Painting
If your paint looks like it’s not sticking, check for adhesion failure by trying a tape pull and inspecting for loose edges—you’ll need to strip and reseal problem areas before repainting.
Watch for blistering, peeling, or a powdery surface and remove compromised paint down to sound concrete, then correct moisture or contamination sources.
If stains keep coming back, identify and treat the stain source (oil, rust, tannins), use appropriate stain blockers or primers, and only then repaint.
Adhesion failure how to diagnose and fix
When paint peels, chips, or flakes from your concrete, it’s usually because the coating couldn’t bond to the surface.
Check adhesion by scraping and tape tests; note oily residue, dust, or previous coatings.
Remove contaminants, etch or mechanically profile the concrete, repair cracks, then use a compatible primer and proper cure times.
Recoat only after confirming a clean, profiled surface.
Blistering, peeling, or powdery surface corrective steps
Inspect the surface closely to pinpoint blistering, peeling, or a powdery (chalky) finish—each symptom tells you what went wrong and guides the fix.
For blisters or peeling, scrape loose areas, sand to sound edges, clean thoroughly, and prime with appropriate concrete primer before repainting.
For chalking, scrub with a stiff brush and TSP, rinse, let dry, then seal with a penetrating concrete sealer prior to coating.
Stains reappearing after painting prevention and remediation
Because stains often come back when the source wasn’t fully stopped or blocked, you’ll need to both identify what’s causing the discoloration and treat it before repainting.
Find oil, rust, mold, or efflorescence sources. Clean with appropriate removers, use a concrete degreaser, rust converter, or biocide, then rinse and dry.
Apply a stain-blocking primer and only then repaint to prevent recurrence.
Cost, Time, and Durability Expectations
You’ll usually spend a day or two on prep (cleaning, patching, and etching) and another day for priming and painting, plus cure time.
Expect DIY material and tool costs in the low-to-mid hundreds, while hiring a pro can run into the high hundreds or more depending on floor size.
With proper prep and the right paint—epoxy or high-quality acrylic—you can expect several years of durable finish, shorter if prep was rushed.
Typical time breakdown for a DIY prep and paint job
A typical DIY concrete floor paint job breaks down into three main phases—prep, painting, and curing/maintenance—and you can expect most weekend projects to take 1–3 days depending on the surface condition and chosen products.
Day 1: clean, degrease, repair, and etch or sand.
Day 2: prime and apply coats.
Day 3: cure time and light use, with full durability in days to weeks.
Estimated costs for materials and tools (DIY vs. pro)
Expect to spend anywhere from $50 to $600 on materials and basic tools for a DIY concrete floor paint job, while hiring a pro typically runs $500 to $2,500 or more depending on square footage and surface condition.
DIY saves labor costs but adds time and learning curve; expect to buy primer, epoxy or acrylic paint, rollers, grinder or etcher, patch compound, and safety gear.
Expected lifespan by paint type and prep quality
Different paint types and how well you prep the slab largely determine how long your floor will last.
Epoxy and polyaspartic coatings last 5–15+ years with proper grinding, etching, and primers.
Concrete-specific latex lasts 2–5 years if you mechanically prep and seal.
Poor prep cuts durability dramatically—expect peeling and frequent touch-ups within months to a couple years, raising long-term costs.
FAQ
You’ve probably got a few common questions—like how long to wait on a new slab, whether acid etching or muriatic acid is safe, and if a primer is required.
You’ll also want to know whether painted concrete can handle vehicle or heavy traffic and how to address high moisture in basements or garages.
Read on for clear, practical answers to each issue.
Can I paint a new concrete slab and how long should I wait?
Can you paint a new concrete slab? You can, but you must wait until it cures fully.
Fresh concrete typically needs 28 days to reach sufficient strength and allow moisture to escape. Painting too soon traps moisture, causing adhesion failure and blistering.
After curing, test moisture levels and verify the surface is clean and dry before applying primer and paint for lasting results.
Is acid etching necessary or can I use muriatic acid safely?
Wondering whether you need to acid-etch your concrete or if muriatic acid will do the job safely?
You usually need surface etching to open pores for paint adhesion. Muriatic acid works but’s hazardous—use diluted solution, proper PPE, ventilation, and neutralize afterwards.
For light contamination, a mechanical scrub or etching product may be safer.
Test a small area first to confirm results.
How do I know if I need a primer before painting concrete?
How do you know if a primer is necessary before painting concrete? Check porosity, stains, and moisture.
If water beads or soaks in inconsistently, or if the slab has oil, efflorescence, or previous coatings, use a masonry primer or stain-blocking sealer.
Primer promotes adhesion, evens absorption, and prevents peeling.
Skip primer only on clean, uniformly porous, and fully cured concrete with paint-compatible products.
Will painted concrete withstand vehicle traffic or heavy use?
Will painted concrete hold up to cars and heavy use? You can get durable results if you choose a high-quality, traffic-rated epoxy or polyaspartic coating, fully prep the surface, and apply recommended thicknesses.
Use a concrete primer and durable topcoat, follow cure times, and consider light sand broadcast for grip.
Expect maintenance over years; heavy, repeated impacts may still wear coatings.
How to handle basement or garage floors with high moisture levels?
If your basement or garage has high moisture, don’t paint until you test and fix the problem—moisture will lift coatings and cause blistering or efflorescence.
Start with a calcium chloride or relative-humidity test. Repair leaks, add drainage or a vapor barrier, and seal cracks.
Use moisture-tolerant primers and epoxy systems only after readings meet manufacturer limits; otherwise, dry and remediate first.